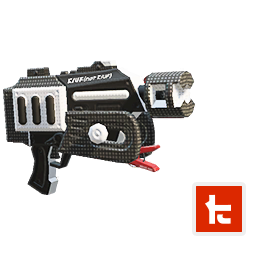
Kensa Rapid Blaster
From Inkipedia, the Splatoon wiki
The Kensa Rapid Blaster is a main weapon in Splatoon 2. It is a Toni Kensa-branded variant of the Rapid Blaster.
Splatoon 2
Kensa Rapid Blaster
| Basic information | |
|---|---|
| Category | Main |
| Class | Shooter |
| Sub | |
| Special | |
| Special points | 200p |
| Range | |
| Impact | |
| Fire rate | |
| Obtainable at | |
| Level | 21 |
| Cost | |
| Specifications | |
| Base damage | 35 (Splash) 85 (Direct hit) |
| Ink consumption | 7% |
| Other variants | |
The Kensa Rapid Blaster was announced on 4 December 2018. It was added to the game on 5 December 2018 as part of the Version 4.3.0 release [1], equipped with Torpedoes and Baller.
Use
- In contrast to the original variant of the Rapid Blaster, which has a supportive build, the Kensa variant has a build suited for a slayer, similar to that of the Rapid Blaster Deco. However, the Kensa variant's build enables it to be a more effective slayer than the Deco variant.
- Use the blast radius to damage opponents hiding around corners, behind obstacles, and up ledges. This especially comes in handy when attacking the Tower. Main Power Up can enlarge the blast radius, maxing out at 29 ability points.
- Like most blasters, the Kensa Rapid Blaster is both mediocre at turfing and far less ink efficient than other shooters. Keep an eye on the ink tank and avoid getting surrounded by opposing ink. Consider using ink-replenishing or ink-saving abilities, such as Ink Recovery Up, if the ink tank keeps getting low too often.
- Because of the relative lack of turfing compared to most other slayers' weapons, mobility will be limited. Swim Speed Up can help close the distance towards certain opponents.
- Torpedoes have a variety of uses, especially a few that minimize the main weapon's weaknesses.[2]
- Torpedoes are a noxious distraction tool, poking at opponents during the neutral phase.
- When rolled on the floor like a Splat Bomb, a Torpedo will remain in its first stage and detonate in a similar fashion, albeit less powerfully. Once the splash damage is confirmed, immediately follow up with a direct hit from the main weapon. Splash damage from a Torpedo (35) plus a direct hit from the Kensa Rapid Blaster (85) is more than enough to splat an opponent. This provides a Kensa Rapid Blaster user faster splatting times.
- Both phases of the Torpedo – especially the droplets from a detonated second stage – turf more efficiently than the main weapon can. This aids both mobility and building up the special gauge.
- While only one Torpedo may be used at a time, Ink Saver (Sub) can still conserve ink for each use of Torpedo, enabling the quick use of a second one right after the first one detonates.
- The Baller is a versatile special weapon with a variety of uses:
- Taking control of a certain area of the stage, such as a Splat Zone or underneath the opponents' Clam basket.
- Forcing the opponents to clear an area, whether leading a Tower or Rainmaker push or stopping one.
- Providing its user an extra layer of protection, such as atop the Tower at a checkpoint or when fleeing an unsafe situation.
- After the Baller's explosion, nearby opponents not splatted are often damaged enough for one or two hits from either the main or sub weapon to splat them.
Countermeasures
- Any weapon with a combination of longer range, better mobility, or higher damage output without sacrificing too much mobility or ink efficiency can counter a Kensa Rapid Blaster. For example, both the Splattershot Pro and H-3 Nozzlenose and their respective variants fulfill all of them. Be aware of both the splash damage and the Torpedoes, however.
- The Splat Brella, Tenta Brella, and their respective variants can protect from the splash damage from both the Kensa Rapid Blaster and the Torpedo.
- Try to exploit the Kensa Rapid Blaster's poor ink efficiency and mediocre turfing by containing it with ink. Sub weapons and teammates can help accomplish this.
- Any long-ranged weapon, such as a charger or most splatlings, can fire with impunity at a Kensa Rapid Blaster as long as it zones out the latter and avoids getting too distracted by Torpedoes.
- Whenever possible, shoot down opponents' Torpedoes as soon as possible to prevent both the damage and the turfing from the resulting droplets.
- When attacked by an opponent's Baller, if possible, concentrate fire on the Baller – especially with bombs – to quickly destroy it and prevent its explosion.
- Splashdown can destroy a Baller if executed before the Baller's explosion. The Baller's user will remain unsplatted, so have an immediate follow-up attack.
Data
Version history
| Version | Adjustments |
|---|---|
| 4.5.0 |
|
| 4.9.0 |
|
Gallery
-
Promo render.
-
Demonstration
Quotes
| View the quotation page. |


