Kensa Splattershot Pro
The Kensa Splattershot Pro is a main weapon in Splatoon 2. It is a Toni Kensa-branded variant of the Splattershot Pro.
Splatoon 2

| Basic information | |
|---|---|
| Category | Main |
| Class | Shooter |
| Sub | |
| Special | |
| Special points | 210p |
| Range | |
| Damage | |
| Fire rate | |
| Obtainable at | |
| Level | 23 |
| Cost | |
| Specifications | |
| Base damage | 42 |
| Ink consumption | 2% |
| Other variants | |
The Kensa Splattershot Pro was released on 3 October 2018 at 02:00 UTC. It comes with Splat Bombs and the Booyah Bomb.
Quick facts
A.k.a.: Kensa Pro, K-Pro
Strengths: Splatting, damage, range
Weaknesses: Slow turfing, reduced ink efficiency, middling fire rate, low run speed (while shooting), very ability dependent
Recommended abilities
| Ability | Purpose |
|---|---|
| Increases main weapon damage up to 49.9 |
Use
- The Kensa Splattershot Pro is a medium ranged slayer weapon, similar to the Splattershot but with a longer range, better accuracy, and higher damage output.
- The extra range and higher damage output, at just a slight cost to fire rate, make it very effective at splatting a wide variety of opponents.
- Main Power Up further increases this damage output, maxing out to 49.9 points of damage at 42 ability points. Even 29 ability points – about three mains – are enough to exceed 49.5 hit points of damage, so it is not uncommon for players to use three mains of Main Power Up with the Kensa Splattershot Pro.
- Also like the Splattershot and its variants, the Kensa Splattershot Pro is great at sharking, making it effective on defense as well.
- The reduced ink efficiency and slower fire rate make the Kensa Splattershot Pro a less effective turfing weapon than most other slayer/support weapons. Avoid getting surrounded by opposing ink and have an exit lane in case of a retreat.
- Reduced turfing ability hinders its ability to either maintain map control or capture a Splat Zone. In general, focus on splatting opponents and rely on teammates with better turfing weapons to maintain zone or map control.[3]
- While the added range and Splat Bombs allow this weapon to potentially play a supportive role, the slower turfing rate combined with the high special gauge requirement for the Kensa Splattershot Pro make it harder to build up its special weapon compared to most conventional support weapons.
- Due to the reduced turfing and ink efficiency, Splat Bombs have to be used more judiciously than usual. However, they can still serve a variety of purposes:
- Pushing into a Splat Zone or any other important area of the stage.
- Flushing out opposing anchors from perches, hindering their ability to control space with their range.
- Providing space to escape, whether via both swimming and running or via Super Jumping.
- The Booyah Bomb can either turn the tide of a battle or fully tilt it in the team's favor if used properly.
- In general, activate the Booyah Bomb in a relatively safe place, as even a Splattershot Jr. within range can break the Booyah Bomb armor.
- The Booyah Bomb can force opponents – particularly anchors – to move out of position or delay an opponent's offensive push.
- The explosion of the Booyah Bomb places enough ink to uncap most Splat Zones and single handedly capture some smaller Splat Zones.
- When deployed, the Booyah Bomb is capable of protecting oneself and one's teammates from attacks - including bombs - and clearing an area of opponents, whether forcing them to flee or splatting them outright.
Countermeasures
- The Kensa Splattershot Pro is a formidable foe for most other weapons, due to its range and damage output. Therefore, most other weapons cannot easily defeat it in a straight one-on-one matchup and must use other means to defeat it.
- A matchup between two opposing Kensa Splattershot Pro wielders will depend on skill, positioning, turf control, and the presence of any supporting players.
- To engage a Kensa Splattershot Pro with a shorter range weapon, try to catch it off guard through either careful flanking or sharking, better positioning, or wise use of bombs. Do not forget that the Kensa Splattershot Pro also has Splat Bombs as well.
- Both variants of the Splat Brella can decently counter the Kensa Splattershot Pro due to the durability of their shields. Variants of the Tenta Brella are more damaging and provide more protection, provided that their shields are opened early enough. Variants of the Undercover Brella, however, are too weak to match the Kensa Splattershot Pro's damage, and their shields are not sturdy enough to provide sufficient protection.
- Try to take advantage of the Kensa Splattershot Pro's relative inability to turf by containing it with ink. This might require the use of sub weapons and teammates.
- A few weapons that either match or exceed the range of the Kensa Splattershot Pro without sacrificing mobility can defeat one head-on. For example, both variants of the .96 Gal overpower and slightly outrange the Kensa Splattershot Pro, while both variants of the Squeezer's burst fire mode outrange it. Both variants of the Dualie Squelchers match the Kensa Splattershot Pro's range and can outmaneuver it with dodge rolling.
- As with versus the Splattershot, long-ranged weapons, such as chargers and most splatlings, can fire upon a Kensa Splattershot Pro with impunity, but they must remain wary of it getting too close.
- To prevent sharking, keep track of all four opponents – particularly which ones have neither been splatted nor super jumped to their spawn point – and turf suspicious puddles of opposing ink, preferably with a sub weapon. Point Sensors, while unable to turf, can expose any sharking opponents.
- If the Kensa Splattershot Pro user activates a Booyah Bomb in an unsafe position, try attacking them, particularly with bombs and chargers.
- Tenta Missiles can splat a Booyah Bomb user in three direct hits.
- A Splashdown within range can severely damage Booyah Bomb armor if not destroy it outright.
Data
- The Kensa Splattershot Pro is a middleweight weapon.
- The matchmaking range is 170. The game's matchmaking system looks at a team's average matchmaking range value, and matches them against a team with a similar average.
- The ink consumption of 2% and ink tank capacity of 100% allows players to fire 50 shots before needing to refill the ink supply.
- This stat can be changed with Ink Saver (Main).
- When initially firing the weapon in humanoid form, the first shot takes 3 frames to come out.
- When firing from swim form, the first shot takes 11 frames to come out.
- The interval between firing and when the player is able to enter swim form or use a sub weapon is 4 frames.
- When firing continuously, it shoots a bullet every 8 frames (7.5 shots per second).
- When firing while moving, the player's movement speed is set to 0.55 units per frame.
- After firing, there is a 20 frame cooldown before the ink tank starts refilling.
- Each shot has a base damage of 42.
- If a shot is in the air for more than 7 frames after being fired, it loses 1.3125 damage per frame until it reaches 21 damage at frame 23.
- The bullet hitbox has a radius of 2 units.
- The angle its shots can deviate while on the ground is 2.7 degrees.
- The angle its shots can deviate while in the air is 6 degrees.
- The outer reticle immediately expands after jumping. After 25 frames, the outer reticle will start shrinking, and will finish shrinking after 70 frames.
- The Kensa Splattershot Pro starts off having a 1% chance to shoot towards the outer reticle instead of the inner reticle.
- This chance increases by 1% per shot, and maximizes at a 25% chance to shoot towards the outer reticle, meaning that it takes 24 shots to reach minimum accuracy.
- When jumping, the chance to shoot towards the outer reticle instead of the inner reticle is immediately set to 40%.
- Accuracy starts recovering 8 frames after the player stops shooting. The chance to shoot towards the outer reticle decreases by 0.5% per frame, if the chance is not already at the minimum, meaning that it takes 56 frames to reach maximum accuracy. (86 after shooting while jumping.)
- Shots initially travel straight at a rate of 38.33333 units per frame for 3 frames. Shots travel straight for 114.99999 distance units.
- After that, the shot's velocity is set to 22.698 units per frame if it is not already lower than the listed value, and decreases further as it travels.
- Ink droplets occur every 88 units.
- The frequency at which ink drips from a shot occurs at a rate of 2 droplets per shot.
- There are a total of 6 different droplet patterns that can be created while firing this weapon.
- Droplets that occur within 11 units of the player have a radius of 18 units, and a width of 8 units.
- These droplets have their radius multiplied by a value ranging from 1.2 if they fell from a height above 100 units to 1.4 if they fell from a height below 30 units.
- Droplets that occur when they travel past 200 units of the player have a radius of 16 units.
- All other ink droplets have a radius of 12.5 units.
- Droplets that are far from the player and all other droplets have their radius multiplied by a value ranging from 1 if they fell from a height above 100 units to 1.2 if they fell from a height below 30 units.
Version history
| Version | Adjustments |
|---|---|
| 4.2.0 |
|
| 4.4.0 |
|
| 4.5.0 |
|
| 4.6.0 |
|
| 4.9.0 |
|
| 5.0.0 |
|
Quotes
 |
Sheldon's Introduction
The Kensa Splattershot Pro is a limited-edition, custom Splattershot created in collaboration with Toni Kensa! Check your opponents with |
Gallery
-
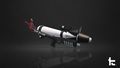
Promo Render
-
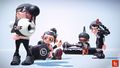
An Inkling boy (first right) with the Kensa Splattershot Pro


