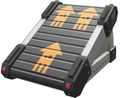
Underground Expressway
|
|
|
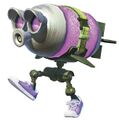
˜ Octobrush with Danger ˜

| Number | 22 |
| Area | 5 |
| Sheldon's Request | |
| Items | 1 Scroll,1 Sardinium, 5 Armor, 1 Curling Bomb Launcher, 1 Ink Storm, 2 Splashdown |
| Music | Buoyant Boogie |
| StrategyWiki has an article about: Underground Expressway |
Underground Expressway is the twenty-second mission of Splatoon 2's single-player mode, Octo Canyon. It is the first and only mission that Sheldon requests the player to use the Herobrush.
Octo Canyon
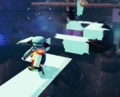
Take one of the blue saucers, and board the invisible platform marked by poles. There are more invisible platforms ahead, in order: two small moving platforms, a stable platform with a checkpoint, and four larger moving platforms circling a larger stable platform. Upon discovering the platform with a checkpoint and one of the four large moving platforms, sprinklers on poles emerge from the water, and upon discovering the large stable platform a ride rail appears to take the player back to the platform marked with poles. Ink towards the direction opposite to the ride rail to reveal the extended part of the platform. Be wary that the four large moving platforms can obstruct and push the player off the stable one. The kettle is next to the rail at the center of rotation of the four moving platforms.
Gameplay
Walkthrough
| Area | Enemies | Armor | Special Weapon | Sunken Scroll | Sardinium | Crust Bucket Ticket |
|---|---|---|---|---|---|---|
| Beginning Area | 6x Octopods, 1x Twintacle Octotrooper | 1x Armor | N/A | N/A | N/A | N/A |
| Checkpoint 1 | 2x Octopods, 2x Shielded Octotroopers, 3x Twintacle Octotroopers | N/A | 1x Splashdown | N/A | N/A | N/A |
| Checkpoint 2 | N/A | 1x Armor | N/A | N/A | N/A | N/A |
| Checkpoint 3 | 1x Tentakook | N/A | N/A | N/A | N/A | N/A |
| Checkpoint 4 | 2x Twintacle Octotroopers | N/A | N/A | N/A | N/A | N/A |
| Checkpoint 5 | 4x Octotroopers, 1x Shielded Rocket Twintacle Octotrooper | 1x Armor | 1x Curling Bomb Rush | N/A | N/A | N/A |
| Checkpoint 6 | 2x Octopods, 1x Twintacle Octodiver, 1x Octocommander | N/A | N/A | N/A | N/A | N/A |
| Checkpoint 7 | 1x Twintacle Octotrooper, 1x Tentakook, 1x Shielded Octotrooper | N/A | 1x Splashdown | N/A | Yes | N/A |
| Final Checkpoint | 2x Octocommanders | 2x Armor | 1x Ink Storm | Yes | N/A | N/A |
Beginning Area
Ahead is a path littered with crates then Octopods. Go through the crates and defeat the Octopods and the Twintacle Octotrooper ahead. To the right from there is a continuation of the path with invisible platforms. There is an Octopod sitting on a crate on the other end. Go straight and defeat the Octopod, turn right at somewhere two to three crate positions away from the crate towards the snow cone at the other end, then turn left at the snow cone to a platform with a launchpad to the next checkpoint.
Checkpoint 1
Ahead are several platforms that have to be navigated through. Climb up the wall ahead and defeat the two Octopods there, then climb up the next wall and defeat the Shielded Octotrooper there. Next, drop down at the grates through the Squid Rings and defeat the Shielded Octotrooper there, which would drop a canned Splashdown. Finally, jump off at the grates, activate the Splashdown if needed, and defeat the three Twintacle Octotroopers there. Drop through the grates onto the next checkpoint.
Checkpoint 2
Activate and ride the ride rail which takes the player to the next checkpoint. Pop the balloons on the way if preferred.
Checkpoint 3
Ahead is a narrow path with a Tentakook attached to a balloon. Chase it down. The path goes from visible to invisible after a left then a right turn, and makes a loop with a crate which the Tentakook will go around, then ends after a right then a left turn, from which the Tentakook will drop off to the left onto another loop of invisible platforms with the "8" shape. Defeat the Tentakook, grab the key it drops, and take it to the vault below the end of the invisible path where the Tentakook dropped off, which uncovers the launchpad to the next checkpoint. Note that it is possible to defeat the Tentakook before it drops off with enough range or mobility, saving time in the process. There is also another ride rail next to the vault back to the first loop above should the player need to get back up.
Checkpoint 4
Ahead is a set of two platforms each with a dash track to cross the gap in between. On the other platform are two Twintacle Octotroopers. Defeat them and proceed along the narrow path on the other platform. Drop off at the grates to the next checkpoint.
Checkpoint 5
Ahead is a broad platform with four Octotroopers and a Shielded Rocket Twintacle Octotrooper in a field littered with inkable barriers and dash tracks, separated from the player by a wall of crates. Destroy the crates and defeat all five enemies to activate the launchpad ahead on a raised platform to the next checkpoint.
Checkpoint 6
Ahead is a broad path filled with Octarian ink, with a broad platform at the other end with two Octopods sitting on a wall of crates, an Twintacle Octodiver below the crates, and an Octocommander on another crate behind. Go through all of that and proceed to the next checkpoint ahead.
Checkpoint 7
Ahead is a large square platform with a large inkable box in the center, surrounded by a lowered moat. A Twinacle Octotrooper patrols around the moat, a Tentakook carrying a key in the moat, and a Shielded Octotrooper carrying a canned Splashdown on top of the box circling a small vault with the Sardinium. All of that can be ignored, where the final checkpoint is ahead at the other end of the path.
Final Checkpoint
Ahead is a structure made of invisible blocks, with a wall on the close end to climb on with crates on it, a box in the middle with crates on it, four towers on the side of the field, an Octocommander on a wall of crates on an uninkable platform on the other end of the field, and two Industrial Squee-Gs on the field: one with a small inkable block and another Octocommander on it, another with a tall inkable block tower than can only be climbed onto by the wall, the box, the four towers on the side or the uninkable platform, with Armor 5 on top of the tower. Get onto the Industrial Squee-G with the block tower, defeat the Octocommanders, and get onto the uninkable platform. The Zapfish is sitting at the other end of the path.
Collectibles
Sunken Scroll
The far right tower on the sides in the Final Checkpoint has a Power Egg on top instead of a crate. Get onto it, then ink in front to reveal an invisible platform ahead. Keeping inking to the edge of the platform, then turn left from there and ink to reveal an invisible block ahead. Get onto the block, keep inking and drop off in front at the edge onto another invisible platform. Turn left from there and go straight. The Scroll is at the end of the path. Alternatively look for the platform from the right edge of the platform with the Zapfish and drop onto it. To get back follow the original path back. Be wary that there is a gap between the tower and the first platform, and between the first platform to the block.

| “ | Hey, squidkids! It's me Callie! ♡ It's been so long since I've written a proper blog post! <:三 <:三 Being on my own like this, I've got time to think, but sometimes I think too much! (>_<;) But I'm really psyched for filming today! Stay fresh! (`ω´) | ” |
— Sunken Scroll 22
| ||
Location: After the last area with the Octocommanders, drop ink over the edge of the path to the Zapfish to reveal an invisible platform. The Sunken Scroll will be there. To get back reveal the rest of the invisible path and jump on top of a Squee-G.

Sardinium
Location: Defeat the Tentakook in checkpoint 7, bring the key dropped to the vault on top of the large box holding the Sardinium next to the Shielded Octotrooper holding Splashdown 2.

Armor
Underground Expressway has five pieces of armor to collect.
Armor 1 Location: In the crate on invisible platforms with an Octopod on it in the beginning area.
Armor 2 Location: In the crate next to the rail and Checkpoint 2.
Armor 3 Location: Behind the far left barrier in Checkpoint 5.
Armor 4 Location: In the crate to the right in the Final Checkpoint.
Armor 5 Location: On top of the Industrial Squee-G with the block tower.
Special Weapon
Curling Bomb Launcher Location: In the orange crate to the left of the wall of crates in Checkpoint 5.
Ink Storm Location: In the left crate in the Final Checkpoint.
Splashdown 1 Location: Defeat the second Shielded Octotrooper in Checkpoint 1.
Splashdown 2 Location: Defeat the Shielded Octotrooper in Checkpoint 7 next to the vault containing the Sardinium.
Enemies and Mechanics
Previously Introduced
-

-

-
-

-
-
-
Twintacle Octodiver
-

-

-

-
-
-
-

-
-


Quotes
English
 Marie's Quotes
| “ | Hold |
” |
| “ | You don't have unlimited ink, so watch the tank on your back. | ” |
| “ | The path ahead is invisible. Just cover it with ink and you'll be fine. | ” |
| “ | Those guys with shields are no big deal if you can flank 'em! | ” |
| “ | Lookin' good. | ” |
| “ | Nice. | ” |
| “ | That was totally brill! | ” |
| “ | Tentakook! | ” |
| “ | More invisible paths. Take it slow. | ” |
| “ | I don't think I'll ever get used to this... | ” |
| “ | It dropped a key. | ” |
| “ | What in the world are they up to? | ” |
| “ | I feel a big fight coming on... | ” |
| “ | Nice fight. Get to that launchpad. | ” |
| “ | When brute force won't work, try using a little finesse. | ” |
| “ | YES. | ” |
| “ | Ready to get up close and personal with a couple of Octocommanders? | ” |
| “ | Lead those industrial Squee-Gs with ink and bombs! | ” |
| “ | You did it! | ” |
 Sheldon's Quotes
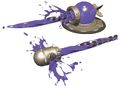
- Requesting the Herobrush:
| “ | OK, take this with you. It'll help me gather some practical battle data. | ” |
| “ | If you love getting up close and personal, the Herobrush is the weapon for you. | ” |
| “ | Hold |
” |
| “ | You can close in on enemies really quickly, and then splat 'em to bits like a ninja! | ” |
- During the Level:
| “ | With the Herobrush, it's all about mashing |
” |
| “ | Ah, yes! Splashdown! Use it! UUUUUUSE IT! | ” |
| “ | Oh! That's a Curling-Bomb Launcher! Let 'em have it! | ” |
| “ | IT'S THE SPLASHDOWN! Press |
” |
Dutch
Marie's Quotes
- "Druk op
 om tijdens het lopen de bodem met inkt te bedekken!"
(Press to cover the ground with ink while walking!) - "Je inktvoorraad is niet oneindig dus let op de inkttank op je rug."
(Your ink supply is not unlimited so pay attention to the ink tank on your back.) - "De bodem is hier onzichtbaar. Maar je kunt hem gewoon inkleuren met inkt!"
(The ground is invisible here. But you can just color it with ink!) - "Die vijanden met schilden stellen weinig voor als je ze van de zijkant of van achter raakt!"
(Those enemies with shields matter little if you hit them from the side or from behind!) - "Dat ziet er goed uit."
(That looks good.) - "Een kunststukje, agent 4!"
(A piece of art, agent 4!) - "Wauw, dat was fantastisch!"
(Wow, that was fantastic!) - "Daar is een Octoskater! Ga erachteraan!"
(There is a Tentakook! Go after her!) - "Nog meer onzichtbare paden... Ga niet te snel!"
(Even more invisible paths... Don't go too fast!) - "Ik weet niet of ik hier ooit echt aan zal wennen..."
(I don't know if I will ever really get used to this...) - "Oké, daar is de sleutel."
(Okay, there is a key.) - "Waar zijn zij mee bezig?"
(What are they doing?) - "Ik geloof dat er hier flink geknokt gaat worden..."
(I believe that there will be a lot of fighting here...) - "Kijk, daar is een lanceerpunt."
(Look, there is a launchpad.) - "Als geweld niet helpt, kun je altijd een strategische aanpak proberen."
(If violence doesn't help, you can always try a strategic approach.) - "Jaaa!"
(Yeees!) - "Ben je er klaar voor om het op te nemen tegen een Octocommandant?"
(Are you ready to take on an Octocommander?) - "Bepaal waar Verfschrapers naartoe gaan met inkt en bommen!"
(Decide where Squee-Gs go to with ink and bombs!) - "Gelukt!"
(Success!)
- After beating the mission for the first time:
- "Uitstekend gedaan! Nog vijf voltvissen te gaan!"
(Outstandingly done! Still five Zapfish to go!)
Krabbert's Quotes
- Order van Krabbert:
- "Oké, hier, neem mee! Je kunt er gegevens mee verzamelen die mij goed van pas komen!"
(Okay, here, take with you! You can collect data with it which is of use to me!) - "Als je graag vijanden tegemoetkomt, dan is de Heldenkwast wel iets voor jou!"
(If you like to approach enemies, then the Herobrush is something for you!) - "Houd ingedrukt om al rennend de grond met inkt te bedekken."
(Hold pressed to cover the ground with ink while running.) - "Of druk herhaaldelijk op de knop om dit wapen rond te zwaaien!"
(Or press the button repeatedly to swing this weapon around!) - "Je kunt snel bij vijanden in de buurt komen en ze er dan van langs geven!"
(You can get close to enemies quickly and then lay into them!)
- Mission quotes:
- "Met de Heldenkwast blijf je op drukken tot je vijand explodeert!"
(With the Herobrush you keep pressing until your enemy explodes!) - "O jaaa, de Superlanding! Nu wordt het interessant!"
(Oh yeees, the Splashdown! Now it becomes interesting!) - "O! Dat is een Curlingbomkanon! Veeg de vloer aan met die vijanden!"
(Oh! That is a Curling Bomb Launcher! Wipe the floor with those enemies!) - "Het is de Superlanding! Druk op
 en vernietig je vijanden!"
(It is the Splashdown! Press and destroy your enemies!)
- After beating the mission for the first time:
- "Eens zien hoe je wapengegevens binnenkomen... Ja, helemaal in orde!"
(Let's see how your weapon data comes in... Yes, completely fine!) - "Dit soort data levert een schat aan informatie op!"
(This kind of data provides a wealth of information!) - "Hoe meer gegevens je genereert, des te eerder kan dit wapen op de markt worden gebracht!"
(The more data you generate, the sooner this weapon can be marketed!) - "Tot dan mag je het dus alleen lenen. Ik kan niet zomaar van alles cadeau doen!"
(You can only borrow it until then. I can't just give everything away!) - "Oké, succes!"
(Okay, good luck!)
Gallery
-

Level icon
Names in other languages
| Language | Name | Meaning |
|---|---|---|
| 地下のトウメイ高速道路 # 塗ってホクサイ 気分は天才 Chika no Tōmei Kōsoku Dōro # Nutte Hokusai Kibun wa Tensai |
Underground Tōmei (invisible) Expressway: Painting by Octobrush in a Genius Mood | |
| Waar inkt is, is een weg | Where there's ink, there's a way[note 1] | |
| - Espace souterrain - Épinceau périlleux |
- Underground space - Perilous Inkbrush | |
| - Grand huit souterrain - L'Épinceau périlleux |
- Underground rollercoaster - The perilous Inkbrush | |
| Pfade ins Ungewisse | Paths into the unknown | |
| A tutta tinta sulle strade invisibili! | In full colour on the invisible streets! | |
| Осьморянские горки «Кальмар на грани» Os'moryanskiye gorki «Kal'mar na grani» |
Octarian slides "Squid on the verge" | |
| Autopista subterránea ˜Peligro invisible˜ |
Underground expressway ˜Invisible danger˜ | |
| Autopista al peligro | Highway to danger |
Translation notes
- ↑ From the phrase "where there's a will, there's a way"
