Inkvisible Avenues: Difference between revisions
m (Updating Sunken Scroll links. AWB edit.) |
GloverMist (talk | contribs) No edit summary |
||
| Line 1: | Line 1: | ||
{{OctoValleyPrevNext | prevnum=10 | nextnum=12 | prev=Inkrail Skyscape | next=Flooder Junkyard | {{OctoValleyPrevNext| prevnum=10| nextnum=12| prev=Inkrail Skyscape| next=Flooder Junkyard}} | ||
{{InfoboxMission | {{InfoboxMission | ||
|subtitle = Find Your Path | |subtitle = Find Your Path | ||
|number = 11 | |number = 11 | ||
|area = [[Area 3|3]] | |area = [[Area 3|3]] | ||
|items = 1 [[Sunken Scroll|scroll]], 1 [[armor]] | |items = 1 [[Sunken Scroll|scroll]], 1 piece of [[armor]] | ||
|music = ''[[Cephaloparade]]'' | |music = ''[[Cephaloparade]]'' | ||
|amiibo = {{Challenge|Figure=Boy|RewardType=Cash|Reward=1300}}<br | |amiibo = {{Challenge|Figure=Boy|RewardType=Cash|Reward=1300}}<br>{{Challenge|Figure=Squid|SquidChallenge=LimitedInk|RewardType=Cash|Reward=1200}} | ||
|image = Hm m11.jpg | |image = Hm m11.jpg | ||
}} | }} | ||
'''Inkvisible Avenues''' is the eleventh mission in ' | '''Inkvisible Avenues''' is the eleventh mission in {{S'}} singleplayer [[mode]], [[Octo Valley (mode)|Octo Valley]]. It makes heavy use of [[invisible platform]]s, hence the name. | ||
== Octo Valley== | ==Octo Valley== | ||
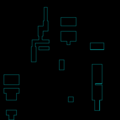
[[File:Inkvisible Avenues Kettle.png|thumb|left|300px]] | [[File:Inkvisible Avenues Kettle.png|thumb|left|300px]] | ||
The [[kettle]] is located on a high platform directly to the left of the entrance to [[Area 3]]. Various obstacles including climbing up walls | |||
The [[kettle]] is located on a high platform directly to the left of the entrance to [[Area 3]]. Various obstacles including climbing up walls have to be passed to reach it, however. | |||
{{clr}} | {{clr}} | ||
| Line 21: | Line 21: | ||
==Walkthrough== | ==Walkthrough== | ||
===Mission briefing=== | |||
=== Mission | |||
{| class="wikitable sitecolor-s" style="margin: auto;" | {| class="wikitable sitecolor-s" style="margin: auto;" | ||
|+ Inkvisible Avenues Stats | |+ Inkvisible Avenues Stats | ||
| Line 28: | Line 27: | ||
! Enemies | ! Enemies | ||
! Armor | ! Armor | ||
!Special | !Special weapon | ||
!Sunken Scroll | !Sunken Scroll | ||
|- | |- | ||
! Beginning | ! Beginning area | ||
| | | 1× [[Octoling (enemy)|Octoling]]<br>2× [[Octocopter]]s | ||
| {{N/A}} | | {{N/A}} | ||
| {{N/A}} | | {{N/A}} | ||
| Line 39: | Line 37: | ||
|- | |- | ||
! Checkpoint 1 | ! Checkpoint 1 | ||
| | | 1× [[Octopod]]<br>1× [[Octostamp]]<br>2× [[Twintacle Octotrooper]]s<br>1× [[Octobomber]] | ||
| {{N/A}} | | {{N/A}} | ||
| {{N/A}} | | {{N/A}} | ||
| Line 50: | Line 43: | ||
|- | |- | ||
! Checkpoint 2 | ! Checkpoint 2 | ||
| | | 2× [[Octoball]]s | ||
| {{N/A}} | | {{N/A}} | ||
| {{N/A}} | | {{N/A}} | ||
| Line 56: | Line 49: | ||
|- | |- | ||
! Checkpoint 3 | ! Checkpoint 3 | ||
| | | 3× Twintacle Octotroopers | ||
| {{N/A}} | | {{N/A}} | ||
| {{N/A}} | | {{N/A}} | ||
| Line 62: | Line 55: | ||
|- | |- | ||
! Checkpoint 4 | ! Checkpoint 4 | ||
| | | 2× Octocopters<br>2× [[Squee-G]]s<br>1× Octobomber | ||
| {{N/A}} | | {{N/A}} | ||
| {{N/A}} | | {{N/A}} | ||
| Line 72: | Line 61: | ||
|- | |- | ||
! Checkpoint 5 | ! Checkpoint 5 | ||
| | | 1× Twintacle [[Octodiver]]<br>3× [[Octocopter]]s | ||
| {{N/A}} | | {{N/A}} | ||
| {{N/A}} | | {{N/A}} | ||
| Line 79: | Line 67: | ||
|- | |- | ||
! Final Checkpoint | ! Final Checkpoint | ||
| | | 9× Twintacle Octotroopers | ||
| | | 1× Piece of [[armor]] | ||
| {{N/A}} | | {{N/A}} | ||
| {{N/A}} | | {{N/A}} | ||
|} | |} | ||
===Beginning | ===Mechanics=== | ||
* Inkvisible Avenues features many [[invisible platform]]s, using them for floors, walls, and ramps. | |||
* [[Balloon Fish]] are sometimes used to quickly reveal invisible platforms. | |||
===Beginning area=== | |||
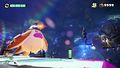
From the starting point, carefully head over to what appears to be a large gap with a [[Balloon Fish]] placed directly in the middle. | From the starting point, carefully head over to what appears to be a large gap with a [[Balloon Fish]] placed directly in the middle. | ||
You will then receive a message from [[Cap'n Cuttlefish]] informing you that the [[Octarian]] forces have hidden the path. Shoot the | You will then receive a message from [[Cap'n Cuttlefish]] informing you that the [[Octarian]] forces have hidden the path. Shoot the Balloon Fish to reveal the hidden paths. As soon as you have made it over, head over a small ramp and you will notice a relatively small gap with two [[Octocopter]]s on the other side. Hidden beside the gap are several invisible walls which you can use to your advantage. As soon as you move in closer to take out the Octocopters, Cap'n Cuttlefish will once again message informing you of an [[Octoling (enemy)|Octoling]] ambush. Deploy a [[Splat Bomb]] or use your [[Hero Shot]] to take out the Octocopters and then move on to your next target: the lone Octoling. Once the enemies have been dispatched, a [[launchpad]] to Checkpoint 1 will be revealed. | ||
===Checkpoint 1=== | ===Checkpoint 1=== | ||
After you | After you have [[Super Jump]]ed from the beginning area, there will be an [[Octopod]]. Splat it, then move forward, where there is an [[Octostamp]]. From there, if you move forward, there will be two [[Twintacle Octotrooper]]s and a barrier to hide behind. Once you have splatted them, head up the invisible ramp. Turn around and you'll find an [[Octobomber]]. Once you have splatted that as well, head to the next checkpoint. | ||
===Checkpoint 2=== | ===Checkpoint 2=== | ||
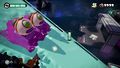
After you | After you reach the second checkpoint, there will be some [[Octoball]]s, rolling down on an invisible ramp. Before they roll down, however, there is a crate containing the [[Sunken Scroll]] that gets covered up by the ramp when it is inked. When you get to the top, ink the right side of the ramp to reveal a small invisible platform. Jump down onto it then go under the ramp. Get the Sunken Scroll inside the crate, then go back to the invisible platform. Ink a path up an invisible wall to get back to the top of the ramp. There will be a checkpoint. | ||
===Checkpoint 3=== | ===Checkpoint 3=== | ||
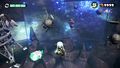
You will | You will Super Jump to Checkpoint 3. There is a wall and only one hole to get to the other side. Find the hole, swim up and into it, and on the other side, there are three Twintacle Octotroopers there. Go and splat them. There are two crates with [[Power Egg]]s in them. Get those, then go up the wall, and Super Jump to Checkpoint 4. | ||
===Checkpoint 4=== | ===Checkpoint 4=== | ||
When you get to | When you get to Checkpoint 4, you will see some [[Power Egg]]s. Get them, and that will reveal the hidden path. The path is narrow, so moving while a squid is not a good idea. Once you turn the second corner, an [[Octocopter]] will appear. Splat it, then proceed. Ink an invisible wall, then you will encounter a [[Squee-G]]. Ink another invisible wall, then proceed on the path. The path is a tiny bit more narrow. Once you pass the third turn, another Octocopter will appear. Splat it, and proceed again. Another Squee-G is on a wall. Pass it, then find the path, which is even more narrow. Once you get halfway across the first strip of the path, an Octobomber will appear. Splat it quickly. The path ends after two more turns, where there is a launchpad. | ||
===Checkpoint 5=== | ===Checkpoint 5=== | ||
Checkpoint 5 | From Checkpoint 5, go down, and you will see some walls. Approach the first wall and some Octocopters will appear in the distance. Behind the first wall is a Twintacle Octodiver. Splat it, then focus on the Octocopters. There are two [[Balloon Fish]] to ink a wall and maybe splat some of the Octocopters. Splat the rest and go up the wall. The final checkpoint will be up the wall. | ||
===Final Checkpoint=== | ===Final Checkpoint=== | ||
Break some crates | Break some crates and you will receive some [[armor]]. Go past a wall and a Twintacle Octotrooper will appear on an invisible platform. Splat it, then proceed. Climb onto the platform and you will see two Twintacle Octotroopers on two separate platforms. Splat them and proceed again. More invisible ground will appear, then three Twintacle Octotroopers will appear. Do your best to splat them. Another set of three Twintacle Octotroopers will appear, but farther away. Splat them then proceed to the [[Zapfish]]. | ||
== Collectibles == | ==Collectibles== | ||
=== Sunken Scroll === | ===Sunken Scroll=== | ||
[[File:Sunkenscroll11.png|center|300px]] | [[File:Sunkenscroll11.png|center|300px]] | ||
[[File:Inkvisible Avenues Checkpoint 2-Sunken Scroll Location.jpg|thumb|left|300px]] '''Location:''' At the second checkpoint, under the invisible ramp. When you hit the second checkpoint, the crate containing the | {{Quote|Twice a year, the Inkopolis Collection fashion show captures the hearts, minds, and wallets of the city's youth. Is there no room in these creatures' minds for anything but battle and fashion?|[[List of Sunken Scrolls in Splatoon#Scroll 11|Sunken Scroll 11]]}} | ||
{{ | |||
=== Armor === | [[File:Inkvisible Avenues Checkpoint 2-Sunken Scroll Location.jpg|thumb|left|300px]] | ||
[[File:Inkvisible Avenues Final Checkpoint-Armor -1.jpg|thumb|left|300px]] | |||
'''Location:''' At the second checkpoint, under the invisible ramp. When you hit the second checkpoint, the crate containing the Scroll is completely visible, however, it is obstructed by a large, invisible ramp. Shoot the ramp and splat the oncoming [[Octoball]]s. Stand at the top of the ramp and jump off the side, angling your momentum toward the underside of the ramp. If done correctly, you should land right next to the [[crate]] containing the Scroll. | |||
{{clr}} | |||
===Armor=== | |||
[[File:Inkvisible Avenues Final Checkpoint-Armor -1.jpg|thumb|left|300px]] | |||
== Quotes == | '''Location:''' Breaking the center crate wields [[armor]]. The crates on the left and right hold [[Power Egg]]s. The armor is helpful to get across the group of Octotroopers and get to the [[Zapfish]]. | ||
{{clr}} | |||
==Quotes== | |||
[[File:Cap'n Cuttlefish Icon.png|left|middle|50px|link=Cap'n Cuttlefish]] [[Cap'n Cuttlefish]]: | [[File:Cap'n Cuttlefish Icon.png|left|middle|50px|link=Cap'n Cuttlefish]] [[Cap'n Cuttlefish]]: | ||
{{clr}} | {{clr}} | ||
<gallery> | <gallery> | ||
Inkvisible Avenues Beginning Area-Cap'n Cuttlefish First Quote .jpg|{{Quote|Those Octo | Inkvisible Avenues Beginning Area-Cap'n Cuttlefish First Quote .jpg|{{Quote|Those Octo scallywags hid the path, did they?!}} | ||
Inkvisible Avenues Beginning Area- Cap'n Cuttlefish Second Quote.jpg|{{Quote|{{color-link|Octoling|orange}} alert!}} | Inkvisible Avenues Beginning Area- Cap'n Cuttlefish Second Quote.jpg|{{Quote|{{color-link|Octoling|orange}} alert!}} | ||
Inkvisible Avenues Beginning Area-Cap'n Cuttlefish Third Quote.jpg|{{Quote|{{color-link|Launchpad|orange}} ahoy!}} | Inkvisible Avenues Beginning Area-Cap'n Cuttlefish Third Quote.jpg|{{Quote|{{color-link|Launchpad|orange}} ahoy!}} | ||
Inkvisible Avenues Checkpoint 1-Cap'n Cuttlefish Fourth Quote.jpg|There's no telling where they'll come from. Stay | Inkvisible Avenues Checkpoint 1-Cap'n Cuttlefish Fourth Quote.jpg|There's no telling where they'll come from. Stay sharp. | ||
Inkvisible Avenues Checkpoint 3-Cap'n Cuttlefish Fifth Quote.jpg|{{Quote|The [[Octarian]]' | Inkvisible Avenues Checkpoint 3-Cap'n Cuttlefish Fifth Quote.jpg|{{Quote|The [[Octarian]]s' see-through technomajiggies are pretty neat!}} | ||
Inkvisible Avenues Checkpoint 4-Cap'n Cuttlefish Sixth Quote.jpg|{{Quote|Oho! You found the hidden path!}} | Inkvisible Avenues Checkpoint 4-Cap'n Cuttlefish Sixth Quote.jpg|{{Quote|Oho! You found the hidden path!}} | ||
Inkvisible Avenues Checkpoint 4-Cap'n Cuttlefish Seventh Quote.jpg|{{Quote|{{color-link|Launchpad|orange}} ahoy!}} | Inkvisible Avenues Checkpoint 4-Cap'n Cuttlefish Seventh Quote.jpg|{{Quote|{{color-link|Launchpad|orange}} ahoy!}} | ||
| Line 140: | Line 134: | ||
</gallery> | </gallery> | ||
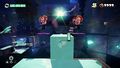
== Gallery == | ==Gallery== | ||
<gallery> | <gallery> | ||
Octo Valley mission 11 Inkvisible Avenues icon.png|Level icon | Octo Valley mission 11 Inkvisible Avenues icon.png|Level icon. | ||
Octo Valley mission 11 Inkvisible Avenues map.png|In-game map | Octo Valley mission 11 Inkvisible Avenues map.png|In-game map. | ||
Inkvisible Avenues Beginning Area-Enemy Octocopters.jpg| | Inkvisible Avenues Beginning Area-Enemy Octocopters.jpg|[[Octocopter]]s. | ||
Inkvisible Avenues Checkpoint 1-Angry Octopod.jpg| | Inkvisible Avenues Checkpoint 1-Angry Octopod.jpg|An angry [[Octopod]]. | ||
Inkvisible Avenues Checkpoint 1-Enemy Octostamp.jpg| | Inkvisible Avenues Checkpoint 1-Enemy Octostamp.jpg|An [[Octostamp]]. | ||
Inkvisible Avenues Checkpoint 1-Enemy Twintacle Octotroopers.jpg| | Inkvisible Avenues Checkpoint 1-Enemy Twintacle Octotroopers.jpg|[[Twintacle Octotrooper]]s. | ||
Inkvisible Avenues Checkpoint 1-Enemy Octobomber.jpg| | Inkvisible Avenues Checkpoint 1-Enemy Octobomber.jpg|An [[Octobomber]]. | ||
Inkvisible Avenues Checkpoint 2-Enemy Octoballs.jpg| | Inkvisible Avenues Checkpoint 2-Enemy Octoballs.jpg|[[Octoball]]s. | ||
Inkvisible Avenues Checkpoint 2-Enemy Octoballs Side View.jpg|Side view | Inkvisible Avenues Checkpoint 2-Enemy Octoballs Side View.jpg|Side view. | ||
Inkvisible avenues invisible platform wall.png| | Inkvisible avenues invisible platform wall.png|An [[invisible platform]] used as a wall. | ||
Inkvisible Avenues Checkpoint 3-Enemy Octarians.jpg| | Inkvisible Avenues Checkpoint 3-Enemy Octarians.jpg|[[Twintacle Octotrooper]]s. | ||
Inkvisible Avenues Checkpoint 3-Enemy Octocopter.jpg| | Inkvisible Avenues Checkpoint 3-Enemy Octocopter.jpg|An Octocopter. | ||
Inkvisible Avenues Checkpoint 3-Squee-G.jpg| | Inkvisible Avenues Checkpoint 3-Squee-G.jpg|A [[Squee-G]]. | ||
Inkvisible Avenues Checkpoint 3-Enemy Octocopter and a Squee-G.jpg| | Inkvisible Avenues Checkpoint 3-Enemy Octocopter and a Squee-G.jpg|An Octocopter and a Squee-G. | ||
Inkvisible Avenues Checkpoint 3-Enemy Octobomber.jpg| | Inkvisible Avenues Checkpoint 3-Enemy Octobomber.jpg|An Octobomber. | ||
Inkvisible Avenues Checkpoint 5-Enemy Octocopters.jpg| | Inkvisible Avenues Checkpoint 5-Enemy Octocopters.jpg|Octocopters. | ||
Inkvisible Avenues Checkpoint 5-Enemy Twintacle Octodiver.jpg| | Inkvisible Avenues Checkpoint 5-Enemy Twintacle Octodiver.jpg|A Twintacle [[Octodiver]]. | ||
Inkvisible Avenues Final Checkpoint-Twintacle Octotrooper Tier 1.jpg| | Inkvisible Avenues Final Checkpoint-Twintacle Octotrooper Tier 1.jpg|Twintacle Octotroopers, tier one. | ||
Inkvisible Avenues Final Checkpoint-Twintacle Octotroopers Tier 2.jpg| | Inkvisible Avenues Final Checkpoint-Twintacle Octotroopers Tier 2.jpg|Twintacle Octotroopers, tier two. | ||
Inkvisible Avenues Final Checkpoint-Twintacle Octotroopers Tier 3.jpg| | Inkvisible Avenues Final Checkpoint-Twintacle Octotroopers Tier 3.jpg|Twintacle Octotroopers, tier three. | ||
Inkvisible Avenues Final Checkpoint-Twintacle Octotroopers Tier 4.jpg| | Inkvisible Avenues Final Checkpoint-Twintacle Octotroopers Tier 4.jpg|Twintacle Octotroopers, tier four. | ||
Inkvisible Avenues Signs.jpg|Signs | Inkvisible Avenues Signs.jpg|Signs | ||
Inkvisible Avenues Signs 2.jpg|Signs #2 | Inkvisible Avenues Signs 2.jpg|Signs #2 | ||
| Line 168: | Line 162: | ||
</gallery> | </gallery> | ||
== Trivia == | ==Trivia== | ||
*The Italian name for this stage is a reference to a line in ''[[wikipedia:The Little Prince|The Little Prince]]'': ''"It is only with the heart that one can see rightly; | * The Italian name for this stage is a reference to a line in ''[[wikipedia:The Little Prince|The Little Prince]]'': ''"It is only with the heart that one can see rightly; what is essential is invisible to the eye"''. | ||
* There are no special | * There are no [[can]]ned [[special weapon]]s in this mission and there is only one piece of [[armor]]. | ||
== Names in other languages == | ==Names in other languages== | ||
{{Foreignname | {{Foreignname | ||
|color=Splatoon | |color=Splatoon | ||
Revision as of 12:48, 21 September 2019
|
|
|
Template:InfoboxMission Inkvisible Avenues is the eleventh mission in Template:S' singleplayer mode, Octo Valley. It makes heavy use of invisible platforms, hence the name.
Octo Valley

The kettle is located on a high platform directly to the left of the entrance to Area 3. Various obstacles including climbing up walls have to be passed to reach it, however.
Gameplay
Walkthrough
Mission briefing
| Area | Enemies | Armor | Special weapon | Sunken Scroll |
|---|---|---|---|---|
| Beginning area | 1× Octoling 2× Octocopters |
N/A | N/A | N/A |
| Checkpoint 1 | 1× Octopod 1× Octostamp 2× Twintacle Octotroopers 1× Octobomber |
N/A | N/A | N/A |
| Checkpoint 2 | 2× Octoballs | N/A | N/A | Yes |
| Checkpoint 3 | 3× Twintacle Octotroopers | N/A | N/A | N/A |
| Checkpoint 4 | 2× Octocopters 2× Squee-Gs 1× Octobomber |
N/A | N/A | N/A |
| Checkpoint 5 | 1× Twintacle Octodiver 3× Octocopters |
N/A | N/A | N/A |
| Final Checkpoint | 9× Twintacle Octotroopers | 1× Piece of armor | N/A | N/A |
Mechanics
- Inkvisible Avenues features many invisible platforms, using them for floors, walls, and ramps.
- Balloon Fish are sometimes used to quickly reveal invisible platforms.
Beginning area
From the starting point, carefully head over to what appears to be a large gap with a Balloon Fish placed directly in the middle. You will then receive a message from Cap'n Cuttlefish informing you that the Octarian forces have hidden the path. Shoot the Balloon Fish to reveal the hidden paths. As soon as you have made it over, head over a small ramp and you will notice a relatively small gap with two Octocopters on the other side. Hidden beside the gap are several invisible walls which you can use to your advantage. As soon as you move in closer to take out the Octocopters, Cap'n Cuttlefish will once again message informing you of an Octoling ambush. Deploy a Splat Bomb or use your Hero Shot to take out the Octocopters and then move on to your next target: the lone Octoling. Once the enemies have been dispatched, a launchpad to Checkpoint 1 will be revealed.
Checkpoint 1
After you have Super Jumped from the beginning area, there will be an Octopod. Splat it, then move forward, where there is an Octostamp. From there, if you move forward, there will be two Twintacle Octotroopers and a barrier to hide behind. Once you have splatted them, head up the invisible ramp. Turn around and you'll find an Octobomber. Once you have splatted that as well, head to the next checkpoint.
Checkpoint 2
After you reach the second checkpoint, there will be some Octoballs, rolling down on an invisible ramp. Before they roll down, however, there is a crate containing the Sunken Scroll that gets covered up by the ramp when it is inked. When you get to the top, ink the right side of the ramp to reveal a small invisible platform. Jump down onto it then go under the ramp. Get the Sunken Scroll inside the crate, then go back to the invisible platform. Ink a path up an invisible wall to get back to the top of the ramp. There will be a checkpoint.
Checkpoint 3
You will Super Jump to Checkpoint 3. There is a wall and only one hole to get to the other side. Find the hole, swim up and into it, and on the other side, there are three Twintacle Octotroopers there. Go and splat them. There are two crates with Power Eggs in them. Get those, then go up the wall, and Super Jump to Checkpoint 4.
Checkpoint 4
When you get to Checkpoint 4, you will see some Power Eggs. Get them, and that will reveal the hidden path. The path is narrow, so moving while a squid is not a good idea. Once you turn the second corner, an Octocopter will appear. Splat it, then proceed. Ink an invisible wall, then you will encounter a Squee-G. Ink another invisible wall, then proceed on the path. The path is a tiny bit more narrow. Once you pass the third turn, another Octocopter will appear. Splat it, and proceed again. Another Squee-G is on a wall. Pass it, then find the path, which is even more narrow. Once you get halfway across the first strip of the path, an Octobomber will appear. Splat it quickly. The path ends after two more turns, where there is a launchpad.
Checkpoint 5
From Checkpoint 5, go down, and you will see some walls. Approach the first wall and some Octocopters will appear in the distance. Behind the first wall is a Twintacle Octodiver. Splat it, then focus on the Octocopters. There are two Balloon Fish to ink a wall and maybe splat some of the Octocopters. Splat the rest and go up the wall. The final checkpoint will be up the wall.
Final Checkpoint
Break some crates and you will receive some armor. Go past a wall and a Twintacle Octotrooper will appear on an invisible platform. Splat it, then proceed. Climb onto the platform and you will see two Twintacle Octotroopers on two separate platforms. Splat them and proceed again. More invisible ground will appear, then three Twintacle Octotroopers will appear. Do your best to splat them. Another set of three Twintacle Octotroopers will appear, but farther away. Splat them then proceed to the Zapfish.
Collectibles
Sunken Scroll
| “ | Twice a year, the Inkopolis Collection fashion show captures the hearts, minds, and wallets of the city's youth. Is there no room in these creatures' minds for anything but battle and fashion? | ” |

Location: At the second checkpoint, under the invisible ramp. When you hit the second checkpoint, the crate containing the Scroll is completely visible, however, it is obstructed by a large, invisible ramp. Shoot the ramp and splat the oncoming Octoballs. Stand at the top of the ramp and jump off the side, angling your momentum toward the underside of the ramp. If done correctly, you should land right next to the crate containing the Scroll.
Armor

Location: Breaking the center crate wields armor. The crates on the left and right hold Power Eggs. The armor is helpful to get across the group of Octotroopers and get to the Zapfish.
Quotes
-
“ Those Octo scallywags hid the path, did they?! ” -
“ Octoling alert! ” -
“ Launchpad ahoy! ” -
There's no telling where they'll come from. Stay sharp.
-
“ The Octarians' see-through technomajiggies are pretty neat! ” -
“ Oho! You found the hidden path! ” -
“ Launchpad ahoy! ” -
“ The path is completely invisible! Watch your step, skipper. ” -
“ I'm nervous just watchin'... ” -
“ Thar she blows!  Zapfish dead ahead!
” -
“ Nice one, bucko! ”
Gallery
-
Level icon.
-
In-game map.
-
An angry Octopod.
-
An Octostamp.
-
An Octobomber.
-
Side view.
-
An invisible platform used as a wall.
-
An Octocopter.
-
A Squee-G.
-
An Octocopter and a Squee-G.
-
An Octobomber.
-

Octocopters.
-
A Twintacle Octodiver.
-
Twintacle Octotroopers, tier one.
-
Twintacle Octotroopers, tier two.
-
Twintacle Octotroopers, tier three.
-
Twintacle Octotroopers, tier four.
-
Signs
-
Signs #2
-
Signs #3


Trivia
- The Italian name for this stage is a reference to a line in The Little Prince: "It is only with the heart that one can see rightly; what is essential is invisible to the eye".
- There are no canned special weapons in this mission and there is only one piece of armor.
