Can't Touch This Station: Difference between revisions
m (fixed access) |
Nukleopatra (talk | contribs) m (Text replacement - "File:S2 Mem Cake" to "File:OE Mem Cake") |
||
| (18 intermediate revisions by 11 users not shown) | |||
| Line 1: | Line 1: | ||
{{OctoExpansionPrevNext|line1=I|prev1=No Whammy Station|prevnum1=03|next1=Righteous Rails Station|nextnum1=05}} | {{OctoExpansionPrevNext|line1=I|prev1=No Whammy Station|prevnum1=03|next1=Righteous Rails Station|nextnum1=05}} | ||
{{ | {{Infobox/Mission/OctoExpansion | ||
|subtitle = "My my my my..." | |subtitle = "My my my my..." | ||
|mission = Get to the goal without getting hit or setting foot in any enemy ink! | |mission = Get to the goal without getting hit or setting foot in any enemy ink! | ||
| Line 21: | Line 21: | ||
|memcake = Sardinium | |memcake = Sardinium | ||
}} | }} | ||
'''Can't Touch This Station''' is a test in | '''Can't Touch This Station''' is a test in {{S2}}{{'s}} paid downloadable content, {{OE}}. This station is unlocked after clearing [[No Whammy Station]] or [[Righteous Rails Station]]. | ||
==Access== | ==Access== | ||
| Line 27: | Line 27: | ||
==Walkthrough== | ==Walkthrough== | ||
{{stub|Added table with checkpoints, enemies, other information.}} | |||
=== Overview === | === Overview === | ||
In this mission, the player has to make their way through pathways guarded by multiple enemies and often stained with big patches of sanitized ink. Touching any enemy ink, either by stepping in it or getting damaged by an enemy | In this mission, the player has to make their way through pathways guarded by multiple enemies and often stained with big patches of sanitized ink. Touching any enemy ink, either by stepping in it or getting damaged by an enemy, fails the test. To complicate this, there are often obstacles and narrow paths and walls to use as covers, and the weapons provided have both strong points and weaknesses not to be underestimated. The level is mainly made up of find-the-key situations, and Agent 8 has to take difficult routes, encountering many enemies ready to shoot at them. | ||
=== Tips === | === Tips === | ||
==== Classic Squiffer ==== | |||
==== Classic | |||
Although being the less expensive choice, facing the mission with the [[Classic Squiffer]] still comes with its risks, paired with some advantages, of course. | Although being the less expensive choice, facing the mission with the [[Classic Squiffer]] still comes with its risks, paired with some advantages, of course. | ||
*It has a medium-long range; it | *It has a medium-long range; it allows Agent 8 to splat enemies keeping the distance and creating paths through enemy ink; still, the player must not overestimate its range; being reckless may lead to fatal mistakes. | ||
**Keep your distance from Sanitized [[Octotrooper]]s and [[Octopod]]s and take advantage of the fast charging of the Squiffer to quickly splat them. | **Keep your distance from Sanitized [[Octotrooper]]s and [[Octopod]]s and take advantage of the fast charging of the Squiffer to quickly splat them. | ||
**Use the [[Curling Bomb]]s, provided alongside the [[Charger]]-class weapon, with correct timing and detonation moment, to get rid of static enemies that block your way at the end of a pathway. | **Use the [[Curling Bomb]]s, provided alongside the [[Charger]]-class weapon, with correct timing and detonation moment, to get rid of static enemies that block your way at the end of a pathway. | ||
**Pay attention to the weapon's range and | **Pay attention to the weapon's range and do not underestimate its limits; when facing the [[Octocommander]], for example, wait until it stops shooting before approaching. The same goes for the [[Octosniper]] section too; wait until he has shot before creating a path to proceed. | ||
***Always take cover (and a quick rest) from the Octosniper exploiting the walls on the sides of the platform. | ***Always take cover (and a quick rest) from the Octosniper exploiting the walls on the sides of the platform. | ||
***Do not approach the [[Twintacle Octotrooper]] at the end of the final section too quickly and recklessly, as its wide barrage of bullets can directly hit Agent 8 and cover | ***Do not approach the [[Twintacle Octotrooper]] at the end of the final section too quickly and recklessly, as its wide barrage of bullets can directly hit Agent 8 and cover sanitized ink on the floor under their feet. | ||
*The Classic Squiffer has | *The Classic Squiffer has a relatively quick charging time and, combined with rapid moves and charge storing, is probably the best advantage that this set provides. | ||
**The Squiffer consents to walk around fast even when fully charged. Although it | **The Squiffer consents to walk around fast even when fully charged. Although it is still risky, you can face Octotroopers even while continuously charging and shooting thanks to this. | ||
*** It is not the best strategy against [[Blobby Octotrooper]]s. | *** It is not the best strategy against [[Blobby Octotrooper]]s. | ||
**Exploit the chance to swim fast and to store the fully charged projectile to swim towards your enemies to improve the possibility of keeping the enemies within the Squiffer's range. | **Exploit the chance to swim fast and to store the fully charged projectile to swim towards your enemies to improve the possibility of keeping the enemies within the Squiffer's range. | ||
***This may be useful, especially against the Octosniper. | ***This may be useful, especially against the Octosniper. | ||
*While charging and moving, always be careful where you set foot: you risk | *While charging and moving, always be careful where you set foot: you risk ending even in a small patch that the Squiffer could not cover entirely. | ||
**Always ink a lot of the pathways to have better freedom of movement and to avoid enemies' projectiles. | **Always ink a lot of the pathways to have better freedom of movement and to avoid enemies' projectiles. | ||
==== Tenta Brella ==== | ==== Tenta Brella ==== | ||
The [[Tenta Brella]], thanks to its long-lasting, wide-spreading canopy, provides safety and good ink coverage. With its power and decent range, it | The [[Tenta Brella]], thanks to its long-lasting, wide-spreading canopy, provides safety and good ink coverage. With its power and decent range, it is probably the best set for this mission. | ||
*Its quite good range and great damage power | *Its quite good range and great damage power allow Agent 8 to splat enemies quickly while keeping a distance from them. | ||
**Aiming with precision | **Aiming with precision one-shots common Octotroopers and heavily damages both the Octocommander and the Octosniper. | ||
**Thanks to its large cluster projectile, it is more useful against [[Shielded Octotrooper]]s, which can be easily splatted by aiming slightly above them to make the fired ink fall on their head. | **Thanks to its large cluster projectile, it is more useful against [[Shielded Octotrooper]]s, which can be easily splatted by aiming slightly above them to make the fired ink fall on their head. | ||
*The Tent | *The Tent provides great protection from enemies. | ||
**Deploying it in pathways guarded by enemies at the end of them | **Deploying it in pathways guarded by enemies at the end of them allows Agent 8 to swim toward them without getting hit by enemy ink. | ||
***This | ***This allows the player to get rid of the Octocommander and the Octosniper very easily. | ||
***Be patient, as the canopy | ***Be patient, as the canopy is not very fast, and swimming too quickly may lead you to touch enemy ink that the Tent has not covered yet. | ||
***The Tent | ***The Tent is very useful for pushing down moving Octotroopers from the stage and wiping out the Octopods in a second. | ||
*This [[Brella]]-class weapon | *This [[Brella]]-class weapon is not very fast, so always pay attention to ink patches and incoming projectiles while fighting enemies. | ||
**Although it | **Although it does not happen every time, with good timing, pressing {{button|R|Switch}} to throw a [[Burst Bomb]] and pressing {{button|ZR|Switch}} right after slightly reduces shooting time. | ||
***This can be | ***This can also be done as an attack combination to get rid of the enemies faster. | ||
***Keep in mind that this technique | ***Keep in mind that this technique costs more ink than a simple shot. | ||
****In general, always pay attention to the ink level, as this weapon consumes ink more than other weapons, and take advantage of the Ink Refillers that you can find through the stage. | ****In general, always pay attention to the ink level, as this weapon consumes ink more than other weapons, and take advantage of the Ink Refillers that you can find through the stage. | ||
==== Splat Roller ==== | ==== Splat Roller ==== | ||
The [[Splat Roller]], because of its lack of range and need for immediate response to enemy attacks, may be a risky choice. It provides good ink coverage and Curling Bombs | The [[Splat Roller]], because of its lack of range and need for immediate response to enemy attacks, may be a risky choice. It provides good ink coverage and Curling Bombs are useful, but its downsides make the challenge extremely difficult in case of distraction. | ||
* Horizontal swings | * Horizontal swings are very useful against Octotroopers and Octopods, especially when they are in packs, but they are less effective against farther enemies. | ||
** Swinging horizontally | ** Swinging horizontally is effective against Shielded Octarians as well, because by aiming slightly above them, the splash falls on their head, splatting them. | ||
*** Remember to take cover or to be careful of their attacks while doing this. | *** Remember to take cover or to be careful of their attacks while doing this. | ||
* Vertical swings, with a range almost as long as the Tenta Brella's one, | * Vertical swings, with a range almost as long as the Tenta Brella's one, are useful against further enemies, but only when there are not many of them, as this kind of attack leaves Agent 8 more exposed to attacks and a possible landing on an enemy ink patch. | ||
** To prevent getting hit when facing many enemies that cannot be reached by horizontally swinging the roller, use the Curling Bomb to splat the farthest and most dangerous enemies, or use them to distract the Octarians and to take the time | ** To prevent getting hit when facing many enemies that cannot be reached by horizontally swinging the roller, use the Curling Bomb to splat the farthest and most dangerous enemies, or use them to distract the Octarians and to take the time to splat them with your main weapon. | ||
*Pushing the roller along the ground | *Pushing the roller along the ground is useful to regain turf, but it is almost useless against enemies because Octotroopers tend to keep their distance when Agent 8 approaches them and they continue to attack, so moving towards them increases the chance of getting hit. | ||
**When inking by pushing the roller, always pay attention to the ink tank, because if Agent 8 runs out of ink just right before an enemy ink patch, they | **When inking by pushing the roller, always pay attention to the ink tank, because if Agent 8 runs out of ink just right before an enemy ink patch, they get damaged and fail the test. | ||
** It | ** It is better to use this attack mode exclusively for inking purposes and when there are not any enemies nearby. | ||
* Since the Splat Roller | * Since the Splat Roller cannot reach extremely long spots with its swings and can leave Agent 8 exposed to enemy attacks, it is better to use Curling Bombs to splat further enemies, especially when there are a couple of them, but they are not close to each other. | ||
**When moving enemies are roaming near the edges of the platforms, use Curling Bombs to push them out of the stage. This may be | **When moving enemies are roaming near the edges of the platforms, use Curling Bombs to push them out of the stage. This may be useful in the section after the Octosniper, where three Octotroopers and a Shielded Octotrooper attack the player from more than one direction, but near the edges of the platforms. | ||
**Curling Bombs are also useful to create a path in the Octosniper section to swim from | **Curling Bombs are also useful to create a path in the Octosniper section to swim from one cover to the next one to get close to the enemy. | ||
== Collectibles == | |||
===Mem cake=== | |||
[[File:OE Mem Cake Sardinium.png|center|100x100px]] | |||
{{Quote|When I get my hands on these fish<br>I might exchange them on the range,<br>Except that they look so delish...|[[Mem cake#Line I series (Octo Canyon)|Sardinium mem cake]]}} | |||
Completing this test awards the player with the [[Sardinium]] mem cake. | |||
=== Mem medal === | |||
[[File:OE Icon Mem medal.png|center]] | |||
<center>The player is awarded a [[mem medal]] from this station after completing {{OE}}.</center> | |||
== | ==Enemies and mechanics== | ||
{{stub|Add Enemies and mechanics gallery.}} | |||
==Quotes== | ==Quotes== | ||
{{Translation needed|Identify and add the regions the "English" quotes are from.}} | {{Translation needed|Identify and add the regions the "English" quotes are from.}} | ||
===English=== | ===English=== | ||
{{collapse| | {{collapse| | ||
====[[File: | ====[[File:OE Icon CQ Cumber.png|45px]] [[C.Q. Cumber]]{{color|'s Quotes|green}}==== | ||
{{Clr}} | {{Clr}} | ||
| | | | ||
| Line 112: | Line 111: | ||
{{collapse| | {{collapse| | ||
====[[File: | ====[[File:OE Icon Cap'n Cuttlefish.png|45px]] [[Cuttlefish|Cap'n Cuttlefish]]{{color|'s Quotes|green}}==== | ||
{{Clr}} | {{Clr}} | ||
| | | | ||
| Line 123: | Line 122: | ||
{{collapse| | {{collapse| | ||
====[[File: | ====[[File:OE Icon Marina.png|45px]] [[Marina]]{{color|'s Quotes|green}}==== | ||
{{Clr}} | {{Clr}} | ||
| | | | ||
| Line 136: | Line 135: | ||
{{collapse| | {{collapse| | ||
====[[File: | ====[[File:OE Icon Pearl.png|45px]] [[Pearl]]{{color|'s Quotes|green}}==== | ||
{{Clr}} | {{Clr}} | ||
| | | | ||
| Line 146: | Line 145: | ||
{{Quote|Booyah - LET'S GO!}} | {{Quote|Booyah - LET'S GO!}} | ||
}} | }} | ||
==Gallery== | |||
<gallery> | |||
I04check1.jpg|The first checkpoint. | |||
I04check2.jpg|The second checkpoint. | |||
I04check3.jpg|The third checkpoint. | |||
Mini 4WD.jpg|A [[wikipedia:Mini 4WD|Mini 4WD]]. | |||
I04check4.jpg|The fourth checkpoint. | |||
I05check5.jpg|The fifth checkpoint. | |||
CheckpointI04.jpg|The sixth checkpoint. | |||
I06check6.jpg|The seventh checkpoint. | |||
Octoex2.jpg|The eighth and final checkpoint. | |||
OE Can't Touch This Station Mem Cake.jpg|Agent 8 being awarded the [[Sardinium]] [[Mem cake|mem cake]] upon completing the station. | |||
</gallery> | |||
{{clr}} | |||
==Trivia== | ==Trivia== | ||
*This station has [[Wikipedia:Mini 4WD|Mini 4WD]] floating around in the background. These miniature vehicle models were made by [[Wikipedia:Tamiya Corporation|Tamiya]]. | *This station has [[Wikipedia:Mini 4WD|Mini 4WD]] floating around in the background. These miniature vehicle models were made by [[Wikipedia:Tamiya Corporation|Tamiya]]. | ||
== | ==Etymology== | ||
The title and subtitle are both lyrics from the [[Wikipedia:MC Hammer|MC Hammer]] song ''[[Wikipedia:U Can't Touch This|U Can't Touch This]]''. | |||
===Names in other languages=== | |||
{{translation needed|Add/complete French (NoA) translation.}} | |||
{{Localized name | {{Localized name | ||
|color=Octo Expansion | |color=Octo Expansion | ||
| Line 161: | Line 175: | ||
|JapM=Surprised to step on enemy ink<br>Ōmōre Wharf Station<ref group="note">A pun on ''"Ō, Mōretsu"'' (Oh, it's terrific), a Japanese buzzword in 1969.</ref><br>Get to the goal without touching any enemy ink! | |JapM=Surprised to step on enemy ink<br>Ōmōre Wharf Station<ref group="note">A pun on ''"Ō, Mōretsu"'' (Oh, it's terrific), a Japanese buzzword in 1969.</ref><br>Get to the goal without touching any enemy ink! | ||
|Dut=Dollen met smetvrees<br>Zal dat goed aflopen?<br>Bereik het doel zonder inkt aan te raken! | |Dut=Dollen met smetvrees<br>Zal dat goed aflopen?<br>Bereik het doel zonder inkt aan te raken! | ||
|DutM=To fool around with mysophobia<br>Will that turn out well?<br>Reach the goal without touching ink! | |DutM=To fool around with mysophobia<br>Will that turn out well?<br>Reach the goal without touching ink!<ref group="note">Erroneously states not to touch any ink, giving the impression that it includes the player's ink.</ref> | ||
|FreA= | |FreA= | ||
|FreAM= | |FreAM= | ||
| Line 171: | Line 185: | ||
|ItaM=I do not like enemy tint!<ref group="note">It plays on the rhyme between "''nemica''" (enemy) and "''mica''" (it's a colloquial expression used as a reinforcing (like using "''do not...!''" instead of "''don't...''")).</ref><br>Labytint<ref group="note">It's a pun between "''Labirinto''" (Labyrinth) and "''tinta''" (tint)</ref><br>Reach the goal without touching enemy ink. | |ItaM=I do not like enemy tint!<ref group="note">It plays on the rhyme between "''nemica''" (enemy) and "''mica''" (it's a colloquial expression used as a reinforcing (like using "''do not...!''" instead of "''don't...''")).</ref><br>Labytint<ref group="note">It's a pun between "''Labirinto''" (Labyrinth) and "''tinta''" (tint)</ref><br>Reach the goal without touching enemy ink. | ||
|Rus=...Объезжаем лужи!<br>Автотрековка<br>Доберись до цели, не касаясь вражеской краски! | |Rus=...Объезжаем лужи!<br>Автотрековка<br>Доберись до цели, не касаясь вражеской краски! | ||
|RusR=...Ob | |RusR=...Ob'yezzhayem luzhi!<br>Avtotrekovka<br>Doberis' do tseli, ne kasayas' vrazheskoy kraski! | ||
|RusM=...Going around the puddles!<br>Auto-Track<br>Reach the goal without touching enemy ink! | |RusM=...Going around the puddles!<br>Auto-Track Village Station<br>Reach the goal without touching the enemy ink! | ||
|SpaA= La tinta rival es fatal<br>Senda Mecánica<br>Llega a la meta sin tocar tinta enemiga. | |SpaA= La tinta rival es fatal<br>Senda Mecánica<br>Llega a la meta sin tocar tinta enemiga. | ||
|SpaAM=Rival ink is fatal<br>Mechanical Path<br>Reach the goal without touching enemy ink. | |SpaAM=Rival ink is fatal<br>Mechanical Path<br>Reach the goal without touching enemy ink. | ||
Latest revision as of 00:14, 7 June 2024
|
|
|
Can't Touch This Station
Get to the goal without getting hit or setting foot in any enemy ink!

| Station | I04 | ||||||||
| Test Fee | |||||||||
| Lives | |||||||||
| Weapons and rewards |
| ||||||||
| Mem cake | |||||||||
| Music | #13 shade |
Can't Touch This Station is a test in Splatoon 2's paid downloadable content, Octo Expansion. This station is unlocked after clearing No Whammy Station or Righteous Rails Station.
Access
The player must clear either I03E01 No Whammy Station or I05B08 Righteous Rails Station to access this test. The shortest way to access this station is to clear I05B08 Righteous Rails Station.
Walkthrough
Overview
In this mission, the player has to make their way through pathways guarded by multiple enemies and often stained with big patches of sanitized ink. Touching any enemy ink, either by stepping in it or getting damaged by an enemy, fails the test. To complicate this, there are often obstacles and narrow paths and walls to use as covers, and the weapons provided have both strong points and weaknesses not to be underestimated. The level is mainly made up of find-the-key situations, and Agent 8 has to take difficult routes, encountering many enemies ready to shoot at them.
Tips
Classic Squiffer
Although being the less expensive choice, facing the mission with the Classic Squiffer still comes with its risks, paired with some advantages, of course.
- It has a medium-long range; it allows Agent 8 to splat enemies keeping the distance and creating paths through enemy ink; still, the player must not overestimate its range; being reckless may lead to fatal mistakes.
- Keep your distance from Sanitized Octotroopers and Octopods and take advantage of the fast charging of the Squiffer to quickly splat them.
- Use the Curling Bombs, provided alongside the Charger-class weapon, with correct timing and detonation moment, to get rid of static enemies that block your way at the end of a pathway.
- Pay attention to the weapon's range and do not underestimate its limits; when facing the Octocommander, for example, wait until it stops shooting before approaching. The same goes for the Octosniper section too; wait until he has shot before creating a path to proceed.
- Always take cover (and a quick rest) from the Octosniper exploiting the walls on the sides of the platform.
- Do not approach the Twintacle Octotrooper at the end of the final section too quickly and recklessly, as its wide barrage of bullets can directly hit Agent 8 and cover sanitized ink on the floor under their feet.
- The Classic Squiffer has a relatively quick charging time and, combined with rapid moves and charge storing, is probably the best advantage that this set provides.
- The Squiffer consents to walk around fast even when fully charged. Although it is still risky, you can face Octotroopers even while continuously charging and shooting thanks to this.
- It is not the best strategy against Blobby Octotroopers.
- Exploit the chance to swim fast and to store the fully charged projectile to swim towards your enemies to improve the possibility of keeping the enemies within the Squiffer's range.
- This may be useful, especially against the Octosniper.
- The Squiffer consents to walk around fast even when fully charged. Although it is still risky, you can face Octotroopers even while continuously charging and shooting thanks to this.
- While charging and moving, always be careful where you set foot: you risk ending even in a small patch that the Squiffer could not cover entirely.
- Always ink a lot of the pathways to have better freedom of movement and to avoid enemies' projectiles.
Tenta Brella
The Tenta Brella, thanks to its long-lasting, wide-spreading canopy, provides safety and good ink coverage. With its power and decent range, it is probably the best set for this mission.
- Its quite good range and great damage power allow Agent 8 to splat enemies quickly while keeping a distance from them.
- Aiming with precision one-shots common Octotroopers and heavily damages both the Octocommander and the Octosniper.
- Thanks to its large cluster projectile, it is more useful against Shielded Octotroopers, which can be easily splatted by aiming slightly above them to make the fired ink fall on their head.
- The Tent provides great protection from enemies.
- Deploying it in pathways guarded by enemies at the end of them allows Agent 8 to swim toward them without getting hit by enemy ink.
- This allows the player to get rid of the Octocommander and the Octosniper very easily.
- Be patient, as the canopy is not very fast, and swimming too quickly may lead you to touch enemy ink that the Tent has not covered yet.
- The Tent is very useful for pushing down moving Octotroopers from the stage and wiping out the Octopods in a second.
- Deploying it in pathways guarded by enemies at the end of them allows Agent 8 to swim toward them without getting hit by enemy ink.
- This Brella-class weapon is not very fast, so always pay attention to ink patches and incoming projectiles while fighting enemies.
- Although it does not happen every time, with good timing, pressing to throw a Burst Bomb and pressing right after slightly reduces shooting time.
- This can also be done as an attack combination to get rid of the enemies faster.
- Keep in mind that this technique costs more ink than a simple shot.
- In general, always pay attention to the ink level, as this weapon consumes ink more than other weapons, and take advantage of the Ink Refillers that you can find through the stage.
- Although it does not happen every time, with good timing, pressing to throw a Burst Bomb and pressing right after slightly reduces shooting time.
Splat Roller
The Splat Roller, because of its lack of range and need for immediate response to enemy attacks, may be a risky choice. It provides good ink coverage and Curling Bombs are useful, but its downsides make the challenge extremely difficult in case of distraction.
- Horizontal swings are very useful against Octotroopers and Octopods, especially when they are in packs, but they are less effective against farther enemies.
- Swinging horizontally is effective against Shielded Octarians as well, because by aiming slightly above them, the splash falls on their head, splatting them.
- Remember to take cover or to be careful of their attacks while doing this.
- Swinging horizontally is effective against Shielded Octarians as well, because by aiming slightly above them, the splash falls on their head, splatting them.
- Vertical swings, with a range almost as long as the Tenta Brella's one, are useful against further enemies, but only when there are not many of them, as this kind of attack leaves Agent 8 more exposed to attacks and a possible landing on an enemy ink patch.
- To prevent getting hit when facing many enemies that cannot be reached by horizontally swinging the roller, use the Curling Bomb to splat the farthest and most dangerous enemies, or use them to distract the Octarians and to take the time to splat them with your main weapon.
- Pushing the roller along the ground is useful to regain turf, but it is almost useless against enemies because Octotroopers tend to keep their distance when Agent 8 approaches them and they continue to attack, so moving towards them increases the chance of getting hit.
- When inking by pushing the roller, always pay attention to the ink tank, because if Agent 8 runs out of ink just right before an enemy ink patch, they get damaged and fail the test.
- It is better to use this attack mode exclusively for inking purposes and when there are not any enemies nearby.
- Since the Splat Roller cannot reach extremely long spots with its swings and can leave Agent 8 exposed to enemy attacks, it is better to use Curling Bombs to splat further enemies, especially when there are a couple of them, but they are not close to each other.
- When moving enemies are roaming near the edges of the platforms, use Curling Bombs to push them out of the stage. This may be useful in the section after the Octosniper, where three Octotroopers and a Shielded Octotrooper attack the player from more than one direction, but near the edges of the platforms.
- Curling Bombs are also useful to create a path in the Octosniper section to swim from one cover to the next one to get close to the enemy.
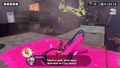
Collectibles
Mem cake

| “ | When I get my hands on these fish I might exchange them on the range, Except that they look so delish... |
” |
Completing this test awards the player with the Sardinium mem cake.
Mem medal
Enemies and mechanics
Quotes
English
 C.Q. Cumber's Quotes
| “ | Please make your way to the goal without taking any damage. | ” |
| “ | If you touch even a single drop of enemy ink, it's game over I'm afraid. | ” |
| “ | It can be easy to lose track of ink on the ground, so watch your step. | ” |
| “ | You took damage - test failed. | ” |
| “ | You contacted enemy ink - test failed. | ” |
 Cap'n Cuttlefish's Quotes
| “ | And take care not to step in any enemy ink either! | ” |
| “ | Splat before you get splatted! | ” |
— When the player has the Classic Squiffer or the Splat Roller equipped.
| ||
| “ | Enemy reinforcements dropping in! TEMPORARILY RETREAT! | ” |
| “ | This has to be the last vault. Find that key, squiddo! | ” |
| “ | Key ahoy! | ” |
 Marina's Quotes
| “ | OK - all you gotta do is get to the goal without taking any damage. | ” |
| “ | Keep moving forward as you ink turf. | ” |
— When the player has the Classic Squiffer or the Splat Roller equipped.
| ||
| “ | Launch your Brella to clear a path through the enemy ink! | ” |
— When the player has the Tenta Brella equipped.
| ||
| “ | That's a vault, which means there must be a key nearby! | ” |
| “ | Oh, great... The key is surrounded. | ” |
| “ | I can see the goal on the other side of that vault! | ” |
| “ | Enemies detected - proceed with caution! | ” |
 Pearl's Quotes
| “ | So don't even THINK about getting shot by an enemy. Got it? | ” |
| “ | Don't forget - you can use your Brella to block enemy shots too! | ” |
— When the player has the Tenta Brella equipped.
| ||
| “ | You got the key - now get to the vault! | ” |
| “ | Then I guess they're all going down! | ” |
| “ | BAM! Let's head back. | ” |
| “ | Booyah - LET'S GO! | ” |
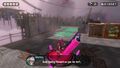
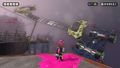
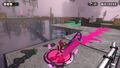
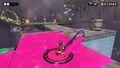
Gallery
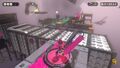
-
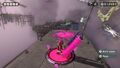
The first checkpoint.
-
The second checkpoint.
-
The third checkpoint.
-
A Mini 4WD.
-
The fourth checkpoint.
-
The fifth checkpoint.
-
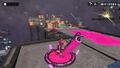
The sixth checkpoint.
-
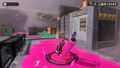
The seventh checkpoint.
-
The eighth and final checkpoint.
-


Trivia
- This station has Mini 4WD floating around in the background. These miniature vehicle models were made by Tamiya.
Etymology
The title and subtitle are both lyrics from the MC Hammer song U Can't Touch This.
Names in other languages
| Language | Name | Meaning |
|---|---|---|
| 敵インク、踏んでびっくり オーモーレ津駅 敵インクにふれずに ゴールせよ! Teki inku, funde bikkuri Ōmōre Tsu Eki Teki inku ni furezu ni gōru seyo! |
Surprised to step on enemy ink Ōmōre Wharf Station[note 1] Get to the goal without touching any enemy ink! | |
| Dollen met smetvrees Zal dat goed aflopen? Bereik het doel zonder inkt aan te raken! |
To fool around with mysophobia Will that turn out well? Reach the goal without touching ink![note 2] | |
| Hasta la vista, buggy ! Balade des buggies Atteins l'arrivée sans toucher l'encre ennemie ! |
Hasta la vista, buggy! Buggy ride Reach the finish line without touching enemy ink! | |
| Ein falscher Schritt und ex! Labytintgarten Erreiche das Ziel, ohne gegnerische Tinte zu brühren! |
One false step and ex[note 3] Labyrink garden[note 4] Reach the goal, without touching enemy ink! | |
| La tinta nemica non mi piace mica! Labitinto Raggiungi il traguardo senza toccare l'inchiostro nemico. |
I do not like enemy tint![note 5] Labytint[note 6] Reach the goal without touching enemy ink. | |
| ...Объезжаем лужи! Автотрековка Доберись до цели, не касаясь вражеской краски! ...Ob'yezzhayem luzhi! Avtotrekovka Doberis' do tseli, ne kasayas' vrazheskoy kraski! |
...Going around the puddles! Auto-Track Village Station Reach the goal without touching the enemy ink! | |
| La tinta rival es fatal Senda Mecánica Llega a la meta sin tocar tinta enemiga. |
Rival ink is fatal Mechanical Path Reach the goal without touching enemy ink. | |
| La tinta rival es fatal Senda Mecánica Llega a meta sin tocar tinta enemiga. |
Rival ink is fatal Mechanical Path Reach the goal without touching enemy ink. |
Translation notes
- ↑ A pun on "Ō, Mōretsu" (Oh, it's terrific), a Japanese buzzword in 1969.
- ↑ Erroneously states not to touch any ink, giving the impression that it includes the player's ink.
- ↑ "ex" is a short word for "Explosion".
- ↑ "Labytint" comes from "Labyrinth" and "Tint" (ink).
- ↑ It plays on the rhyme between "nemica" (enemy) and "mica" (it's a colloquial expression used as a reinforcing (like using "do not...!" instead of "don't...")).
- ↑ It's a pun between "Labirinto" (Labyrinth) and "tinta" (tint)
