Spinning Spreaders: Difference between revisions

From Inkipedia, the Splatoon wiki
m (Reverted edits by FartEater275 (talk) to last revision by YOLO2020)
Tag: Rollback
(Overhauled layout.)
Line 12: Line 12:
'''Spinning Spreaders''' is the eighteenth mission in ''[[Splatoon]]'s'' single-player [[mode]], [[Octo Valley (mode)|Octo Valley]]. It gets its name from its heavy use of [[Spreader]]s.


== Octo Valley==
==Octo Valley==
When reaching [[Area 4]], fall down the large pit, behind Agent 3 is more platform. That is where the kettle is to Mission 18.


Line 18: Line 18:
<embedvideo service="youtube">https://www.youtube.com/watch?v=mKXvUN3WTag</embedvideo>


== Walkthrough ==
==Walkthrough==
=== Map ===


<gallery mode=>
===Mission Briefing===
Spinning Spreaders Beginning Area Map.jpg|Spinning Spreaders Beginning Map
Spinning Spreaders Checkpoint 1 Map.jpg|Spinning Spreaders Checkpoint 1 Map
Spinning Spreaders Checkpoints 2 and 3 Map.jpg|Spinning Spreaders Checkpoints 2 and 3 Map
Spinning Spreaders Final Checkpoint Map.jpg|Spinning Spreaders Final Checkpoint Map
</gallery>
 
=== Mission Briefing ===


{| class="wikitable sitecolor-s" style="margin: auto;"
Line 44: Line 36:
| {{N/A}}
| {{N/A}}
|-
|-
! Checkpoints 1
! Checkpoint 1
| 4x Octocopters
| 4x Octocopters <br>1x Twintacle Octotrooper
1x Twintacle Octotrooper
| 1x Piece of Armor
| 1x Piece of Armor
| {{N/A}}
| {{N/A}}
| Yes
| Yes
|-
|-
! Checkpoint 2 and 3
! Checkpoint 2
| 3x Twintacle Octotroopers
| 1x Twintacle Octotrooper
| {{N/A}}
| {{N/A}}
| {{N/A}}
|-
! Checkpoint 3
| 2x Twintacle Octotroopers
| {{N/A}}
| {{N/A}}
| {{N/A}}
| {{N/A}}
Line 58: Line 55:
|-
|-
! Final Checkpoint
! Final Checkpoint
| 2x Kelp Octolings
| 2x Elite Octolings
| 1x Piece of Armor
| 1x Piece of Armor
| 1x Bomb Rush
| 1x Bomb Rush
Line 64: Line 61:
|}
|}


== Beginning ==
===Beginning Area===
2 Spreaders and 3 Octotroopers can be found, 2 of the Octotroopers are riding on the center of the Spreader while the other Octotrooper is riding above the spreader. A Launchpad awaits Agent 3.
Two Spreaders and three Twintacle Octotroopers can be found, two of the Octotroopers are riding on the center of the Spreaders' axles while the other is positioned on the end of the furthest one. Splat the Twintacle Octotroopers as you head for the Launchpad at the end to jump towards the next Checkpoint.


== Checkpoint 1==
===Checkpoint 1===
The first part of this area is getting up a platform, and what's seen is 4 Octocopters and 3 spreaders. Taking out the Octocopters will make getting across the area a lot easier. The Third spreader is covering ink on a wall. Getting up the wall, an Octotrooper can be found guarding a small crate, but it only holds 1 [[Power Egg]]. A Launchpad awaits Agent 3.
The first part of this area is getting across a series of platforms. You are now faced with four Octocopters and three Spreaders. Taking out the Octocopters will make getting across the area a lot easier. But ride one of the ends of the longest Spreader that will take you to a far-off platform containing the mission's Sunken Scroll. Once you collect it, use the Launchpad to return to the main route. When you do ink the steep slope with a short Spreader at the right area to easily get to the top and splat the Twintacle Octotrooper before getting to the Launchpad towards the next Checkpoint.


== Checkpoints 2 and 3 ==
===Checkpoint 2===
'''Checkpoint 2''': Agent 3 is first placed with a large spreader with an Octotrooper sitting on the edge. Then passed that is a 3-armed Spreader. One of the arms holds a line of [[Power Eggs]]
There is now a large one-bar Spreader inking a large platform with a lone Twintacle Octotrooper. Take it out and drop down to a platform below and cross the tri-bar Spreader to reach the next Checkpoint.


'''Checkpoint 3''': Getting up a small tower, a 4-armed Spreader can be found, 2 Octotroopers can be seen guarding the area along with a vault on the other side. One of the Octotroopers holds the key for the Vault. Take down the Certain Octotrooper and open the Vault.
===Checkpoint 3===
When you climb up a narrow wall, there is a four-bar Spreader with two Twintacle Octotroopers positioned on two of its ends. One of them has the Key to the Vault of the far platform. Splat both of them and grab the Key and open the Vault containing the Launchpad leading to the final Checkpoint.


== Final Checkpoint ==
===Final Checkpoint===
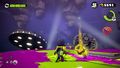
Agent 3 Is now placed in an area holding 4 spreaders. Getting to the area will trigger a fight with 2 Seaweed Octolings. Defeating the second Seaweed Octoling will reveal a key to the vault located in the center of the area. Unlock the vault and it'll reveal an Inkrail. Use the Inkrail and Agent 3 will capture another Zapfish.
Now you are positioned on a large platform with four one-bar Spreaders and a Vault in its center. You are then ambushed by an Elite Octoling. Take it out, which prompts another Elite Octoling to attack. Splatting it will reveal the Key to the Vault. Opening it will reveal a Launchpad sending you to the Zapfish.


''Mission 18 Complete!''
==Collectibles==
 
===Sunken Scroll===
== Collectibles ==
=== Sunken Scroll ===
[[File:Splatoon Sunken Scroll 18.png|center|frameless|300px]]
[[File:Splatoon Sunken Scroll 18.png|center|frameless|300px]]
{{Quote|It's Black Friday every day at the Booyah Base Ultra-Mega-Hyper Sale! Every deal's a doorbuster! If you want to be the FRESHEST squid in Inkopolis, you CANNOT miss this incredible shopportunity!|[[Sunken Scroll]] {{color|18|green}}}}
Line 88: Line 84:


{{Clr}}
{{Clr}}
=== Armor ===
===Armor===
[[File:Spinning Spreaders Checkpoint 1-Armor -1.jpg|left|thumb|300px]]
[[File:Spinning Spreaders Checkpoint 1-Armor -1.jpg|left|thumb|300px]]
'''Location of Armor 1:'''
'''Location of Armor 1:''' This set of Armor is located on a small cylindrical platform to the right of the first Checkpoint.
{{Clr}}
{{Clr}}
[[File:Spinning Spreaders Final Checkpoint-Armor -2.jpg|left|thumb|300px]]
[[File:Spinning Spreaders Final Checkpoint-Armor -2.jpg|left|thumb|300px]]
'''Location of Armor 2:'''
'''Location of Armor 2:''' This set of Armor is located on the Spreader in front of the Vault at the final Checkpoint.
{{Clr}}
{{Clr}}


=== Special Weapon ===
===Special Weapon===
[[File:Spinning Spreaders Final Checkpoint-Bomb Rush.jpg|left|thumb|300px]]
[[File:Spinning Spreaders Final Checkpoint-Bomb Rush.jpg|left|thumb|300px]]
'''Location:'''
'''Location:'''The Canned Bomb Rush is in a crate on top of the axle of the Spreader to the right of the Vault at the final Checkpoint.
{{Clr}}
{{Clr}}


== Quotes ==
==Enemies and Mechanics==
 
===Previously Introduced===
[[File:S Icon Agent 1.png|left|55px]]{{color-link|Agent 1|purple}}:
{{Clr}}
<gallery>
<gallery>
Spinning Spreaders Beginning Area-Agent 1's First Quote.jpg|{{Quote|{{color-link|Spreader|orange}}! Yikes!}}
Twintacle Octotroopers.jpg|[[Twintacle Octotrooper]]
Spinning Spreaders Checkpoint 1-Agent 1's Second Quote.jpg|{{Quote|Smooth Moves!}}
Octocopter1.png|[[Octocopter]]
Spinning Spreaders Checkpoint 2 and 3-Agent 1's Third Quote.jpg|{{Quote|Thar be the {{color-link|key|orange}}, ya bucko!}}
Vault Render.jpeg|[[Vault]] and [[Key]]
Spinning Spreaders Final Checkpoint-Agent 1's Fifth Quote.jpg|{{Quote|One more incoming!}}
Spreader.jpeg|[[Spreader]]
Spinning Spreaders Final Checkpoint-Agent 1's Sixth Quote.jpg|{{Quote|WHOA! That actually sounded like the cap'n!}}
Launchpad Render.jpeg|[[Launchpad]]
Spinning Spreaders Final Checkpoint-Agent 1's Seventh Quote.jpg|{{Quote|{{color-link|Bomb Rush|orange}} ahoy!}}
</gallery>
</gallery>
==Quotes==
{{Collapse|
===[[File:S Icon Agent 1.png|left|55px]] [[Callie|Agent 1]]{{color|'s Quotes|green}}===
{{Clr}}
{{Clr}}
[[File:S Icon Agent 2.png|left|55px]][[Agent 2]]:
|
{{Clr}}
{{Quote|{{color|Spreader|orange}}! Yikes!}}
<gallery>
{{Quote|Smooth Moves!}}
Spinning Spreaders Beginning Area-Agent 2's First Quote.jpg|{{Quote| Whoa! Whoa!}}
{{Quote|Thar be the {{color|key|orange}}, ya bucko!}}
Spinning Spreaders Checkpoint 2 and 3-Agent 2's Second Quote.jpg|{{Quote|Your [[Cap'n Cuttlefish]] impression needs work...}}
{{Quote|One more incoming!}}
Spinning Spreaders Final Checkpoint-Agent 2's Third Quote.jpg|{{Quote|Smells like {{color-link|Octolings|orange}}...}}
{{Quote|WHOA! That actually sounded like the cap'n!}}
Spinning Spreaders Final Checkpoint-Agent 2's Fourth Quote.jpg|{{Quote|Oho! Ya found the {{color-link|key|orange}}!}}
{{Quote|{{color|Bomb Rush|orange}} ahoy!}}
</gallery>
}}
 
{{Collapse|
===[[File:S Icon Agent 2.png|left|55px]] [[Marie|Agent 2]]{{color|'s Quotes|green}}===
{{Clr}}
{{Clr}}
|
{{Quote|Whoa! Whoa!}}
{{Quote|Your Cap'n Cuttlefish impression needs work...}}
{{Quote|Smells like {{color|Octolings|orange}}...}}
{{Quote|Oho! Ya found the {{color|key|orange}}!}}
}}


== Gallery ==
==Gallery==
<gallery>
<gallery>
Octo Valley mission 18 Spinning Spreaders icon.png|Level icon
Octo Valley mission 18 Spinning Spreaders map.png|In-game map
Spinning Spreaders Beginning Area Map.jpg|Spinning Spreaders Beginning Map
Spinning Spreaders Checkpoint 1 Map.jpg|Spinning Spreaders Checkpoint 1 Map
Spinning Spreaders Checkpoints 2 and 3 Map.jpg|Spinning Spreaders Checkpoints 2 and 3 Map
Spinning Spreaders Final Checkpoint Map.jpg|Spinning Spreaders Final Checkpoint Map
Spinning Spreaders Beginning Area-Enemy Octarian.jpg| Spinning Spreaders Beginning Area-Enemy [[Twintacle Octotrooper]]
Spinning Spreaders Beginning Area-Enemy Octarians.jpg|Spinning Spreaders Beginning Area-Enemy Twintacle Octotroopers
Line 140: Line 150:
</gallery>
</gallery>


== Names in other languages ==
==Names in other languages==
{{Foreignname
{{Foreignname
|color=Splatoon
|color=Splatoon

Revision as of 00:00, 17 May 2022

#17: Octosniper Ramparts
Octo Valley missions
#19: Tumbling Splatforms


Template:InfoboxMission Spinning Spreaders is the eighteenth mission in Splatoon's single-player mode, Octo Valley. It gets its name from its heavy use of Spreaders.

Octo Valley

When reaching Area 4, fall down the large pit, behind Agent 3 is more platform. That is where the kettle is to Mission 18.

Gameplay

Walkthrough

Mission Briefing

Spinning Spreaders Stats
Area Enemies Armor Special Weapon Sunken Scroll
Beginning Area 3x Twintacle Octotroopers N/A N/A N/A
Checkpoint 1 4x Octocopters
1x Twintacle Octotrooper
1x Piece of Armor N/A Yes
Checkpoint 2 1x Twintacle Octotrooper N/A N/A N/A
Checkpoint 3 2x Twintacle Octotroopers N/A N/A N/A
Final Checkpoint 2x Elite Octolings 1x Piece of Armor 1x Bomb Rush N/A

Beginning Area

Two Spreaders and three Twintacle Octotroopers can be found, two of the Octotroopers are riding on the center of the Spreaders' axles while the other is positioned on the end of the furthest one. Splat the Twintacle Octotroopers as you head for the Launchpad at the end to jump towards the next Checkpoint.

Checkpoint 1

The first part of this area is getting across a series of platforms. You are now faced with four Octocopters and three Spreaders. Taking out the Octocopters will make getting across the area a lot easier. But ride one of the ends of the longest Spreader that will take you to a far-off platform containing the mission's Sunken Scroll. Once you collect it, use the Launchpad to return to the main route. When you do ink the steep slope with a short Spreader at the right area to easily get to the top and splat the Twintacle Octotrooper before getting to the Launchpad towards the next Checkpoint.

Checkpoint 2

There is now a large one-bar Spreader inking a large platform with a lone Twintacle Octotrooper. Take it out and drop down to a platform below and cross the tri-bar Spreader to reach the next Checkpoint.

Checkpoint 3

When you climb up a narrow wall, there is a four-bar Spreader with two Twintacle Octotroopers positioned on two of its ends. One of them has the Key to the Vault of the far platform. Splat both of them and grab the Key and open the Vault containing the Launchpad leading to the final Checkpoint.

Final Checkpoint

Now you are positioned on a large platform with four one-bar Spreaders and a Vault in its center. You are then ambushed by an Elite Octoling. Take it out, which prompts another Elite Octoling to attack. Splatting it will reveal the Key to the Vault. Opening it will reveal a Launchpad sending you to the Zapfish.

Collectibles

Sunken Scroll

File:Splatoon Sunken Scroll 18.png
It's Black Friday every day at the Booyah Base Ultra-Mega-Hyper Sale! Every deal's a doorbuster! If you want to be the FRESHEST squid in Inkopolis, you CANNOT miss this incredible shopportunity!

Location: At the first checkpoint on a floating platform to the right of the spinning scrubbers. After you reach the first checkpoint, proceed as you usually would until you get to the second set of spinning scrubbers, the longer one. Stand on one of the long scrubbers and ink it. As you ride it you should see the platform with the crate containing the scroll on it. Ink the wall of the platform and jump to it as a squid to collect the scroll.

Armor

Location of Armor 1: This set of Armor is located on a small cylindrical platform to the right of the first Checkpoint.

Location of Armor 2: This set of Armor is located on the Spreader in front of the Vault at the final Checkpoint.

Special Weapon

Location:The Canned Bomb Rush is in a crate on top of the axle of the Spreader to the right of the Vault at the final Checkpoint.

Enemies and Mechanics

Previously Introduced

Quotes

Agent 1's Quotes

Spreader! Yikes!
Smooth Moves!
Thar be the key, ya bucko!
One more incoming!
WHOA! That actually sounded like the cap'n!
Bomb Rush ahoy!

Agent 2's Quotes

Whoa! Whoa!
Your Cap'n Cuttlefish impression needs work...
Smells like Octolings...
Oho! Ya found the key!

Gallery

Names in other languages

Template:Foreignname