Hero Gear: Difference between revisions
(→Trivia) |
(Many minor fixes and changes) |
||
| Line 1: | Line 1: | ||
[[File:S3 promo art 3D new Agent 3 Hero Suit 01.jpg|thumb|The Hero | [[File:S3 promo art 3D new Agent 3 Hero Suit 01.jpg|thumb|The Hero Gear shown at full strength.]] | ||
{{For|the outfits worn in {{S}} and {{S2}}, as well as the clothing worn in [[Return of the Mammalians]] missions that do not use the Hero Gear|Hero Suit}} | {{For|the outfits worn in {{S}} and {{S2}}, as well as the clothing worn in [[Return of the Mammalians]] missions that do not use the Hero Gear|Hero Suit}} | ||
{{quote|A loadout selected from your own Hero Gear.|[[O.R.C.A.]]'s Notes}} | {{quote|A loadout selected from your own Hero Gear.|[[O.R.C.A.]]'s Notes}} | ||
| Line 9: | Line 9: | ||
The Hero Gear consists of the [[Hero Shot]] and [[Smallfry (character)|Smallfry]] by default. It is also equipped with [[Splashdown]], which operates exactly like [[special weapon]]s do in multiplayer matches (i.e. the [[special gauge]] charges as the player inks turf, and the player can use Splashdown with {{Button|Right Stick Click|Switch}} when it is full). Whenever the player obtains a [[canned special]], it temporarily replaces Splashdown and the special gauge is immediately filled. Once the Canned Special is used, the special gauge is reset to zero regardless of any previous charge. | The Hero Gear consists of the [[Hero Shot]] and [[Smallfry (character)|Smallfry]] by default. It is also equipped with [[Splashdown]], which operates exactly like [[special weapon]]s do in multiplayer matches (i.e. the [[special gauge]] charges as the player inks turf, and the player can use Splashdown with {{Button|Right Stick Click|Switch}} when it is full). Whenever the player obtains a [[canned special]], it temporarily replaces Splashdown and the special gauge is immediately filled. Once the Canned Special is used, the special gauge is reset to zero regardless of any previous charge. | ||
While exploring Alterna, the player's Splashdown is replaced with a unique ability that powers up Smallfry with [[Power Eggs]], allowing the player to throw them at a [[Fuzzy Ooze|Fuzzball]] to clean it up. This ability does not need to be charged and there is no limit on its use, although it will fail if the player does not have enough Power Eggs to clean the targeted Fuzzball. A variant of this | While exploring Alterna, the player's Splashdown is replaced with a unique ability that powers up Smallfry with [[Power Eggs]], allowing the player to throw them at a [[Fuzzy Ooze|Fuzzball]] to clean it up. This ability does not need to be charged and there is no limit on its use, although it will fail if the player does not have enough Power Eggs to clean the targeted Fuzzball. A variant of this ability is used during [[Rocket Battle]], requiring [[Golden Eggs]] to activate instead. | ||
==Upgrades== | ==Upgrades== | ||
[[File:S3 Icon Upgrade Point.png|thumb|The icon for an Upgrade Point.]] | [[File:S3 Icon Upgrade Point.png|thumb|The icon for an Upgrade Point.]] | ||
The player can use '''Upgrade Points''' to purchase upgrades that provide bonuses to Agent 3 and Smallfry while the Hero Gear is equipped, as well as the ability to use [[Splat Bomb]]s, [[Burst Bomb]]s and [[Curling Bomb]]s. If more than one type of sub weapon is unlocked (including Smallfry), the player can switch between them | The player can use '''Upgrade Points''' to purchase upgrades that provide bonuses to Agent 3 and Smallfry while the Hero Gear is equipped, as well as the ability to use [[Splat Bomb]]s, [[Burst Bomb]]s and [[Curling Bomb]]s. If more than one type of sub weapon is unlocked (including Smallfry), the player can switch between them using {{Button|DPad|Switch}}. | ||
There are a total of 23 upgrades to purchase, eight of which are duplicates of another upgrade. When an upgrade that has a duplicate is purchased, the description and sometimes the title of its pair will change to become the second level of that upgrade (i.e. "Get Curling Bombs" becomes "Better Curling Bombs".) Some upgrades will change the appearance of Agent 3 or their Hero Shot. Specifically, when both [[#inkres|Ink Resistance Up]] are obtained, the player gets the Hero Boots; when both [[#special|Special Charge Up]] are obtained, the player gets the Hero Mindset; when all bombs are upgraded, the player gets the Hero ink tank; | There are a total of 23 upgrades to purchase, eight of which are duplicates of another upgrade. When an upgrade that has a duplicate is purchased, the description and sometimes the title of its pair will change to become the second level of that upgrade (i.e. "Get Curling Bombs" becomes "Better Curling Bombs".) Some upgrades will change the appearance of Agent 3 or their Hero Shot. Specifically, when both [[#inkres|Ink Resistance Up]] are obtained, the player gets the Hero Boots; when both [[#special|Special Charge Up]] are obtained, the player gets the Hero Mindset; when all bombs are upgraded, the player gets the Hero [[Ink tank|ink tank]]; when both [[#inktank|Ink-Tank Capacity Up]] and [[#suit|Suit Recovery Up]] are obtained, the player gets the Hero Suit; and when each [[#heroshot|Hero Shot upgrade]] is obtained, the Hero Shot will progressively change its appearance. | ||
Most upgrades must be unlocked using [[Sardinium]] before they can be purchased. A maximum of 99 Upgrade Points can be earned, which is exactly enough to purchase every possible upgrade when paired with the 27 pieces of Sardinium available in Alterna. The player can reset the Hero Gear at any time, relocking all upgrades and refunding all spent Upgrade Points and Sardinium. Upgrade Points are earned by inking the ground, using Smallfry to clear | Most upgrades must be unlocked using [[Sardinium]] before they can be purchased. A maximum of 99 Upgrade Points can be earned, which is exactly enough to purchase every possible upgrade when paired with the 27 pieces of Sardinium available in Alterna. The player can reset the Hero Gear at any time, relocking all upgrades and refunding all spent Upgrade Points and Sardinium. Upgrade Points are earned by inking the ground, using Smallfry to clear Fuzzy Ooze, and finding items throughout Alterna. | ||
Upgrades have no effect while the player is not equipped with the Hero Gear. | Upgrades have no effect while the player is not equipped with the Hero Gear. | ||
| Line 23: | Line 23: | ||
===Upgrade order=== | ===Upgrade order=== | ||
[[File:Hero Gear Upgrade Tree Complete Inkling.jpg|thumb|The Hero Gear upgrading screen after all upgrades are unlocked as it appears for [[Inkling]] Agent 3.]] | [[File:Hero Gear Upgrade Tree Complete Inkling.jpg|thumb|The Hero Gear upgrading screen after all upgrades are unlocked as it appears for [[Inkling]] Agent 3.]] | ||
The first group of upgrades is behind a lock that costs 1 | The first group of upgrades is behind a lock that costs 1 Sardinium. Unlocking it grants access to [[#fryhp|Smallfry HP Up]] (which costs 1 Upgrade Point) and the first Special Charge Up (also 1 Upgrade Point). | ||
The second group of upgrades is behind a 1 Sardinium lock as well. Unlocking the block grants access to the first | The second group of upgrades is behind a 1 Sardinium lock as well. Unlocking the block grants access to the first Ink Resistance Up (3 Points), Hero Shot upgrade (2 Points) and Ink-Tank Capacity Up (3 Points). | ||
The third group of upgrades is split into 3 horizontal rows that cost 3 Sardinium each, as well as 2 single locks on the top and bottom that only cost 1 Sardinium each. Unlocking the top row will grant access to [[#fryink|Smallfry Ink Saver]] (3 Points) and the second Ink Resistance Up (4 Points). The top single lock contains the second Ink-Tank Capacity Up (4 Points), which is blocking the second Special Charge Up (5 Points).<br> | The third group of upgrades is split into 3 horizontal rows that cost 3 Sardinium each, as well as 2 single locks on the top and bottom that only cost 1 Sardinium each. Unlocking the top row will grant access to [[#fryink|Smallfry Ink Saver]] (3 Points) and the second Ink Resistance Up (4 Points). The top single lock contains the second Ink-Tank Capacity Up (4 Points), which is blocking the second Special Charge Up (5 Points).<br> | ||
Unlocking the middle row will grant access [[#splat|Splat Bombs]] (3 Points) and the first [[#sensor|Sensor]] (4 Points). Unlocking the bottom row will grant access to the first | Unlocking the middle row will grant access to [[#splat|Splat Bombs]] (3 Points) and the first [[#sensor|Sensor]] (4 Points). Unlocking the bottom row will grant access to the first Suit Recovery Up (3 Points) and [[#ninja|Ninja Squid]] (4 Points). The bottom single lock contains Splat Bombs (4 Points), which are blocking [[#fryrespawn|Smallfry Quick Respawn]] (5 Points). | ||
The fourth group of upgrades | The fourth group of upgrades are behind a lock that costs 4 Sardinium. Unlocking it grants access to the second Hero Shot upgrade (8 Points), as well as [[#curling|Curling Bombs]] and [[#burst|Burst Bombs]] (both 5 Points), which are blocking their respective upgrade nodes (also both 5 Points). | ||
The final group of upgrades has two locks that both cost 5 Sardinium. The first one contains the second Suit Recovery Up and Sensor (both 6 Points). The second and final lock contains [[#frydmg|Smallfry Damage Up]] (10 Points). | The final group of upgrades has two locks that both cost 5 Sardinium. The first one contains the second Suit Recovery Up and Sensor (both 6 Points). The second and final lock contains [[#frydmg|Smallfry Damage Up]] (10 Points). | ||
| Line 202: | Line 202: | ||
<span id="heroshot">[[File:S3 Upgrade Better Hero Shot.png|24px|link=#heroshot2]] '''Better Hero Shot''' / '''Even Better Hero Shot'''</span> | <span id="heroshot">[[File:S3 Upgrade Better Hero Shot.png|24px|link=#heroshot2]] '''Better Hero Shot''' / '''Even Better Hero Shot'''</span> | ||
* 1st: "Increases the | * 1st: "Increases the Hero Shot's rate of fire." | ||
* 2nd: "Further increases the Hero Shot's rate of fire." | * 2nd: "Further increases the Hero Shot's rate of fire." | ||
<span id="sensor">[[File:S3 Upgrade Get Sensor.png|24px|link=#sensor2]] '''Get Sensor''' / '''Better Sensor'''</span> | <span id="sensor">[[File:S3 Upgrade Get Sensor.png|24px|link=#sensor2]] '''Get Sensor''' / '''Better Sensor'''</span> | ||
| Line 212: | Line 211: | ||
<span id="burst">[[File:S3 Upgrade Get Burst Bombs.png|24px|link=#burst2]] '''Get Burst Bombs''' / '''Better Burst Bombs'''</span> | <span id="burst">[[File:S3 Upgrade Get Burst Bombs.png|24px|link=#burst2]] '''Get Burst Bombs''' / '''Better Burst Bombs'''</span> | ||
* 1st: "Gain access to bombs that explode as soon as they touch something." | * 1st: "Gain access to bombs that explode as soon as they touch something." | ||
* 2nd: "Decreases amount of ink consumed by | * 2nd: "Decreases amount of ink consumed by Burst Bombs." | ||
<span id="curling">[[File:S3 Upgrade Get Curling Bombs.png|24px|link=#curling2]] '''Get Curling Bombs''' / '''Better Curling Bombs'''</span> | <span id="curling">[[File:S3 Upgrade Get Curling Bombs.png|24px|link=#curling2]] '''Get Curling Bombs''' / '''Better Curling Bombs'''</span> | ||
* 1st: "Gain access to bombs that ink the floor in a straight line before they explode." | * 1st: "Gain access to bombs that ink the floor in a straight line before they explode." | ||
* 2nd: "Decreases amount of ink consumed by | * 2nd: "Decreases amount of ink consumed by Curling Bombs." | ||
<span id="splat">[[File:S3 Upgrade Get Splat Bombs.png|24px|link=#splat2]] '''Get Splat Bombs''' / '''Better Splat Bombs'''</span> | <span id="splat">[[File:S3 Upgrade Get Splat Bombs.png|24px|link=#splat2]] '''Get Splat Bombs''' / '''Better Splat Bombs'''</span> | ||
* 1st: "Gain access to bombs that explode a short time after they land." | * 1st: "Gain access to bombs that explode a short time after they land." | ||
* 2nd: "Decreases amount of ink consumed by | * 2nd: "Decreases amount of ink consumed by Splat Bombs." | ||
<span id="inkres">[[File:S3 Upgrade Ink Resistance Up.png|24px|link=#inkres2]] '''[[Ink Resistance Up]]'''</span> | <span id="inkres">[[File:S3 Upgrade Ink Resistance Up.png|24px|link=#inkres2]] '''[[Ink Resistance Up]]'''</span> | ||
| Line 227: | Line 226: | ||
<span id="inktank">[[File:S3 Upgrade Ink-Tank Capacity Up.png|24px|link=#inktank2]] '''Ink-Tank Capacity Up'''</span> | <span id="inktank">[[File:S3 Upgrade Ink-Tank Capacity Up.png|24px|link=#inktank2]] '''Ink-Tank Capacity Up'''</span> | ||
* 1st: "Increases your | * 1st: "Increases your Ink Tank's capacity." | ||
* 2nd: "Further increases your Ink Tank's capacity." | * 2nd: "Further increases your Ink Tank's capacity." | ||
| Line 234: | Line 233: | ||
<span id="frydmg">[[File:S3 Upgrade Smallfry Damage Up.png|24px|link=#frydmg2]] '''Smallfry Damage Up'''</span> | <span id="frydmg">[[File:S3 Upgrade Smallfry Damage Up.png|24px|link=#frydmg2]] '''Smallfry Damage Up'''</span> | ||
* "Increases damage dealt by | * "Increases damage dealt by Smallfry." | ||
<span id="fryhp">[[File:S3 Upgrade Smallfry HP Up.png|24px|link=#fryhp2]] '''Smallfry HP Up''' | <span id="fryhp">[[File:S3 Upgrade Smallfry HP Up.png|24px|link=#fryhp2]] '''Smallfry HP Up''' | ||
| Line 257: | Line 256: | ||
== Gallery == | == Gallery == | ||
<gallery> | <gallery> | ||
File:Hero Gear Upgrade Tree Complete Octoling.jpg|The | File:Hero Gear Upgrade Tree Complete Octoling.jpg|The Hero Gear upgrading screen after all upgrades are unlocked as it appears for [[Octoling (playable)|Octoling]] Agent 3. | ||
File:RoTM Hero Gear Upgrade screen.jpg| | File:RoTM Hero Gear Upgrade screen.jpg|A mostly completed upgrade screen. | ||
File:Hero | File:S3 Hero Gear.jpg|Agent 3 with fully restored Hero Gear. | ||
File: | File:Hero-gear.png|Agent 3 with partially restored Hero Gear. | ||
File:S3 Hero Mode Sloshing Machine.png|Rear view | File:S3 Hero Mode Sloshing Machine.png|Rear view | ||
File:Space | File:Space Hero Gear.png|The unique Hero Gear given to Agent 3 before [[Rocket Battle]]. | ||
File:Space-Hear Gear(rear).png|Rear | File:Space-Hear Gear(rear).png|Rear view | ||
File:Space Hero Gear.png | File:Space-Hero Gear.png|Side view | ||
</gallery> | </gallery> | ||
Revision as of 17:06, 2 May 2023
- For the outfits worn in Splatoon and Splatoon 2, as well as the clothing worn in Return of the Mammalians missions that do not use the Hero Gear, see Hero Suit.
| “ | A loadout selected from your own Hero Gear. | ” |
— O.R.C.A.'s Notes
| ||
The Hero Gear is the set of equipment used by Agent 3 while exploring Alterna, and is also present as a weapon option for golden kettles.
Description
The Hero Gear consists of the Hero Shot and Smallfry by default. It is also equipped with Splashdown, which operates exactly like special weapons do in multiplayer matches (i.e. the special gauge charges as the player inks turf, and the player can use Splashdown with when it is full). Whenever the player obtains a canned special, it temporarily replaces Splashdown and the special gauge is immediately filled. Once the Canned Special is used, the special gauge is reset to zero regardless of any previous charge.
While exploring Alterna, the player's Splashdown is replaced with a unique ability that powers up Smallfry with Power Eggs, allowing the player to throw them at a Fuzzball to clean it up. This ability does not need to be charged and there is no limit on its use, although it will fail if the player does not have enough Power Eggs to clean the targeted Fuzzball. A variant of this ability is used during Rocket Battle, requiring Golden Eggs to activate instead.
Upgrades
The player can use Upgrade Points to purchase upgrades that provide bonuses to Agent 3 and Smallfry while the Hero Gear is equipped, as well as the ability to use Splat Bombs, Burst Bombs and Curling Bombs. If more than one type of sub weapon is unlocked (including Smallfry), the player can switch between them using .
There are a total of 23 upgrades to purchase, eight of which are duplicates of another upgrade. When an upgrade that has a duplicate is purchased, the description and sometimes the title of its pair will change to become the second level of that upgrade (i.e. "Get Curling Bombs" becomes "Better Curling Bombs".) Some upgrades will change the appearance of Agent 3 or their Hero Shot. Specifically, when both Ink Resistance Up are obtained, the player gets the Hero Boots; when both Special Charge Up are obtained, the player gets the Hero Mindset; when all bombs are upgraded, the player gets the Hero ink tank; when both Ink-Tank Capacity Up and Suit Recovery Up are obtained, the player gets the Hero Suit; and when each Hero Shot upgrade is obtained, the Hero Shot will progressively change its appearance.
Most upgrades must be unlocked using Sardinium before they can be purchased. A maximum of 99 Upgrade Points can be earned, which is exactly enough to purchase every possible upgrade when paired with the 27 pieces of Sardinium available in Alterna. The player can reset the Hero Gear at any time, relocking all upgrades and refunding all spent Upgrade Points and Sardinium. Upgrade Points are earned by inking the ground, using Smallfry to clear Fuzzy Ooze, and finding items throughout Alterna.
Upgrades have no effect while the player is not equipped with the Hero Gear.
Upgrade order
The first group of upgrades is behind a lock that costs 1 Sardinium. Unlocking it grants access to Smallfry HP Up (which costs 1 Upgrade Point) and the first Special Charge Up (also 1 Upgrade Point).
The second group of upgrades is behind a 1 Sardinium lock as well. Unlocking the block grants access to the first Ink Resistance Up (3 Points), Hero Shot upgrade (2 Points) and Ink-Tank Capacity Up (3 Points).
The third group of upgrades is split into 3 horizontal rows that cost 3 Sardinium each, as well as 2 single locks on the top and bottom that only cost 1 Sardinium each. Unlocking the top row will grant access to Smallfry Ink Saver (3 Points) and the second Ink Resistance Up (4 Points). The top single lock contains the second Ink-Tank Capacity Up (4 Points), which is blocking the second Special Charge Up (5 Points).
Unlocking the middle row will grant access to Splat Bombs (3 Points) and the first Sensor (4 Points). Unlocking the bottom row will grant access to the first Suit Recovery Up (3 Points) and Ninja Squid (4 Points). The bottom single lock contains Splat Bombs (4 Points), which are blocking Smallfry Quick Respawn (5 Points).
The fourth group of upgrades are behind a lock that costs 4 Sardinium. Unlocking it grants access to the second Hero Shot upgrade (8 Points), as well as Curling Bombs and Burst Bombs (both 5 Points), which are blocking their respective upgrade nodes (also both 5 Points).
The final group of upgrades has two locks that both cost 5 Sardinium. The first one contains the second Suit Recovery Up and Sensor (both 6 Points). The second and final lock contains Smallfry Damage Up (10 Points).
1 |
3 |
1 | ||||||||
4 |
||||||||||
5 |
||||||||||
Unlockable skills
![]() Better Hero Shot / Even Better Hero Shot
Better Hero Shot / Even Better Hero Shot
- 1st: "Increases the Hero Shot's rate of fire."
- 2nd: "Further increases the Hero Shot's rate of fire."
![]() Get Sensor / Better Sensor
Get Sensor / Better Sensor
- 1st: "Automatically marks nearby items and enemies while you're submerged in ink."
- 2nd: "Automatically marks objects, even in kid form. The scan reaches a bit further while submerged in ink."
![]() Get Burst Bombs / Better Burst Bombs
Get Burst Bombs / Better Burst Bombs
- 1st: "Gain access to bombs that explode as soon as they touch something."
- 2nd: "Decreases amount of ink consumed by Burst Bombs."
![]() Get Curling Bombs / Better Curling Bombs
Get Curling Bombs / Better Curling Bombs
- 1st: "Gain access to bombs that ink the floor in a straight line before they explode."
- 2nd: "Decreases amount of ink consumed by Curling Bombs."
![]() Get Splat Bombs / Better Splat Bombs
Get Splat Bombs / Better Splat Bombs
- 1st: "Gain access to bombs that explode a short time after they land."
- 2nd: "Decreases amount of ink consumed by Splat Bombs."
- 1st: "Improves mobility when walking through enemy ink."
- 2nd: "Further improves mobility when walking through enemy ink."
![]() Ink-Tank Capacity Up
Ink-Tank Capacity Up
- 1st: "Increases your Ink Tank's capacity."
- 2nd: "Further increases your Ink Tank's capacity."
- "Become less visible while swimming through ink."
![]() Smallfry Damage Up
Smallfry Damage Up
- "Increases damage dealt by Smallfry."
![]() Smallfry HP Up
Smallfry HP Up
- "Increases Smallfry's overall health."
This allows Smallfry to take more damage from enemy attacks before being splatted.
![]() Smallfry Ink Saver
Smallfry Ink Saver
- "Decreases amount of ink consumed when throwing Smallfry."
![]() Smallfry Quick Respawn
Smallfry Quick Respawn
- "Reduces Smallfry's respawn time."
This reduces the amount of time that Smallfry takes to recover from being splatted.
- 1st: "Increases the rate at which the special gauge fills."
- 2nd: "Further increases the rate at which the special gauge fills."
![]() Suit Recovery Up
Suit Recovery Up
- 1st: "Increases the recovery rate of your suit after it's broken by enemy ink."
- 2nd: "Further increases the recovery rate of your suit after it's broken by enemy ink."
Gallery
-
The Hero Gear upgrading screen after all upgrades are unlocked as it appears for Octoling Agent 3.
-
A mostly completed upgrade screen.
-
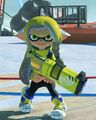
Agent 3 with fully restored Hero Gear.
-
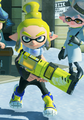
Agent 3 with partially restored Hero Gear.
-
Rear view
-
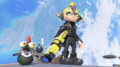
The unique Hero Gear given to Agent 3 before Rocket Battle.
-
Rear view
-

Side view


Trivia
- The Upgrade Point's icon closely resembles the Cuttlegear logo.
- If an upgrade has two instances and neither have been bought yet, hovering over either icon with the cursor only makes the first description show on both. However, after buying one of the instances, the first description is bound to that icon and only shows when hovering over it specifically, while the second description only appears over the other icon.
Names in other languages
- Hero Gear
- Upgrade Point

.png)