Flooder Junkyard: Difference between revisions
m (Updating Sunken Scroll links. AWB edit.) |
GloverMist (talk | contribs) (Starting cleanup, not finished.) |
||
| Line 1: | Line 1: | ||
{{OctoValleyPrevNext | prevnum=11 | nextnum=13 | prev=Inkvisible Avenues | next=Shifting Splatforms }} | {{OctoValleyPrevNext| prevnum=11| nextnum=13| prev=Inkvisible Avenues| next=Shifting Splatforms}} | ||
{{InfoboxMission | {{InfoboxMission | ||
|subtitle = Renegade Robots | |subtitle = Renegade Robots | ||
| Line 11: | Line 10: | ||
|image = Hm m12.jpg | |image = Hm m12.jpg | ||
}} | }} | ||
'''Flooder Junkyard''' is the twelfth mission available in {{S'}} single-player [[mode]], [[Octo Valley (mode)|Octo Valley]]. The mission is named as such because of its heavy use of [[Flooder]]s. | |||
==Octo Valley== | |||
[[File:Mission12Kettle.jpg|300px|thumb|left]] | |||
Use the same path that you used to reach Mission 10. As you reach [[Area 3]], head right, and there are two steep ramps. Use the ramps and jump on the platform, then go right. [[Ink]] the wall and use it to reach the higher platform. Also, an [[Inkrail]] can be found near a small wall. Climb up the wall to reveal the hidden [[Kettle]] leading to Mission 12. | |||
==Gameplay== | ==Gameplay== | ||
<embedvideo service="youtube">https://www.youtube.com/watch?v=-TX_WMlcbqA</embedvideo> | <embedvideo service="youtube">https://www.youtube.com/watch?v=-TX_WMlcbqA</embedvideo> | ||
== Walkthrough == | ==Walkthrough== | ||
===Map=== | |||
=== Map === | |||
<gallery mode=packed> | <gallery mode=packed> | ||
Flooder Junkyard Beginning Area and Checkpoint 1 Map.jpg| | Flooder Junkyard Beginning Area and Checkpoint 1 Map.jpg|Beginning area and Checkpoint 1 map. | ||
Flooder Junkyard Checkpoint 2 Map and Zapfish Location.jpg| | Flooder Junkyard Checkpoint 2 Map and Zapfish Location.jpg|Checkpoint 2 map and [[Zapfish]] location. | ||
Flooder Junkyard Checkpoint 3 Map.jpg| | Flooder Junkyard Checkpoint 3 Map.jpg|Checkpoint 3 map. | ||
Flooder Junkyard Checkpoint 4 Map.jpg| | Flooder Junkyard Checkpoint 4 Map.jpg|Checkpoint 4 map. | ||
</gallery> | </gallery> | ||
=== Mission | ===Mission briefing=== | ||
{{color|'''Mission Objective Alpha'''|orange}}: Navigate through Flooder Junkyard and retrieve the octonapped [[Zapfish]]. This mission requires quite a bit of backtracking, so be on guard. | {{color|'''Mission Objective Alpha'''|orange}}: Navigate through Flooder Junkyard and retrieve the octonapped [[Zapfish]]. This mission requires quite a bit of backtracking, so be on guard. | ||
{{color|'''Mission Objective Bravo'''|blue}}: Locate and retrieve the [[Sunken Scroll]]. | {{color|'''Mission Objective Bravo'''|blue}}: Locate and retrieve the [[Sunken Scroll]]. | ||
'''Recommended | '''Recommended weapons''': [[Hero Shot]] and [[Seeker]]s | ||
{| class="wikitable sitecolor-s" style="margin: auto;" | {| class="wikitable sitecolor-s" style="margin: auto;" | ||
|+ Flooder Junkyard Stats | |+ Flooder Junkyard Stats | ||
| Line 42: | Line 39: | ||
! Enemies | ! Enemies | ||
! Armor | ! Armor | ||
!Special | !Special weapon | ||
!Sunken Scroll | !Sunken Scroll | ||
|- | |- | ||
! Beginning | ! Beginning area/Checkpoint 1 | ||
| 2x | | 2x [[Flooder]]s | ||
| {{N/A}} | | {{N/A}} | ||
| {{N/A}} | | {{N/A}} | ||
| Line 58: | Line 55: | ||
|- | |- | ||
! Checkpoint 3 | ! Checkpoint 3 | ||
| 5x Twintacle | | 5x Twintacle [[Octodiver]]s | ||
2x Twintacle | 2x [[Twintacle Octotrooper]]s | ||
| 1x Piece of | | 1x Piece of [[armor]] | ||
| {{N/A}} | | {{N/A}} | ||
| {{N/A}} | | {{N/A}} | ||
|- | |- | ||
! Checkpoint 4 | ! Checkpoint 4 | ||
| 1x Octodiver | | 1x [[Octodiver]] | ||
| {{N/A}} | | {{N/A}} | ||
| {{N/A}} | | {{N/A}} | ||
| Line 71: | Line 68: | ||
|} | |} | ||
=== Mechanics === | ===Mechanics=== | ||
* [[Vault]]s are used at Checkpoints 1, 3, and 4. They are usually found within [[Flooder]] mazes. [[Key]]s are also found here. They are also found within Flooder mazes and are usually guarded by [[Octodiver]]s, but can also be found unattended. | |||
*[[Vault]]s are used at | * There are three sets of [[Inkrail]]s found in this mission. The first Inkrail is located on the far left platform of Checkpoint 2 and leads to Checkpoint 3. The second is located on the far right platform of Checkpoint 2 and leads to the [[List of Sunken Scrolls in Splatoon#Scroll 12|Sunken Scroll 12]]. The third and final Inkrail can be found at the end of the Flooder maze at Checkpoint 4 and leads to the [[Zapfish]] located on the upper portion of Checkpoint 2. | ||
* A single [[propeller]] lift is found near the exit of Checkpoint 3. | |||
*There are three sets of [[Inkrail]]s found in this | |||
{{collapse| | {{collapse| | ||
=== Mechanics | ===Mechanics gallery=== | ||
| | | | ||
<gallery | <gallery> | ||
Flooder Junkyard Beginning Area-Vault -1.jpg| | Flooder Junkyard Beginning Area-Vault -1.jpg|Beginning Area - [[Vault]] #1 | ||
Flooder Junkyard Beginning Area-Vault Key -1.jpg| | Flooder Junkyard Beginning Area-Vault Key -1.jpg|Beginning Area - [[Key]] #1 | ||
Flooder Junkyard- Inkrails and a Flooder.jpg| | Flooder Junkyard- Inkrails and a Flooder.jpg|[[Inkrail]]s and a [[Flooder]]. | ||
Flooder Junkyard Checkpoint 3-Vault -2.jpg| | Flooder Junkyard Checkpoint 3-Vault -2.jpg|Checkpoint 3 - Vault #2 | ||
Flooder Junkyard Checkpoint 3-Vault Key -2.jpg| | Flooder Junkyard Checkpoint 3-Vault Key -2.jpg|Checkpoint 3 - Key #2 | ||
Flooder Junkyard Checkpoint 4-Vault -3.jpg| | Flooder Junkyard Checkpoint 4-Vault -3.jpg|Checkpoint 4 - Vault #3 | ||
Flooder Junkyard Checkpoint 4-Vault Key -3.jpg| | Flooder Junkyard Checkpoint 4-Vault Key -3.jpg|Checkpoint 4 - Key #3 | ||
Flooder Junkyard Checkpoint 4-Deactivated Inkrail.jpg|Checkpoint 4 - deactivated Inkrail. | |||
Flooder Junkyard Checkpoint 4 Activated Inkrail.jpg|Checkpoint 4 - activated Inkrail. | |||
Flooder Junkyard Checkpoint 4-Deactivated Inkrail.jpg| | |||
Flooder Junkyard Checkpoint 4 Activated Inkrail.jpg| | |||
</gallery> | </gallery> | ||
}} | }} | ||
== Beginning | ===Beginning area/Checkpoint 1=== | ||
'''Beginning | '''Beginning area''': After taking the [[Launchpad]], you will face off against two [[Flooder]]s, which cannot be destroyed. The [[key]] to the [[vault]] can be found on the left side of the area which the Flooders are patrolling. | ||
'''Checkpoint 1''': You will be placed in another area being guarded by two Flooders. Get to the other side and an [[Inkrail]] will be found. If you take the Inkrail to the end, there will be a [[crate]] holding lots of [[Power Egg]]s. | |||
'''Checkpoint | ===Checkpoints 2 and 3=== | ||
'''Checkpoint 2''': Break the normal crates to the right to reveal an iron bar. Going through the bars will continue the mission. A locked Vault can be found and the key can be found past the next checkpoint. | |||
'''Checkpoint 3''': Ignoring the Vault, heading into an area full of crates, you have to look for the key. The key is located on the right side of a back corner. You will also have to brush off a few [[Octodiver]]s while trying to get the key. When the key is collected, head back to the checkpoint and unlock the vault. The vault reveals a platform with a [[propeller]] lift that will elevate you to an area with two [[Octotrooper]]s guarding a Launchpad. You are not required to splat the Octotroopers to reveal the Launchpad. | |||
'''Checkpoint | |||
===Final checkpoint=== | |||
You will now be placed in a larger area in which five Flooders are guarding. There is a locked vault on the other side. A key is held by an Octodiver, so take it down and the Key will be revealed. Be cautious though, as Flooders will still chase you. Getting to the vault, it will reveal an Inkrail. Take the Inkrail and it will lead you to the Zapfish. | |||
''Mission 12 completed!'' | |||
''Mission 12 | |||
==Collectibles== | ==Collectibles== | ||
===Sunken Scroll=== | |||
[[File:Sunkenscroll12.png|frameless|center|Sunken Scroll 12]] | |||
{{Quote|The first battles of the Great War ended in victory for the Octarian forces. The diligent Octarians easily dominated the Inklings, who were unable to wake up early enough in the morning to defend themselves.|[[Sunken Scroll]] {{color|12|green}}}} | |||
[[File:Flooder Junkyard Checkpoint 2-Sunken Scroll Location.jpg|thumb|left|300px]] | |||
[[File: | |||
'''Location''': At the second checkpoint, under the platform with the [[Inkrail]]. When you hit the first checkpoint, proceed like you normally would until you reach the platform with the Inkrail leading to the next area. Instead of using the Inkrail, drop to a platform beneath the one with the Inkrail (there is no lip to land on, so angle yourself inward). The scroll will be there along with a second Inkrail. | |||
Alternatively you can get to the | Alternatively, you can get to the Sunken Scroll by going to the second platform and then shooting the Inkrail on the platform underneath the first platform. Use this Inkrail to swim to the Sunken Scroll. | ||
=== Armor === | ===Armor=== | ||
[[File:Flooder Junkyard Checkpoint 3-Armor.jpg| | [[File:Flooder Junkyard Checkpoint 3-Armor.jpg|thumb|left|300px|Checkpoint 3 - armor.]] | ||
'''Location''': | |||
[[File:Cap'n Cuttlefish Icon.png|left|55px]] [[Cap'n Cuttlefish ]]: | ==Quotes== | ||
[[File:Cap'n Cuttlefish Icon.png|left|55px]] [[Cap'n Cuttlefish]]: | |||
{{clr}} | {{clr}} | ||
<gallery> | <gallery> | ||
| Line 156: | Line 151: | ||
== Trivia == | == Trivia == | ||
*The last platform with the [[Zapfish]] is shaped like a giant flooder. This is the same | *The last platform with the [[Zapfish]] is shaped like a giant flooder. This is the same as [[Far-Flung Flooders]] in [[Area 5]]. | ||
== Names in other languages == | == Names in other languages == | ||
Revision as of 19:33, 14 November 2019
|
|
|
Template:InfoboxMission Flooder Junkyard is the twelfth mission available in Template:S' single-player mode, Octo Valley. The mission is named as such because of its heavy use of Flooders.
Octo Valley
Use the same path that you used to reach Mission 10. As you reach Area 3, head right, and there are two steep ramps. Use the ramps and jump on the platform, then go right. Ink the wall and use it to reach the higher platform. Also, an Inkrail can be found near a small wall. Climb up the wall to reveal the hidden Kettle leading to Mission 12.
Gameplay
Walkthrough
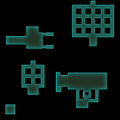
Map
-
Beginning area and Checkpoint 1 map.
-
Checkpoint 2 map and Zapfish location.
-
Checkpoint 3 map.
-
Checkpoint 4 map.
Mission briefing
Mission Objective Alpha: Navigate through Flooder Junkyard and retrieve the octonapped Zapfish. This mission requires quite a bit of backtracking, so be on guard. Mission Objective Bravo: Locate and retrieve the Sunken Scroll.
Recommended weapons: Hero Shot and Seekers
| Area | Enemies | Armor | Special weapon | Sunken Scroll |
|---|---|---|---|---|
| Beginning area/Checkpoint 1 | 2x Flooders | N/A | N/A | N/A |
| Checkpoint 2 | 2x Flooders | N/A | N/A | Yes |
| Checkpoint 3 | 5x Twintacle Octodivers | 1x Piece of armor | N/A | N/A |
| Checkpoint 4 | 1x Octodiver | N/A | N/A | N/A |
Mechanics
- Vaults are used at Checkpoints 1, 3, and 4. They are usually found within Flooder mazes. Keys are also found here. They are also found within Flooder mazes and are usually guarded by Octodivers, but can also be found unattended.
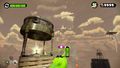
- There are three sets of Inkrails found in this mission. The first Inkrail is located on the far left platform of Checkpoint 2 and leads to Checkpoint 3. The second is located on the far right platform of Checkpoint 2 and leads to the Sunken Scroll 12. The third and final Inkrail can be found at the end of the Flooder maze at Checkpoint 4 and leads to the Zapfish located on the upper portion of Checkpoint 2.
- A single propeller lift is found near the exit of Checkpoint 3.
Mechanics gallery


Beginning area/Checkpoint 1
Beginning area: After taking the Launchpad, you will face off against two Flooders, which cannot be destroyed. The key to the vault can be found on the left side of the area which the Flooders are patrolling.
Checkpoint 1: You will be placed in another area being guarded by two Flooders. Get to the other side and an Inkrail will be found. If you take the Inkrail to the end, there will be a crate holding lots of Power Eggs.
Checkpoints 2 and 3
Checkpoint 2: Break the normal crates to the right to reveal an iron bar. Going through the bars will continue the mission. A locked Vault can be found and the key can be found past the next checkpoint.
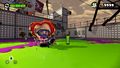
Checkpoint 3: Ignoring the Vault, heading into an area full of crates, you have to look for the key. The key is located on the right side of a back corner. You will also have to brush off a few Octodivers while trying to get the key. When the key is collected, head back to the checkpoint and unlock the vault. The vault reveals a platform with a propeller lift that will elevate you to an area with two Octotroopers guarding a Launchpad. You are not required to splat the Octotroopers to reveal the Launchpad.
Final checkpoint
You will now be placed in a larger area in which five Flooders are guarding. There is a locked vault on the other side. A key is held by an Octodiver, so take it down and the Key will be revealed. Be cautious though, as Flooders will still chase you. Getting to the vault, it will reveal an Inkrail. Take the Inkrail and it will lead you to the Zapfish.
Mission 12 completed!
Collectibles
Sunken Scroll
| “ | The first battles of the Great War ended in victory for the Octarian forces. The diligent Octarians easily dominated the Inklings, who were unable to wake up early enough in the morning to defend themselves. | ” |
— Sunken Scroll 12
| ||

Location: At the second checkpoint, under the platform with the Inkrail. When you hit the first checkpoint, proceed like you normally would until you reach the platform with the Inkrail leading to the next area. Instead of using the Inkrail, drop to a platform beneath the one with the Inkrail (there is no lip to land on, so angle yourself inward). The scroll will be there along with a second Inkrail.
Alternatively, you can get to the Sunken Scroll by going to the second platform and then shooting the Inkrail on the platform underneath the first platform. Use this Inkrail to swim to the Sunken Scroll.
Armor

Location:
Quotes
-
“ Flooders... These things can't be destroyed. ” -
“ Check the location of enemies and keys with  .
.
” -
“ Oho! You found the key! ” -
“ One of the Octarians probably has the key. Find it with the !
” -
“ Oho! You found the key! ” -
“ Thar she blows!  Zapfish dead ahead!
”
Gallery
-
Level icon
-
In-game map
-

Flooder Junkyard Beginning Area-Flooder
-
Flooder Junkyard Checkpoint 3-Enemy Twintacle Octodiver
-
Flooder Junkyard Checkpoint 3-Inked Enemy Twintacle Octodiver
-
Flooder Junkyard Checkpoint 3-Glaring Twintacle Octodiver
-
Flooder Junkyard Checkpoint 3-Enemy Twintacle Octodivers
-
Flooder Junkyard Checkpoint 3-Enemy Twintacle Octotroopers
-
Flooder Junkyard Checkpoint 4-Enemy Octodiver
-
Flooder Junkyard Giant Flooder
-
Flooder Junkyard Mission End


Trivia
- The last platform with the Zapfish is shaped like a giant flooder. This is the same as Far-Flung Flooders in Area 5.
