Inner Agent 3: Difference between revisions
(Undo revision 249388 by Kirbeat (talk) Adding "the" would make sense if it just said locker, but it says locker 8 so adding "the" doesn't work.) Tag: Undo |
(Lots of small edits, plus a redirect at the top.) |
||
| Line 1: | Line 1: | ||
{{OctoExpansionPrevNext|line1=A|prev1=Central Station|prevnum1=00|next1=|nextnum1=}} | ''For the fight that takes place in the initial escape phases, see [[Spinal Phase]].''{{OctoExpansionPrevNext|line1=A|prev1=Central Station|prevnum1=00|next1=|nextnum1=}} | ||
{{InfoboxMission/OctoExpansion | {{InfoboxMission/OctoExpansion | ||
|subtitle = | |subtitle = | ||
| Line 13: | Line 13: | ||
==Gameplay== | ==Gameplay== | ||
Inner Agent 3 behaves like the [[Agent 3]] battle in the [[Spinal Phase]], but [[Agent 3]] has significantly increased health, accuracy, and aggressiveness; the arena itself is also much smaller and the walls and cover present cannot be inked. | |||
In all phases of the fight, Inner Agent 3 is equipped with the [[Hero Shot]] as their [[main weapon]] and [[Autobomb]]s as their [[sub weapon]]. However, unlike in multiplayer matches, the Autobombs are able to follow you for a much longer time and should not be taken lightly. Agent 3 can perform a dodge roll at any time as if they were landing with the [[Drop Roller]] [[ability]]. There are five phases, and the player must disable their shield to progress past a phase. In each phase, Agent 3 uses a different [[special weapon]]. Inner Agent 3's shield can be disabled by shooting them ten times, or by detonating a [[Splat Bomb]] near them and then shooting them four times, or by detonating two Splat Bombs near them. Just like every player, Agent 3 recovers from damage over time if the player does not attack them, accelerated if they swim through their own ink. The key way to win is with turf control, allowing the player to have an advantage in mobility while also hindering Agent 3's. | In all phases of the fight, Inner Agent 3 is equipped with the [[Hero Shot]] as their [[main weapon]] and [[Autobomb]]s as their [[sub weapon]]. However, unlike in multiplayer matches, the Autobombs are able to follow you for a much longer time and should not be taken lightly. Agent 3 can perform a dodge roll at any time as if they were landing with the [[Drop Roller]] [[ability]]. There are five phases, and the player must disable their shield to progress past a phase. In each phase, Agent 3 uses a different [[special weapon]]. Inner Agent 3's shield can be disabled by shooting them ten times, or by detonating a [[Splat Bomb]] near them and then shooting them four times, or by detonating two Splat Bombs near them. Just like every player, Agent 3 recovers from damage over time if the player does not attack them, accelerated if they swim through their own ink. The key way to win is with turf control, allowing the player to have an advantage in mobility while also hindering Agent 3's. | ||
===Phase 1=== | ===Phase 1=== | ||
Agent 3 enters the battle with a [[Splashdown]] which should be avoided. Be sure to dodge their shots and Autobombs at all times. During this phase, Agent 3 attacks with the [[Inkjet]] to supplement the Hero Shot and Autobombs. While using the Inkjet, Agent 3 can fire a maximum of six shots before returning to the launching point, which is marked just as it is in multiplayer. While they are vulnerable during the special, it is equally important not to stay put long enough to take damage in the process. It is vital to ink around where they land so they can be slightly slowed down. Once Agent 3's shield is broken and they [[Super Jump]] to the UFO to ready their next attack, ink some ground while they are recovering. | Agent 3 enters the battle with a [[Splashdown]], which should be avoided. Be sure to dodge their shots and Autobombs at all times. During this phase, Agent 3 attacks with the [[Inkjet]] to supplement the Hero Shot and Autobombs. While using the Inkjet, Agent 3 can fire a maximum of six shots before returning to the launching point, which is marked just as it is in multiplayer. While they are vulnerable during the special, it is equally important not to stay put long enough to take damage in the process. It is vital to ink around where they land so they can be slightly slowed down. There are two strategies here; shooting Agent 3 out of the air and waiting until they land and are vulnerable. Once Agent 3's shield is broken and they [[Super Jump]] to the UFO to ready their next attack, ink some ground while they are recovering. | ||
===Phase 2=== | ===Phase 2=== | ||
Agent 3 Super Jumps onto the stage with a Splashdown. During this phase, Agent 3 now uses the [[Bubble Blower]], which both protects them and lets them cover large amounts of turf at once. However, Agent 3 is exposed and cannot fire back when using it, though they may still perform a dodge roll. Either go around the bubbles to attack or throw a Splat Bomb at one of their bubbles right when they release one to deal decent damage to them, then attack. Be cautious as Agent 3 oftentimes follows the Bubble Blower with an Autobomb which automatically explodes upon hitting a bubble, causing all nearby bubbles to burst. Take back some lost turf while they recover their shield again. | Agent 3 Super Jumps onto the stage with a Splashdown once more. During this phase, Agent 3 now uses the [[Bubble Blower]], which both protects them and lets them cover large amounts of turf at once. However, Agent 3 is exposed and cannot fire back when using it, though they may still perform a dodge roll. Either go around the bubbles to attack or throw a Splat Bomb at one of their bubbles right when they release one to deal decent damage to them, then attack. Be cautious as Agent 3 oftentimes follows the Bubble Blower with an Autobomb which automatically explodes upon hitting a bubble, causing all nearby bubbles to burst. Take back some lost turf while they recover their shield again, and recover your own shield if you were damaged by the bubbles. | ||
===Phase 3=== | ===Phase 3=== | ||
Agent 3 | Agent 3 again starts off with a Splashdown Super Jump. During this phase, Agent 3 uses an [[Bomb Launcher|Autobomb Launcher]], deploying up to four Autobombs at a time. As the player will likely be surrounded by Autobombs if Agent 3 is left alone, taking them down quickly is advised. Unlike the previous phases, Agent 3's Autobomb Launcher doesn't open up any obvious weak points. Turf control is vital for this phase due to Agent 3 being forced to use their Hero Shot to get unstuck from the player's ink and counterattack while wasting their Bomb Launcher in the process. Dodge their shots and break their shield again. If that does not work, avoid the Autobombs and attack when their special is gone. Take back turf again when Agent 3 retreats to recover. | ||
===Phase 4=== | ===Phase 4=== | ||
Agent 3 remains on the floating platform during this phase, using the [[Tenta Missiles]]. Between specials, Inner Agent 3 fires onto the field or throws Autobombs to charge up more Tenta Missiles. While the Octo Shot's fire can sometimes reach Agent 3 if the player fires while jumping, the best way to deal with this phase reliably is to throw Splat Bombs in fairly close succession, thus dealing more damage than Agent 3 can heal from. It takes two bombs to break their shield. While waiting, the | Agent 3 remains on the floating platform during this phase, using the [[Tenta Missiles]]. Between specials, Inner Agent 3 fires onto the field or throws Autobombs to charge up more Tenta Missiles. While the [[Octo Shot]]'s fire can sometimes reach Agent 3 if the player fires while jumping, the best way to deal with this phase reliably is to throw Splat Bombs in fairly close succession, thus dealing more damage than Agent 3 can heal from. It takes two bombs to break their shield. While waiting, the platform starts to move, making it difficult for the player to aim at them. | ||
===Phase 5=== | ===Phase 5=== | ||
Agent 3 uses a similar sequence of three Splashdowns as they did in the earlier boss fight, but the Splashdowns are executed much faster with very few openings between each use. Once enough time has passed, Agent 3 can use their chained Splashdowns again. Notably, once Agent 3 has | Agent 3 uses a similar sequence of three Splashdowns as they did in the earlier boss fight, but the Splashdowns are executed much faster with very few openings between each use. Once enough time has passed, Agent 3 can use their chained Splashdowns again. It is possible to damage Agent 3 between the Splashdowns, but they will simply dodge-roll and execute another Splashdown. Notably, once Agent 3 has taken enough damage, they automatically recover their special and may use a single panic Splashdown. In order to avoid getting splatted or taking damage from the Splashdowns, standing on the opposite side of one of the two obstacles on the map helps to block any damage. Beware of losing turf control at this point, as being slowed by Agent 3's ink is usually fatal. Once Agent 3 stops and attacks, focus fire on them, but they might use a Splashdown as a defensive attack. Dodge the attack and finish them off, or take a risk and try to shoot them out of the Splashdown to splat them. | ||
==Trivia== | ==Trivia== | ||
| Line 39: | Line 39: | ||
* If the player has insufficient CQ Points, therefore gaining a loan from [[Pearl]], Inner Agent 3 will not close after it has been unlocked. | * If the player has insufficient CQ Points, therefore gaining a loan from [[Pearl]], Inner Agent 3 will not close after it has been unlocked. | ||
* If the player tries to open the locker before they unlock Inner Agent 3, the locker will make a sound and the door will shake a little. | * If the player tries to open the locker before they unlock Inner Agent 3, the locker will make a sound and the door will shake a little. | ||
* The locker number that the Golden Toothpick is placed in is number 8. This goes along with the recurring theme of the number 8 in the ''[[Octo Expansion]].'' | |||
* It is possible to defeat Inner Agent 3 mid panic Splashdown. When they initiate it, shoot at them in the brief moment of their vulnerability. | * It is possible to defeat Inner Agent 3 mid panic Splashdown. When they initiate it, shoot at them in the brief moment of their vulnerability. | ||
Revision as of 23:18, 20 September 2021
For the fight that takes place in the initial escape phases, see Spinal Phase.
|
|
|
Template:InfoboxMission/OctoExpansion Inner Agent 3 is an extra boss in the Octo Expansion.
Inner Agent 3 is unlocked by collecting all eighty full mem cakes by beating each level legitimately without asking for help, having 0 CQ points in debt, and completing the escape levels, even with help. The boss fight is initiated by investigating locker 8 near the vending machine in Central Station. The player is rewarded with the Golden Toothpick after defeating the boss.
Gameplay
Inner Agent 3 behaves like the Agent 3 battle in the Spinal Phase, but Agent 3 has significantly increased health, accuracy, and aggressiveness; the arena itself is also much smaller and the walls and cover present cannot be inked.
In all phases of the fight, Inner Agent 3 is equipped with the Hero Shot as their main weapon and Autobombs as their sub weapon. However, unlike in multiplayer matches, the Autobombs are able to follow you for a much longer time and should not be taken lightly. Agent 3 can perform a dodge roll at any time as if they were landing with the Drop Roller ability. There are five phases, and the player must disable their shield to progress past a phase. In each phase, Agent 3 uses a different special weapon. Inner Agent 3's shield can be disabled by shooting them ten times, or by detonating a Splat Bomb near them and then shooting them four times, or by detonating two Splat Bombs near them. Just like every player, Agent 3 recovers from damage over time if the player does not attack them, accelerated if they swim through their own ink. The key way to win is with turf control, allowing the player to have an advantage in mobility while also hindering Agent 3's.
Phase 1
Agent 3 enters the battle with a Splashdown, which should be avoided. Be sure to dodge their shots and Autobombs at all times. During this phase, Agent 3 attacks with the Inkjet to supplement the Hero Shot and Autobombs. While using the Inkjet, Agent 3 can fire a maximum of six shots before returning to the launching point, which is marked just as it is in multiplayer. While they are vulnerable during the special, it is equally important not to stay put long enough to take damage in the process. It is vital to ink around where they land so they can be slightly slowed down. There are two strategies here; shooting Agent 3 out of the air and waiting until they land and are vulnerable. Once Agent 3's shield is broken and they Super Jump to the UFO to ready their next attack, ink some ground while they are recovering.
Phase 2
Agent 3 Super Jumps onto the stage with a Splashdown once more. During this phase, Agent 3 now uses the Bubble Blower, which both protects them and lets them cover large amounts of turf at once. However, Agent 3 is exposed and cannot fire back when using it, though they may still perform a dodge roll. Either go around the bubbles to attack or throw a Splat Bomb at one of their bubbles right when they release one to deal decent damage to them, then attack. Be cautious as Agent 3 oftentimes follows the Bubble Blower with an Autobomb which automatically explodes upon hitting a bubble, causing all nearby bubbles to burst. Take back some lost turf while they recover their shield again, and recover your own shield if you were damaged by the bubbles.
Phase 3
Agent 3 again starts off with a Splashdown Super Jump. During this phase, Agent 3 uses an Autobomb Launcher, deploying up to four Autobombs at a time. As the player will likely be surrounded by Autobombs if Agent 3 is left alone, taking them down quickly is advised. Unlike the previous phases, Agent 3's Autobomb Launcher doesn't open up any obvious weak points. Turf control is vital for this phase due to Agent 3 being forced to use their Hero Shot to get unstuck from the player's ink and counterattack while wasting their Bomb Launcher in the process. Dodge their shots and break their shield again. If that does not work, avoid the Autobombs and attack when their special is gone. Take back turf again when Agent 3 retreats to recover.
Phase 4
Agent 3 remains on the floating platform during this phase, using the Tenta Missiles. Between specials, Inner Agent 3 fires onto the field or throws Autobombs to charge up more Tenta Missiles. While the Octo Shot's fire can sometimes reach Agent 3 if the player fires while jumping, the best way to deal with this phase reliably is to throw Splat Bombs in fairly close succession, thus dealing more damage than Agent 3 can heal from. It takes two bombs to break their shield. While waiting, the platform starts to move, making it difficult for the player to aim at them.
Phase 5
Agent 3 uses a similar sequence of three Splashdowns as they did in the earlier boss fight, but the Splashdowns are executed much faster with very few openings between each use. Once enough time has passed, Agent 3 can use their chained Splashdowns again. It is possible to damage Agent 3 between the Splashdowns, but they will simply dodge-roll and execute another Splashdown. Notably, once Agent 3 has taken enough damage, they automatically recover their special and may use a single panic Splashdown. In order to avoid getting splatted or taking damage from the Splashdowns, standing on the opposite side of one of the two obstacles on the map helps to block any damage. Beware of losing turf control at this point, as being slowed by Agent 3's ink is usually fatal. Once Agent 3 stops and attacks, focus fire on them, but they might use a Splashdown as a defensive attack. Dodge the attack and finish them off, or take a risk and try to shoot them out of the Splashdown to splat them.
Trivia
- Agent 8 was, according to Cap'n Cuttlefish, in a battle with Agent 3 before the events of the Octo Expansion, but never got to finish after they got taken by "someone". This might mean that Agent 8 is mentally continuing the battle as a result of getting their memories back, although whether Agent 8 did this willingly or not remains unclear.
- The battle could also happen due to Agent 8 looking up to Agent 3 and wanting to surpass them in skill, as supported by the Spanish name for the fight.
- One of the obstacles in this stage appears to be DJ Octavio's turntables and wasabi, set in a museum case.
- Because a few game developers from The Legend of Zelda: Breath of the Wild helped with the development of the Octo Expansion, it is possible that the battle against Inner Agent 3 was intended to reference the first four boss battles in The Champions' Ballad as, like the battle against Inner Agent 3, those take place inside of the player character's mind and are harder versions of previously fought bosses.
- If the player has insufficient CQ Points, therefore gaining a loan from Pearl, Inner Agent 3 will not close after it has been unlocked.
- If the player tries to open the locker before they unlock Inner Agent 3, the locker will make a sound and the door will shake a little.
- The locker number that the Golden Toothpick is placed in is number 8. This goes along with the recurring theme of the number 8 in the Octo Expansion.
- It is possible to defeat Inner Agent 3 mid panic Splashdown. When they initiate it, shoot at them in the brief moment of their vulnerability.
Gallery
-
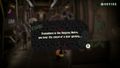
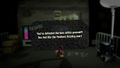
The message that appears when the Inner Agent 3 battle has been unlocked.
-
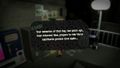
The message that appears when beginning the battle for the first time.
-
Agent 3 before the battle starts.
-
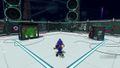
The stage where the fight takes place.
-
The display for defeating Inner Agent 3.
-
The message that appears after beating the Inner Agent 3 battle for the first time.


-
The Phase 4 & 5 strategies in action.
