[[File:Lair of The Octoballs Stats.png|frameless|850px|center]]
! Area
{{Clr}}
! Enemies
! Armor
!Special Weapon
!Sunken Scroll
|-
! Beginning Area
| 1x Octopod
| {{N/A}}
| {{N/A}}
| {{N/A}}
|-
! Checkpoint 1
| 6x Octopods
| {{N/A}}
| {{N/A}}
| {{N/A}}
|-
! Checkpoint 2
| 4x Octoballs
| {{N/A}}
| {{N/A}}
| {{N/A}}
|-
! Checkpoint 3
| 1x Squee-G
1x Octoball
| {{N/A}}
| {{N/A}}
| Yes
|-
! Checkpoint 4
| 3x Squee-Gs
3x Octoballs
| 1x Piece of Armor
| {{N/A}}
| {{N/A}}
|-
! Checkpoint 5
| 2x Octoballs
| {{N/A}}
| {{N/A}}
| {{N/A}}
|-
! Checkpoint 6
| 3x Octoballs
| {{N/A}}
| {{N/A}}
| {{N/A}}
|-
! Final Checkpoint
| 1x Squee-G
2x Twintacle Octotroopers
| {{N/A}}
| {{N/A}}
| {{N/A}}
|}
===Mechanics===
===Beginning===
===Beginning===
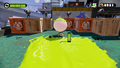
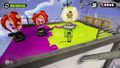
[[File:Mission2-B.jpg|thumb|300px|right]] Travel down the ramp immediately in front of you, which leads to a small platform surrounded by [[crate]]s and an [[Octopod]]. Splat the Octopod by shooting it with [[ink]] with {{Button|ZR}}. Destroy the six surrounding crates for a couple of [[Power Egg]]s, then ink the wall just ahead and swim {{Button|ZL}} up it for a few more.
[[File:S Lair of the Octoballs Beginning.png|thumb|300px|left]]
Travel down the ramp immediately in front of you, which leads to a small platform surrounded by [[crate]]s and an [[Octopod]]. Splat the Octopod by shooting it with [[ink]] with {{Button|ZR}}. Destroy the six surrounding crates for a couple of [[Power Egg]]s, then ink the wall just ahead and swim up it with {{Button|ZL}} for a few more.
{{clr}}
===Checkpoint 1===
[[File:S Lair of the Octoballs Checkpoint 1.png|thumb|300px|left]]
You will encounter another open area, this time with six crates with four Octopods on top. They will immediately jump down and approach you, so shoot the [[Balloon Fish]] to take them all out easily.
===Checkpoint 1 {{Map|A}}===
[[File:Mission2-1.jpg|thumb|300px|left]] You will encounter another open area, this time with six crates with four Octopods on top. They will immediately jump down and approach you, so splatter the [[Balloon Fish]] to take them all out easily.
The wall ahead of you will now be covered in ink, so swim up it and shoot ink at the next slightly curved wall you come across.
The wall ahead of you will now be covered in ink, so swim up it and shoot ink at the next slightly curved wall you come across.
Travel up this wall, and shoot the Octopod waiting at the top. Make a somewhat wide U-turn and coat the next ramped wall with ink, collecting Power Eggs as you make your way to the top. An Octopod will likely drop down as you are swimming up this wall, so be careful to avoid its explosion. Destroy the two small crates for some Power Eggs, and swim up the wall to your left after coating it in ink.
Travel up this wall and shoot the Octopod waiting at the top. Make a somewhat wide U-turn and coat the next ramped wall with ink, collecting Power Eggs as you make your way to the top. An Octopod will likely drop down as you are swimming up this wall, so be careful to avoid its explosion. Destroy the two small crates for some Power Eggs, and swim up the wall to your left after coating it in ink.
Upon reaching the next platform, you will be met with a ramp leading up to a large wall with a Balloon Fish and four Power Eggs. Simply shoot the Balloon Fish until it explodes and swim up the wall. At the top of the wall, there will be a power line covered in Power Eggs. Collect these and activate the [[launchpad]] with {{Button|ZL}}.
===Checkpoint 2===
[[File:S Lair of the Octoballs Checkpoint 2.png|thumb|300px|left]]
Upon reaching the next platform, you will be met with a ramp leading up to a large wall with a Balloon Fish and four Power Eggs. Simply shoot the Balloon Fish until it explodes, and swim up the wall. At the top of the wall, there will be a power line covered in Power Eggs. Collect these and activate the [[launchpad]] {{Button|ZL}}.
Travel forward until you reach a [[grate]]d ledge, overlooking a large area with crates and an [[Octoball]] perched atop a stack of them. Destroy the crates from the safety of the ledge, and shoot ink until the Octoball becomes submerged in it. Shoot the Octoball to finish it off. Drop off the ledge, ink the ramped wall, and swim up it to reach a path littered with Power Eggs.
===Checkpoint 2 {{Map|B}}===
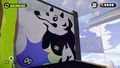
[[File:Mission2-2.jpg|thumb|300px|right]] Travel forward until you reach a [[grate]]d ledge, overlooking a large area with crates and an [[Octoball]] perched atop a stack of them. Destroy the crates from the safety of the ledge, and splatter ink until the Octoball becomes submerged in it. Shoot the Octoball. Drop off the ledge, ink the ramped wall, and swim up it to reach a path littered with Power Eggs.
Collect the Power Eggs and turn left. Spray ink along the inclined pathway and slowly begin traveling up it. However, stay near the bottom, as three Octoballs will appear and begin rolling toward you. Wait until they become submerged in your ink and get in a close enough range to shoot them. Swim up the incline, ink the next wall, and swim up that as well.
{{clr}}
Collect the Power Eggs and turn left. Spray ink along the inclined pathway and slowly begin traveling up it. However, stay near the bottom, as three Octoballs will appear and begin rolling toward you. Wait until they become submerged in your ink, and get in a close enough range where you can shoot them. Swim up the incline, ink the next wall, and swim up it.
===Checkpoint 3===
===Checkpoint 3===
[[File:Mission2-3.jpg|thumb|300px|left]] Immediately turn left and collect the Power Eggs. You will encounter a large wall below a grated ledge. However, this wall is guarded by a [[Squee-G]], an [[Octarian]] enemy that cleans up [[Agent 3]]'s ink. Spray ink on one side of the Squee-G to distract it, then ink a path on the other side and quickly swim up it to the safety of the ledge.
[[File:S Lair of the Octoballs Checkpoint 3.png|thumb|300px|left]]
Immediately turn left and collect the Power Eggs. You will encounter a large wall below a grated ledge. However, this wall is guarded by a [[Squee-G]], an [[Octarian]] enemy that cleans up your ink. Spray ink on one side of the Squee-G to distract it, then ink a path on the other side and quickly swim up it to the safety of the ledge.
After turning the corner, drop through the ledge by turning into a squid. You will land safely on a small outcropping with a crate and launchpad. Destroy the crate, collect the [[Sunken Scroll]] hidden inside, and then turn around and use the launchpad to return to the grated ledge.
After turning the corner, drop through the ledge by turning into a squid. You will land safely on a small outcropping with a crate and launchpad. Destroy the crate, collect the [[Sunken Scroll]] hidden inside, and then turn around and use the launchpad to return to the grated ledge.
Continue walking along the ledge, collecting Power Eggs, until you reach a grassy platform. Turn left, destroy the crates, and splatter ink on the ground to submerge the awaiting Octoball. Kill it once it is submerged, then turn left and ink a path up the next wall. This wall is partially covered by a window, so you must spray ink in an "L" shape and travel up it to the next platform.
Continue walking along the ledge, collecting Power Eggs, until you reach a grassy platform. Turn left, destroy the crates, and shoot ink on the ground to submerge the awaiting Octoball. Kill it once it is submerged, then turn left and ink a path up the next wall. This wall is partially covered by a window, so you must spray ink in an L shape and travel up it to the next platform.
Turn right to face the next wall. Spread ink so that you can swim up and access the launchpad, then press {{Button|ZL}} to launch.
Turn right to face the next wall. Spread ink so that you can swim up and access the launchpad, then press {{Button|ZL}} to launch.
===Checkpoint 4===
===Checkpoint 4===
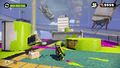
[[File:Mission2-4.jpg|thumb|300px|right]] You will immediately encounter an area with various platforms and enemies. Stand on the grated ledge and spread ink around until the first Octoball is submerged, and then shoot it. The ground is guarded by three Squee-Gs, so be sure to consistently ink so that it is not all erased. Collect the Power Egg that is sitting on the circular platform, and from the safety of this platform, spread ink around so that the second Octoball becomes submerged. Kill it, and collect the [[armor]] sitting on top of the second Squee-G. The third Octoball will immediately roll down off of a high platform, so submerge and kill it.
[[File:S Lair of the Octoballs Checkpoint 4.png|thumb|300px|left]]
You will immediately encounter an area with various platforms and enemies. Stand on the grated ledge and shoot ink around until the first Octoball is submerged, then shoot it. The ground is guarded by three Squee-Gs, so be sure to consistently ink so that it is not all erased. Collect the Power Egg that is sitting on the circular platform, and from the safety of this platform, submerge and splat the second Octoball. Now collect the [[armor]] sitting on top of the second Squee-G. The third Octoball will immediately roll down off of a high platform, so submerge and splat it.
Swim up the tall, conical platform and shoot one of the Balloon Fish, which your ink can now reach. It will explode and destroy the second Balloon Fish, splattering ink on most of the wall that would normally be inaccessible. Jump off of the ledge, collect the Power Egg sitting on the third Squee-G, and ink a path up the bottom portion of the wall. Swim up the wall.
Swim up the tall, conical platform and shoot one of the Balloon Fish, which your ink can now reach. This Balloon Fish will explode and destroy the second Balloon Fish, splattering ink on most of the wall that would normally be inaccessible. Jump off of the ledge, collect the Power Egg sitting on the third Squee-G, and ink a path up the bottom portion of the wall. Swim up the wall.
===Checkpoint 5===
===Checkpoint 5===
[[File:Mission2-5.jpg|frameless|300px|left]] Turn right and launch from the launchpad. You will land on a stack of crates in a large, square area dotted with similar crates. Shoot ink at your feet, destroying the stack of crates, and quickly move forward. Two Octoballs will roll to the ground, landing in your puddle of ink, so take advantage of this and shoot them. Destroy the remaining crates and use the next launchpad.
[[File:S Lair of the Octoballs Checkpoint 5.png|thumb|300px|left]]
{{Clr}}
Turn right and launch from the launchpad. You will land on a stack of crates in a large, square area dotted with similar crates. Shoot ink at your feet, destroying the stack of crates, and quickly move forward. Two Octoballs will roll to the ground, landing in your puddle of ink, so take advantage of this and shoot them. Destroy the remaining crates and use the next launchpad.
{{clr}}
===Checkpoint 6===
===Checkpoint 6===
[[File:Mission2-6.jpg|thumb|300px|right]] Ink up the narrow wall and immediately turn right. Splatter ink on the long, thin walkway and slowly move forward along it. Three Octoballs will appear and land in the pathway of ink you created, so shoot them while they are submerged. Continue forward and jump off of the platform.
[[File:S Lair of the Octoballs Checkpoint 6.png|thumb|300px|left]]
Ink up the narrow wall and immediately turn right. Shoot ink on the long, thin walkway and slowly move forward along it. Three Octoballs will appear and land in the pathway of ink you created, so shoot them while they are submerged. Continue forward and jump off of the platform.
Ink the Power Eggs on top of the pillars as you descend to collect them quickly. As you approach the large wall ahead of you, you will see a small section to the right, cornered off by crates. Ignore the wall and destroy the crates instead, then use the launchpad behind them.
{{clr}}
===Final Checkpoint===
[[File:S Lair of the Octoballs Final Checkpoint.png|thumb|300px|left]]
Ink the Power Eggs on top of the pillars as you descend to collect them quickly. As you approach the large wall ahead of you, you will see a small section to the right, cornered off by crates. Ignore the wall, destroying the crates instead, and use the launchpad behind them.
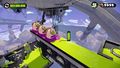
Turn left and swim up to the [[Ink Cannon]]. Press {{Button|ZL}} to activate it, then use {{Button|ZR}} to shoot at the two [[Twintacle Octotrooper]]s at the top of the wall, taking them out. Then ink the entire wall from top to bottom, collecting the ring of Power Eggs as you go. As you near the bottom of the wall while using the [[Ink Cannon]], you will see a Squee-G quickly erasing the ink you leave behind. Ink as much of the bottom portion of the wall as you can, then quickly jump forwards off the ledge. Swim past the pillars and up the inked wall, where you will find the stolen [[Zapfish]]. Shoot its protective shield until the shield bursts and then swim forward to collect it.
===Final Checkpoint {{Map|C}}===
{{clr}}
[[File:Mission2-F.jpg|thumb|300px|left]] Turn left and swim up to the [[Ink Cannon]]. Press {{Button|ZL}} to activate it. Shoot {{Button|ZR}} the Ink Cannon at the two [[Twintacle Octotrooper]]s at the top of the wall, taking them out. Then, ink the entire wall from top to bottom, collecting the ring of Power Eggs as you go. As you near the bottom of the wall while using the [[Ink Cannon]], you will see a Squee-G quickly erasing the ink you leave behind. Ink as much of the bottom portion of the wall as you can, then ''quickly'' jump forwards off of the ledge. Swim past the pillars and up the fully-inked wall, where you will find the stolen [[Zapfish]]. Shoot its protective shield until the shield bursts, and then swim forward to collect it.
{{Quote|We Octarians dwell in a world deep underground. The individual caves in which we live are connected by a network of transport devices known as kettles. Wow... You learn something new every day!|[[Sunken Scroll]] {{color|2|green}} }}
'''Location:''' The [[Sunken Scroll]] can be found after the 2nd [[Checkpoint]].[[File:Mission2-S.jpg|frameless|right|300px]] Swim up the wall onto the [[grate]]d walkway, turn the corner, and then drop through the grate onto the platform below. You will find a small [[crate]] and a [[launchpad]]. Destroy the crate to reveal [[Sunken Scroll]] {{color|2|green}}, collect it, and then turn around and use the launchpad to return to the grated walkway.
{{Quote|We Octarians dwell in a world deep underground. The individual caves in which we live are connected by a network of transport devices known as kettles. Wow... You learn something new every day!|[[Sunken Scroll]] {{color|2|green}}}}
[[File:S Lair of the Octoballs Scroll.png|thumb|right|300px]]
'''Location:''' The [[Sunken Scroll]] can be found after the second [[spawn point|checkpoint]]. Swim up the wall onto the [[grate]]d walkway, turn the corner, and then drop through the grate onto the platform below. You will find a small [[crate]] and a [[launchpad]]. Destroy the crate to reveal Sunken Scroll 2, collect it, and then turn around and use the launchpad to return to the grated walkway.
{{Clr}}
{{Clr}}
===Armor===
===Armor===
'''Location:''' After the 4th checkpoint, the [[armor]] can be found sitting on top of a [[Squee-G]].
'''Location:''' After the fourth checkpoint, the [[armor]] can be found sitting on top of a [[Squee-G]].
Lair of the Octoballs-Cap'n Cuttlefish First Quote.jpg|{{Quote|Splatter the wall with ink, and then swim up it in {{Button|ZL1}}{{color|squid form|orange}}!}}
|
Lair of the Octoballs-Cap'n Cuttlefish Second Quote.jpg|{{Quote|Ya gotta submerge the {{color-link|Octoballs|orange}} in {{color-link|ink|orange}} to scuttle 'em!}}
{{MissionQuote|S|Cap'n Cuttlefish|Splatter the wall with ink, and then swim up it in {{Button|ZL1}}{{color|squid form|orange}}!}}
Lair of the Octoballs-Cap'n Cuttlefish Third Quote.jpg|{{Quote|Bravo!}}
{{MissionQuote|S|Cap'n Cuttlefish|Ya gotta submerge the {{color-link|Octoballs|orange}} in {{color-link|ink|orange}} to scuttle 'em!}}
Lair of the Octoballs-Cap'n Cuttlefish Fourth Quote.jpg|{{Quote|Baddies! Look alive, bucko!}}
{{MissionQuote|S|Cap'n Cuttlefish|Bravo!}}
Lair of the Octoballs-Cap'n Cuttlefish Fifth Quote.jpg|{{Quote|Ooh, that's a {{color-link|Squee-G|orange}}... Ya can't hurt these fellas!}}
Lair of the Octoballs-Cap'n Cuttlefish Tenth Quote.jpg|{{Quote|To fire the {{color-link|Ink Cannon|orange}}, hold {{Button|ZL1}} to aim and then press {{Button|ZR1}}!}}
Travel down the ramp immediately in front of you, which leads to a small platform surrounded by crates and an Octopod. Splat the Octopod by shooting it with ink with . Destroy the six surrounding crates for a couple of Power Eggs, then ink the wall just ahead and swim up it with for a few more.
Checkpoint 1
You will encounter another open area, this time with six crates with four Octopods on top. They will immediately jump down and approach you, so shoot the Balloon Fish to take them all out easily.
The wall ahead of you will now be covered in ink, so swim up it and shoot ink at the next slightly curved wall you come across.
Travel up this wall and shoot the Octopod waiting at the top. Make a somewhat wide U-turn and coat the next ramped wall with ink, collecting Power Eggs as you make your way to the top. An Octopod will likely drop down as you are swimming up this wall, so be careful to avoid its explosion. Destroy the two small crates for some Power Eggs, and swim up the wall to your left after coating it in ink.
Upon reaching the next platform, you will be met with a ramp leading up to a large wall with a Balloon Fish and four Power Eggs. Simply shoot the Balloon Fish until it explodes and swim up the wall. At the top of the wall, there will be a power line covered in Power Eggs. Collect these and activate the launchpad with .
Checkpoint 2
Travel forward until you reach a grated ledge, overlooking a large area with crates and an Octoball perched atop a stack of them. Destroy the crates from the safety of the ledge, and shoot ink until the Octoball becomes submerged in it. Shoot the Octoball to finish it off. Drop off the ledge, ink the ramped wall, and swim up it to reach a path littered with Power Eggs.
Collect the Power Eggs and turn left. Spray ink along the inclined pathway and slowly begin traveling up it. However, stay near the bottom, as three Octoballs will appear and begin rolling toward you. Wait until they become submerged in your ink and get in a close enough range to shoot them. Swim up the incline, ink the next wall, and swim up that as well.
Checkpoint 3
Immediately turn left and collect the Power Eggs. You will encounter a large wall below a grated ledge. However, this wall is guarded by a Squee-G, an Octarian enemy that cleans up your ink. Spray ink on one side of the Squee-G to distract it, then ink a path on the other side and quickly swim up it to the safety of the ledge.
After turning the corner, drop through the ledge by turning into a squid. You will land safely on a small outcropping with a crate and launchpad. Destroy the crate, collect the Sunken Scroll hidden inside, and then turn around and use the launchpad to return to the grated ledge.
Continue walking along the ledge, collecting Power Eggs, until you reach a grassy platform. Turn left, destroy the crates, and shoot ink on the ground to submerge the awaiting Octoball. Kill it once it is submerged, then turn left and ink a path up the next wall. This wall is partially covered by a window, so you must spray ink in an L shape and travel up it to the next platform.
Turn right to face the next wall. Spread ink so that you can swim up and access the launchpad, then press to launch.
Checkpoint 4
You will immediately encounter an area with various platforms and enemies. Stand on the grated ledge and shoot ink around until the first Octoball is submerged, then shoot it. The ground is guarded by three Squee-Gs, so be sure to consistently ink so that it is not all erased. Collect the Power Egg that is sitting on the circular platform, and from the safety of this platform, submerge and splat the second Octoball. Now collect the armor sitting on top of the second Squee-G. The third Octoball will immediately roll down off of a high platform, so submerge and splat it.
Swim up the tall, conical platform and shoot one of the Balloon Fish, which your ink can now reach. It will explode and destroy the second Balloon Fish, splattering ink on most of the wall that would normally be inaccessible. Jump off of the ledge, collect the Power Egg sitting on the third Squee-G, and ink a path up the bottom portion of the wall. Swim up the wall.
Checkpoint 5
Turn right and launch from the launchpad. You will land on a stack of crates in a large, square area dotted with similar crates. Shoot ink at your feet, destroying the stack of crates, and quickly move forward. Two Octoballs will roll to the ground, landing in your puddle of ink, so take advantage of this and shoot them. Destroy the remaining crates and use the next launchpad.
Checkpoint 6
Ink up the narrow wall and immediately turn right. Shoot ink on the long, thin walkway and slowly move forward along it. Three Octoballs will appear and land in the pathway of ink you created, so shoot them while they are submerged. Continue forward and jump off of the platform.
Ink the Power Eggs on top of the pillars as you descend to collect them quickly. As you approach the large wall ahead of you, you will see a small section to the right, cornered off by crates. Ignore the wall and destroy the crates instead, then use the launchpad behind them.
Final Checkpoint
Turn left and swim up to the Ink Cannon. Press to activate it, then use to shoot at the two Twintacle Octotroopers at the top of the wall, taking them out. Then ink the entire wall from top to bottom, collecting the ring of Power Eggs as you go. As you near the bottom of the wall while using the Ink Cannon, you will see a Squee-G quickly erasing the ink you leave behind. Ink as much of the bottom portion of the wall as you can, then quickly jump forwards off the ledge. Swim past the pillars and up the inked wall, where you will find the stolen Zapfish. Shoot its protective shield until the shield bursts and then swim forward to collect it.
Collectibles
Sunken Scroll
“
We Octarians dwell in a world deep underground. The individual caves in which we live are connected by a network of transport devices known as kettles. Wow... You learn something new every day!
Location: The Sunken Scroll can be found after the second checkpoint. Swim up the wall onto the grated walkway, turn the corner, and then drop through the grate onto the platform below. You will find a small crate and a launchpad. Destroy the crate to reveal Sunken Scroll 2, collect it, and then turn around and use the launchpad to return to the grated walkway.
Armor
Location: After the fourth checkpoint, the armor can be found sitting on top of a Squee-G.