Saltspray Rig: Difference between revisions
StarAdamStar (talk | contribs) (→Trivia: Linked to specific Shifty Station layouts.) |
Trig Jegman (talk | contribs) mNo edit summary |
||
| (37 intermediate revisions by 29 users not shown) | |||
| Line 7: | Line 7: | ||
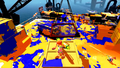
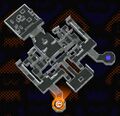
[[File:Saltsprayrigmap.png|thumb|Saltspray Rig overview.]] | [[File:Saltsprayrigmap.png|thumb|Saltspray Rig overview.]] | ||
Saltspray Rig is shaped like a squid, with two [[ | Unlike most other [[Stage|stages]] in the [[Splatoon (series)|''Splatoon'' series]] that feature rotational symmetry, Saltspray Rig's stage layout is laterally symmetrical, with the exception of the obstacles in the top area. Saltspray Rig is shaped like a squid, with two [[spawn point]]s leading into a series of pathways and drop-offs. The spawn point area is not accessible to the enemy team, except in [[Rainmaker]] mode. There are two elevators located in the middle of the map to quickly move from the bottom area to the top area. Pathways stemming from each spawn point cannot be accessed by the other team, and branch off into smaller trails that lead to the top area and bottom area. | ||
==Ranked Battle | The top area is located opposite the teams' spawn points. It is normally the last area to be claimed due to its distance from the spawn points. It features a tall structure in the middle which is heavily contested in the later parts of the game to claim the surrounding turf. There is also a moving platform that a player can use to claim turf quickly, but in turn, exposes the player, as the player will fall through the platform if they turn into a squid. | ||
The bottom area is located between the team's spawn points. It is often the first area that is claimed but is typically forgotten towards the end of the game, due to the battle shifting towards the top area. In the last minute, it is easily claimable. The starting areas in Saltspray Rig cannot be reached on foot by the opposing team, so there is a lot of turf that can be easily claimed during the game. A team with a [[charger]], [[splatling]], [[Inkstrike]] or [[Inkzooka]], though, may be able to claim some turf if the opposing team is not paying attention. Both areas contain paths leading to the bottom area and top area. If a team is not careful, the opposing team may launch an Inkstrike in the area near the end of a battle, claiming some turf which the players cannot claim after leaving their starting area. The only way a player can get back up their team's starting area is to [[Super Jump]] to their team's respective spawn or one of their teammates, or a [[Squid Beakon]]. There is an abyss surrounding the stage as a hazard for players who fall in. | |||
This stage puts the Alpha team at a slight disadvantage. The Bravo team has more viable right-side peeking points, as [[Inkling]]s are right-handed, so they can peek around a wall and be mostly protected. Peeking to the left, on the other hand, fully exposes them, leaving them open for attack. Additionally, the Bravo team can use the two moving platforms faster at the start of a match. | |||
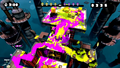
==Ranked Battle terrain== | |||
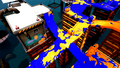
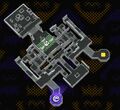
[[File:Saltspray Rig.jpg|thumb|Saltspray Rig in different terrain.]] | [[File:Saltspray Rig.jpg|thumb|Saltspray Rig in different terrain.]] | ||
In Ranked Battle, specifications for the terrain or placement of objects are different between the modes; these changes create new paths or new objects to take cover behind. | In [[Ranked Battle]]s, specifications for the terrain or placement of objects are different between the modes; these changes create new paths or new objects to take cover behind. | ||
===[[Splat Zones]]=== | ===[[Splat Zones]]=== | ||
The Splat Zone for Saltspray Rig sits just below the top area, just inside the "entrance" and before the ramp. It can be easily taken by players shooting ink on ledges on the opposing sides, but if the front of the zone is not protected, the opposing team can easily take control of the zone. | The Splat Zone for Saltspray Rig sits just below the top area, just inside the "entrance" and before the ramp. It can be easily taken by players shooting [[ink]] on ledges on the opposing sides, but if the front of the zone is not protected, the opposing team can easily take control of the zone. | ||
===[[Tower Control]]=== | ===[[Tower Control]]=== | ||
The | The Tower starts at the bottom of the T-shaped section just before the top area. When taken, the Tower briefly travels around the T and down the pathway towards the enemy base before turning and going down the side of the map. It then begins traveling on the lower pathways that lead to the bottom area. Each team's goal zone is directly below the exit opposite from the bottom area when going there. Boxes have been added so that players can easily attack the other team if they have taken the Tower or vice versa. This means that the action on this stage is condensed to a small area, making the top and bottom areas go almost completely unused. | ||
===[[Rainmaker]]=== | ===[[Rainmaker]]=== | ||
The Rainmaker weapon starts on the middle platform that the elevators rise to. Platforms containing the Rainmaker goal pedestals are built next to the spawn point. Walls have been added so that a team can reach their opponents' base. Walls block off the far side alley, forcing players to leave the spawn area through more direct routes. | The [[Rainmaker (weapon)|Rainmaker]] starts on the middle platform that the elevators rise to. Platforms containing the Rainmaker goal pedestals are built next to the spawn point. Walls have been added so that a team can reach their opponents' base. Walls block off the far side alley, forcing players to leave the spawn area through more direct routes. | ||
==''Splatoon''== | ==''Splatoon''== | ||
{{Infobox/Stage | {{Infobox/Stage | ||
|game = Splatoon | |game = Splatoon | ||
|introduced = | |image=S Stage Saltspray Rig.jpg | ||
|introduced = ''Initial Release'' ({{ver|s|1.0.0}}) | |||
|totalbp = 1,900 | |totalbp = 1,900 | ||
|features = Moving Platforms | |features = Moving Platforms | ||
| Line 37: | Line 44: | ||
* There were much fewer vertical pipes to swim up. | * There were much fewer vertical pipes to swim up. | ||
* The [[ | * The [[spawn point]]s were closer together. | ||
* Four small areas were located near teams' bases, accessed by thin, curved walkways. | * Four small areas were located near teams' bases, accessed by thin, curved walkways. | ||
* The | * The bottom area was not present. | ||
* The routes that currently allow players to access the | * The routes that currently allow players to access the top area from either side were much less detailed. | ||
* Most edges were secured by presumably [[grate]]d fences. | * Most edges were secured by presumably [[grate]]d fences. | ||
* The top area had fewer crates than in the final version. | * The top area had fewer crates than in the final version. | ||
| Line 46: | Line 53: | ||
<gallery> | <gallery> | ||
Saltsprag Rig (Beta).png|A pre-release version of Saltspray Rig. | Saltsprag Rig (Beta).png|A pre-release version of Saltspray Rig. | ||
PreSR1.png|The | PreSR1.png|The top area and connecting walkways. | ||
PreSR2.png|The four smaller areas and their connecting walkways. | PreSR2.png|The four smaller areas and their connecting walkways. | ||
PreSR3.png|The | PreSR3.png|The {{GP}} map of Saltspray Rig. | ||
PreSR4.png|The | PreSR4.png|The top area and moving grates platform. | ||
PreSR5.png|One of the four smaller areas and the platforms that lead to it. | PreSR5.png|One of the four smaller areas and the platforms that lead to it. | ||
PreSR6.png|Another view of one of the four smaller areas. | PreSR6.png|Another view of one of the four smaller areas. | ||
| Line 56: | Line 63: | ||
===Release version=== | ===Release version=== | ||
Saltspray Rig was released with launch of | Saltspray Rig was released with the launch of {{S}}. | ||
===Maps=== | ===Maps=== | ||
<gallery> | <gallery> | ||
Map Saltspray Rig Turf War Overhead.png|Turf War (alpha) | Map Saltspray Rig Turf War Overhead.png|[[Turf War]] (alpha) | ||
Map Saltspray Rig Splat Zones Overhead.jpg|Splat Zones (alpha) | Map Saltspray Rig Splat Zones Overhead.jpg|[[Splat Zones]] (alpha) | ||
Map Saltspray Rig Tower Control Overhead Right.jpg|Tower Control (alpha) | Map Saltspray Rig Tower Control Overhead Right.jpg|[[Tower Control]] (alpha) | ||
Map Saltspray Rig Rainmaker Overhead Right.jpg|Rainmaker (alpha) | Map Saltspray Rig Rainmaker Overhead Right.jpg|[[Rainmaker]] (alpha) | ||
Map Saltspray Rig Turf War Overhead Left.jpg|Turf War (bravo) | Map Saltspray Rig Turf War Overhead Left.jpg|Turf War (bravo) | ||
Map Saltspray Rig Splat Zones Overhead Left.jpg|Splat Zones (bravo) | Map Saltspray Rig Splat Zones Overhead Left.jpg|Splat Zones (bravo) | ||
Map Saltspray Rig Tower Control Overhead Left.jpg|Tower Control (bravo) | Map Saltspray Rig Tower Control Overhead Left.jpg|Tower Control (bravo) | ||
Map Saltspray Rig Rainmaker Overhead Left.jpg|Rainmaker (bravo) | Map Saltspray Rig Rainmaker Overhead Left.jpg|Rainmaker (bravo) | ||
</gallery> | </gallery> | ||
===Gallery=== | ===Gallery=== | ||
<gallery> | <gallery> | ||
Splat Zones Saltspray Rig.jpg|A match of | Splat Zones Saltspray Rig.jpg|A match of Splat Zones on Saltspray Rig. | ||
Splat roller pushing.gif|An [[Inkling]] running with the | Splat roller pushing.gif|An [[Inkling]] running with the [[Splat Roller]] on one of the small pathways. | ||
SaltsprayRigp2.jpg|Far in the background of Saltspray Rig, a large bridge can be seen. There are also a few [[Animal#Seagulls|seagulls]] flying around. | SaltsprayRigp2.jpg|Far in the background of Saltspray Rig, a large bridge can be seen. There are also a few [[Animal#Seagulls|seagulls]] flying around. | ||
Saltspray jellies.png|[[Jellyfish]] on a tower at Saltspray Rig. | Saltspray jellies.png|[[Jellyfish]] on a tower at Saltspray Rig. | ||
SaltspraySplatfest.jpg|An isometric view of the north of Saltspray Rig, during a [[Splatfest]]. | SaltspraySplatfest.jpg|An isometric view of the north of Saltspray Rig, during a [[Splatfest]]. | ||
Saltspray view during splatfest.png|The view from Saltspray Rig during a Splatfest. | Saltspray view during splatfest.png|The view from Saltspray Rig during a Splatfest. | ||
ZinkPromo1.jpg|Promo for | ZinkPromo1.jpg|Promo for [[Zink]] at Saltspray Rig. | ||
S Saltspray Rig Top Area.png|An Inkling in the top area, next to the moving grated platform. | |||
Custom E-Liter 3K.jpg|A Inkling Girl fires a [[Custom E-liter 3K]] in the top middle of Saltspray Rig. | |||
</gallery> | </gallery> | ||
===Splatfests=== | |||
Saltspray Rig was available in the following [[Splatfest]]s in {{S}}: | |||
* [[Red Kitsune Udon vs. Green Tanuki Soba (July 2015)]] | |||
* [[Roller Coasters vs. Water Slides]] | |||
* [[Eating vs. Sleeping]] | |||
* [[Autobots vs. Decepticons]] | |||
* [[Airhead vs. Wisecracker (2015)|Airhead vs. Wisecracker]] | |||
* [[Cats vs. Dogs (October 2015)]] | |||
* [[Love vs. Money]] | |||
* [[Burgers vs. Pizza]] | |||
* [[Hoverboard vs. Jet Pack]] | |||
==Quotes== | ==Quotes== | ||
| Line 87: | Line 108: | ||
==Trivia== | ==Trivia== | ||
* Saltspray Rig was one of the two playable maps during the ''[[Splatoon Global Testfire]]'', alongside [[Walleye Warehouse]]. | * Saltspray Rig was one of the two playable maps during the ''[[Splatoon Global Testfire]]'', alongside [[Walleye Warehouse]]. | ||
* | * Saltspray Rig, [[Skipper Pavilion]], [[Zappy Longshocking]], and [[Bridge to Tentaswitchia]] are the only stages that have lateral symmetry. | ||
** Saltspray Rig is one of the two stages that is not truly symmetrical in the ''[[Splatoon (series)|Splatoon]]'' series, followed by [[Kelp Dome]]; the obstacles in the top area are not arranged symmetrically. | |||
* An evening variant of this map exists in [[Octo Valley (mode)|Octo Valley]] in the mission [[Octoling Onslaught]]. | * An evening variant of this map exists in [[Octo Valley (mode)|Octo Valley]] in the mission [[Octoling Onslaught]]. | ||
* Saltspray Rig is | * Saltspray Rig is the only stage in {{S}} whose name is not related to an aquatic organism. | ||
* | * Saltspray Rig and [[Urchin Underpass]] are the only stages in ''Splatoon'' to not return in a sequel. | ||
==Etymology== | ==Etymology== | ||
Saltspray Rig is derived from the nouns ' | Saltspray Rig is derived from the nouns 'saltspray' and 'rig'. Saltspray is salt that comes from the ocean waves, and a rig is a structure housing equipment used to drill or extract oil from underground. | ||
シオノメ油田 Shionome Yuden is derived from '' | シオノメ油田 ''Shionome Yuden'' is derived from 'Shionome' (the point where two ocean currents meet) and 'oil field', an area deep underground in the ocean for oil to be drilled or extracted. | ||
===Names in other languages=== | ===Names in other languages=== | ||
{{ | {{Localized name | ||
|color=Splatoon | |color=Splatoon | ||
|Jap=シオノメ油田 | |Jap=シオノメ油田 | ||
|JapR=Shionome Yuden | |JapR=Shionome Yuden | ||
|JapM=Shionome | |JapM=Shionome Oil Field | ||
|Spa=Plataforma Gaviota | |Spa=Plataforma Gaviota | ||
|SpaM=Seagull Rig | |SpaM=Seagull Rig | ||
| Line 115: | Line 135: | ||
|Ita=Raffineria | |Ita=Raffineria | ||
|ItaM=Refinery | |ItaM=Refinery | ||
|Internal=Seaplant | |||
}} | }} | ||
==External links== | ==External links== | ||
{{External links | |||
|twitch=no | |||
|speedrun=no | |||
|youtube=no | |||
|strategywiki=Splatoon/Saltspray Rig | |||
}} | |||
{{Navbox/S Locations}} | {{Navbox/S Locations}} | ||
[[Category: | [[Category:Splatoon stages]] | ||
[[es:Plataforma Gaviota]] | |||
[[fr:Station Doucebrise]] | [[fr:Station Doucebrise]] | ||
Revision as of 05:21, 21 March 2024
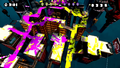
Saltspray Rig is a multiplayer stage in Splatoon.
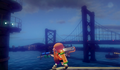
Saltspray Rig is an ocean-based oil rig, with pipes, crates, and suspended platforms resting over a large body of water.
Layout

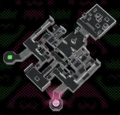
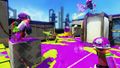
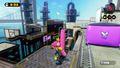
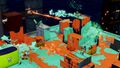
Unlike most other stages in the Splatoon series that feature rotational symmetry, Saltspray Rig's stage layout is laterally symmetrical, with the exception of the obstacles in the top area. Saltspray Rig is shaped like a squid, with two spawn points leading into a series of pathways and drop-offs. The spawn point area is not accessible to the enemy team, except in Rainmaker mode. There are two elevators located in the middle of the map to quickly move from the bottom area to the top area. Pathways stemming from each spawn point cannot be accessed by the other team, and branch off into smaller trails that lead to the top area and bottom area.
The top area is located opposite the teams' spawn points. It is normally the last area to be claimed due to its distance from the spawn points. It features a tall structure in the middle which is heavily contested in the later parts of the game to claim the surrounding turf. There is also a moving platform that a player can use to claim turf quickly, but in turn, exposes the player, as the player will fall through the platform if they turn into a squid.
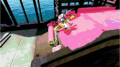
The bottom area is located between the team's spawn points. It is often the first area that is claimed but is typically forgotten towards the end of the game, due to the battle shifting towards the top area. In the last minute, it is easily claimable. The starting areas in Saltspray Rig cannot be reached on foot by the opposing team, so there is a lot of turf that can be easily claimed during the game. A team with a charger, splatling, Inkstrike or Inkzooka, though, may be able to claim some turf if the opposing team is not paying attention. Both areas contain paths leading to the bottom area and top area. If a team is not careful, the opposing team may launch an Inkstrike in the area near the end of a battle, claiming some turf which the players cannot claim after leaving their starting area. The only way a player can get back up their team's starting area is to Super Jump to their team's respective spawn or one of their teammates, or a Squid Beakon. There is an abyss surrounding the stage as a hazard for players who fall in.
This stage puts the Alpha team at a slight disadvantage. The Bravo team has more viable right-side peeking points, as Inklings are right-handed, so they can peek around a wall and be mostly protected. Peeking to the left, on the other hand, fully exposes them, leaving them open for attack. Additionally, the Bravo team can use the two moving platforms faster at the start of a match.
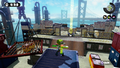
Ranked Battle terrain

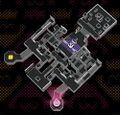
In Ranked Battles, specifications for the terrain or placement of objects are different between the modes; these changes create new paths or new objects to take cover behind.
Splat Zones
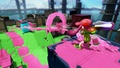
The Splat Zone for Saltspray Rig sits just below the top area, just inside the "entrance" and before the ramp. It can be easily taken by players shooting ink on ledges on the opposing sides, but if the front of the zone is not protected, the opposing team can easily take control of the zone.
Tower Control
The Tower starts at the bottom of the T-shaped section just before the top area. When taken, the Tower briefly travels around the T and down the pathway towards the enemy base before turning and going down the side of the map. It then begins traveling on the lower pathways that lead to the bottom area. Each team's goal zone is directly below the exit opposite from the bottom area when going there. Boxes have been added so that players can easily attack the other team if they have taken the Tower or vice versa. This means that the action on this stage is condensed to a small area, making the top and bottom areas go almost completely unused.
Rainmaker
The Rainmaker starts on the middle platform that the elevators rise to. Platforms containing the Rainmaker goal pedestals are built next to the spawn point. Walls have been added so that a team can reach their opponents' base. Walls block off the far side alley, forcing players to leave the spawn area through more direct routes.
Splatoon

| Added in | Initial Release (1.0.0) |
| Total area | 1,900p |
| Features | Moving Platforms |
| Hazards | Abyss |
Saltspray Rig underwent a series of changes between its development period and release.
Pre-release version
The pre-release version included many differences, such as:
- There were much fewer vertical pipes to swim up.
- The spawn points were closer together.
- Four small areas were located near teams' bases, accessed by thin, curved walkways.
- The bottom area was not present.
- The routes that currently allow players to access the top area from either side were much less detailed.
- Most edges were secured by presumably grated fences.
- The top area had fewer crates than in the final version.
-
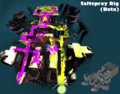
A pre-release version of Saltspray Rig.
-
The top area and connecting walkways.
-
The four smaller areas and their connecting walkways.
-
The
 map of Saltspray Rig.
-
The top area and moving grates platform.
-
One of the four smaller areas and the platforms that lead to it.
-
Another view of one of the four smaller areas.
-
Another view in an older version of Saltspray Rig.
.png)


Release version
Saltspray Rig was released with the launch of Splatoon.
Maps
-
Turf War (alpha)
-
Splat Zones (alpha)
-
Tower Control (alpha)
-
Rainmaker (alpha)
-
Turf War (bravo)
-
Splat Zones (bravo)
-
Tower Control (bravo)
-
Rainmaker (bravo)


Gallery
-
A match of Splat Zones on Saltspray Rig.
-
An Inkling running with the Splat Roller on one of the small pathways.
-
Far in the background of Saltspray Rig, a large bridge can be seen. There are also a few seagulls flying around.
-
Jellyfish on a tower at Saltspray Rig.
-
An isometric view of the north of Saltspray Rig, during a Splatfest.
-
The view from Saltspray Rig during a Splatfest.
-
Promo for Zink at Saltspray Rig.
-
An Inkling in the top area, next to the moving grated platform.
-
A Inkling Girl fires a Custom E-liter 3K in the top middle of Saltspray Rig.


Splatfests
Saltspray Rig was available in the following Splatfests in Splatoon:
- Red Kitsune Udon vs. Green Tanuki Soba (July 2015)
- Roller Coasters vs. Water Slides
- Eating vs. Sleeping
- Autobots vs. Decepticons
- Airhead vs. Wisecracker
- Cats vs. Dogs (October 2015)
- Love vs. Money
- Burgers vs. Pizza
- Hoverboard vs. Jet Pack
Quotes
| View the quotation page. |
Trivia
- Saltspray Rig was one of the two playable maps during the Splatoon Global Testfire, alongside Walleye Warehouse.
- Saltspray Rig, Skipper Pavilion, Zappy Longshocking, and Bridge to Tentaswitchia are the only stages that have lateral symmetry.
- An evening variant of this map exists in Octo Valley in the mission Octoling Onslaught.
- Saltspray Rig is the only stage in Splatoon whose name is not related to an aquatic organism.
- Saltspray Rig and Urchin Underpass are the only stages in Splatoon to not return in a sequel.
Etymology
Saltspray Rig is derived from the nouns 'saltspray' and 'rig'. Saltspray is salt that comes from the ocean waves, and a rig is a structure housing equipment used to drill or extract oil from underground.
シオノメ油田 Shionome Yuden is derived from 'Shionome' (the point where two ocean currents meet) and 'oil field', an area deep underground in the ocean for oil to be drilled or extracted.
Names in other languages
| Language | Name | Meaning |
|---|---|---|
| シオノメ油田 Shionome Yuden |
Shionome Oil Field | |
| Plate-forme Mouette | Seagull Rig | |
| Station Doucebrise | Fresh Breeze Station | |
| Bohrinsel Nautilus | Nautilus Oil Rig | |
| Raffineria | Refinery | |
| Plataforma Gaviota | Seagull Rig | |
| Seaplant |
External links
External links:
![]()
