Port Mackerel: Difference between revisions
Vernanonix (talk | contribs) No edit summary |
(Added info in the Splat Zones section.) |
||
| Line 14: | Line 14: | ||
==Notable Locations== | ==Notable Locations== | ||
==Splat Zones== | ==Splat Zones== | ||
In Splat Zones there are two zones located on one side of the two open areas of the map. The only known change from the [[Turf War]] iteration is the fact that the forklifts that move back and forth between the shipping containers are absent. | |||
In Splat Zones, it is always a good idea to check on the zone closest to your spawn regularly. If an enemy sneaks past and gains control of it, it will be all the more difficult getting it back. The side passage located at the spawn in great for chargers and any weapon that can place beacons as the high ground is very safe on Port Mackerel. Another good idea for chargers is to watch the corridors made by the containers as its narrow shape can be used to easily splat enemies going down those paths. | |||
==Tips== | ==Tips== | ||
Revision as of 15:23, 4 June 2015

Port Mackerel is an online multiplayer Stage in Splatoon. Much like Kelp Dome, it includes many corridors, such as ones around large, colored boxes and crates. This stage was not available at the launch of Splatoon, but was patched in on June 1st, 2015 and made its first appearance in the stage rotation at 10pm EST the same day.
Layout
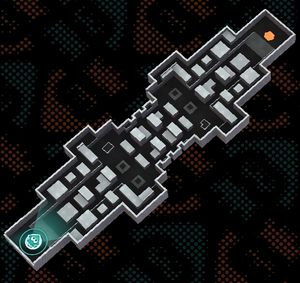
Port Mackerel is a shipping yard and, as such, there are numerous containers littering the field, making for several narrow paths in a grid shape. In the middle is another gridded area and on either side of it is an open area and an inkable forklift that rides back and forth across all three lanes. There also exist two upper paths from either spawn point that run around the perimeter of the map, ending in the middle area.
Notable Locations
Splat Zones
In Splat Zones there are two zones located on one side of the two open areas of the map. The only known change from the Turf War iteration is the fact that the forklifts that move back and forth between the shipping containers are absent.
In Splat Zones, it is always a good idea to check on the zone closest to your spawn regularly. If an enemy sneaks past and gains control of it, it will be all the more difficult getting it back. The side passage located at the spawn in great for chargers and any weapon that can place beacons as the high ground is very safe on Port Mackerel. Another good idea for chargers is to watch the corridors made by the containers as its narrow shape can be used to easily splat enemies going down those paths.
Tips
- Due to the numerous narrow alleys, Rollers, Chargers, and Killer Wails are great options on this level.
- While there isn't much in the way of accessible high ground, the forklifts are an option and getting on shipping containers is possible from the right locations, though they are all covered in plastic on top and cannot be inked.
- There is a huge area all the way around the spawn point so make sure to ink that too.
- Due to the narrow lanes and obstructed views, it's easy to bypass enemies completely without either knowing. Use the gamepad to keep tabs on where ink is being sprayed or make use of Echolocators.
Gallery
-
Port Makerel shown in a pre-release screenshot.

