User:Shisei/Sandbox

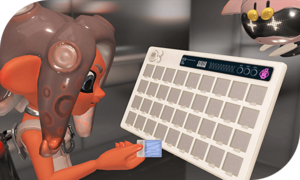
The Color-Chip Collection is a new feature available in Splatoon 3: Side Order. It looks like several smaller palettes, each holding a category of color chips, and acts as an encyclopedia of all color chips Agent 8 encounters while climbing the Spire of Order.
Collecting Color Chips

Encountering a color chip for the first time adds it to the collection, provided the player completes the floor they encounter it at. Color chips encountered through Color Chip Saturation do not count towards unlocking them in the collection. There are a total of sixty-two color chips that are able to be added to the collection.
Each color chip has three levels of completion. Achieving each level unlocks a quote from Acht, Marina and Pearl respectively. The player can level up a color chip by setting multiple copies of it into their palette in a single run. The usual progression is one copy for first level, three copies for second level and five copies for third level. Some chips only need one copy to unlock all three levels. Chips that allow for more than five copies to be placed in a palette only need five to unlock the third level.
Badges
- Main article: Badge#Story_Mode
There are six color chip categories total, each containing three different tones. A tone is a group of color chips that share the same color. Completing all color chips in a specific tone awards the player with a Badge.
| Color-Chip Collection Badges | ||||
|---|---|---|---|---|
| Collected Data for All Color Chips of the Same Tone | Unlock extra Collection information for all chips in a group (indicated by a line in the Collection screen) by equipping sufficient copies of a given chip in your Palette during one run. | |||
Color Chip Details
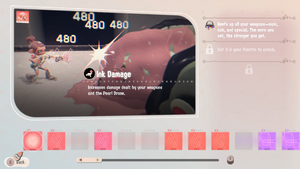
Pressing on a specific color chip in the collection shows additional information about it, including a description of the chip and quotes from Acht, Marina and Pearl that give tips on how the chip can be used.
For a list of all color chip stats, visit the Color chip page. {{Construction}}
 Power Category
The Power category contains nine color chips. These chips focus on increasing overall damage dealt, whether that be by increasing the damage or fire-rate of the main weapon, increasing damage dealt by explosions or specific Specials, or increasing the damage dealt by Agent 8's ink.
 Ink Damage
Increases damage dealt by your weapons and the Pearl Drone.
![]() Beefs up all your weapons-main,sub, and special. The more you set, the more you get.
Beefs up all your weapons-main,sub, and special. The more you set, the more you get.
![]() If you ever feel indecisive, you can't go wrong with these! Unless you have nine already. Can't help you there.
If you ever feel indecisive, you can't go wrong with these! Unless you have nine already. Can't help you there.
![]() This one chip can power up, like, ALL your stuff! What's there to think about? Just take it!
This one chip can power up, like, ALL your stuff! What's there to think about? Just take it!
 Splash Damage
Increases damage dealt by explosions.

![]() Gives oomph to bombs, blasters, and the explosions from breaking portals or splatting enemies.
Gives oomph to bombs, blasters, and the explosions from breaking portals or splatting enemies.
![]() It makes a good team with the Splash Radius chip. Any bombs Pearl throws get the boost too!
It makes a good team with the Splash Radius chip. Any bombs Pearl throws get the boost too!
![]() What if explosions... but MORE. You can't not take it! It wouldn't be fair to ME!
What if explosions... but MORE. You can't not take it! It wouldn't be fair to ME!
 Sound-Wave Damage
Increases damage dealt by sound waves from the Killer Wail 5.1, Wave Breaker, or Pearl Drone.

![]() Not many attacks use sound waves. But you don't need many of these to make them count.
Not many attacks use sound waves. But you don't need many of these to make them count.
![]() Speaking of powerful sounds, this also enhances Pearl's signature Killer Wail!
Speaking of powerful sounds, this also enhances Pearl's signature Killer Wail!
![]() My Killer Wail? Oh yeah, the one from the Drone Killer Wail chip!
My Killer Wail? Oh yeah, the one from the Drone Killer Wail chip!
 Main Firing Speed
Increases your main weapon's firing rate.

![]() This'll let you fire more quickly, which has obvious benefits, but you'll also use up ink faster.
This'll let you fire more quickly, which has obvious benefits, but you'll also use up ink faster.
![]() Pairing it with Ink Saver (Main) or Ink Recovery Rate helps. I also recommend Ink-Bottle Drop!
Pairing it with Ink Saver (Main) or Ink Recovery Rate helps. I also recommend Ink-Bottle Drop!
![]() Who cares about running out of ink as long as you splat 'em all first? BAMBAMBAMBAMBAM!
Who cares about running out of ink as long as you splat 'em all first? BAMBAMBAMBAMBAM!
 Horizontal Slash Speed
Increases your splatana's horizontal-slash rate.

![]() This lets you keep slashing so that you don't have to stop until everything around you is gone.
This lets you keep slashing so that you don't have to stop until everything around you is gone.
![]() Be careful, because it also uses up more ink. Though I'm sure Pearl has thoughts about that.
Be careful, because it also uses up more ink. Though I'm sure Pearl has thoughts about that.
![]() I was just... I was gonna... Uh, yeah, don't get careless and run outta ink, Eight!
I was just... I was gonna... Uh, yeah, don't get careless and run outta ink, Eight!
 Splatling Barrage
Increases the number of shots fired from a single charge with a splatling.

![]() This lets you fire for longer on a single charge. Doesn't take up extra ink either. Good deal.
This lets you fire for longer on a single charge. Doesn't take up extra ink either. Good deal.
![]() Taking Main Piercing along with it is a good way to get the most out of every shot in the barrage!
Taking Main Piercing along with it is a good way to get the most out of every shot in the barrage!
![]() Line 'em up and extermin-Eight 'em! Heheh, see what I did there?
Line 'em up and extermin-Eight 'em! Heheh, see what I did there?
 Main Damage (Close)
Increases damage dealt with your main weapon's shots to nearby targets.

![]() Doesn't affect subs or specials, but it packs more punch per chip than Ink Damage.
Doesn't affect subs or specials, but it packs more punch per chip than Ink Damage.
![]() You'll really appreciate having it when enemies get a little too close for comfort!
You'll really appreciate having it when enemies get a little too close for comfort!
![]() OR! Run right up to the enemy and blast away! Nothing beats the rush of close combat.
OR! Run right up to the enemy and blast away! Nothing beats the rush of close combat.
 Main Damage (Distant)
Increases damage dealt with your main weapon's shots to far-off targets.

![]() This goes great with chargers or splatlings. Hit hard from far away so they never get close.
This goes great with chargers or splatlings. Hit hard from far away so they never get close.
![]() Imagine what it's like with a few Main Range chips! Oh, except Pearl doesn't like chargers.
Imagine what it's like with a few Main Range chips! Oh, except Pearl doesn't like chargers.
![]() The thing about chargers is I can't hit anything, and for some reason everything can hit me!
The thing about chargers is I can't hit anything, and for some reason everything can hit me!
 Poison Ink
Increases damage enemies take when they're on your ink.

![]() It's all you need for the big, slow-moving ones. It's even better with Main Ink Coverage to take turf.
It's all you need for the big, slow-moving ones. It's even better with Main Ink Coverage to take turf.
![]() Just remember that his won't do much against the little fish who leave trails of ink as they go.
Just remember that his won't do much against the little fish who leave trails of ink as they go.
![]() It's always the small ones that're the biggest problems! Yo, Marina, what's that look for?!
It's always the small ones that're the biggest problems! Yo, Marina, what's that look for?!
 Support Category
The Support category contains thirteen color chips. These chips focus on increasing ink efficiency, offer help with targeting and more.
 Ink-Recovery Rate
Increases ink-tank refill rate.

![]() This doesn't just refill ink faster in swim form, by the way. It also works while in Octoling form.
This doesn't just refill ink faster in swim form, by the way. It also works while in Octoling form.
![]() It's tough when you're out of ink but not out of enemies. But with this, maybe things will be OK!
It's tough when you're out of ink but not out of enemies. But with this, maybe things will be OK!
![]() So with enough of these, it won't matter if we run out? And people will get off our case about it?
So with enough of these, it won't matter if we run out? And people will get off our case about it?
 Ink Saver (Main)
Decreases amount of ink consumed by your main weapon.

![]() If you took Main Firing Speed and are worried about your ink levels, this should ease your mind.
If you took Main Firing Speed and are worried about your ink levels, this should ease your mind.
![]() Yep! It's nice to enjoy those kinds of perks without running out of ink all the time. Right, Pearl?
Yep! It's nice to enjoy those kinds of perks without running out of ink all the time. Right, Pearl?
![]() Why are you telling me?! This is Eight's thing, not mine! Eight's!
Why are you telling me?! This is Eight's thing, not mine! Eight's!
 Ink Saver (Sub)
Decreases amount of ink consumed by your sub weapon.

![]() At max level, this could bring your ink consumption down 75 percent. That buys a lot of bombs.
At max level, this could bring your ink consumption down 75 percent. That buys a lot of bombs.
![]() It's one to watch out for! In fact, with Splash Damage, you might not even need your main weapon!
It's one to watch out for! In fact, with Splash Damage, you might not even need your main weapon!
![]() Great idea! Hear that, Eight? is out. We're all about now!
Great idea! Hear that, Eight? is out. We're all about now!
 Splat Ink Recovery
Refill ink by defeating enemies.

![]() With this, you could probably take out a swarm of smaller ones and not lose any ink.
With this, you could probably take out a swarm of smaller ones and not lose any ink.
![]() You recover the same amount of ink for every splat, so it's most effective against a horde of weaker enemies.
You recover the same amount of ink for every splat, so it's most effective against a horde of weaker enemies.
![]() I bet one bomb in the right place could get a whole ink tank back!
I bet one bomb in the right place could get a whole ink tank back!
 Sticky Ink
Decreases the movement speed of enemies on your ink.

![]() Slowing down enemies on your turf means Poison Ink is even more effective if you have it.
Slowing down enemies on your turf means Poison Ink is even more effective if you have it.
![]() And if you've set Hindrance Damage, that synchronizes nicely too!
And if you've set Hindrance Damage, that synchronizes nicely too!
![]() The ink's so gunky. Eight's not gonna get bogged down in this stuff, right?
The ink's so gunky. Eight's not gonna get bogged down in this stuff, right?
 Knockback
Attacks from your main weapon push enemies away. Does not affect certain heavy enemies.

![]() It makes your main weapon push enemies away. Might be fun to try to knock them clean off the floor.
It makes your main weapon push enemies away. Might be fun to try to knock them clean off the floor.
![]() Even if you get cornered, this can give you a fighting chance! Just remember one thing...
Even if you get cornered, this can give you a fighting chance! Just remember one thing...
![]() "Careful you don't run out of ink, Pearl!" Name ONE time!
"Careful you don't run out of ink, Pearl!" Name ONE time!
 Explosion Knockback
Increases the distance enemies are blown back by explosions.

![]() Explosions from bombs or blasters will knock foes around even more. The further the better, I say.
Explosions from bombs or blasters will knock foes around even more. The further the better, I say.
![]() If you've set any bombs to Pearl, like Drone Burst Bomb, this applies to those too.
If you've set any bombs to Pearl, like Drone Burst Bomb, this applies to those too.
![]() And if you ALSO set Splat Drone Gauge... Wait, can we count on getting all of these at once?
And if you ALSO set Splat Drone Gauge... Wait, can we count on getting all of these at once?
 Shot-Spread Reduction
Reduces the shot spread on your main weapon.

![]() This reduces the spray from your ink shots. Always helps to hit whatever you're aiming at.
This reduces the spray from your ink shots. Always helps to hit whatever you're aiming at.
![]() You don't always want less spread in a target-rich environment. But any sharpshooters will love this!"
You don't always want less spread in a target-rich environment. But any sharpshooters will love this!"
![]() You sound like Sheldon. This one's OK if you like to be precise, but if you'd rather make a mess, pass.
You sound like Sheldon. This one's OK if you like to be precise, but if you'd rather make a mess, pass.
 Homing Shots
Causes your main weapon to track targets. Having two or more improves the tracking.

![]() It hits marked enemies without having to aim. It can be quirky, so not everyone's a fan.",
It hits marked enemies without having to aim. It can be quirky, so not everyone's a fan.",
![]() If you struggle with aiming, this is for you. But it can be hard to ink turf when the shots would rather hit enemies.
If you struggle with aiming, this is for you. But it can be hard to ink turf when the shots would rather hit enemies.
![]() Shooting is awesome, and aiming is boring. So it gets the Pearl seal of approval!
Shooting is awesome, and aiming is boring. So it gets the Pearl seal of approval!
 Quick Charge
Increases your main weapon's charge speed.

![]() A must-have for charger users. The only thing better than having one is having lots.
A must-have for charger users. The only thing better than having one is having lots.
![]() This helps with the main drawback of chargers and splatlings! But they still use a lot of ink, so...
This helps with the main drawback of chargers and splatlings! But they still use a lot of ink, so...
![]() "Be suuuper-duuuper careful not to run out of ink, Eight!" How do you like my Marina impression?!
"Be suuuper-duuuper careful not to run out of ink, Eight!" How do you like my Marina impression?!
 No-Launch Brella
Prevents the brella shield from launching, allowing you to keep shooting with it open.

![]() Your brella canopy won't launch even if you hold , so you get the shield and the shots.
Your brella canopy won't launch even if you hold , so you get the shield and the shots.
![]() Isn't that great, Pearl? Now you don't need to worry about launching your brella by accident!
Isn't that great, Pearl? Now you don't need to worry about launching your brella by accident!
![]() Yeah, isn't that wonderful, Eight? Oh, and while I'm at it, CAREFUL NOT TO RUN OUT OF INK!
Yeah, isn't that wonderful, Eight? Oh, and while I'm at it, CAREFUL NOT TO RUN OUT OF INK!
 Brella Cooldown
Speeds up brella canopy regeneration after the brella shield is launched or broken.

![]() This makes it less of a problem if your brella canopy is gone, since you'll get it back faster.
This makes it less of a problem if your brella canopy is gone, since you'll get it back faster.
![]() Even when you launch the brella to clear some space, it won't be long before you can guard again!
Even when you launch the brella to clear some space, it won't be long before you can guard again!
![]() Great for all those people who keep launching the brella on accident! Not me. Other people.
Great for all those people who keep launching the brella on accident! Not me. Other people.
 Midfire Charge
Allows you to begin a new splatling charge before the previous charge is depleted.

![]() Hold while firing to get a new charge going. Though it'll stop your current barrage.
Hold while firing to get a new charge going. Though it'll stop your current barrage.
![]() Goes great with Splatling Barrage. If you charge during a lull, you could keep shooting forever!
Goes great with Splatling Barrage. If you charge during a lull, you could keep shooting forever!
![]() Firing all day long with a splatling sounds like a party! Uh, assuming nobody shows up with a charger.
Firing all day long with a splatling sounds like a party! Uh, assuming nobody shows up with a charger.
 Range Category
The Range category contains ten color chips. These chips ink more turf, make you shoot further or pierce enemies, among others.
Names in other languages
{{translation needed}}
| Language | Name | Meaning |
|---|
