Take the small ramp on the left and furthest from the entrance of Area #5. There is another ramp, but don't take it. Preform a Swimming Squid Jump to the other side and use the Inkrail. the Inkrail will take Agent 3 to Mission 24.
Take the small ramp on the left and furthest from the entrance of Area #5. There is another ramp, but don't take it. Preform a Swimming Squid Jump to the other side and use the Inkrail. the Inkrail will take Agent 3 to Mission 24.
Pinwheel Power Plant Final Checkpoint Map Piece 2.jpg| Pinwheel Power Plant Final Checkpoint Map Piece 2
Pinwheel Power Plant Final Checkpoint Map Piece 2.jpg| Pinwheel Power Plant Final Checkpoint Map Piece 2
</gallery>
</gallery>
=== Mission Briefing ===
{| class="wikitable" style="margin: auto;"
{| class="wikitable" style="margin: auto;"
Line 85:
Line 81:
=== Mechanics ===
=== Mechanics ===
==Walthrough==
== Beginning ==
===Beginning ===
2 Pinwheels can be found as the start of the beginning of Mission 24. If Agent 3 stays on the second Pinwheel, there is a secret area, holding 4 large crates. One crate carries a lot of [[Power Egg]]s, and a Launchpad. The secret Launchpad takes Agent 3 to another Launchpad, going to Checkpoint 1.
2 Pinwheels can be found as the start of the beginning of Mission 24. If Agent 3 stays on the second Pinwheel, there is a secret area, holding 4 large crates. One crate carries a lot of [[Power Egg]]s, and a Launchpad. The secret Launchpad takes Agent 3 to another Launchpad, going to Checkpoint 1.
== Checkpoint 1 ==
===Checkpoint 1===
A small narrow lines of platforms are swarmed with Octotroopers, two of them are a shielded Octotrooper. The Best way to get around these guys are to distracted them with a [[Splat Bomb]] They'll pay attention to the direction Agent 3 Threw the Splat Bomb, now being able to shoot the Octotroopers. the First small crate holds armor, and the next small crate holds an Inkzooka, now making the next section for Checkpoint 1 more easier. Once passed the area, an Inkrail will take Agent 3 to the next Checkpoint.
A small narrow lines of platforms are swarmed with Octotroopers, two of them are a shielded Octotrooper. The Best way to get around these guys are to distracted them with a [[Splat Bomb]] They'll pay attention to the direction Agent 3 Threw the Splat Bomb, now being able to shoot the Octotroopers. the First small crate holds armor, and the next small crate holds an Inkzooka, now making the next section for Checkpoint 1 more easier. Once passed the area, an Inkrail will take Agent 3 to the next Checkpoint.
== Checkpoint 2 ==
===Checkpoint 2===
Going under the Pinwheel to start off, there is a wall to get back to the original platforms, but the Pinwheel above can block Agent 3 sometimes. another Pinwheel can be found as well, but can distract Agent 3 when trying to get of a small wall to find a Launchpad.
Going under the Pinwheel to start off, there is a wall to get back to the original platforms, but the Pinwheel above can block Agent 3 sometimes. another Pinwheel can be found as well, but can distract Agent 3 when trying to get of a small wall to find a Launchpad.
== Checkpoint 3 ==
=== Checkpoint 3 ===
A crate is a blockade from continuing the mission, but can be broken. The crate in frount on the right holds armor. Breaking the crates, an Octobomber can be found hiding. Checkpoint 3 is very Similar to Checkpoint 1.
A crate is a blockade from continuing the mission, but can be broken. The crate in frount on the right holds armor. Breaking the crates, an Octobomber can be found hiding. Checkpoint 3 is very Similar to Checkpoint 1.
== Checkpoint 4 ==
===Checkpoint 4===
Agent 3 falls down onto an upcoming platform, a Pinwheel is present at the bottom as well, don't let the pinwheel push Agent 3 off. There is now a Splatform which is required to get up on to reach another Launchpad. If Agent 3 Fails the climb, Agent 3 can climb on the wall or use the Geyser to get back up.
Agent 3 falls down onto an upcoming platform, a Pinwheel is present at the bottom as well, don't let the pinwheel push Agent 3 off. There is now a Splatform which is required to get up on to reach another Launchpad. If Agent 3 Fails the climb, Agent 3 can climb on the wall or use the Geyser to get back up.
== Final Checkpoint ==
=== Final Checkpoint ===
Another Splatform is back but instead of rotating, it moves back and forth. If the jump is preformed a little late, Agent 3 will miss the platform, so be very careful on this Checkpoint. An Octotrooper can be found riding the First and last Pinwheel. Now there is a Splatform that needs to be taken to reach the Zapfish, which there are 2 Octotroopers on the Splatform. If Agent 3 fails to reach the Splatform,Agent 3 can swim back up or use a geyser found on the bottom platform. Once Agent 3 has reached the top of the Tower, the zapfish will be there.
Another Splatform is back but instead of rotating, it moves back and forth. If the jump is preformed a little late, Agent 3 will miss the platform, so be very careful on this Checkpoint. An Octotrooper can be found riding the First and last Pinwheel. Now there is a Splatform that needs to be taken to reach the Zapfish, which there are 2 Octotroopers on the Splatform. If Agent 3 fails to reach the Splatform,Agent 3 can swim back up or use a geyser found on the bottom platform. Once Agent 3 has reached the top of the Tower, the zapfish will be there.
Line 111:
Line 107:
{{Quote|Why are we here? For what purpose do we exist? We must not dwell on these questions. We can merely trust in the will of the universe and spend our days and nights in harmony with the world, celebrating this festival called Life.|[[Sunken Scroll]] {{color|24|green}}}}
{{Quote|Why are we here? For what purpose do we exist? We must not dwell on these questions. We can merely trust in the will of the universe and spend our days and nights in harmony with the world, celebrating this festival called Life.|[[Sunken Scroll]] {{color|24|green}}}}
{{clr}}
{{clr}}
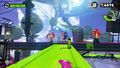
[[File:Pinwheel Power Plant Checkpoint 2-Sunken Scroll Location.jpg|frameless|left|300px]]'''Location:''' At the second checkpoint on the floating platform to the left of the second [[pinwheel]]. When you arrive at the second checkpoint go down the drop and up the wall to get to the second pinwheel. Splat the [[Octotrooper]] and ride one of the spinning platforms to jump across to the floating platform and get the scroll. It should be noted that the jump can only be made in squid form. Behind it is a [[Lanchpad]] to take you the other platform.
[[File:Pinwheel Power Plant Checkpoint 2-Sunken Scroll Location.jpg|thumb|left|300px]]'''Location:''' At the second checkpoint on the floating platform to the left of the second [[pinwheel]]. When you arrive at the second checkpoint go down the drop and up the wall to get to the second pinwheel. Splat the [[Octotrooper]] and ride one of the spinning platforms to jump across to the floating platform and get the scroll. It should be noted that the jump can only be made in squid form. Behind it is a [[Lanchpad]] to take you the other platform.
{{Clr}}
{{Clr}}
=== Armor ===
=== Armor ===
[[File:Pinwheel Power Plant Checkpoint 1- Armor -1.jpg|left|frameless|300px]] '''Location:'''
[[File:Pinwheel Power Plant Checkpoint 1- Armor -1.jpg|left|thumb|300px]] '''Location:'''
{{Clr}}
{{Clr}}
[[File:Pinwheel Power Plant Checkpoint 3-Armor -2.jpg|left|frameless|300px]] '''Location:'''
[[File:Pinwheel Power Plant Checkpoint 3-Armor -2.jpg|left|thumb|300px]] '''Location:'''
{{Clr}}
{{Clr}}
=== Special Weapon ===
=== Special Weapon ===
[[File:Pinwheel Power Plant Checkpoint 1-Inkzooka - 1.jpg|left|frameless|300px]] '''Location:'''
[[File:Pinwheel Power Plant Checkpoint 1-Inkzooka - 1.jpg|left|thumb|300px]] '''Location:'''
{{Clr}}
{{Clr}}
[[File:Pinwheel Power Plant Checkpoint 3- Inkzooka -2.jpg|left|frameless|300px]] '''Location:'''
[[File:Pinwheel Power Plant Checkpoint 3- Inkzooka -2.jpg|left|thumb|300px]] '''Location:'''
Pinwheel Power Plant Beginning Area-Agent 1's First Quote.jpg|{{Quote|Those spinny things make me nauseous...*urp*}}
Pinwheel Power Plant Beginning Area-Agent 1's First Quote.jpg|{{Quote|Those spinny things make me nauseous...*urp*}}
Pinwheel Power Plan Checkpoint 1-Agent 1's Second Quote.jpg|{{Quote|You might want that {{color-link|inkzooka|orange}}.}}
Pinwheel Power Plan Checkpoint 1-Agent 1's Second Quote.jpg|{{Quote|You might want that {{color-link|inkzooka|orange}}.}}
Line 139:
Line 135:
[[File:Agent 2 Icon.png|left|55px]][[Agent 2]]:
[[File:Agent 2 Icon.png|left|55px]][[Agent 2]]:
{{Clr}}
{{Clr}}
<gallery mode=packed>
<gallery mode>
Pinwheel Power Plant Beginning Area-Agent 2's First Quote.jpg|{{Quote|Press {{Button|X}} to {{Button|ZL1}} dash jump over the beams.}} *urp*
Pinwheel Power Plant Beginning Area-Agent 2's First Quote.jpg|{{Quote|Press {{Button|X}} to {{Button|ZL1}} dash jump over the beams.}} *urp*
Pinwheel Power Plant Checkpoint 1-Agent 2's Second Quote.jpg|{{Quote|Lookin' good [[Agent 3]].}}
Pinwheel Power Plant Checkpoint 1-Agent 2's Second Quote.jpg|{{Quote|Lookin' good [[Agent 3]].}}
Line 147:
Line 143:
== Gallery ==
== Gallery ==
<gallery mode=packed>
<gallery mode>
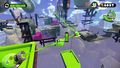
Pinwheel Power Plant Checkpoint 2-Enemy Octarians.jpg|Pinwheel Power Plant Checkpoint 2-Enemy [[Octarians]]
Pinwheel Power Plant Checkpoint 2-Enemy Octarians.jpg|Pinwheel Power Plant Checkpoint 2-Enemy [[Octarians]]
Pinwheel Power Plant Checkpoint 1-Hoard of Enemy Octarians.jpg|Pinwheel Power Plant Checkpoint 1-Hoard of Enemy Octarians
Pinwheel Power Plant Checkpoint 1-Hoard of Enemy Octarians.jpg|Pinwheel Power Plant Checkpoint 1-Hoard of Enemy Octarians
Line 164:
Line 160:
==Trivia==
==Trivia==
*[[File:Pinwheel Power Plant typo.jpg|frameless|right|175]]This mission's subtitle is a pun on "defences" and "the fences", referring to the [[grate]]s on some [[pinwheel]]s.
*[[File:Pinwheel Power Plant typo.jpg|thumb|right]]This mission's subtitle is a pun on "defences" and "the fences", referring to the [[grate]]s on some [[pinwheel]]s.
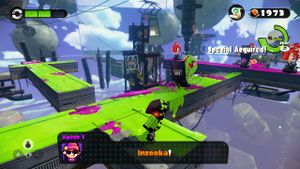
*In the Europe and Oceania version of the game, one of [[Agent 1]]'s quotes during {{PAGENAME}} has a typographical error: when [[Agent 3]] picks up one of the [[Inkzooka]] [[Canned Special]]s, she will say "Inzooka!".
*In the Europe and Oceania version of the game, one of [[Agent 1]]'s quotes during {{PAGENAME}} has a typographical error: when [[Agent 3]] picks up one of the [[Inkzooka]] [[Canned Special]]s, she will say "Inzooka!".
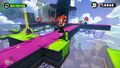
Pinwheel Power Plant is the twenty-fourth mission in Splatoon's single-player mode, Octo Valley. It is named as such because of its heavy use of Pinwheels.
Take the small ramp on the left and furthest from the entrance of Area #5. There is another ramp, but don't take it. Preform a Swimming Squid Jump to the other side and use the Inkrail. the Inkrail will take Agent 3 to Mission 24.
2 Pinwheels can be found as the start of the beginning of Mission 24. If Agent 3 stays on the second Pinwheel, there is a secret area, holding 4 large crates. One crate carries a lot of Power Eggs, and a Launchpad. The secret Launchpad takes Agent 3 to another Launchpad, going to Checkpoint 1.
Checkpoint 1
A small narrow lines of platforms are swarmed with Octotroopers, two of them are a shielded Octotrooper. The Best way to get around these guys are to distracted them with a Splat Bomb They'll pay attention to the direction Agent 3 Threw the Splat Bomb, now being able to shoot the Octotroopers. the First small crate holds armor, and the next small crate holds an Inkzooka, now making the next section for Checkpoint 1 more easier. Once passed the area, an Inkrail will take Agent 3 to the next Checkpoint.
Checkpoint 2
Going under the Pinwheel to start off, there is a wall to get back to the original platforms, but the Pinwheel above can block Agent 3 sometimes. another Pinwheel can be found as well, but can distract Agent 3 when trying to get of a small wall to find a Launchpad.
Checkpoint 3
A crate is a blockade from continuing the mission, but can be broken. The crate in frount on the right holds armor. Breaking the crates, an Octobomber can be found hiding. Checkpoint 3 is very Similar to Checkpoint 1.
Checkpoint 4
Agent 3 falls down onto an upcoming platform, a Pinwheel is present at the bottom as well, don't let the pinwheel push Agent 3 off. There is now a Splatform which is required to get up on to reach another Launchpad. If Agent 3 Fails the climb, Agent 3 can climb on the wall or use the Geyser to get back up.
Final Checkpoint
Another Splatform is back but instead of rotating, it moves back and forth. If the jump is preformed a little late, Agent 3 will miss the platform, so be very careful on this Checkpoint. An Octotrooper can be found riding the First and last Pinwheel. Now there is a Splatform that needs to be taken to reach the Zapfish, which there are 2 Octotroopers on the Splatform. If Agent 3 fails to reach the Splatform,Agent 3 can swim back up or use a geyser found on the bottom platform. Once Agent 3 has reached the top of the Tower, the zapfish will be there.
Why are we here? For what purpose do we exist? We must not dwell on these questions. We can merely trust in the will of the universe and spend our days and nights in harmony with the world, celebrating this festival called Life.
Location: At the second checkpoint on the floating platform to the left of the second pinwheel. When you arrive at the second checkpoint go down the drop and up the wall to get to the second pinwheel. Splat the Octotrooper and ride one of the spinning platforms to jump across to the floating platform and get the scroll. It should be noted that the jump can only be made in squid form. Behind it is a Lanchpad to take you the other platform.
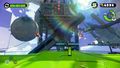
Pinwheel Power Plant Final Checkpoint-Another Enemy Octotrooper
Pinwheel Power Plant Final Checkpoint-Enemy Octotroopers
Trivia
This mission's subtitle is a pun on "defences" and "the fences", referring to the grates on some pinwheels.
In the Europe and Oceania version of the game, one of Agent 1's quotes during Pinwheel Power Plant has a typographical error: when Agent 3 picks up one of the InkzookaCanned Specials, she will say "Inzooka!".
This mission is the only mission to feature Shielded Twintacle Octodivers.


 Zapfish is...up there.
 to
to  dash jump over the beams.


