Competitive:Callouts: Difference between revisions
(sentence case) |
GuyPerfect (talk | contribs) m (Using temporary weapon template) |
||
| Line 24: | Line 24: | ||
{{collapse|| | {{collapse|| | ||
===Shooters=== | ===Shooters=== | ||
* {{ | * {{tempweapon|.52 Gal}} - 52, Gal, Gallon. | ||
* {{ | * {{tempweapon|.52 Gal Deco}} - 52, Gal, Gallon, 52 Deco. | ||
* {{ | * {{tempweapon|.96 Gal}} - 96, Gal, Gallon. | ||
* {{ | * {{tempweapon|.96 Gal Deco}} - 96, Gal, Gallon, 96 Deco. | ||
* {{ | * {{tempweapon|Aerospray MG}} - Aero. | ||
* {{ | * {{tempweapon|Aerospray PG}} - Aero. | ||
* {{ | * {{tempweapon|Aerospray RG}} - Aero. | ||
* {{ | * {{tempweapon|Berry Splattershot Pro}} - Berry, Berry Pro, Pro. | ||
* {{ | * {{tempweapon|Cherry H-3 Nozzlenose}} - H3, Cherry. | ||
* {{ | * {{tempweapon|Custom Dual Squelcher}} - Squelcher. | ||
* {{ | * {{tempweapon|Custom Jet Squelcher}} - Jet. | ||
* {{ | * {{tempweapon|Custom Splattershot Jr.}} - Junior, Custom Junior. | ||
* {{ | * {{tempweapon|Dual Squelcher}} - Squelcher. | ||
* {{ | * {{tempweapon|Forge Splattershot Pro}} - Forge, Forge Pro, Pro. | ||
* {{ | * {{tempweapon|H-3 Nozzlenose}} - H3. | ||
* {{ | * {{tempweapon|H-3 Nozzlenose D}} - H3. | ||
* {{ | * {{tempweapon|Hero Shot Replica}} - Splattershot. | ||
* {{ | * {{tempweapon|Jet Squelcher}} - Jet. | ||
* {{ | * {{tempweapon|L-3 Nozzlenose}} - L3. | ||
* {{ | * {{tempweapon|L-3 Nozzlenose D}} - L3. | ||
* {{ | * {{tempweapon|Neo Splash-o-matic}} - Splash. | ||
* {{ | * {{tempweapon|Neo Sploosh-o-matic}} - Sploosh. | ||
* {{ | * {{tempweapon|N-ZAP '83}} - N-zap. | ||
* {{ | * {{tempweapon|N-ZAP '85}} - N-zap. | ||
* {{ | * {{tempweapon|N-ZAP '89}} - N-zap. | ||
* {{ | * {{tempweapon|Octoshot Replica}} - Tentatek, T-tek, Octoshot. | ||
* {{ | * {{tempweapon|Splash-o-matic}} - Splash. | ||
* {{ | * {{tempweapon|Splattershot}} - Splattershot. | ||
* {{ | * {{tempweapon|Splattershot Jr.}} - Junior. | ||
* {{ | * {{tempweapon|Splattershot Pro}} - Pro. | ||
* {{ | * {{tempweapon|Sploosh-o-matic}} - Sploosh. | ||
* {{ | * {{tempweapon|Sploosh-o-matic 7}} - Sploosh. | ||
* {{ | * {{tempweapon|Tentatek Splattershot}} - Tentatek, T-tek, Octoshot. | ||
* {{ | * {{tempweapon|Wasabi Splattershot}} - Wasabi. | ||
===Blasters=== | ===Blasters=== | ||
* {{ | * {{tempweapon|Blaster}} - Blaster. | ||
* {{ | * {{tempweapon|Custom Blaster}} - Blaster. | ||
* {{ | * {{tempweapon|Custom Range Blaster}} - Blaster, CRB. | ||
* {{ | * {{tempweapon|Grim Range Blaster}} - Blaster, Grim. | ||
* {{ | * {{tempweapon|Luna Blaster}} - Luna, Loony, Blaster. | ||
* {{ | * {{tempweapon|Luna Blaster Neo}} - Luna, Loony, Blaster. | ||
* {{ | * {{tempweapon|Range Blaster}} - Blaster. | ||
* {{ | * {{tempweapon|Rapid Blaster}} - Blaster. | ||
* {{ | * {{tempweapon|Rapid Blaster Deco}} - Blaster. | ||
* {{ | * {{tempweapon|Rapid Blaster Pro}} - Blaster. | ||
* {{ | * {{tempweapon|Rapid Blaster Pro Deco}} - Blaster. | ||
===Chargers=== | ===Chargers=== | ||
* {{ | * {{tempweapon|Bamboozler 14 Mk I}} - Bamboo, Stick, Boozler. | ||
* {{ | * {{tempweapon|Bamboozler 14 Mk II}} - Bamboo, Stick, Boozler, Poison Stick. | ||
* {{ | * {{tempweapon|Bamboozler 14 Mk III}} - Bamboo, Stick, Boozler. | ||
* {{ | * {{tempweapon|Bento Splat Charger}} - Charger, Bento. | ||
* {{ | * {{tempweapon|Bento Splatterscope}} - Charger, Bento. | ||
* {{ | * {{tempweapon|Classic Squiffer}} - Squiffer, Squiff. | ||
* {{ | * {{tempweapon|Custom E-liter 3K}} - Charger. | ||
* {{ | * {{tempweapon|Custom E-liter 3K Scope}} - Charger. | ||
* {{ | * {{tempweapon|E-liter 3K}} - Charger. | ||
* {{ | * {{tempweapon|E-liter 3K Scope}} - Charger. | ||
* {{ | * {{tempweapon|Fresh Squiffer}} - Squiffer, Squiff. | ||
* {{ | * {{tempweapon|Hero Charger Replica}} - Charger. | ||
* {{ | * {{tempweapon|Kelp Splat Charger}} - Charger. | ||
* {{ | * {{tempweapon|Kelp Splatterscope}} - Charger. | ||
* {{ | * {{tempweapon|New Squiffer}} - Squiffer, Squiff. | ||
* {{ | * {{tempweapon|Splat Charger}} - Charger. | ||
* {{ | * {{tempweapon|Splatterscope}} - Charger. | ||
===Rollers=== | ===Rollers=== | ||
* {{ | * {{tempweapon|Carbon Roller}} - Carbon. | ||
* {{ | * {{tempweapon|Carbon Roller Deco}} - Carbon. | ||
* {{ | * {{tempweapon|CoroCoro Splat Roller}} - CoroCoro, Roller. | ||
* {{ | * {{tempweapon|Dynamo Roller}} - Dynamo. | ||
* {{ | * {{tempweapon|Gold Dynamo Roller}} - Dynamo. | ||
* {{ | * {{tempweapon|Hero Roller Replica}} - Roller. | ||
* {{ | * {{tempweapon|Krak-On Splat Roller}} - Krak-On, Kraken Roller, Roller. | ||
* {{ | * {{tempweapon|Splat Roller}} - Roller. | ||
* {{ | * {{tempweapon|Tempered Dynamo Roller}} - Dynamo. | ||
===Brushes=== | ===Brushes=== | ||
* {{ | * {{tempweapon|Inkbrush}} - Brush. | ||
* {{ | * {{tempweapon|Inkbrush Nouveau}} - Brush. | ||
* {{ | * {{tempweapon|Octobrush}} - Brush. | ||
* {{ | * {{tempweapon|Octobrush Nouveau}} - Brush. | ||
* {{ | * {{tempweapon|Permanent Inkbrush}} - Brush. | ||
===Sloshers=== | ===Sloshers=== | ||
* {{ | * {{tempweapon|Slosher}} - Bucket, Slosher. | ||
* {{ | * {{tempweapon|Slosher Deco}} - Bucket, Slosher. | ||
* {{ | * {{tempweapon|Sloshing Machine}} - Sloshing Machine, Slosher, Laundry. | ||
* {{ | * {{tempweapon|Sloshing Machine Neo}} - Sloshing Machine, Slosher, Laundry. | ||
* {{ | * {{tempweapon|Soda Slosher}} - Bucket, Slosher. | ||
* {{ | * {{tempweapon|Tri-Slosher}} - Bucket, Tri-Slosher. | ||
* {{ | * {{tempweapon|Tri-Slosher Nouveau}} - Bucket, Tri-Slosher. | ||
===Splatlings=== | ===Splatlings=== | ||
* {{ | * {{tempweapon|Custom Hydra Splatling}} - Hydra, Custom Hydra. | ||
* {{ | * {{tempweapon|Heavy Splatling}} - Heavy, Splatling. | ||
* {{ | * {{tempweapon|Heavy Splatling Deco}} - Heavy, Splatling. | ||
* {{ | * {{tempweapon|Heavy Splatling Remix}} - Heavy, Splatling, Remix. | ||
* {{ | * {{tempweapon|Hydra Splatling}} - Hydra. | ||
* {{ | * {{tempweapon|Mini Splatling}} - Mini. | ||
* {{ | * {{tempweapon|Refurbished Mini Splatling}} - Mini, Remi. | ||
* {{ | * {{tempweapon|Zink Mini Splatling}} - Mini, Zink, Zimi | ||
}} | }} | ||
</div> | </div> | ||
Revision as of 19:57, 25 August 2017
Callouts are concise phrases designed to broadcast as much information about the enemy as possible in as few syllables as possible. Splatoon squads should consider using them to improve team coordination.
Callouts use a common format of [number of enemies] at [location]. More detailed information may be called out: [weapon held by enemy] at [location] moving to [location].
If the enemy has taken damage: [weapon held by enemy] is weak.
To say that the enemy is located where the player got splatted: On my X. To indicate the signal, the player needs to press the Booyah!(NA)[a]/Nice!(EU/OC)[b] signal.
Traded with [weapon held by enemy] is used to communicate that both the player and the enemy got splatted.
Got [number of enemies] or Got [weapon held by enemy] are used to report any successful splats.
[weapon held by enemy] got me is used to communicate that the player got splatted and the team is one down.
[weapon held by enemy] jumped out is used to communicate that the enemy super jumped away.
For example, a typical callout would be "Charger on their Snipe". This callout alerts the team that a Splat Charger or E-liter 3K player is at the most common sniping location.
Weapon naming
The full weapon name could be used, but these abbreviations and alternate names make communication more efficient. Special Weapons should also be called out if they are being deployed.
Shooters
- Template:Tempweapon - 52, Gal, Gallon.
- Template:Tempweapon - 52, Gal, Gallon, 52 Deco.
- Template:Tempweapon - 96, Gal, Gallon.
- Template:Tempweapon - 96, Gal, Gallon, 96 Deco.
- Template:Tempweapon - Aero.
- Template:Tempweapon - Aero.
- Template:Tempweapon - Aero.
- Template:Tempweapon - Berry, Berry Pro, Pro.
- Template:Tempweapon - H3, Cherry.
- Template:Tempweapon - Squelcher.
- Template:Tempweapon - Jet.
- Template:Tempweapon - Junior, Custom Junior.
- Template:Tempweapon - Squelcher.
- Template:Tempweapon - Forge, Forge Pro, Pro.
- Template:Tempweapon - H3.
- Template:Tempweapon - H3.
- Template:Tempweapon - Splattershot.
- Template:Tempweapon - Jet.
- Template:Tempweapon - L3.
- Template:Tempweapon - L3.
- Template:Tempweapon - Splash.
- Template:Tempweapon - Sploosh.
- Template:Tempweapon - N-zap.
- Template:Tempweapon - N-zap.
- Template:Tempweapon - N-zap.
- Template:Tempweapon - Tentatek, T-tek, Octoshot.
- Template:Tempweapon - Splash.
- Template:Tempweapon - Splattershot.
- Template:Tempweapon - Junior.
- Template:Tempweapon - Pro.
- Template:Tempweapon - Sploosh.
- Template:Tempweapon - Sploosh.
- Template:Tempweapon - Tentatek, T-tek, Octoshot.
- Template:Tempweapon - Wasabi.
Blasters
- Template:Tempweapon - Blaster.
- Template:Tempweapon - Blaster.
- Template:Tempweapon - Blaster, CRB.
- Template:Tempweapon - Blaster, Grim.
- Template:Tempweapon - Luna, Loony, Blaster.
- Template:Tempweapon - Luna, Loony, Blaster.
- Template:Tempweapon - Blaster.
- Template:Tempweapon - Blaster.
- Template:Tempweapon - Blaster.
- Template:Tempweapon - Blaster.
- Template:Tempweapon - Blaster.
Chargers
- Template:Tempweapon - Bamboo, Stick, Boozler.
- Template:Tempweapon - Bamboo, Stick, Boozler, Poison Stick.
- Template:Tempweapon - Bamboo, Stick, Boozler.
- Template:Tempweapon - Charger, Bento.
- Template:Tempweapon - Charger, Bento.
- Template:Tempweapon - Squiffer, Squiff.
- Template:Tempweapon - Charger.
- Template:Tempweapon - Charger.
- Template:Tempweapon - Charger.
- Template:Tempweapon - Charger.
- Template:Tempweapon - Squiffer, Squiff.
- Template:Tempweapon - Charger.
- Template:Tempweapon - Charger.
- Template:Tempweapon - Charger.
- Template:Tempweapon - Squiffer, Squiff.
- Template:Tempweapon - Charger.
- Template:Tempweapon - Charger.
Rollers
- Template:Tempweapon - Carbon.
- Template:Tempweapon - Carbon.
- Template:Tempweapon - CoroCoro, Roller.
- Template:Tempweapon - Dynamo.
- Template:Tempweapon - Dynamo.
- Template:Tempweapon - Roller.
- Template:Tempweapon - Krak-On, Kraken Roller, Roller.
- Template:Tempweapon - Roller.
- Template:Tempweapon - Dynamo.
Brushes
- Template:Tempweapon - Brush.
- Template:Tempweapon - Brush.
- Template:Tempweapon - Brush.
- Template:Tempweapon - Brush.
- Template:Tempweapon - Brush.
Sloshers
- Template:Tempweapon - Bucket, Slosher.
- Template:Tempweapon - Bucket, Slosher.
- Template:Tempweapon - Sloshing Machine, Slosher, Laundry.
- Template:Tempweapon - Sloshing Machine, Slosher, Laundry.
- Template:Tempweapon - Bucket, Slosher.
- Template:Tempweapon - Bucket, Tri-Slosher.
- Template:Tempweapon - Bucket, Tri-Slosher.
Splatlings
- Template:Tempweapon - Hydra, Custom Hydra.
- Template:Tempweapon - Heavy, Splatling.
- Template:Tempweapon - Heavy, Splatling.
- Template:Tempweapon - Heavy, Splatling, Remix.
- Template:Tempweapon - Hydra.
- Template:Tempweapon - Mini.
- Template:Tempweapon - Mini, Remi.
- Template:Tempweapon - Mini, Zink, Zimi
Location naming
- Our and Their - These modifiers are used to distinguish things on "our" side vs "their" side. This leads to names like "Our Perch" and "Their Halfpipe".
- Left and Right - Used to identify one of the repeated features on the left or right side of a map. This leads to names like "Our Left Box" and "Our Right Box".
- Spawn - The area near the Spawn Point.
- Zone - The zones in Splat Zones.
- Tower - The tower in Tower Control.
- Goal - The Rainmaker goal.
- Mid - The middle of the map.
- Structures - Areas can be called out by their shape or structure: Square, Wall, Bridge.
- Decorations - Naming an area based on the decorations near it can result in callouts that are very easy to remember. An area with a shovel prop could be called Tool. The area near a tree would be called Tree. The area near a box or crate could be called Box or Crate.
- Hill or Ramp - An incline.
- Snipe - An area commonly used for sniping.
- Top, Perch, Pillar, or Overlook - An elevated location.
- Plat - A platform.
- Court - An open area.
- Street - A long ramp or walkway.
- Open - Ramps and walkways that are lacking cover.
- Close - Ramps and walkways that are closed off by a wall, ceiling, or tunnel.
- Back - A generally avoided or less-used area of the map that is "in the back" and out of the way.
- Sneaky - A stealthy path to a location.
- Alley - A narrow path, often enclosed by walls.
- Cubby - A location with walls on 3 sides. Often a good spot to place a Beakon.
- Cat - Catwalk. These are grated surfaces that squids will drop through.
- Jump - A location where a jump is required to move from one location to another.
- Elbow - Walkways with a 90 degree angle.
- Shoulder - A ramp leading up the side of a tall or large structure.
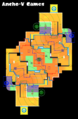
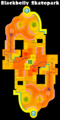
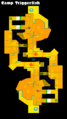
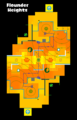
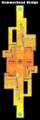
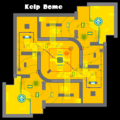
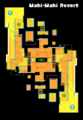
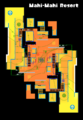
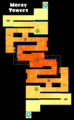
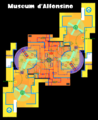
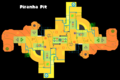
Map overviews with callouts
Examples
These are just examples. A team may decide that different or more detailed location callouts are needed in a particular area.
-
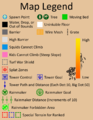
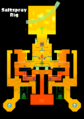
Map Legend
-
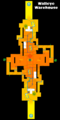
Mahi-Mahi Resort Phase A
-
Mahi-Mahi Resort Phase B

Templates
-
-

-
-

-
-
-
-
-
Mahi-Mahi Resort Phase A
-
Mahi-Mahi Resort Phase B
-
-
-
-

-
-

-


Cite error: <ref> tags exist for a group named "notes", but no corresponding <references group="notes"/> tag was found
