Damage: Difference between revisions
m (Text replacement - "[[Octoling (playable)|" to "[[") |
|||
| (43 intermediate revisions by 17 users not shown) | |||
| Line 1: | Line 1: | ||
{{for|the | {{for|the damage-increasing ability|Damage Up}} | ||
'''Damage''' is the attack value dealt by a [[weapon]]. Players or objects will become [[splatted]] if they take enough damage. The player receives visual and audio feedback when they become damaged. The [[Splatoon (series)|''Splatoon'' series]] has several types of damage and ways to heal. | |||
==Health points (HP)== | |||
Damage values are subtracted from health points. The health points of a player or object must be lowered down to 0 for them to be splatted or destroyed. Some HP values are listed here: | |||
* Players have 100 HP. | |||
* The [[Rainmaker shield]] has 1000 HP. See the Rainmaker shield article for information on damage multipliers. | |||
* [[Splash Wall]]s have 600 HP in ''Splatoon'' (naturally losing 85.71 HP per second), and 800 HP in ''Splatoon 2'' (naturally losing 114.28 HP per second). | |||
* For HP values for the enemies in [[Octo Canyon (mode)|Octo Canyon]], see [[Octo Canyon data]]. | |||
* For [[Salmonid]] HP, see [[Salmon Run data]]. | |||
==Feedback== | |||
===Visual=== | |||
* When the player accumulates more than 30 damage in ''Splatoon'' and ''[[Splatoon 2]]'', and 20 damage in ''[[Splatoon 3]]'', an [[ink]] effect appears on the border of the TV screen. | |||
** In ''[[Splatoon]]'', when the player gets splatted, an ink effect appears on the border of the {{GP}} screen. | |||
* When an enemy player accumulates more than 30 damage in ''Splatoon'' and ''Splatoon 2'', and 20 damage in ''Splatoon 3'', that player's location becomes visible to the team on the [[map]] screen. | |||
<gallery> | <gallery> | ||
StuckInInk.png|An Inkling | StuckInInk.png|An [[Inkling]] stuck in enemy ink. | ||
EnemyHurtInGamePad.png| | EnemyHurtInGamePad.png|An enemy's location showing up on the map after getting hurt. | ||
</gallery> | </gallery> | ||
===Audio=== | |||
A hit confirmation sound can be heard when the player successfully damages an object or opponent. [[Charger]] and [[blaster]] weapons, as well as the [[Sloshing Machine]] and [[H-3 Nozzlenose]], have a high-pitched sound when hitting a direct hit while other weapons have a more subtle sound. The sound varies when hitting different kinds of [[Salmonid]]s. There is a clash sound when hitting [[armor]]. | |||
The player's [[Inkling]] or [[Octoling]] cries out in pain if they are damaged. There are also sounds for when players are submerged in [[ink]] and not swimming - this sound can give away the position of a hiding player, as the opponent players can hear the bubbly sound. | |||
===Vibration=== | |||
While playing, the vibration feature of [[Nintendo]]'s controllers alerts the player when any kind of damage is around them. Examples of vibration feedback include bombs, the [[Sting Ray]], blasts, and splats. | |||
This feature can be disabled in the system's settings. | |||
==Healing damage== | |||
After taking damage, there is a one-second delay before healing begins. Touching even a small drop of enemy [[ink]] on the ground can reset this delay. In humanoid form, players heal at a rate of 12.5 damage per second. While submerged in ink, players heal at a rate of 100 damage per second. | |||
In [[Octo Canyon (mode)|Octo Canyon mode]] in ''Splatoon 2'', the delay before healing begins is 1.5 seconds. This was also true for online battles, but as of version {{ver|S2|2.0.0}} of ''Splatoon 2'', the delay was reduced to one second, while the Octo Canyon healing delay remained at 1.5 seconds. | |||
== | ==Types of damage== | ||
===Falloff damage=== | |||
If a player is fighting outside of the effective range of their weapon, falloff damage occurs. This means the damage dealt is less, often making it necessary to hit an opponent extra times to [[Splat (occurrence)|splat]] them. This happens because [[ink]] is less lethal when it loses velocity, which happens if a player is fighting outside of the effective range of their weapon. When a player is fighting at effective range, a crosshair appears when they point their aiming reticle at someone. | |||
The [[Slosher]] and [[Tri-Slosher]] are least likely to experience difficulties related to falloff damage because their damage starts very high. [[Shooter|Blasters]], [[charger]]s and the [[Sloshing Machine]] are not affected by falloff damage at all. Falloff damage can be mitigated by using [[Damage Up]] in ''[[Splatoon]]'' or [[Main Power Up]] with certain weapons in ''[[Splatoon 2]]''. | |||
== | ===Passive ink damage=== | ||
Stepping in enemy ink accumulates up to 50 damage at 30 damage per second in ''Splatoon'', and up to 40 damage at 18 damage per second in ''Splatoon 2''. The [[Ink Resistance Up]] [[gear ability|ability]] reduces this to 30 damage at 12 damage per second in ''Splatoon'', and up to 20 damage at 9 damage per second in ''Splatoon 2''. | |||
=== | ===Splash damage=== | ||
Splash damage is damage that is dealt within the effective range of a weapon, but still with reduced damage as a penalty for not aiming well. It is dealt by the blast from blasters and the Sloshing Machine when the player does not land a direct hit, and by [[roller]]s (including [[brush]]es) when the target is hit by the far left or far right splashes of ink. | |||
==Damage in ''Splatoon''== | |||
Some damage mechanics were removed in ''[[Splatoon 2]]''. These ''[[Splatoon]]''-specific mechanics are documented here. | |||
The | ===Damage Up vs. Defense Up=== | ||
The [[Damage Up]] and [[Defense Up]] [[gear ability|abilities]] interact by canceling the effects of the other. If a weapon starts at dealing 52 damage per shot, it still does 52 damage if the attacker is wearing one main of Damage Up and the defender is wearing one main of Defense Up. But if the attacker is wearing no Damage Up and the defender is wearing three subs of Defense Up, the damage is reduced to 49.6, forcing the attacker to land one extra shot in order to splat the defender. This leads to players stacking more and more of these abilities to counter each other. | |||
=== | ===Hits-to-splat tables=== | ||
These images show the hits-to-splat ratios for all possible match-ups of Damage Up and Defense Up, for weapons that deal consistent damage. Weapons that deal consistent damage but never have their hits-to-splat changed are the [[Aerospray]]s, [[H-3 Nozzlenose]], [[Jet Squelcher]], [[Slosher]], [[Sloshing Machine]], [[Splattershot Pro]], and [[Tri-Slosher]]. | |||
[[Shooter|Blasters]], [[charger]]s and [[roller]]s deal variable damage, so they are affected differently. The edge of a blaster blast may become too weak to splat in two hits, and the edge of a [[Rapid Blaster]] blast may become too weak to splat in four hits, requiring the blaster player to either use Damage Up or aim their weapon more accurately. Chargers may require an extra hit to splat if the player did not fully charge their shot. Rollers have their effective range slightly reduced by Defense Up, which sometimes results in a different number of hits-to-splat. | |||
<gallery> | |||
Hits-to-Splat 28dmg.png|Dual Squelcher, N-ZAP, Splash-o-matic, Splattershot Jr., Mini Splatling, Heavy Splatling. | |||
Hits-to-Splat 29dmg.png|L-3 Nozzlenose. | |||
Hits-to-Splat 35dmg.png|Hydra Splatling (full charge), Splattershot. | |||
Hits-to-Splat 37dmg.png|Octobrush. | |||
Hits-to-Splat 38dmg.png|Sploosh-o-matic. | |||
Hits-to-Splat 52dmg.png|.52 Gal, .96 Gal. | |||
</gallery> | |||
===Benefits of reaching damage cap=== | |||
The number of hits required to splat an opponent is determined by the base damage of a weapon. Weapons that need more than one hit to splat have a damage limit regardless of how much damage is stacked. The damage cap is calculated with the formula 99.99/(H-1), where H is the number of hits to splat an undamaged opponent with no Damage Up. | |||
If a player stacks enough Damage Up to approach these limits, then the player has the potential to need one less hit-to-splat if the enemy steps on the player's ink color. Stepping on player's ink makes the enemy player get stuck and get dealt damage over time. Normally, touching enemy ink accumulates up to 50 damage at a rate of 30 damage per second, but with Ink Resistance Up, only 30 damage can accumulate, and at a rate of 12 damage per second. The closer the player is to reaching a damage limit, the higher the chances to get one less hit-to-splat. | |||
For example, the base damage of a fully charged [[Bamboozler]] shot does 80 damage. If the player stacks two mains and five subs of Damage Up to reach the 99.9 damage limit, and if the enemy walks on the player's ink for a split second, there is the potential to splat them in one fully charged Bamboozler shot instead of two shots. | |||
The Splattershot Pro has the potential to splat in two shots instead of three if the player stacks enough damage up to do 49.9 damage per shot and the enemy walks on the player's ink. The Jet Squelcher has the potential to splat in three shots instead of four if the player stacks enough damage up to do 33.3 damage per shot and the enemy walks on the player's ink. | |||
For damage limits on other weapons, see the chart below. | For damage limits on other weapons, see the chart below. | ||
<gallery> | <gallery> | ||
Damage Up 2HKO+ Chart.png|Damage Up increases the damage per hit of two-hit+ splat weapons to limits of 24.9, 33.3, 49.9, or 99.9. | |||
</gallery> | </gallery> | ||
== | ===Calculating damage=== | ||
<pre> | <pre> | ||
a = Ability Points of Damage Up = 10 × [Number of Damage Up | a = Ability Points of Damage Up = 10 × [Number of Damage Up main slots] + 3 × [Number of Damage Up sub slots] | ||
d = Ability Points of Defense Up = 10 × [Number of Defense Up | d = Ability Points of Defense Up = 10 × [Number of Defense Up main slots] + 3 × [Number of Defense Up sub slots] | ||
A = (0.99 × a - (0.09 × a) ^ 2) / 100 | A = (0.99 × a - (0.09 × a) ^ 2) / 100 | ||
D = (0.99 × d - (0.09 × d) ^ 2) / 100 | D = (0.99 × d - (0.09 × d) ^ 2) / 100 | ||
| Line 234: | Line 99: | ||
==Gallery== | ==Gallery== | ||
<gallery> | <gallery> | ||
Norm dmg.png|A [[Splattershot]]'s base damage on a | Norm dmg.png|A [[Splattershot]]'s base damage on a [[bumper]]. | ||
Defense dmg.png|A | Defense dmg.png|A Splattershot's base damage on a bumper with two mains of Defense Up. | ||
</gallery> | </gallery> | ||
[[Category:Game information]] | |||
Latest revision as of 17:33, 28 September 2023
- For the damage-increasing ability, see Damage Up.
Damage is the attack value dealt by a weapon. Players or objects will become splatted if they take enough damage. The player receives visual and audio feedback when they become damaged. The Splatoon series has several types of damage and ways to heal.
Health points (HP)
Damage values are subtracted from health points. The health points of a player or object must be lowered down to 0 for them to be splatted or destroyed. Some HP values are listed here:
- Players have 100 HP.
- The Rainmaker shield has 1000 HP. See the Rainmaker shield article for information on damage multipliers.
- Splash Walls have 600 HP in Splatoon (naturally losing 85.71 HP per second), and 800 HP in Splatoon 2 (naturally losing 114.28 HP per second).
- For HP values for the enemies in Octo Canyon, see Octo Canyon data.
- For Salmonid HP, see Salmon Run data.
Feedback
Visual
- When the player accumulates more than 30 damage in Splatoon and Splatoon 2, and 20 damage in Splatoon 3, an ink effect appears on the border of the TV screen.
- In Splatoon, when the player gets splatted, an ink effect appears on the border of the
 screen.
- In Splatoon, when the player gets splatted, an ink effect appears on the border of the
- When an enemy player accumulates more than 30 damage in Splatoon and Splatoon 2, and 20 damage in Splatoon 3, that player's location becomes visible to the team on the map screen.
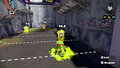
-
An Inkling stuck in enemy ink.
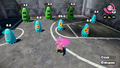
-

An enemy's location showing up on the map after getting hurt.


Audio
A hit confirmation sound can be heard when the player successfully damages an object or opponent. Charger and blaster weapons, as well as the Sloshing Machine and H-3 Nozzlenose, have a high-pitched sound when hitting a direct hit while other weapons have a more subtle sound. The sound varies when hitting different kinds of Salmonids. There is a clash sound when hitting armor.
The player's Inkling or Octoling cries out in pain if they are damaged. There are also sounds for when players are submerged in ink and not swimming - this sound can give away the position of a hiding player, as the opponent players can hear the bubbly sound.
Vibration
While playing, the vibration feature of Nintendo's controllers alerts the player when any kind of damage is around them. Examples of vibration feedback include bombs, the Sting Ray, blasts, and splats.
This feature can be disabled in the system's settings.
Healing damage
After taking damage, there is a one-second delay before healing begins. Touching even a small drop of enemy ink on the ground can reset this delay. In humanoid form, players heal at a rate of 12.5 damage per second. While submerged in ink, players heal at a rate of 100 damage per second.
In Octo Canyon mode in Splatoon 2, the delay before healing begins is 1.5 seconds. This was also true for online battles, but as of version 2.0.0 of Splatoon 2, the delay was reduced to one second, while the Octo Canyon healing delay remained at 1.5 seconds.
Types of damage
Falloff damage
If a player is fighting outside of the effective range of their weapon, falloff damage occurs. This means the damage dealt is less, often making it necessary to hit an opponent extra times to splat them. This happens because ink is less lethal when it loses velocity, which happens if a player is fighting outside of the effective range of their weapon. When a player is fighting at effective range, a crosshair appears when they point their aiming reticle at someone.
The Slosher and Tri-Slosher are least likely to experience difficulties related to falloff damage because their damage starts very high. Blasters, chargers and the Sloshing Machine are not affected by falloff damage at all. Falloff damage can be mitigated by using Damage Up in Splatoon or Main Power Up with certain weapons in Splatoon 2.
Passive ink damage
Stepping in enemy ink accumulates up to 50 damage at 30 damage per second in Splatoon, and up to 40 damage at 18 damage per second in Splatoon 2. The Ink Resistance Up ability reduces this to 30 damage at 12 damage per second in Splatoon, and up to 20 damage at 9 damage per second in Splatoon 2.
Splash damage
Splash damage is damage that is dealt within the effective range of a weapon, but still with reduced damage as a penalty for not aiming well. It is dealt by the blast from blasters and the Sloshing Machine when the player does not land a direct hit, and by rollers (including brushes) when the target is hit by the far left or far right splashes of ink.
Damage in Splatoon
Some damage mechanics were removed in Splatoon 2. These Splatoon-specific mechanics are documented here.
Damage Up vs. Defense Up
The Damage Up and Defense Up abilities interact by canceling the effects of the other. If a weapon starts at dealing 52 damage per shot, it still does 52 damage if the attacker is wearing one main of Damage Up and the defender is wearing one main of Defense Up. But if the attacker is wearing no Damage Up and the defender is wearing three subs of Defense Up, the damage is reduced to 49.6, forcing the attacker to land one extra shot in order to splat the defender. This leads to players stacking more and more of these abilities to counter each other.
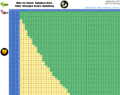
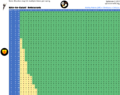
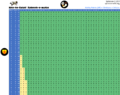
Hits-to-splat tables
These images show the hits-to-splat ratios for all possible match-ups of Damage Up and Defense Up, for weapons that deal consistent damage. Weapons that deal consistent damage but never have their hits-to-splat changed are the Aerosprays, H-3 Nozzlenose, Jet Squelcher, Slosher, Sloshing Machine, Splattershot Pro, and Tri-Slosher.
Blasters, chargers and rollers deal variable damage, so they are affected differently. The edge of a blaster blast may become too weak to splat in two hits, and the edge of a Rapid Blaster blast may become too weak to splat in four hits, requiring the blaster player to either use Damage Up or aim their weapon more accurately. Chargers may require an extra hit to splat if the player did not fully charge their shot. Rollers have their effective range slightly reduced by Defense Up, which sometimes results in a different number of hits-to-splat.
-
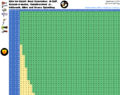
Dual Squelcher, N-ZAP, Splash-o-matic, Splattershot Jr., Mini Splatling, Heavy Splatling.
-
L-3 Nozzlenose.
-
Hydra Splatling (full charge), Splattershot.
-
Octobrush.
-
Sploosh-o-matic.
-
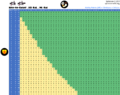
.52 Gal, .96 Gal.


Benefits of reaching damage cap
The number of hits required to splat an opponent is determined by the base damage of a weapon. Weapons that need more than one hit to splat have a damage limit regardless of how much damage is stacked. The damage cap is calculated with the formula 99.99/(H-1), where H is the number of hits to splat an undamaged opponent with no Damage Up.
If a player stacks enough Damage Up to approach these limits, then the player has the potential to need one less hit-to-splat if the enemy steps on the player's ink color. Stepping on player's ink makes the enemy player get stuck and get dealt damage over time. Normally, touching enemy ink accumulates up to 50 damage at a rate of 30 damage per second, but with Ink Resistance Up, only 30 damage can accumulate, and at a rate of 12 damage per second. The closer the player is to reaching a damage limit, the higher the chances to get one less hit-to-splat.
For example, the base damage of a fully charged Bamboozler shot does 80 damage. If the player stacks two mains and five subs of Damage Up to reach the 99.9 damage limit, and if the enemy walks on the player's ink for a split second, there is the potential to splat them in one fully charged Bamboozler shot instead of two shots.
The Splattershot Pro has the potential to splat in two shots instead of three if the player stacks enough damage up to do 49.9 damage per shot and the enemy walks on the player's ink. The Jet Squelcher has the potential to splat in three shots instead of four if the player stacks enough damage up to do 33.3 damage per shot and the enemy walks on the player's ink.
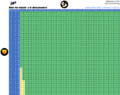
For damage limits on other weapons, see the chart below.
-
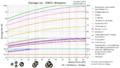
Damage Up increases the damage per hit of two-hit+ splat weapons to limits of 24.9, 33.3, 49.9, or 99.9.

Calculating damage
a = Ability Points of Damage Up = 10 × [Number of Damage Up main slots] + 3 × [Number of Damage Up sub slots]
d = Ability Points of Defense Up = 10 × [Number of Defense Up main slots] + 3 × [Number of Defense Up sub slots]
A = (0.99 × a - (0.09 × a) ^ 2) / 100
D = (0.99 × d - (0.09 × d) ^ 2) / 100
When Damage Up ≥ Defense Up
Damage = [base damage] × [1 + (A - D)]
When Damage Up < Defense Up
Damage = [base damage] × [1 + (A - D) / 1.8]
Gallery
-
A Splattershot's base damage on a bumper.
-
A Splattershot's base damage on a bumper with two mains of Defense Up.


