Gusher Gauntlet: Difference between revisions

From Inkipedia, the Splatoon wiki
(→‎Gallery: Improved caption.)
 
(7 intermediate revisions by 4 users not shown)
Line 10: Line 10:
|image=OV Gusher Gauntlet beginning.jpg
|image=OV Gusher Gauntlet beginning.jpg
}}
}}
{{StrategyWiki|Splatoon|Gusher Gauntlet}}
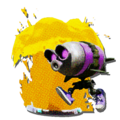
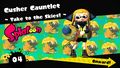
'''Gusher Gauntlet''' is the fourth mission in {{S}}{{'s}} single-player [[mode]], [[Octo Valley (mode)|Octo Valley]]. It is the first mission of [[Area 2]], coming directly after the first [[boss]], [[The Mighty Octostomp!]]. It is also the first mission to include [[Octostamp]]s, and is named for the many [[gusher]]s throughout the mission.


Line 19: Line 18:
{{clr}}
{{clr}}


==Gameplay==
==Summary==
<embedvideo service="youtube">https://www.youtube.com/watch?v=ulIfadRGAxU</embedvideo>
{{Stage elements
 
|enemy=
==Walkthrough==
{{Stage elements/row|object=Octopod|file=OV Octopod render.jpg|location=Beginning Area<br>Final Checkpoint|total=3<br>4}}
{|class="wikitable sitecolor-s" style="margin: auto;"
{{Stage elements/row|object=Twintacle Octotrooper|file=Twintacle Octotroopers.jpg|location=Checkpoint 1<br>Checkpoint 3<br>Final Checkpoint|total=2<br>5<br>1}}
|+ Gusher Gauntlet Stats
{{Stage elements/row|object=Octotrooper|file=Octotroopers1.jpg|location=Checkpoint 1<br>Final Checkpoint|total=1<br>3}}
! Area
{{Stage elements/row|object=Octostamp|file=OV Octostamp render.jpg|location=Checkpoint 2|total=3}}
! Enemies
{{Stage elements/row|object=Shielded Twintacle Octotrooper|file=S2 3D art Shielded Twintacle Octotrooper.png|location=Checkpoint 2|total=2}}
! Armor
|item=
! Special Weapon
{{Stage elements/row|object=Sunken Scroll|file=S Icon Sunken Scroll.png|location=Final Checkpoint|total=1}}
! Sunken Scroll
|feature=
|-
{{Stage elements/row|object=Gusher|file=S2 Icon Gusher.png|location=All zones|total=22}}
! Beginning Area
}}
| 3x Octopods
| {{N/A}}
| {{N/A}}
| {{N/A}}
|-
! Checkpoint 1
| 2x Twintacle Octotroopers <br>1x Octotrooper
| {{N/A}}
| {{N/A}}
| {{N/A}}
|-
! Checkpoint 2
| 3x Octostamps <br>2x Octocopters <br>2x Shielded Twintacle Octotroopers
| {{N/A}}
| {{N/A}}
| {{N/A}}
|-
! Checkpoint 3
| 5x Twintacle Octotroopers
| {{N/A}}
| {{N/A}}
| {{N/A}}
|-
! Final Checkpoint
| 4x Octopods <br>3x Octotroopers <br>1x Twintacle Octotrooper
| {{N/A}}
| {{N/A}}
| Yes
|}
 
===Beginning===
[[File:Gusher Gauntlet Start.png|thumb|right|300px]]
 
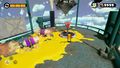
Walk forwards and spray [[ink]] on the ground in front of you and on the edge of the next platform with the {{Button|ZR}} button. If possible, splat the [[Octopod]] from a distance before it can hurt you. Dash Jump onto the circular platform and spray the red, circular knob which will erupt into a [[Gusher]]. Swim into this flowing pillar of ink with {{Button|ZL}} and rise to its surface. Jump forward into the long, grassy platform and take out the two Octopods waiting to greet you. Collect the [[Power Egg]]s and continue to the next [[spawn point|checkpoint]].
 
===Checkpoint 1===
[[File:Gusher Gauntlet Fighting.png|thumb|left|300px]]
 
Walk forward and activate the [[launchpad]] with {{Button|ZL}}. You will land on top of a pillar in the center of a triangular platform and immediately be assaulted by two [[Twintacle Octotrooper]]s and an [[Octotrooper]]. Jump off of the pillar quickly and activate the nearest Gusher. Rise to the top of it, and take out the surrounding Octotroopers from this vantage point. Maneuver around the platform, using the three Gushers to destroy the [[Octarian]] enemies and the [[crate]]s they are perched on. Make sure to collect the Power Egg hidden in each [[balloon]] above the Gushers as well.
 
After defeating the three Octarians, activate the nearest Gusher, rise to its surface, and jump onto the central pillar to reach the newly-activated launchpad.
 
===Checkpoint 2===
[[File:Gusher Gauntlet Cap'n Cuttlefish Talking.png|thumb|right|300px]]
 
Walk forward and destroy the four crates in front of the next ledge. An [[Octostamp]] will immediately jump down onto the platform you are standing on, so move out of the way and spray ink at its back while it momentarily struggles face-down. Spray ink on the wall and swim up it to reach the next area.
 
As soon as you arrive on the higher platform, two Octostamps will assault you from ledges. Closely watch their shadows so you can avoid their deadly impact. Take them out by spraying ink on their backs. Move forward, spray ink on the ramp, and swim up it.
 
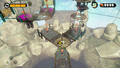
[[File:Gusher Gauntlet on a Gusher.png|thumb|left|300px]]
 
Activate the Gusher immediately in front of you. Rise to its surface and spray ink at the two [[Octocopter]]s, one to the left of you and one to the right. Alternatively, you might activate the Gushers under them to take them out in one splat. Similarly, you could also activate the two Gushers underneath the two [[Shielded Octotrooper|Shielded]] [[Twintacle Octotrooper]]s. Once they have been defeated, Dash Jump onto the platform beneath them, swim up one of the Gushers, and activate the [[Inkrail]] on the next platform. Travel along it until you reach the next checkpoint.
 
===Checkpoint 3===
[[File:Gusher Gauntlet Seven Gushers.png|thumb|300px|right]]
 
Move forward along the platform until you drop off into the playing field below. This area is littered with unactivated Gushers and guarded by five Twintacle Octotroopers which will immediately begin chasing you. Activate the Gauntlets and travel up and down them to avoid Octarian fire, spraying ink at them along the way. Once you have defeated the last Twintacle Octotrooper, ink a path up one of the curved walls and swim up it to reach the next launchpad.
 
===Final Checkpoint===
[[File:Gusher Gauntlet Super Jump.png|thumb|left|300px]]
 
Walk forward and activate the first Gusher you encounter. Travel up this Gusher to the [[grate|net]] platform above. Make sure you do not use squid form while on one of these nets as you will fall through to the platform below.
 
Optionally, you could turn right and take out the two Octopods guarding the Gusher. Activate this Gusher and travel up it, defeating the Octarian enemies at the top and destroying the few crates to collect some Power Eggs. Turn into a squid on this net platform to fall through to the platform below. Walk back to the Gusher you initially used and choose the left path this time. Splat the two Octopods near that Gusher, activate it, and ride it to the top.


[[File:Gusher Gauntlet Zapfish.png|thumb|300px|right]]
As the name suggests, Gusher Gauntlet features many Gushers to use for navigation, offensive tactics, and defensive tactics. The first areas use Gushers for platforming challenges, before turning to defensive tools in the third and fourth areas. The final area uses Gushers to ambush enemies while climbing a tall tower to get to the Zapfish.
 
Turn left, destroy the Octotrooper patrolling this Gusher, activate it, and ride it to its surface. Quickly take out the Twintacle Octotrooper at the top and destroy the crate below it to reveal this mission's [[Sunken Scroll]]. Use squid form to fall through this net platform, returning to the one below, and travel to the opposite area. Destroy the Octotrooper guarding it, activate the Gusher, and travel to its surface. Ink the [[Zapfish]]'s shield until it bursts, and then walk up to the Zapfish to collect it and complete the mission.
{{clr}}


==Collectibles==
==Collectibles==
===Sunken Scroll===
===Sunken Scroll===
[[File:Splatoon Sunken Scroll 4.png|frameless|center|300px]]
[[File:S Sunken Scroll 4.png|frameless|center|300px]]


{{Quote|This scroll was found in a deep rock layer, its age estimated at approximately 2,000 years. It details the ancient Turf Wars of the time. It seems the ancient four-versus-four battle format had already been established at this stage.|[[Sunken Scroll]] {{color|4|green|}}}}
Line 114: Line 46:
Use the first Gusher you encounter and ride to its surface. Then, take the left Gusher to its top, and take the next left Gusher you see also to ''its'' top. Defeat the [[Twintacle Octotrooper]] and the [[crate]] immediately underneath it to reveal [[List of Sunken Scrolls in Splatoon#Scroll 4|Sunken Scroll 4]].
{{clr}}
{{clr}}
==Enemies and Mechanics==
===First Introduced===
<gallery>
S2 Icon Gusher.png|[[Gusher]]
Octostamp1.png|[[Octostamp]]
</gallery>
===Previously Introduced===
<gallery>
Octotroopers1.jpg|[[Octotrooper]]
Twintacle Octotroopers.jpg|[[Twintacle Octotrooper]]
S2 3D art Shielded Twintacle Octotrooper.png|[[Shielded Octotrooper|Shielded Twintacle Octotrooper]]
Octopod Splatoon 2.jpg|[[Octopod]]
Launchpad Render.jpg|[[Launchpad]]
</gallery>


==Quotes==
==Quotes==
Line 150: Line 66:
==Gallery==
==Gallery==
<gallery>
<gallery>
File:Octo Valley mission 04 Gusher Gauntlet icon.png|Level icon
OV Gusher Gauntlet mission icon.png|Level icon
File:Octo Valley mission 04 Gusher Gauntlet map.png|In-game map
Octo Valley mission 04 Gusher Gauntlet map.png|In-game map
File:Gusher Gauntlet Map.png|An out of game map.
Gusher Gauntlet Map.png|An out of game map.
File:OV Gusher Gauntlet Octotrooper.png|Enemy [[Octotrooper]]
OV Gusher Gauntlet Octotrooper.png|Enemy [[Octotrooper]]
File:Gusher Gauntlet-Hoard of Enemy Twintacle Octotroopers.jpg|Hoard of Enemy Twintacle Octotroopers
Gusher Gauntlet Seven Gushers.png|Fighting arena with seven Gushers
File:Gusher Gauntlet-Agent Octopods and Gusher.jpg|Agent 3, Octopods, and Gusher
Gusher Gauntlet-Agent Octopods and Gusher.jpg|Agent 3, Octopods, and Gusher
File:Gusher Gauntlet-Signs.jpg|Signs
Gusher Gauntlet Super Jump.png|Super jumping to the next area
File:Gusher Gauntlet-Gold Sign.jpg|Gold Sign
Gusher Gauntlet-Signs.jpg|Signs
File:Gusher Gauntlet Mission End.jpg|Gusher Gauntlet Mission End
Gusher Gauntlet-Gold Sign.jpg|Gold Sign
Gusher Gauntlet Mission End.jpg|Gusher Gauntlet Mission End
</gallery>
</gallery>


Line 165: Line 82:


==Names in other languages==
{{Localized name
{{Localized name
|color=Splatoon
|color=Splatoon
Line 183: Line 99:
|SpaE=El laberinto de surtidores
|SpaE=El laberinto de surtidores
|SpaEM=The labyrinth of gushers
|SpaEM=The labyrinth of gushers
}}
==External links==
{{External links
|twitch=no
|speedrun=https://www.speedrun.com/Splatoon1?h=Gusher_Gauntlet_04-NG-wiiu&x=l_kwjmg1wg-z27n60k0-e8mp30v8.lr3zyx2l
|youtube=https://www.youtube.com/watch?v=ulIfadRGAxU
|strategywiki=Splatoon/Gusher Gauntlet
}}
}}


Latest revision as of 20:21, 25 March 2024

#B1: The Mighty Octostomp!
Octo Valley missions
#5: Floating Sponge Garden

Gusher Gauntlet
~ Take to the Skies! ~
OV Gusher Gauntlet beginning.jpg
Number 4
Area 2
Sheldon's Request
Items 1 scroll
Music Tentacular Circus
amiibo challenges Inkling BoyInkling Boy (recolor)Inkling Boy 2S Weapon Main Hero Roller Replica.png Results Arrow.png Cash 900


Inkling SquidInkling Squid (recolor)Inkling Squid 2Empty ink tank.png Results Arrow.png Cash 900

Gusher Gauntlet is the fourth mission in Splatoon's single-player mode, Octo Valley. It is the first mission of Area 2, coming directly after the first boss, The Mighty Octostomp!. It is also the first mission to include Octostamps, and is named for the many gushers throughout the mission.

Octo Valley

The kettle leading to Gusher Gauntlet

The kettle for this mission is in the far right corner of the zone, on top of a platform.

Summary

Gusher Gauntlet stage summary
Enemies
Enemy name Image Locations and total found
Octopod
OV Octopod render.jpg
Beginning Area
Final Checkpoint
3
4
Twintacle Octotrooper
Twintacle Octotroopers.jpg
Checkpoint 1
Checkpoint 3
Final Checkpoint
2
5
1
Octotrooper
Octotroopers1.jpg
Checkpoint 1
Final Checkpoint
1
3
Octostamp
OV Octostamp render.jpg
Checkpoint 2 3
Shielded Twintacle Octotrooper
S2 3D art Shielded Twintacle Octotrooper.png
Checkpoint 2 2
Items
Item name Image Locations and total found
Sunken Scroll
S Icon Sunken Scroll.png
Final Checkpoint 1
Features
Feature name Image Locations and total found
Gusher
S2 Icon Gusher.png
All zones 22

As the name suggests, Gusher Gauntlet features many Gushers to use for navigation, offensive tactics, and defensive tactics. The first areas use Gushers for platforming challenges, before turning to defensive tools in the third and fourth areas. The final area uses Gushers to ambush enemies while climbing a tall tower to get to the Zapfish.

Collectibles

Sunken Scroll

S Sunken Scroll 4.png
This scroll was found in a deep rock layer, its age estimated at approximately 2,000 years. It details the ancient Turf Wars of the time. It seems the ancient four-versus-four battle format had already been established at this stage.

Location: The Sunken Scroll can be found after the final checkpoint.

Gusher Gauntlet Sunken Scroll Location.png

Use the first Gusher you encounter and ride to its surface. Then, take the left Gusher to its top, and take the next left Gusher you see also to its top. Defeat the Twintacle Octotrooper and the crate immediately underneath it to reveal Sunken Scroll 4.

Quotes

S Icon Cap'n Cuttlefish.png
Cap'n Cuttlefish's Quotes

Cap'n Cuttlefish
S Icon Cap'n Cuttlefish.png
Shoot a Gusher to make it burst skyward. So satisfying...
Cap'n Cuttlefish
S Icon Cap'n Cuttlefish.png
Turn into a ZLsquid, and the jump from the Gusher!
Cap'n Cuttlefish
S Icon Cap'n Cuttlefish.png
Sink me! You're surrounded!
Cap'n Cuttlefish
S Icon Cap'n Cuttlefish.png
Launchpad dead ahead!
Cap'n Cuttlefish
S Icon Cap'n Cuttlefish.png
Oho! An Octostamp!
Cap'n Cuttlefish
S Icon Cap'n Cuttlefish.png
That's it! Heave ho!
Cap'n Cuttlefish
S Icon Cap'n Cuttlefish.png
Try activating the Gusher after you're already aboard, bucko.
Cap'n Cuttlefish
S Icon Cap'n Cuttlefish.png
Showtime. Use the Gushers, bucko.
Cap'n Cuttlefish
S Icon Cap'n Cuttlefish.png
Launchpad ahoy!
Cap'n Cuttlefish
S Icon Cap'n Cuttlefish.png
I smell a ZapfishZapfish! Check it out with width=auto, eh?

Gallery

Trivia

  • The Italian name for this stage references the way of saying the sky's the limit.

Names in other languages

Language Name Meaning
Japan Japanese ふき上がる カンケツセン
~うってぶっとび!フライハイ~

Fuki agaru Kanketsusen
Utte Buttobi! Furai-Hai
Blowing-up Geysers:
Shoot and Jump! Fly High
Canada French (NOA) Jet d'encre indélébile
~Conquête des cieux!~
Inedible ink fontain
~Conquest of the heavens!~
France French (NOE) - Festival forestier -
Des jets d'encre du toner
- Forest Festival -
The Gushers of the toner
Germany German Tintenfontänen-Parcours Gushers-Parcours
Italy Italian Inferno di geyser:
il cielo NON è il limite!
Geyser inferno:
the sky is NOT the limit!
Mexico Spanish (NOA) El laberinto de surtidores
~ ¡Conquista los cielos! ~
The labyrinth of gushers
~ Conquer the skies! ~
Spain Spanish (NOE) El laberinto de surtidores The labyrinth of gushers

External links

External links:
 Speedruncom icon.png Youtube icon.png StrategyWiki Icon.svg