Shifting Splatforms: Difference between revisions
m (music link) |
GloverMist (talk | contribs) (Cleanup.) |
||
| Line 1: | Line 1: | ||
{{OctoValleyPrevNext | prevnum=12 | nextnum=14 | prev=Flooder Junkyard | next=Octoling Assault }} | {{OctoValleyPrevNext| prevnum=12| nextnum=14| prev=Flooder Junkyard| next=Octoling Assault}} | ||
{{InfoboxMission | {{InfoboxMission | ||
|subtitle = Midnight Rendezvous | |subtitle = Midnight Rendezvous | ||
| Line 10: | Line 9: | ||
|image = Hm m13.jpg | |image = Hm m13.jpg | ||
}} | }} | ||
'''Shifting Splatforms''' is the thirteenth [[mission]] in ' | '''Shifting Splatforms''' is the thirteenth [[mission]] in {{S'}} single-player [[mode]], [[Octo Valley (mode)|Octo Valley]]. | ||
== Octo Valley== | ==Octo Valley== | ||
Mission 13 is located on an elevated area | Mission 13 is located on an elevated area in [[Area 3]] on the left side of the area. Go left when first approaching the area, passing the brick walls. There is a ramp to access and get up to it. Mission 13 should be behind you when above the ramp. | ||
Another way of reaching Mission 13 | Another way of reaching Mission 13 is to head to the two ramps on the right side of the area. Make it to the platform and there should be a small wall in front of you. Going past the small wall, go around the center of the tower, and behind it is the kettle to Mission 13. | ||
==Gameplay== | ==Gameplay== | ||
<embedvideo service="youtube">https://www.youtube.com/watch?v=yd-OpQYlf7M</embedvideo> | <embedvideo service="youtube">https://www.youtube.com/watch?v=yd-OpQYlf7M</embedvideo> | ||
== Walkthrough == | ==Walkthrough== | ||
=== Map === | ===Map=== | ||
<gallery mode=packed> | <gallery mode=packed> | ||
Shifting Splatforms Beginning Area Map.jpg| | Shifting Splatforms Beginning Area Map.jpg|Beginning Area map. | ||
Shifting Splatforms Checkpoint 1 Map.jpg| | Shifting Splatforms Checkpoint 1 Map.jpg|Checkpoint 1 map. | ||
Shifting Splatforms Checkpoint 2 Map.jpg| | Shifting Splatforms Checkpoint 2 Map.jpg|Checkpoint 2 map. | ||
Shifting Splatforms Final Checkpoint Map.jpg| | Shifting Splatforms Final Checkpoint Map.jpg|Final Checkpoint map. | ||
</gallery> | </gallery> | ||
=== Mission | ===Mission briefing=== | ||
{| class="wikitable sitecolor-s" style="margin: auto;" | {| class="wikitable sitecolor-s" style="margin: auto;" | ||
|+ Shifting Splatforms | |+ Shifting Splatforms stats | ||
! Area | ! Area | ||
! Enemies | ! Enemies | ||
! Armor | ! Armor | ||
!Special | !Special weapon | ||
!Sunken Scroll | !Sunken Scroll | ||
|- | |- | ||
| Line 45: | Line 44: | ||
|- | |- | ||
! Checkpoint 1 | ! Checkpoint 1 | ||
| | | 4× [[Octocopter]]s | ||
2× [[Octotrooper]]s | |||
1× Twintacle Octocopter | |||
| | | 1× Piece of [[armor]] | ||
| {{N/A}} | | {{N/A}} | ||
| {{N/A}} | | {{N/A}} | ||
|- | |- | ||
! Checkpoint 2 | ! Checkpoint 2 | ||
| | | 2× Octocopters | ||
| {{N/A}} | | {{N/A}} | ||
| {{N/A}} | | {{N/A}} | ||
| Line 60: | Line 59: | ||
|- | |- | ||
! Final Checkpoint | ! Final Checkpoint | ||
| | | 2× [[Twintacle Octotrooper]]s | ||
1× Octocopter | |||
| | | 1× Piece of armor | ||
| {{N/A}} | | {{N/A}} | ||
| {{N/A}} | | {{N/A}} | ||
|} | |} | ||
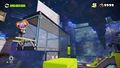
=== Mechanics === | ===Mechanics=== | ||
[[File:3 Shifting Splatforms.jpg|thumb|right]] | |||
{{ | |||
* Moving platforms are used through this mission and often found near [[grate]]s or other obstacles. These platforms are used as a type of puzzle for [[Agent 3]] to solve. While most of the platforms are horizontal; three of the four platforms that lead to the [[Zapfish]] are vertical. The first and third platforms move at the same rate, while the second moves at a different rate. | |||
{{clr}} | |||
==Beginning Area== | ===Beginning Area=== | ||
Walk off the [[ | Walk off the [[spawn point]] and down the ramp. There will be a [[grate]], so turn into a squid to pass through it. There will next be a large moving platform. Walk onto it. [[Ink]] the platform, swim to the other side of it, and jump off it onto another platform. Destroy the crates and splat the two [[Octotrooper]]s. Then walk up the ramp and press {{Button|ZL}} to [[Super Jump]] at the [[launchpad]]. | ||
==Checkpoint 1== | ===Checkpoint 1=== | ||
Jump off the platform with the checkpoint. There will be several | Jump off the platform with the checkpoint. There will be several platforms to pass through. Cross them, like at the beginning. Splat the Octotroopers and [[Octocopter]]s before they can splat you. On the last one, turn right, ink the small wall and jump off the platform onto it and climb up it. | ||
==Checkpoint 2== | ===Checkpoint 2=== | ||
In this Checkpoint, | In this Checkpoint, you will come across some Octocopters which are the only enemies in this area. Splat them and head upwards on moving platforms. The last one travels under a grate, so turn into a squid to pass through. The launchpad is on the last platform which is not in motion. Towards the end of the walkway. There you will see three boxes, one of which contains the [[Sunken Scroll]]. | ||
==Final Checkpoint== | ===Final Checkpoint=== | ||
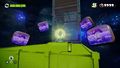
Go through the first | Go through the first platform and splat the Octocopter and Octotrooper. Destroy the crates, including the one with [[armor]]. Go through another platform before heading to the three moving horizontal platforms. Ink the platforms, then swim up and collect the [[Zapfish]]. | ||
== Collectibles== | ==Collectibles== | ||
=== Sunken Scroll === | ===Sunken Scroll=== | ||
[[File:Sunkenscroll13.png|center|frameless|300px]] | [[File:Sunkenscroll13.png|center|frameless|300px]] | ||
''' | {{Quote|Heralded by loud explosions, the 'Great Octoweapons' quickly stormed the Inklings' central stronghold. Victory for the Octarians seemed all but certain, but due to a plug being carelessly pulled from its socket, their hopes were dashed.|[[Sunken Scroll]] {{color|13|green}}}} | ||
{{ | |||
[[File:Shifting Splatforms Checkpoint 2-Sunken Scroll Location.jpg|left|thumb|300px]] | |||
'''Location:''' At the second checkpoint, beside the large wall. When landing on the checkpoint, you will face a large wall with moving platforms and two [[Octocopter]]s overhead. Rather than engaging them, go on the path to the right. Around the corner of the wall will be three large [[crate]]s. Destroy them and collect the scroll. | |||
{{clr}} | |||
[[File: | ===Armor=== | ||
[[File:Shifting Splatforms Checkpoint 1-Armor -1.jpg|left|thumb|300px]] | |||
'''Armor 1 location:''' | |||
{{clr}} | {{clr}} | ||
[[File:Shifting Splatforms Final Checkpoint- Armor -2.jpg|left|thumb|300px]] | |||
'''Armor 2 location:''' | |||
{{clr}} | |||
==Quotes== | |||
[[File:Cap'n Cuttlefish Icon.png|left|55px]] [[Cap'n Cuttlefish]]: | |||
{{clr}} | |||
<gallery> | <gallery> | ||
Shifting Splatforms Beginning Area-Cap'n Cuttlefish First Quote.jpg|{{Quote|"You can {{color|slip through|orange}} that {{color|grating|orange}} in {{Button|ZL1}} squid form.}} | Shifting Splatforms Beginning Area-Cap'n Cuttlefish First Quote.jpg|{{Quote|"You can {{color|slip through|orange}} that {{color|grating|orange}} in {{Button|ZL1}} squid form.}} | ||
| Line 106: | Line 113: | ||
Shifting Splatforms Checkpoint 1-Cap'n Cuttlefish Third Quote.jpg|{{Quote|Watch your step!}} | Shifting Splatforms Checkpoint 1-Cap'n Cuttlefish Third Quote.jpg|{{Quote|Watch your step!}} | ||
Shifting Splatforms Checkpoint 1 -Cap'n Cuttlefish Fourth Quote.jpg|{{Quote|That's it! Heave ho!}} | Shifting Splatforms Checkpoint 1 -Cap'n Cuttlefish Fourth Quote.jpg|{{Quote|That's it! Heave ho!}} | ||
Shifting Splatforms Checkpoint 2-Cap'n Cuttlefish Fifth Quote.jpg|{{Quote|I think you need to climb onto that big...thingamajig!}} | Shifting Splatforms Checkpoint 2-Cap'n Cuttlefish Fifth Quote.jpg|{{Quote|I think you need to climb onto that big... thingamajig!}} | ||
Shifting Splatforms Final Checkpoint-Cap'n Cuttlefish Sixth Quote.jpg|{{Quote|Thar she blows{{Button|Z}}{{color-link|Zapfish|orange}} dead ahead!}} | Shifting Splatforms Final Checkpoint-Cap'n Cuttlefish Sixth Quote.jpg|{{Quote|Thar she blows! {{Button|Z}}{{color-link|Zapfish|orange}} dead ahead!}} | ||
Shifting Splatforms Final Checkpoint -Cap'n Cuttlefish Seventh Quote.jpg|{{Quote|Ah I see... That's how you climb it!}} | Shifting Splatforms Final Checkpoint -Cap'n Cuttlefish Seventh Quote.jpg|{{Quote|Ah, I see... That's how you climb it!}} | ||
</gallery> | </gallery> | ||
== Gallery == | ==Gallery== | ||
<gallery> | <gallery> | ||
Octo Valley mission 13 Shifting Splatforms icon.png|Level icon | Octo Valley mission 13 Shifting Splatforms icon.png|Level icon. | ||
Octo Valley mission 13 Shifting Splatforms map.png|In-game map | Octo Valley mission 13 Shifting Splatforms map.png|In-game map. | ||
Shifting Splatforms Beginning Area-Enemy Twintacle Octotroopers .jpg| | Shifting Splatforms Beginning Area-Enemy Twintacle Octotroopers .jpg|Beginning Area - enemy [[Twintacle Octotrooper]]s. | ||
Shifting Splatforms Beginning Area and Checkpoint 1-Enemy Twintacle Octotrooper.jpg| | Shifting Splatforms Beginning Area and Checkpoint 1-Enemy Twintacle Octotrooper.jpg|Beginning Area and Checkpoint 1 - enemy Twintacle Octotrooper. | ||
Shifting Splatforms Checkpoint 1-Enemy Twintacle Octotrooper.jpg| | Shifting Splatforms Checkpoint 1-Enemy Twintacle Octotrooper.jpg|Checkpoint 1 - enemy Twintacle Octotrooper. | ||
Shifting Splatforms Checkpoint 1-Enemy Octarians.jpg| | Shifting Splatforms Checkpoint 1-Enemy Octarians.jpg|Checkpoint 1 - enemy [[Octarian]]s. | ||
Shifting Splatforms Checkpoint 1-Enemy Octocopters.jpg| | Shifting Splatforms Checkpoint 1-Enemy Octocopters.jpg|Checkpoint 1 - enemy [[Octocopter]]s. | ||
Shifting Splatforms Checkpoint 2-Enemy Octocopters.jpg| | Shifting Splatforms Checkpoint 2-Enemy Octocopters.jpg|Checkpoint 2 - Enemy Octocopters. | ||
Shifting Splatforms Final Checkpoint-Twintacle Octotrooper and Octocopter.jpg| | Shifting Splatforms Final Checkpoint-Twintacle Octotrooper and Octocopter.jpg|Final Checkpoint - Twintacle Octotrooper and Octocopter. | ||
Shifting Splatforms Final Checkpoint-Lone Twintacle Octotrooper.jpg| | Shifting Splatforms Final Checkpoint-Lone Twintacle Octotrooper.jpg|Final Checkpoint - lone Twintacle Octotrooper. | ||
Shifting Splatforms Creepy Monitor.jpg| | Shifting Splatforms Creepy Monitor.jpg|Creepy monitor. | ||
Shifting Splatforms Several Creepy Monitors and Zapfish.jpg| | Shifting Splatforms Several Creepy Monitors and Zapfish.jpg|Several creepy monitors and [[Zapfish]] plush. | ||
Shifting Splatforms End Mission.jpg| | Shifting Splatforms End Mission.jpg|End of mission. | ||
</gallery> | </gallery> | ||
== Names in other languages == | ==Names in other languages== | ||
{{Foreignname | {{Foreignname | ||
|color=Splatoon | |color=Splatoon | ||
| Line 149: | Line 156: | ||
{{Navbox/Octo Valley}} | {{Navbox/Octo Valley}} | ||
[[Category:Octo Valley missions]] | [[Category:Octo Valley missions]] | ||
Revision as of 11:57, 31 December 2019
|
|
|
Template:InfoboxMission Shifting Splatforms is the thirteenth mission in Template:S' single-player mode, Octo Valley.
Octo Valley
Mission 13 is located on an elevated area in Area 3 on the left side of the area. Go left when first approaching the area, passing the brick walls. There is a ramp to access and get up to it. Mission 13 should be behind you when above the ramp.
Another way of reaching Mission 13 is to head to the two ramps on the right side of the area. Make it to the platform and there should be a small wall in front of you. Going past the small wall, go around the center of the tower, and behind it is the kettle to Mission 13.
Gameplay
Walkthrough
Map
-
Beginning Area map.
-
Checkpoint 1 map.
-
Checkpoint 2 map.
-
Final Checkpoint map.
Mission briefing
| Area | Enemies | Armor | Special weapon | Sunken Scroll |
|---|---|---|---|---|
| Beginning Area | 2x Twintacle Octotroopers | N/A | N/A | N/A |
| Checkpoint 1 | 4× Octocopters
2× Octotroopers 1× Twintacle Octocopter |
1× Piece of armor | N/A | N/A |
| Checkpoint 2 | 2× Octocopters | N/A | N/A | Yes |
| Final Checkpoint | 2× Twintacle Octotroopers
1× Octocopter |
1× Piece of armor | N/A | N/A |
Mechanics

- Moving platforms are used through this mission and often found near grates or other obstacles. These platforms are used as a type of puzzle for Agent 3 to solve. While most of the platforms are horizontal; three of the four platforms that lead to the Zapfish are vertical. The first and third platforms move at the same rate, while the second moves at a different rate.
Beginning Area
Walk off the spawn point and down the ramp. There will be a grate, so turn into a squid to pass through it. There will next be a large moving platform. Walk onto it. Ink the platform, swim to the other side of it, and jump off it onto another platform. Destroy the crates and splat the two Octotroopers. Then walk up the ramp and press ![]() to Super Jump at the launchpad.
to Super Jump at the launchpad.
Checkpoint 1
Jump off the platform with the checkpoint. There will be several platforms to pass through. Cross them, like at the beginning. Splat the Octotroopers and Octocopters before they can splat you. On the last one, turn right, ink the small wall and jump off the platform onto it and climb up it.
Checkpoint 2
In this Checkpoint, you will come across some Octocopters which are the only enemies in this area. Splat them and head upwards on moving platforms. The last one travels under a grate, so turn into a squid to pass through. The launchpad is on the last platform which is not in motion. Towards the end of the walkway. There you will see three boxes, one of which contains the Sunken Scroll.
Final Checkpoint
Go through the first platform and splat the Octocopter and Octotrooper. Destroy the crates, including the one with armor. Go through another platform before heading to the three moving horizontal platforms. Ink the platforms, then swim up and collect the Zapfish.
Collectibles
Sunken Scroll
| “ | Heralded by loud explosions, the 'Great Octoweapons' quickly stormed the Inklings' central stronghold. Victory for the Octarians seemed all but certain, but due to a plug being carelessly pulled from its socket, their hopes were dashed. | ” |
— Sunken Scroll 13
| ||

Location: At the second checkpoint, beside the large wall. When landing on the checkpoint, you will face a large wall with moving platforms and two Octocopters overhead. Rather than engaging them, go on the path to the right. Around the corner of the wall will be three large crates. Destroy them and collect the scroll.
Armor

Armor 1 location:

Armor 2 location:
Quotes
-
“ "You can slip through that grating in  squid form.
” -
“ Aye! Well done! ” -
“ Watch your step! ” -
“ That's it! Heave ho! ” -
“ I think you need to climb onto that big... thingamajig! ” -
“ Thar she blows!  Zapfish dead ahead!
” -
“ Ah, I see... That's how you climb it! ”
Gallery
-
Level icon.
-
In-game map.
-
Beginning Area - enemy Twintacle Octotroopers.
-

Beginning Area and Checkpoint 1 - enemy Twintacle Octotrooper.
-
Checkpoint 1 - enemy Twintacle Octotrooper.
-
Checkpoint 1 - enemy Octarians.
-
Checkpoint 1 - enemy Octocopters.
-
Checkpoint 2 - Enemy Octocopters.
-
Final Checkpoint - Twintacle Octotrooper and Octocopter.
-
Final Checkpoint - lone Twintacle Octotrooper.
-

Creepy monitor.
-
Several creepy monitors and Zapfish plush.
-

End of mission.


