'''Propeller-Lift Fortress''' is the sixteenth mission available in singleplayer [[Octo Valley (mode)|Octo Valley]]. It is the first mission of the fourth area after the third boss, [[The Rampaging Octowhirl!]]. The mission is named as such because of its heavy use of [[Propeller]]s. It is also the first level to introduce [[Octoling (enemy)|Kelp Octoling]]s.
'''Propeller-Lift Fortress''' is the sixteenth mission available in [[Octo Valley (mode)|Octo Valley]]. It is the first mission of the fourth area after the third boss, [[The Rampaging Octowhirl!]]. The mission is named as such because of its heavy use of [[Propeller]]s. It is also the first level to introduce [[Octoling (enemy)|Kelp Octoling]]s.
== Octo Valley==
== Octo Valley==
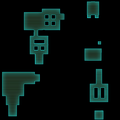
[[File:Mission16.jpg|thumb|250px|left]] When first entering [[Area 4]], mission 16 can be found under the area. fall down the large gap you see in area #4.[[File:Mission16Inkrail.jpg|thumb|250px|right]]There should be 2 Inkrails (Can be found to the left and right) and a Gusher. Take the Inkrail on the left. A Gusher and extra platforming can be found. Mission 16 can be found on that platform.
[[File:Mission16.jpg|thumb|250px|left]] When first entering [[Area 4]], mission 16 can be found under the area. fall down the large gap you see in area #4.[[File:Mission16Inkrail.jpg|thumb|250px|left]]There should be 2 Inkrails (Can be found to the left and right) and a Gusher. Take the Inkrail on the left. A Gusher and extra platforming can be found. Mission 16 can be found on that platform.
{{clr}}
{{clr}}
Line 22:
Line 22:
== Walkthrough ==
== Walkthrough ==
=== Map ===
<gallery mode=packed>
Propeller-Lift Fortress Beginning Area Map.jpg|Propeller-Lift Fortress Beginning Area Map
Propeller-Lift Fortress Checkpoints 1 and 2 Map.jpg|Propeller-Lift Fortress Checkpoints 1 and 2 Map
The very first section of this mission holds 2 Propeller-Lifts. It holds 4 Octotroopers and 1 Armor to collect. There is an [[Inkrail]] to use to advance toward Checkpoint 2.
The very first section of this mission holds 2 Propeller-Lifts. It holds 4 Octotroopers and 1 Armor to collect. There is an [[Inkrail]] to use to advance toward Checkpoint 2.
== Checkpoints 1 and 2 ==
==Checkpoints 1 and 2==
===Checkpoint 1===
===Checkpoint 1===
Line 83:
Line 70:
The first part of Checkpoint 2 holds 3 [[Octobomber]]s and 1 armor to collect. There is a Propeller-Life located above the Octobombers. It's best to splat them so they won't distract [[Agent 3]]. After passing that, an area similar to Checkpoint 1, but there are 2 [[Octotrooper]]s. The Armor is located on one of the platforms which needs to be triggered to raise the Propeller-Lift. To advance to the next Checkpoint, the player will have to use the Propeller-Life to elevate them to the [[Launchpad]], heading to Checkpoint 3.
The first part of Checkpoint 2 holds 3 [[Octobomber]]s and 1 armor to collect. There is a Propeller-Life located above the Octobombers. It's best to splat them so they won't distract [[Agent 3]]. After passing that, an area similar to Checkpoint 1, but there are 2 [[Octotrooper]]s. The Armor is located on one of the platforms which needs to be triggered to raise the Propeller-Lift. To advance to the next Checkpoint, the player will have to use the Propeller-Life to elevate them to the [[Launchpad]], heading to Checkpoint 3.
== Checkpoint 3 ==
==Checkpoint 3==
After taking the [[Launchpad]], [[Agent 3]] will be put in an area surrounded by water. There is a Propeller-Life in the distance and can only be reached with the [[Ink Cannon]] after shooting the Propeller-Life with the Ink Cannon, but there is a single [[Octocopter]] guarding the Ink Cannon. A platform will reveal when [[Agent 3]] successfully hits the Propeller-Life with the Ink Cannon. Take the Platform to get across the Water. The player will meet 5 Octocopters and an Octobomber that awaits near the end of the ride. There is a Launchpad after climbing the wall, leading to the final Checkpoint.
After taking the [[Launchpad]], [[Agent 3]] will be put in an area surrounded by water. There is a Propeller-Life in the distance and can only be reached with the [[Ink Cannon]] after shooting the Propeller-Life with the Ink Cannon, but there is a single [[Octocopter]] guarding the Ink Cannon. A platform will reveal when [[Agent 3]] successfully hits the Propeller-Life with the Ink Cannon. Take the Platform to get across the Water. The player will meet 5 Octocopters and an Octobomber that awaits near the end of the ride. There is a Launchpad after climbing the wall, leading to the final Checkpoint.
== Final Checkpoint ==
==Final Checkpoint==
Once [[Agent 3]] has reached the final [[spawn point|checkpoint]], there will be two propeller lifts, one with a bubbler on it. Once they've jumped off the platform, a Kelp Octoling will appear. Splat it then another one will appear. Once you've splatted both of them, a [[ Launchpad ]] will appear. Super Jump to the platform with the [[ Zapfish ]] then burst its shield. Mission 16 complete!
Once [[Agent 3]] has reached the final [[spawn point|checkpoint]], there will be two propeller lifts, one with a bubbler on it. Once they've jumped off the platform, a Kelp Octoling will appear. Splat it then another one will appear. Once you've splatted both of them, a [[ Launchpad ]] will appear. Super Jump to the platform with the [[ Zapfish ]] then burst its shield.
'''Armor 1 Location:''' Before going into the area with the Octotrooper, make sure the platforms are moved far enough to reach the first armor. It can also be done by jumping in squid form to reach the lone platform. Can be found in the Beginning.
'''Armor 1 Location:''' Before going into the area with the Octotrooper, make sure the platforms are moved far enough to reach the first armor. It can also be done by jumping in squid form to reach the lone platform. Can be found in the Beginning.
{{Clr}}
[[File:Propeller-Lift Fortress Checkpoints 1 and 2-Armor -2.jpg|left|thumb|300px|Propeller-Lift Fortress Checkpoints 1 and 2-Armor #2]]
'''Armor 2 Location:''' There are 2 small crates on the right side of the wall which advances [[Agent 3]] to the next checkpoint. Destroy the top crate, which will reveal armor. Can be found in Checkpoint 1.
'''Armor 2 Location:''' There are 2 small crates on the right side of the wall which advances [[Agent 3]] to the next checkpoint. Destroy the top crate, which will reveal armor. Can be found in Checkpoint 1.
{{Clr}}
[[File:Propeller-Lift Fortress Checkpoints 1 and 2-Armor -3.jpg|left|thumb|300px|Propeller-Lift Fortress Checkpoints 1 and 2-Armor #3]]
'''Armor 3 Location:''' One of the crates away from the group of [[Octobomber]]s wields armor inside. Can be found in checkpoint 2.
'''Armor 3 Location:''' One of the crates away from the group of [[Octobomber]]s wields armor inside. Can be found in checkpoint 2.
{{Clr}}
[[File:Propeller-Lift Fortress Checkpoints 1 and 2-Armor -4.jpg|left|thumb|300px|Propeller-Lift Fortress Checkpoints 1 and 2-Armor #4]]
'''Armor 4 Location:''' Going into the area with 2 [[Octotrooper]]s, there is armor on one of the platforms that will rise when the Propeller-Life is being shot at. It can be picked up even if the platform is elevated. Can be found in Checkpoint 2.
'''Armor 4 Location:''' Going into the area with 2 [[Octotrooper]]s, there is armor on one of the platforms that will rise when the Propeller-Life is being shot at. It can be picked up even if the platform is elevated. Can be found in Checkpoint 2.
{{Clr}}
[[File:Propeller-Lift Fortress Final Checkpoint-Armor -5.jpg|left|thumb|300px|Propeller-Lift Fortress Final Checkpoint-Armor #5]]
'''Armor 5 Location:''' During a duel with the [[Octoling (enemy)|Octoling]], the last armor can be found on the right side of the platform. Break the 2 crates and the armor will appear. Can be found in the Last Checkpoint.
'''Armor 5 Location:''' During a duel with the [[Octoling (enemy)|Octoling]], the last armor can be found on the right side of the platform. Break the 2 crates and the armor will appear. Can be found in the Last Checkpoint.
Propeller-Lift Fortress Final Checkpoint-Agent 2's Sixth Quote.jpg|{{Quote|Down goes the second course! Oh, and there's the {{color-link|launchpad|orange}}!}}
*The German name for this mission is a play on the phrase "durch Wind und Wetter" which means "through Wind and Weather". It shares a wind-themed pun with [[Propeller-Lift Playground]].
*The German name for this mission is a play on the phrase "durch Wind und Wetter" which means "through Wind and Weather". It shares a wind-themed pun with [[Propeller-Lift Playground]].
Propeller-Lift Fortress is the sixteenth mission available in Octo Valley. It is the first mission of the fourth area after the third boss, The Rampaging Octowhirl!. The mission is named as such because of its heavy use of Propellers. It is also the first level to introduce Kelp Octolings.
There should be 2 Inkrails (Can be found to the left and right) and a Gusher. Take the Inkrail on the left. A Gusher and extra platforming can be found. Mission 16 can be found on that platform.
The very first section of this mission holds 2 Propeller-Lifts. It holds 4 Octotroopers and 1 Armor to collect. There is an Inkrail to use to advance toward Checkpoint 2.
Checkpoints 1 and 2
Checkpoint 1
After using the Inkrail, there is another Propeller-Lift that can raise several platforms, along with 3 Octoballs and 1 armor to collect. Agent 3 can advance to Checkpoint 2 with or without raising the platforms with the Propeller-Lift.
Checkpoint 2
The first part of Checkpoint 2 holds 3 Octobombers and 1 armor to collect. There is a Propeller-Life located above the Octobombers. It's best to splat them so they won't distract Agent 3. After passing that, an area similar to Checkpoint 1, but there are 2 Octotroopers. The Armor is located on one of the platforms which needs to be triggered to raise the Propeller-Lift. To advance to the next Checkpoint, the player will have to use the Propeller-Life to elevate them to the Launchpad, heading to Checkpoint 3.
Checkpoint 3
After taking the Launchpad, Agent 3 will be put in an area surrounded by water. There is a Propeller-Life in the distance and can only be reached with the Ink Cannon after shooting the Propeller-Life with the Ink Cannon, but there is a single Octocopter guarding the Ink Cannon. A platform will reveal when Agent 3 successfully hits the Propeller-Life with the Ink Cannon. Take the Platform to get across the Water. The player will meet 5 Octocopters and an Octobomber that awaits near the end of the ride. There is a Launchpad after climbing the wall, leading to the final Checkpoint.
Final Checkpoint
Once Agent 3 has reached the final checkpoint, there will be two propeller lifts, one with a bubbler on it. Once they've jumped off the platform, a Kelp Octoling will appear. Splat it then another one will appear. Once you've splatted both of them, a Launchpad will appear. Super Jump to the platform with the Zapfish then burst its shield.
Before the Great Turf War, there were amicable relations between the Inklings and the Octarians. They couldn't have dreamed that rising sea levels would force them to battle fiercely over the remaining territory.
Location: At the third checkpoint on a floating platform above the pool of water. After hitting the checkpoint, use the turret to hit the fan, bringing the platform over to you. As you defeat the enemies, keep note of the taller portion of the wall to the left. Ink a trail up that rather than the main wall when you reach the end of the pool. Climb up it, spray the ground, and turn around. Using the ink you sprayed, jump over to the platform as a squid and get the scroll within the crate. If you went up the short part of the wall, don't worry. You can still pray the fan to move the platform out so you can try again.
Armor
Propeller-Lift Fortress contains a grand total of five pieces of armor.
Propeller-Lift Fortress Beginning Area-Armor #1
Armor 1 Location: Before going into the area with the Octotrooper, make sure the platforms are moved far enough to reach the first armor. It can also be done by jumping in squid form to reach the lone platform. Can be found in the Beginning.
Propeller-Lift Fortress Checkpoints 1 and 2-Armor #2
Armor 2 Location: There are 2 small crates on the right side of the wall which advances Agent 3 to the next checkpoint. Destroy the top crate, which will reveal armor. Can be found in Checkpoint 1.
Propeller-Lift Fortress Checkpoints 1 and 2-Armor #3
Armor 3 Location: One of the crates away from the group of Octobombers wields armor inside. Can be found in checkpoint 2.
Propeller-Lift Fortress Checkpoints 1 and 2-Armor #4
Armor 4 Location: Going into the area with 2 Octotroopers, there is armor on one of the platforms that will rise when the Propeller-Life is being shot at. It can be picked up even if the platform is elevated. Can be found in Checkpoint 2.
Propeller-Lift Fortress Final Checkpoint-Armor #5
Armor 5 Location: During a duel with the Octoling, the last armor can be found on the right side of the platform. Break the 2 crates and the armor will appear. Can be found in the Last Checkpoint.
Special Weapon
Location: The Bubbler can be found in the Last Checkpoint. It can be found on the left platform of the Propeller-Lift's Platforms. It will be helpful to fight against the 2 Octolings.
The German name for this mission is a play on the phrase "durch Wind und Wetter" which means "through Wind and Weather". It shares a wind-themed pun with Propeller-Lift Playground.


