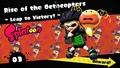
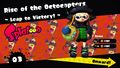
'''Rise of the Octocopters''' is the third mission in ''[[Splatoon]]''<nowiki>'</nowiki>s single-player [[mode]], [[Octo Valley (mode)|Octo Valley]]. It is the first level to introduce [[Octocopter]]s, [[Octobomber]]s, the [[Inkzooka]], and [[Inkrail]]s.
{{StrategyWiki|Splatoon|Rise of the Octocopters}}
'''Rise of the Octocopters''' is the third mission in {{S}}{{'s}} single-player [[mode]], [[Octo Valley (mode)|Octo Valley]]. It is the first level to introduce [[Octocopter]]s, [[Octobomber]]s, the [[Inkzooka]], and [[Inkrail]]s.
== Octo Valley==
== Octo Valley==
[[File:Mission3-K.jpg|thumb|left|300px]]
[[File:OV Rise of the Octocopters kettle.jpg|thumb|left|300px]]
The player must enter Octo Valley for the first time and speak to [[Cap'n Cuttlefish]]. Once done, the player can find this level's [[Kettle]] on a platform behind Cuttlefish's hut in [[Area 1]].
The player must enter Octo Valley for the first time and speak to [[Cuttlefish|Cap'n Cuttlefish]]. Once done, the player can find this level's [[Kettle]] on a platform behind Cuttlefish's hut in [[Area 1]].
You will spawn on a grassy platform with flowers and a tree. Shoot [[ink]] on the tree with {{Button|ZR}} to collect three [[Power Egg]]s, then continue forward. Swim with {{Button|ZL}} through the yellow ink path down each of four slopes, collecting all of the Power Eggs along the way. Jump off the last platform to reach the first [[checkpoint]].
You will spawn on a grassy platform with flowers and a tree. Shoot [[ink]] on the tree with {{Button|ZR}} to collect three [[Power Egg]]s, then continue forward. Swim with {{Button|ZL}} through the yellow ink path down each of four slopes, collecting all of the Power Eggs along the way. Jump off the last platform to reach the first [[spawn point|checkpoint]].
{{clr}}
{{clr}}
Line 105:
Line 106:
===Checkpoint 2===
===Checkpoint 2===
[[File:Mission3-2.jpg|thumb|300px|right]]
[[File:Mission3-2.jpg|thumb|left|300px]]
Turn right and ink the tree to collect its hidden Power Eggs. With a swimming start, dash jump onto the second platform and collect its Power Egg. Dash jump onto the next platform and do the same to reach the final platform. If you fall off one of these pillars, spread ink up one of its sides and swim up it to continue. You cannot, however, swim up to the final platform; you must dash jump there instead.
Turn right and ink the tree to collect its hidden Power Eggs. With a swimming start, dash jump onto the second platform and collect its Power Egg. Dash jump onto the next platform and do the same to reach the final platform. If you fall off one of these pillars, spread ink up one of its sides and swim up it to continue. You cannot, however, swim up to the final platform; you must dash jump there instead.
Line 118:
Line 119:
===Checkpoint 4===
===Checkpoint 4===
[[File:Mission3-4.jpg|thumb|right|300px]]
[[File:Mission3-4.jpg|thumb|left|300px]]
Destroy the four crates and collect the Power Egg that appears out of the smallest one. Continue forward and kill the two Octocopters hovering above a pit. Hide behind one of the three barriers if necessary. After taking out the Octocopters, dash jump onto the moving platform above the pit. If you fall off the platform or land in the pit, simply ink a path up the moving platform or stationary platform ahead. Swim up either of these walls to continue. Once on the moving platform, dash jump onto the stationary platform to reach the next checkpoint.
Destroy the four crates and collect the Power Egg that appears out of the smallest one. Continue forward and kill the two Octocopters hovering above a pit. Hide behind one of the three barriers if necessary. After taking out the Octocopters, dash jump onto the moving platform above the pit. If you fall off the platform or land in the pit, simply ink a path up the moving platform or stationary platform ahead. Swim up either of these walls to continue. Once on the moving platform, dash jump onto the stationary platform to reach the next checkpoint.
Line 126:
Line 127:
[[File:Mission3-5.jpg|thumb|left|300px]]
[[File:Mission3-5.jpg|thumb|left|300px]]
Walk forward and collect the [[Inkzooka]] [[Canned Special]] and the two Power Eggs on either side of it. Destroy the four crates surrounding the short wall, and click {{Button|RS}} to activate the [[Special Weapon]]. Fire it repeatedly with {{Button|ZR}} at the enemies ahead - two [[Octotrooper]]s and three Octocopters. Dodge their attacks and if the Inkzooka runs out of ink before all the enemies have been defeated, move closer and take them out with your [[Hero Shot]]. Once the enemies have been killed, a [[launchpad]] will appear. Activate it by pressing {{Button|ZL}}.
Walk forward and collect the [[Inkzooka]] [[canned special|can]] and the two Power Eggs on either side of it. Destroy the four crates surrounding the short wall, and click {{Button|RS}} to activate the [[special weapon]]. Fire it repeatedly with {{Button|ZR}} at the enemies ahead - two [[Octotrooper]]s and three Octocopters. Dodge their attacks and if the Inkzooka runs out of ink before all the enemies have been defeated, move closer and take them out with your [[Hero Shot]]. Once the enemies have been killed, a [[launchpad]] will appear. Activate it by pressing {{Button|ZL}}.
{{clr}}
{{clr}}
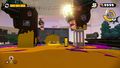
===Checkpoint 6===
===Checkpoint 6===
[[File:Mission3-6.jpg|thumb|300px|right]]
[[File:Mission3-6.jpg|thumb|left|300px]]
Swim forward in the trail of ink to collect three Power Eggs. Jump down into the pool of ink below and ink a path forward. Kill the two Octocopters, but do not move on to the next checkpoint. Instead, spread ink up the wall of the left pillar and swim up it. Once on top of the pillar, spread ink at your feet. Then, turn right to face the other pillar, and spread ink along its wall. Perform a dash jump and swim up the second pillar to reach a crate containing a [[Sunken Scroll]]. Once you have collected the Scroll, jump down and continue to the next checkpoint.
Swim forward in the trail of ink to collect three Power Eggs. Jump down into the pool of ink below and ink a path forward. Kill the two Octocopters, but do not move on to the next checkpoint. Instead, spread ink up the wall of the left pillar and swim up it. Once on top of the pillar, spread ink at your feet. Then, turn right to face the other pillar, and spread ink along its wall. Perform a dash jump and swim up the second pillar to reach a crate containing a [[Sunken Scroll]]. Once you have collected the Scroll, jump down and continue to the next checkpoint.
Line 142:
Line 143:
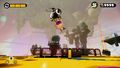
===Checkpoint 8===
===Checkpoint 8===
[[File:Mission3-8.jpg|thumb|right|300px]]
[[File:Mission3-8.jpg|thumb|left|300px]]
Dash Jump onto the first moving platform, then the second. Ink a path up the next wall, covered in three Power Eggs, and travel up it. If you fall off a platform into enemy ink, simply shoot ink on the side of a platform to continue.
Dash Jump onto the first moving platform, then the second. Ink a path up the next wall, covered in three Power Eggs, and travel up it. If you fall off a platform into enemy ink, simply shoot ink on the side of a platform to continue.
Line 148:
Line 149:
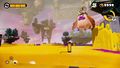
===Final Checkpoint===
===Final Checkpoint===
[[File:Mission3-F.jpg|thumb|left|300px]]
[[File:OV Rise of the Octocopters final checkpoint.jpg|thumb|left|300px]]
Destroy the crates in front of you to collect armor and some Power Eggs. Continue around the short wall, where you will see a field of enemy ink and crates guarded by a large [[Octobomber]]. Maneuver around the field, avoiding the Octobomber's [[Splat Bomb]] attacks, until you are at a close enough range where you can take it out.
Destroy the crates in front of you to collect armor and some Power Eggs. Continue around the short wall, where you will see a field of enemy ink and crates guarded by a large [[Octobomber]]. Maneuver around the field, avoiding the Octobomber's [[Splat Bomb]] attacks, until you are at a close enough range where you can take it out.
{{Quote|This seems to be an Octarian assault vehicle, but it doesn't seem to have an engine. The big question, then... how does it move? It's frighteningly clear that the source of Octarian power lies outside the realm of established science.|[[Sunken Scroll]] 3}}
{{Quote|This seems to be an Octarian assault vehicle, but it doesn't seem to have an engine. The big question, then... how does it move? It's frighteningly clear that the source of Octarian power lies outside the realm of established science.|[[List of Sunken Scrolls in Splatoon#Scroll 3|Sunken Scroll 3]]}}
[[File:Rise of the Octocopters-Sunken Scroll Location.jpg|thumb|left|300px]]
[[File:Rise of the Octocopters-Sunken Scroll Location.jpg|thumb|left|300px]]
[[File:Mission3-S.jpg|thumb|right|300px]]
[[File:OV Rise of the Octocopters Sunken Scroll.jpg|thumb|right|300px]]
'''Location:''' At the sixth checkpoint, on the right pillar after the drop. Ink the pillar on the left, climb it, ink the pillar on the right, and then climb it and reach the top.
'''Location:''' At the sixth checkpoint, on the right pillar after the drop. Ink the pillar on the left, climb it, ink the pillar on the right, and then climb it and reach the top.
Line 168:
Line 169:
===Armor===
===Armor===
'''Location of Armor 1:'''
[[File:Rise of the Octocopters-Armor -1.jpg|thumb|left|300px]]
[[File:Rise of the Octocopters-Armor -1.jpg|thumb|left|300px]]
{{Clr}}
'''Location of Armor 1:'''
'''Location of Armor 2:'''
[[File:Rise of the Octocopters-Armor -2.jpg|thumb|left|300px]]
[[File:Rise of the Octocopters-Armor -2.jpg|thumb|left|300px]]
'''Location of Armor 2:'''
{{clr}}
{{clr}}
===Special Weapons===
===Special Weapons===
'''Location of Inkzooka 1:'''
[[File:Rise of the Octocopters-Inkzooka -1.jpg|thumb|left|300px]]
[[File:Rise of the Octocopters-Inkzooka -1.jpg|thumb|left|300px]]
{{Clr}}
'''Location of Inkzooka 1:'''
'''Location of Inkzooka 2:'''
[[File:Rise of the Octocopters-Inkzooka -2.jpg|thumb|left|300px]]
{{clr}}
[[File:Rise of the Octocopters-Inkzooka -2.jpg|thumb|left|300px]]
{{MissionQuote|S|Cap'n Cuttlefish|Swim through the ink in {{Button|ZL1}}{{color|squid form|orange}}!}}
<gallery mode=packed>
{{MissionQuote|S|Cap'n Cuttlefish|While swimming in {{Button|ZL1}} {{color|squid form|orange}}, press {{Button|X}} to {{color|jump|orange}} over gaps.}}
Rise of the Octocopters-Cap'n Cuttlefish First Quote.jpg|{{Quote|Swim through the ink in {{Button|ZL1}}{{color|squid form|orange}}!}}
Rise of the Octocopters-Cap'n Cuttlefish Second Quote.jpg|{{Quote|While swimming in {{Button|ZL1}} {{color|squid form|orange}}, press {{Button|X}} to {{color|jump|orange}} over gaps.}}
Rise of the Octocopters-Cap'n Cuttlefish Third Quote.jpg|{{Quote|Nice jump, bucko!}}
{{MissionQuote|S|Cap'n Cuttlefish|Shoot {{color-link|Inkrails|orange}} with {{Button|ZR1}} to activate them!}}
Rise of the Octocopters-Cap'n Cuttlefish Fourth Quote.jpg|{{Quote|That's it! Heave ho!}}
{{MissionQuote|S|Cap'n Cuttlefish|You'll fall off the Inkrail if you let go of {{Button|ZL1}}.}}
Rise of the Octocopters-Cap'n Cuttlefish Fifth Quote.jpg|{{Quote|Shoot {{color-link|Inkrails|orange}} with {{Button|ZR1}} to activate them!}}
{{MissionQuote|S|Cap'n Cuttlefish|Rest up behind a wall if you're hurtin'.}}
Rise of the Octocopters-Cap'n Cuttlefish Sixth Quote.jpg|{{Quote|You'll fall off the Inkrail if you let go of {{Button|ZL1}}.}}
{{MissionQuote|S|Cap'n Cuttlefish|The {{color-link|Inkzooka|orange}}! Press {{Button|RS}} to equip it, and then open fire with {{Button|ZR1}}.}}
Rise of the Octocopters-Cap'n Cuttlefish Seventh Quote.jpg|{{Quote|Rest up behind a wall if you're hurtin'.}}
{{MissionQuote|S|Cap'n Cuttlefish|Aye! Well done!}}
Rise of the Octocopters-Cap'n Cuttlefish Eighth Quote.jpg|{{Quote|The {{color-link|Inkzooka|orange}}! Press {{Button|RS}} to equip it, and then open fire with {{Button|ZR1}}.}}
Rise of the Octocopters-Cap'n Cuttlefish Ninth Quote.jpg|{{Quote|Aye! Well done!}}
{{MissionQuote|S|Cap'n Cuttlefish|Aye! Well done!}}
Rise of the Octocopters-Cap'n Cuttlefish Tenth Quote.jpg|{{Quote|Avast! {{color-link|Octocopter|orange}}{{color|s|orange}} below!}}
{{MissionQuote|S|Cap'n Cuttlefish|Sink me! Ya did it!}}
Rise of the Octocopters-Cap'n Cuttlefish Eleventh Quote.jpg|{{Quote|Aye! Well done!}}
{{MissionQuote|S|Cap'n Cuttlefish|Thar she blows! {{Button|Z}}{{color-link|Zapfish|orange}} dead ahead!}}
Rise of the Octocopters-Cap'n Cuttlefish Twelfth Quote.jpg|{{Quote|Sink me! Ya did it!}}
{{MissionQuote|S|Cap'n Cuttlefish|That nasty-looking scallywag is an {{color-link|Octobomber|orange}}.}}
Rise of the Octocopters-Cap'n Cuttlefish Thirteenth Quote.jpg|{{Quote|Thar she blows! {{Button|Z}}{{color-link|Zapfish|orange}} dead ahead!}}
{{MissionQuote|S|Cap'n Cuttlefish|Bravo!}}
Rise of the Octocopters-Cap'n Cuttlefish Fourteenth Quote.jpg|{{Quote|That nasty-looking scallywag is an {{color-link|Octobomber|orange}}.}}
}}
Rise of the Octocopters-Cap'n Cuttlefish Fifteenth Quote.jpg|{{Quote|Bravo!}}
</gallery>}}
==Gallery==
==Gallery==
<gallery>
<gallery>
Octo Valley mission 03 Rise of the Octocopters icon.png|Level icon.
OV Rise of the Octocopters mission icon.png|Level icon
Octo Valley mission 03 Rise of the Octocopters map.png|In-game map.
Octo Valley mission 03 Rise of the Octocopters map.png|In-game map
Rise of the Octocopters-Enemy Octocopters.jpg|Enemy [[Octocopter]]s.
Rise of the Octocopters-Confused Octocopter.jpg|Confused Octocopter
Rise of the Octocopters-Enemy Octocopter Up-Close.jpg|Enemy Octocopter up close.
Rise of the Octocopters-Sunset Octocopters.jpg|Sunset Octocopters
Rise of the Octocopters-Confused Octocopter.jpg|Confused Octocopter.
Rise of the Octocopters-Enemy Octotroopers.jpg|Enemy Octotroopers
Rise of the Octocopters-Patrolling Enemy Octocopters.jpg|Patrolling enemy Octocopters.
Rise of the Octocopters-Enemy Octobomber.jpg|Enemy [[Octobomber]]
Rise of the Octocopters-Enemy Octarians.jpg|Enemy [[Octarians]].
Rise of the Octocopters-Plants in a Glass Enclosure.jpg|Plants in a glass enclosure
Rise of the Octocopters-Sunset Octocopters.jpg|Sunset Octocopters.
OV Rise of the Octocopters first clear.jpg|Mission complete
Rise of the Octocopters-Enemy Octotrooper.jpg|Enemy [[Octotrooper]].
Rise of the Octocopters Mission End Second Time.jpg|Mission end, second time
Rise of the Octocopters-Enemy Octotroopers.jpg|Enemy Octotroopers.
Rise of the Octocopters-Enemy Octobomber.jpg|Enemy [[Octobomber]].
Rise of the Octocopters-Plants in a Glass Enclosure.jpg|Plants in a glass enclosure.
Mission3-E.jpg|Mission Complete.
Rise of the Octocopters Mission End Second Time.jpg|Mission end, second time.
</gallery>
</gallery>
==Trivia==
==Trivia==
* The Italian name for this stage references a quote from [[wikipedia:Charles V, Holy Roman Emperor|Charles V]]: "''On my empire, the sun never sets''".
*The Italian name for this stage references a quote from [[wikipedia:Charles V, Holy Roman Emperor|Charles V]]: "''On my empire, the sun never sets''".
The player must enter Octo Valley for the first time and speak to Cap'n Cuttlefish. Once done, the player can find this level's Kettle on a platform behind Cuttlefish's hut in Area 1.
You will spawn on a grassy platform with flowers and a tree. Shoot ink on the tree with to collect three Power Eggs, then continue forward. Swim with through the yellow ink path down each of four slopes, collecting all of the Power Eggs along the way. Jump off the last platform to reach the first checkpoint.
Checkpoint 1
Just ahead is a large area littered with crates. Destroy these crates to receive a few Power Eggs, and then continue forward. You will encounter two Octocopters, Octarian enemies that are able to fly and shoot purple ink. Because their ink travels in slow bursts, taking them out will be relatively easy. Shoot the first Octocopter you come across, and then swim up the inked ramp, collecting the Power Eggs in your path. Turn and destroy the second Octocopter, and then continue forward by breaking the three crates in your way. Dash jump by turning into a squid in your own ink with , swimming forward with , and jumping with across the gap to the next checkpoint.
Checkpoint 2
Turn right and ink the tree to collect its hidden Power Eggs. With a swimming start, dash jump onto the second platform and collect its Power Egg. Dash jump onto the next platform and do the same to reach the final platform. If you fall off one of these pillars, spread ink up one of its sides and swim up it to continue. You cannot, however, swim up to the final platform; you must dash jump there instead.
Upon reaching the final platform, collect the Power Egg immediately in front of you. Take out the Octocopter and destroy the two crates to the left of the steep ramp ahead of you. The smaller, decorated crate contains armor, so collect it and return to ink the ramp, collecting its three Power Eggs. Swim up the ramp, shoot ink onto the Inkrail pod, and travel through it by holding and moving along its path. Be careful not to let go of because you will fall off the Inkrail.
Checkpoint 3
Ink the next Inkrail pod and enter it. This time, there will be no floor underneath the Inkrail's path, so do not let go of or you will be forced to respawn from Checkpoint 3. Continue along the path and disembark at its end to reach the fourth checkpoint.
Checkpoint 4
Destroy the four crates and collect the Power Egg that appears out of the smallest one. Continue forward and kill the two Octocopters hovering above a pit. Hide behind one of the three barriers if necessary. After taking out the Octocopters, dash jump onto the moving platform above the pit. If you fall off the platform or land in the pit, simply ink a path up the moving platform or stationary platform ahead. Swim up either of these walls to continue. Once on the moving platform, dash jump onto the stationary platform to reach the next checkpoint.
Checkpoint 5
Walk forward and collect the Inkzookacan and the two Power Eggs on either side of it. Destroy the four crates surrounding the short wall, and click to activate the special weapon. Fire it repeatedly with at the enemies ahead - two Octotroopers and three Octocopters. Dodge their attacks and if the Inkzooka runs out of ink before all the enemies have been defeated, move closer and take them out with your Hero Shot. Once the enemies have been killed, a launchpad will appear. Activate it by pressing .
Checkpoint 6
Swim forward in the trail of ink to collect three Power Eggs. Jump down into the pool of ink below and ink a path forward. Kill the two Octocopters, but do not move on to the next checkpoint. Instead, spread ink up the wall of the left pillar and swim up it. Once on top of the pillar, spread ink at your feet. Then, turn right to face the other pillar, and spread ink along its wall. Perform a dash jump and swim up the second pillar to reach a crate containing a Sunken Scroll. Once you have collected the Scroll, jump down and continue to the next checkpoint.
Checkpoint 7
Destroy the crate on the left to collect a Power Egg, then ink a path up the wall immediately in front of you. Swim up this path and continue forward, spreading ink on the wall just ahead. Dash jump into the ink you splattered and swim to the top. Take out the Octotrooper to the right and collect the Power Egg on top of the short pillar. From the top of this pillar, dash jump onto the moving platform ahead and spread ink on the wall in front of you. Dash jump onto this platform and take out the two Octotroopers, hiding behind the walls and short pillars if necessary. Destroy the few crates sitting on the ground to collect Power Eggs, and then ink the Inkrail pod and travel along its path to the next checkpoint.
Checkpoint 8
Dash Jump onto the first moving platform, then the second. Ink a path up the next wall, covered in three Power Eggs, and travel up it. If you fall off a platform into enemy ink, simply shoot ink on the side of a platform to continue.
Final Checkpoint
Destroy the crates in front of you to collect armor and some Power Eggs. Continue around the short wall, where you will see a field of enemy ink and crates guarded by a large Octobomber. Maneuver around the field, avoiding the Octobomber's Splat Bomb attacks, until you are at a close enough range where you can take it out.
Ink a path on the platform just beyond where the Octobomber was hovering and swim up it. Do the same to the next platform and finally, ink a path up the curved wall covered in Power Eggs. Dash jump onto this wall and swim up it to reach the Zapfish, surrounded by a shield. Destroy this shield and swim forward to retrieve the Zapfish and complete the mission.
Collectibles
Sunken Scroll
“
This seems to be an Octarian assault vehicle, but it doesn't seem to have an engine. The big question, then... how does it move? It's frighteningly clear that the source of Octarian power lies outside the realm of established science.
Location: At the sixth checkpoint, on the right pillar after the drop. Ink the pillar on the left, climb it, ink the pillar on the right, and then climb it and reach the top.