'''Splat-Switch Revolution''', also named '''Switch Box Shake-Up''',{{EUOC}} is the twenty-second mission in {{S}}{{'s}} single-player [[mode]], [[Octo Valley (mode)|Octo Valley]]. It is the first mission of Area 5 after the fourth boss, [[The Ravenous Octomaw!]]. The mission gets its name from its heavy use of [[Splat-Switch]]es.
{{InfoboxMission
==Octo Valley==
|subtitle = A Change of Scenery
Upon entering [[Area 5]], use the ramp on the left, then go to the entryway. there should be a Sponge. Expand the sponge and head to the next platforms. As players may think it's a dead-end, there is a Propeller-Lift above the platform. It'll take the platform down. Use the platform as an elevator and the player should find Mission 22.
'''Splat-Switch Revolution''' is the twenty-second mission in ''[[Splatoon|Splatoon's]]'' single-player [[mode]], [[Octo Valley (mode)|Octo Valley]]. It is the first mission of the Area 5 after the fourth boss, [[The Ravenous Octomaw!]]. The mission gets its name from its heavy use of [[Splat-Switch]]es.
== Octo Valley==
==Gameplay==
Upon entering [[Area 5]], use the ramp on the left, then go to the entry way. there should be a Sponge. Expand the sponge and head to the next platforms. As players may think it's a dead-end, there is a Propeller-Lift above the platform. It'll take the platform down. Use the platform as an elevator and Agent 3 should find Mission 22.
Once you start, there is an [[Octotrooper]] on the right side of the block. Take it out, then splat the [[Splat-Switch]] on the block. This makes the block rise and rotate, revealing another block underneath it. As they rise, ink a passage up them and jump onto the next platform. Once you are there, splat the Splat-Switch in front of you. It will flip, revealing an Octotrooper on the back of it. Take it out, then jump across the gap to arrive at the first checkpoint.
Now you will see two canned specials: [[Inkzooka]] to the left, [[Bubbler]] to the right. Choose one because you will need it. Take the [[Launchpad]] to the next platform. You will see three [[Octoballs]], take them out, but be ready for a surprise...
Once you splat the Octoballs, four platforms will appear, each with a [[Twintacle Octotrooper]] on it. If you grabbed the Inkzooka, you could use it to splat all four quickly, or if you chose the Bubbler you could use it to protect yourself as you take out the Octotroopers. As you do so, the platforms will alternately rise and fall. Once you splat all four Octotroopers, a Launchpad will appear, thus taking you to the next checkpoint.
Once you land, there will be an Octotrooper in front of you. Take it out and jump onto the next platform. There you will see two large blocks, and the right one has a [[Splat-Switch]] in front. Splat it, and they will rotate. As they do so, two more Octotroopers will become visible. Take them out and ink the sides of the blocks so you can reach the top. You will see five blocks arranged in a cross shape. The bottom one will have a Launchpad, and the middle one will have a Splat-Switch. Ink the switch, and the blocks on the side will move downward. Two new blocks (previously out of sight) will take their place, and each of those blocks has an Octotrooper. Take them out, and ink the sides of the blocks. If you go to the top without taking the Launchpad, you will see an orange [[crate]] behind the top block, on a platform that you cannot see from the front. Break it open to reveal the [[Sunken Scroll]]. Collect it, and go back to the side with the Launchpad. Swim back up to the Launchpad, and fly over to the next checkpoint.
==Walkthrough==
=== Beginning ===
Once you start, there is an Octotrooper on the right side of the block. Take it out, then splat the Splat Switch on the block. This makes the block rise and rotate, revealing another block underneath it. As they rise, ink a passage up them and jump onto the next platform. Once you are there, splat the Splat Switch in front of you. It will flip, revealing an Octotrooper on the back of it. Take it out, then jump across the gap to arrive at the first checkpoint.
=== Checkpoint 1 ===
===Checkpoint 3===
Now you will see two canned specials: Inkzooka to the left, Bubbler to the right. Choose one because you will need it. Take the Launchpad to the next platform. You will see three Octoballs, take them out but be ready for a surprise...
Now you're at a large platform with a few raised sections. Three Twintacle Octotroopers are waiting for you, so take them out. But once you do so, two [[Octosnipers]] will appear, and the raised areas will change. Once you splat the Octosnipers, a Launchpad will appear. Now you can launch over to the next area.
Once you splat the Octoballs, four platforms will appear, each with a Twintacle Octotrooper on it. If you grabbed the Inkzooka, you could use it to splat all four quickly, or if you chose the Bubbler you could use it to protect yourself as you take out the Octotroopers. As you do so, the platforms will alternately rise and fall. Once you splat all four Octotroopers, a Launchpad will appear, thus taking you to the next checkpoint.
===Checkpoint 4===
Ahead of you, there will be two large blocks, one hanging above the other but not touching it. A short distance beyond them, there's an Octotrooper which you should take out. Once you have done so, shoot the Splat-Switch directly above your head (on the bottom of the floating block). The block you are standing on will rotate, and new platforms will move in front of you, creating a new path. Three Octoballs will rush at you, and you can splat them. If you backtrack, you will notice a Splat-Switch on the side of a floating block. Splat it, and a large group of blocks will rotate into place. Splat the Ocotrooper which is now near you before inking the sides of the blocks and swimming to the top. Splat the three Octoballs you see, and now you've made it to the penultimate stop.
=== Checkpoint 2 ===
===Final Checkpoint===
Once you land, there will be an Octotrooper in front of you. Take it out and jump onto the next platform. There you will see two large blocks, and the right one has a Splat Switch in front. Splat it, and they will rotate. As they do so, two more Octotroopers will become visible. Take them out and ink the sides of the blocks so you can reach the top. You will see five blocks arranged in a cross shape. The bottom one will have a Launchpad, and the middle one will have a Splat Switch. Ink the switch, and the blocks on the side will move downward. Two new blocks (previously out of sight) will take their place, and each of those blocks has an Octotrooper. Take them out, and ink the sides of the blocks. If you go to the top without taking the Launchpad, you will see an orange crate behind the top block, on a platform which you cannot see from the front. Break it open to reveal the Sunken Sea Scroll. Collect it, and go back to the side with the Launchpad. Swim back up to the Launchpad, and fly over to the next checkpoint!
There is an oval floating in front of you, which has a Splat-Switch on the side. Once you splat it, the block will rotate and reveal a Launchpad. You will be launched to an area with an inactive [[Flooder]] (which has a [[Vault]] on top) and four Twintacle Octotroopers (three on the ground and one atop the Vault). There is a canned [[Bubbler]] inside the orange crate, so be sure to grab it. As soon as you take out the Twintacle Octotroopers that are on the ground, two platforms will rise up, each with an Octotrooper. Two Flooders will appear, and the inactive one will activate. The key will be in the front left corner, so splat all the enemies, grab it, and unlock the vault. The Launchpad you unlock will send you to the [[Zapfish]].
=== Checkpoint 3 ===
==Collectibles==
Now you're at a large platform with a few raised sections. Three Twintacle Octotroopers are waiting for you, so take them out. But once you do so, two Octosnipers will appear, and the raised areas will change. Once you splat the Octosnipers, a Launchpad will appear. Now you can launch over to the next area.
{{Quote|From the depths of the sea we emerged long ago, seeking the light of the surface. In search of still greater lights, we now send this message into outer space, sealed in a disk. Perhaps one day, we will encounter other intelligent life...| [[Sunken Scroll]] {{color|21|green}}}}
Ahead of you, there will be two large blocks, one hanging above the other but not touching it. A short distance beyond them, there's an Octotrooper which you should take out. Once you have done so, shoot the Splat Switch directly above your head (on the bottom of the floating block). The block you are standing on will rotate, and new platforms will move in front of you, creating a new path. Three Octoballs will rush at you, and you can splat them. If you backtrack, you will notice a Splat Switch on the side of a floating block. Splat it, and a large group of blocks will rotate into place. Splat the Ocotrooper which is now near you before inking the sides of the blocks and swimming to the top. Splat the three Octoballs you see, and now you've made it to the penultimate stop.
There is a oval floating in front of you, which has a Splat Switch on the side. Once you splat it, the block will rotate and reveal a Launchpad. You will be launched to an area with an inactive Flooder (which has a Vault on top) and four Twintacle Octotroopers (three on the ground and one atop the Vault). There is a canned Bubbler inside the orange crate, so be sure to grab it. As soon as you take out the Twintacle Octotroopers that are on the ground, two platforms will rise up, each with an Octotrooper. Two Flooders will appear, and the inactive one will activate. The key will be in the front left corner, so splat all the enemies, grab it, and unlock the vault. The Launchpad you unlock will send you to the Zapfish. Congratulations, you've completed another mission!
== Collectibles ==
'''Location:''' At the second checkpoint, behind the [[Splat-Switch]] contraption. After hitting the second checkpoint, go through it normally until the [[launchpad]] on the wall later is available after activating the Splat-Switch. Rather than climbing the wall and jumping into the launchpad, go around it on one of the side platforms and jump to the platform behind the wall where the scroll is located.
{{Quote|From the depths of the sea we emerged long ago, seeking the light of the surface. In search of still greater lights, we now send this message into outer space, sealed in a disk. Perhaps one day, we will encounter other intelligent life...| [[Sunken Scroll]] {{color|21|green}}}}
[[File:Splat-Switch Revolution Checkpoint 2-Sunken Scroll Location.jpg|thumb|300px|left]]'''Location:''' At the second checkpoint, behind the [[Splat Switch]] contraption. After hitting the second checkpoint, go through it normally until the [[launchpad]] on the wall later is available after activating the splat switch. Rather than climbing the wall and jumping into the launchpad, go around it on one of the side platforms and jump to the platform behind the wall where the scroll is located.
{{Clr}}
{{Clr}}
=== Special Weapons ===
===Special weapons===
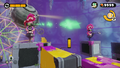
[[File:Splat-Switch Revolution Beginning Area-Bubbler to the Right and Inkzooka to the Left.jpg|thumb|300px|left]]'''Location of Inkzooka and Bubbler:'''
[[File:Splat-Switch Revolution Beginning Area-Bubbler to the Right and Inkzooka to the Left.jpg|thumb|300px|left]]'''Location of Inkzooka and Bubbler:'''
{{Clr}}
{{Clr}}
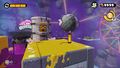
[[File:Splat-Switch Revolution Final Checkpoint-Bubbler - 2.jpg|thumb|300px|left]]'''Location of Bubbler 2:'''
[[File:Splat-Switch Revolution Final Checkpoint-Bubbler - 2.jpg|thumb|300px|left]]'''Location of Bubbler 2:'''
Splat-Switch Revolution Beginning Area-Agent 1's First Quote.jpg|{{Quote|A {{color-link| Splat Switch|orange}}! Haven't seen one of those in a while.}}
File:Octotroopers1.jpg|[[Octotrooper]]
Splat Switch-Revolution Beginning Area-Agent 1's Second Quote.jpg|{{Quote|{{color-link|Inkzooka|orange}} to the left, {{color-link|Bubbler|orange}} to the right...}}
Splat-Switch Revolution Checkpoint 3-Agent 1's Third Quote.jpg|{{Quote|Look sharp, [[Agent 3]]!}}
File:OctoSniper.jpg|[[Octosniper]]
Splat-Switch Revolution Checkpoint 4-Agent 1's Fourth Quote.jpg|{{Quote|Uh... Looks like a dead end.}}
File:Inactive Flooder Artwork.jpg|[[Flooder]]
Splat-Switch Revolution Final Checkpoint-Agent 1's Fifth Quote.jpg|{{Quote|{{Button|Z}}{{color-link|Zapfish|orange}} sighted! But where is the [[key]]?}}
File:Launchpad Render.jpg|[[Launchpad]]
Splat-Switch Revolution Final Checkpoint-Agent 1's Sixth Quote.jpg|{{Quote|The {{color-link|key|orange}}!}}
Splat-Switch Revolution, also named Switch Box Shake-Up,(EU/OC)[a] is the twenty-second mission in Splatoon's single-player mode, Octo Valley. It is the first mission of Area 5 after the fourth boss, The Ravenous Octomaw!. The mission gets its name from its heavy use of Splat-Switches.
Upon entering Area 5, use the ramp on the left, then go to the entryway. there should be a Sponge. Expand the sponge and head to the next platforms. As players may think it's a dead-end, there is a Propeller-Lift above the platform. It'll take the platform down. Use the platform as an elevator and the player should find Mission 22.
Once you start, there is an Octotrooper on the right side of the block. Take it out, then splat the Splat-Switch on the block. This makes the block rise and rotate, revealing another block underneath it. As they rise, ink a passage up them and jump onto the next platform. Once you are there, splat the Splat-Switch in front of you. It will flip, revealing an Octotrooper on the back of it. Take it out, then jump across the gap to arrive at the first checkpoint.
Checkpoint 1
Now you will see two canned specials: Inkzooka to the left, Bubbler to the right. Choose one because you will need it. Take the Launchpad to the next platform. You will see three Octoballs, take them out, but be ready for a surprise...
Once you splat the Octoballs, four platforms will appear, each with a Twintacle Octotrooper on it. If you grabbed the Inkzooka, you could use it to splat all four quickly, or if you chose the Bubbler you could use it to protect yourself as you take out the Octotroopers. As you do so, the platforms will alternately rise and fall. Once you splat all four Octotroopers, a Launchpad will appear, thus taking you to the next checkpoint.
Checkpoint 2
Once you land, there will be an Octotrooper in front of you. Take it out and jump onto the next platform. There you will see two large blocks, and the right one has a Splat-Switch in front. Splat it, and they will rotate. As they do so, two more Octotroopers will become visible. Take them out and ink the sides of the blocks so you can reach the top. You will see five blocks arranged in a cross shape. The bottom one will have a Launchpad, and the middle one will have a Splat-Switch. Ink the switch, and the blocks on the side will move downward. Two new blocks (previously out of sight) will take their place, and each of those blocks has an Octotrooper. Take them out, and ink the sides of the blocks. If you go to the top without taking the Launchpad, you will see an orange crate behind the top block, on a platform that you cannot see from the front. Break it open to reveal the Sunken Scroll. Collect it, and go back to the side with the Launchpad. Swim back up to the Launchpad, and fly over to the next checkpoint.
Checkpoint 3
Now you're at a large platform with a few raised sections. Three Twintacle Octotroopers are waiting for you, so take them out. But once you do so, two Octosnipers will appear, and the raised areas will change. Once you splat the Octosnipers, a Launchpad will appear. Now you can launch over to the next area.
Checkpoint 4
Ahead of you, there will be two large blocks, one hanging above the other but not touching it. A short distance beyond them, there's an Octotrooper which you should take out. Once you have done so, shoot the Splat-Switch directly above your head (on the bottom of the floating block). The block you are standing on will rotate, and new platforms will move in front of you, creating a new path. Three Octoballs will rush at you, and you can splat them. If you backtrack, you will notice a Splat-Switch on the side of a floating block. Splat it, and a large group of blocks will rotate into place. Splat the Ocotrooper which is now near you before inking the sides of the blocks and swimming to the top. Splat the three Octoballs you see, and now you've made it to the penultimate stop.
Final Checkpoint
There is an oval floating in front of you, which has a Splat-Switch on the side. Once you splat it, the block will rotate and reveal a Launchpad. You will be launched to an area with an inactive Flooder (which has a Vault on top) and four Twintacle Octotroopers (three on the ground and one atop the Vault). There is a canned Bubbler inside the orange crate, so be sure to grab it. As soon as you take out the Twintacle Octotroopers that are on the ground, two platforms will rise up, each with an Octotrooper. Two Flooders will appear, and the inactive one will activate. The key will be in the front left corner, so splat all the enemies, grab it, and unlock the vault. The Launchpad you unlock will send you to the Zapfish.
Collectibles
Sunken Scroll
“
From the depths of the sea we emerged long ago, seeking the light of the surface. In search of still greater lights, we now send this message into outer space, sealed in a disk. Perhaps one day, we will encounter other intelligent life...
Location: At the second checkpoint, behind the Splat-Switch contraption. After hitting the second checkpoint, go through it normally until the launchpad on the wall later is available after activating the Splat-Switch. Rather than climbing the wall and jumping into the launchpad, go around it on one of the side platforms and jump to the platform behind the wall where the scroll is located.