Take the launchpad and break the crates ahead. Behind the crates is a [[Shielded Octotrooper]] on a vault in the center of the platform. To the sides are two more of such vaults, and behind it are three launchpads on walls. The player has to take all three launchpads to three different sections in whichever order they desire. At the end of each section is a key, a checkpoint to save progress and a launchpad back to this area. Upon completing a path the respective wall with the respective launchpad lowers to indicate completion. The player must gather all three keys to activate all three [[Splat-Switch]]es. Doing so raises the block with the middle splat-switch to reveal a launchpad on its back side to the final checkpoint.
===Left path Checkpoint 1===
Taking the left launchpad in the beginning area takes the player here. Ahead is a weird structure with curvy narrow paths branching from a central block. The player has to climb up to that block and hit the splat-switch ahead, causing the branches to the side to rotate, forming an upwards path to the right which the player takes. From there the player is introduced to a circular loop platform with a block in the center. The player has to get on the block and hit the [[Tentakook]] running on the loop. Upon defeating the Tentakook, the block rises to introduce two blocks above, both can be hit by the player's weapon but not the player themselves. The right one does not have anything interactable, while the left one has a splat-switch on its side. Hitting it will cause the structure ahead to rotate, allowing access when the movement is complete. The next checkpoint is on the structure.
===Left path Checkpoint 2===
Ahead are three [[Octocopter]]s above another circular loop platform with two blocks suspended on inner opposite sides. Defeating them will cause the further block to rise and move towards the closer block, revealing a splat-switch on its back side. Hitting it will cause the aforementioned block to the right to rotate, revealing a splat-switch on its back side. The player must go back and hit it, causing the structure behind it to deform and assemble into a curvy path upwards. From there the player has to go along the path, defeating [[Deluxe Octocopter]]s on the way. At the top is a checkpoint, a key and a launchpad back the the beginning area.
===Left path Checkpoint 3===
Pick up the key and take the launchpad to return to the beginning area.
===Middle path Checkpoint 1===
Taking the middle launchpad in the beginning area takes the player here. Ahead are two [[Grapplink]]s lined up such that the next one is behind and lower than the previous one. The player must hit the grapplinks successively before they fall too far to reach the next grapplink. If the player succeeds in making to the end of the grapplink path they fall onto a platform with a launchpad to the next checkpoint, and if they fail they fall on another platform with a launchpad back to the beginning of the section.
===Middle path Checkpoint 2===
Ahead is another grapplink path with five grapplinks. The player must hit the grapplinks successively to make it to the end. If the player succeeds in hitting the fifth grapplink they land on a platform with the next checkpoint, if they fall after hitting the third or fourth grapplink they land on a platform with a launchpad back to the beginning of the section, and if they fail to do neither they fall to their death.
===Middle path Checkpoint 3===
Drop down to pick up the key, then cross the gap, collect the Scroll if the splat-switch has been hit (see Collectibles) and take the launchpad back to the beginning area.
===Right path Checkpoint 1===
Taking the launchpad to the right in the beginning area takes the player here. Ahead is a platform with two Shielded Octotroopers on a path of Octarian ink circling a platform of the same level in the middle. Defeating them makes the platform in the middle raise, revealing a hole the player can jump down. Below is a path leading up to a platform with four [[Octotrooper]]s circling a raised block in the middle with a Shielded Octotrooper on top. Defeat the whole lot and the [[Octostamp]] behind the bumper ahead. Climb up the block behind the bumper and activate the splat-switches to the side. Doing so activates the next checkpoint and reforms the path.
===Right path Checkpoint 2===
The player now has to take the same path again with the newly spawned enemies. Getting onto the narrow path spawns a Shielded Octotrooper at the other end, then two more Shielded Octotroopers to the side of the raised block, with another Shielded Octotrooper on top. Behind the whole lot is another Octostamp behind the bumper, and behind that is the next checkpoint. The player has to navigate and defeat the enemies and reach the next checkpoint.
===Right path Checkpoint 3===
Pick up the key and take the launchpad back to the beginning area.
===Final Checkpoint===
The player lands in front of a large platform with three [[Industrial Squee-G]]s, two large inkable blocks on the left and right ledge, two uninkable blocks on the sides of the far ledge, and a smaller inkable block in the middle with a Shielded Octotrooper on top. Upon boarding the Industrial Squee-G docked in front of the checkpoint, eight Octotroopers spawn throughout the field, and the Industrial Squee-Gs proceed to take them down. The player has to use the Squee-Gs to reach the uninkable blocks, first the left one to pick up the key, then the right one to unlock the vault with the launchpad to the Zapfish. Upon picking up the key eight more Octotroopers spawn, promptly distracting the Squee-Gs. The player can go out and board another Industrial Squee-G, or simply wait for the Squee-G docked at the corner nearby to return. The player can also take down the Shielded Octotrooper if necessary, which activates a launchpad there, but the launchpad is an unnecessary detour to an area with five Flooders patrolling an area with four blocks in the middle, and more suspended in the air. The player can simply take the launchpad behind to go back, landing on the Industrial Squee-G docked on the right corner of the platform.
{{Quote|Salmonids are known to keep their weapons in tip-top shape. The frying pans they wield have often been passed down from generation to generation. You can see the unwavering pride of these fierce warriors in their (somewhat crazed) eyes.|[[Sunken Scroll]] {{color|19|green}}}}
{{Quote|Salmonids are known to keep their weapons in tip-top shape. The frying pans they wield have often been passed down from generation to generation. You can see the unwavering pride of these fierce warriors in their (somewhat crazed) eyes.|[[Sunken Scroll]] {{color|19|green}}}}
'''Location:''' After defeating the shielded [[Octotrooper]] enter the center [[launchpad]]. On the second area with Grapplinks hit the splat-switch on the third Grapplink. As you fall, you will land on a platform with a [[launchpad]]. The launchpad will take you to the first Grapplink and you can continue. At the end of the area you will find the Sunken Scroll on a [[grate]].
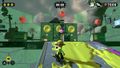
'''Location:''' To the left of the fourth grapplink in middle path checkpoint 2 is a splat-switch suspended in the air. The player has to hit it after hitting the fourth grapplink. Doing so moves the grate with the Scroll on top to the gap in middle path checkpoint 3. After activating the splat-switch the player has to take the launchpad below and redo the section.
[[File:Octo Canyon Level 19 Scroll location 1.jpg|320px|thumb|left|Scroll location before activating the Splat-Switch]]
[[File:Octo Canyon Level 19 Scroll location 1.jpg|320px|thumb|left|Scroll location before activating the Splat-Switch]]
[[File:Octo Canyon Level 19 Scroll location 2.jpg|320px|thumb|left|Scroll location after activating the Splat-Switch]]
[[File:Octo Canyon Level 19 Scroll location 2.jpg|320px|thumb|left|Scroll location after activating the Splat-Switch]]
Line 28:
Line 158:
===Sardinium===
===Sardinium===
'''Location:''' At the first checkpoint in the area accessed from the left-most launchpad, there is a spinning block with two inkable switches. Inking one will cause a platform to rotate upright, allowing the player to progress. Inking both will cause the block to stop spinning and lower, allowing the player to jump onto the block to reach a crate containing the Sardinium.
'''Location:''' At left path checkpoint 1, take the left path instead after hitting the first splat-switch. Another splat-switch can be found on the block with the first splat-switch. Hitting it will lower the block, allowing the player to get on top and uncovering the crate behind holding the Sardinium. [[File:Octo Canyon Level 19 Sardinium location.jpg|320px|thumb|left|Sardinium location]]
The Experimentorium has 3 pieces of armor to collect.
The Experimentorium has 3 pieces of armor to collect.
'''Armor 1 Location:''' Located on the left side of an O shaped platform accessible after inking the 2nd inkswitch required to progress on the left launchpad's route.
'''Armor 1 Location:''' In the lone crate on the left side of the loop in left path checkpoint 2.
'''Armor 2 Location:''' After landing from the right launchpad, there will be two small pillars on the left and right sides of a square just ahead. The armor is located at the top of the left one.
'''Armor 2 Location:''' In the crate on the block to the right of the platform with a hole in right path checkpoint 1.
'''Armor 3 Location:''' After activating all three switches and using the launchpad that rises from the center, the closest Squee-G to the landing spot will have Armor in a crate on it.
'''Armor 3 Location:''' In the crate on top of the Industrial Squee-G docked in front of the final checkpoint.
===Crust Bucket Ticket===
===Crust Bucket Ticket===
'''Location:''' After reaching the final checkpoint with the 3 [[Industrial Squee-G]], head over to the platform in the middle of the area with the [[Shielded Octotrooper]] on top. Splat that fool into oblivion, and a launchpad will appear where they were standing. Use it, and it'll take you to an area filled with [[Flooder]]s. Hop across the platforms until you reach the far end of the area, and after reaching higher ground, jump on a [[Flooder]] and ride it to the platform on the left of where you should be facing. Climb up onto it, and you'll see a crate which you can bust open to find your ticket.
'''Location:''' Take the launchpad on the block in the middle of the area in the final checkpoint to the detour area with Flooders. Navigate through the Flooders across the block to the large block on the other side. Climb up on it and get on a Flooder. From there navigate across the Flooders to the large block on the left. On top is a lone crate with the ticket. From there the player can take the curved plank walk to the launchpad back.
Climb up the block to the right near the center of the map, and unfurl the Inkfurler on the left. Then take the path with the bouncepads. Jump over the uninkable wall with the last one. The kettle is at the end of the platform.
Take the launchpad and break the crates ahead. Behind the crates is a Shielded Octotrooper on a vault in the center of the platform. To the sides are two more of such vaults, and behind it are three launchpads on walls. The player has to take all three launchpads to three different sections in whichever order they desire. At the end of each section is a key, a checkpoint to save progress and a launchpad back to this area. Upon completing a path the respective wall with the respective launchpad lowers to indicate completion. The player must gather all three keys to activate all three Splat-Switches. Doing so raises the block with the middle splat-switch to reveal a launchpad on its back side to the final checkpoint.
Left path Checkpoint 1
Taking the left launchpad in the beginning area takes the player here. Ahead is a weird structure with curvy narrow paths branching from a central block. The player has to climb up to that block and hit the splat-switch ahead, causing the branches to the side to rotate, forming an upwards path to the right which the player takes. From there the player is introduced to a circular loop platform with a block in the center. The player has to get on the block and hit the Tentakook running on the loop. Upon defeating the Tentakook, the block rises to introduce two blocks above, both can be hit by the player's weapon but not the player themselves. The right one does not have anything interactable, while the left one has a splat-switch on its side. Hitting it will cause the structure ahead to rotate, allowing access when the movement is complete. The next checkpoint is on the structure.
Left path Checkpoint 2
Ahead are three Octocopters above another circular loop platform with two blocks suspended on inner opposite sides. Defeating them will cause the further block to rise and move towards the closer block, revealing a splat-switch on its back side. Hitting it will cause the aforementioned block to the right to rotate, revealing a splat-switch on its back side. The player must go back and hit it, causing the structure behind it to deform and assemble into a curvy path upwards. From there the player has to go along the path, defeating Deluxe Octocopters on the way. At the top is a checkpoint, a key and a launchpad back the the beginning area.
Left path Checkpoint 3
Pick up the key and take the launchpad to return to the beginning area.
Middle path Checkpoint 1
Taking the middle launchpad in the beginning area takes the player here. Ahead are two Grapplinks lined up such that the next one is behind and lower than the previous one. The player must hit the grapplinks successively before they fall too far to reach the next grapplink. If the player succeeds in making to the end of the grapplink path they fall onto a platform with a launchpad to the next checkpoint, and if they fail they fall on another platform with a launchpad back to the beginning of the section.
Middle path Checkpoint 2
Ahead is another grapplink path with five grapplinks. The player must hit the grapplinks successively to make it to the end. If the player succeeds in hitting the fifth grapplink they land on a platform with the next checkpoint, if they fall after hitting the third or fourth grapplink they land on a platform with a launchpad back to the beginning of the section, and if they fail to do neither they fall to their death.
Middle path Checkpoint 3
Drop down to pick up the key, then cross the gap, collect the Scroll if the splat-switch has been hit (see Collectibles) and take the launchpad back to the beginning area.
Right path Checkpoint 1
Taking the launchpad to the right in the beginning area takes the player here. Ahead is a platform with two Shielded Octotroopers on a path of Octarian ink circling a platform of the same level in the middle. Defeating them makes the platform in the middle raise, revealing a hole the player can jump down. Below is a path leading up to a platform with four Octotroopers circling a raised block in the middle with a Shielded Octotrooper on top. Defeat the whole lot and the Octostamp behind the bumper ahead. Climb up the block behind the bumper and activate the splat-switches to the side. Doing so activates the next checkpoint and reforms the path.
Right path Checkpoint 2
The player now has to take the same path again with the newly spawned enemies. Getting onto the narrow path spawns a Shielded Octotrooper at the other end, then two more Shielded Octotroopers to the side of the raised block, with another Shielded Octotrooper on top. Behind the whole lot is another Octostamp behind the bumper, and behind that is the next checkpoint. The player has to navigate and defeat the enemies and reach the next checkpoint.
Right path Checkpoint 3
Pick up the key and take the launchpad back to the beginning area.
Final Checkpoint
The player lands in front of a large platform with three Industrial Squee-Gs, two large inkable blocks on the left and right ledge, two uninkable blocks on the sides of the far ledge, and a smaller inkable block in the middle with a Shielded Octotrooper on top. Upon boarding the Industrial Squee-G docked in front of the checkpoint, eight Octotroopers spawn throughout the field, and the Industrial Squee-Gs proceed to take them down. The player has to use the Squee-Gs to reach the uninkable blocks, first the left one to pick up the key, then the right one to unlock the vault with the launchpad to the Zapfish. Upon picking up the key eight more Octotroopers spawn, promptly distracting the Squee-Gs. The player can go out and board another Industrial Squee-G, or simply wait for the Squee-G docked at the corner nearby to return. The player can also take down the Shielded Octotrooper if necessary, which activates a launchpad there, but the launchpad is an unnecessary detour to an area with five Flooders patrolling an area with four blocks in the middle, and more suspended in the air. The player can simply take the launchpad behind to go back, landing on the Industrial Squee-G docked on the right corner of the platform.
Collectibles
Sunken Scroll
“
Salmonids are known to keep their weapons in tip-top shape. The frying pans they wield have often been passed down from generation to generation. You can see the unwavering pride of these fierce warriors in their (somewhat crazed) eyes.
Location: To the left of the fourth grapplink in middle path checkpoint 2 is a splat-switch suspended in the air. The player has to hit it after hitting the fourth grapplink. Doing so moves the grate with the Scroll on top to the gap in middle path checkpoint 3. After activating the splat-switch the player has to take the launchpad below and redo the section.
Scroll location before activating the Splat-SwitchScroll location after activating the Splat-Switch
Sardinium
Location: At left path checkpoint 1, take the left path instead after hitting the first splat-switch. Another splat-switch can be found on the block with the first splat-switch. Hitting it will lower the block, allowing the player to get on top and uncovering the crate behind holding the Sardinium.
Sardinium location
Armor
The Experimentorium has 3 pieces of armor to collect.
Armor 1 Location: In the lone crate on the left side of the loop in left path checkpoint 2.
Armor 2 Location: In the crate on the block to the right of the platform with a hole in right path checkpoint 1.
Armor 3 Location: In the crate on top of the Industrial Squee-G docked in front of the final checkpoint.
Crust Bucket Ticket
Location: Take the launchpad on the block in the middle of the area in the final checkpoint to the detour area with Flooders. Navigate through the Flooders across the block to the large block on the other side. Climb up on it and get on a Flooder. From there navigate across the Flooders to the large block on the left. On top is a lone crate with the ticket. From there the player can take the curved plank walk to the launchpad back.


