Rainmaker shield: Difference between revisions
m (→Breaking the shield: Another minor grammatical error has been corrected.) Tags: mobile edit mobile web edit |
Cuttlfish59 (talk | contribs) (→Trivia: Expanding article) |
||
| (17 intermediate revisions by 14 users not shown) | |||
| Line 1: | Line 1: | ||
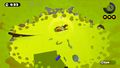
[[File:Rainmaker Shield. | [[File:S Rainmaker Shield.png|thumb|right|The Rainmaker shield.]] | ||
{{other uses|the shield|the weapon that | {{other uses|the shield|the weapon that the shield protects|Rainmaker (weapon)}} ''For the mode it is used in, see '''[[Rainmaker]]'''.'' | ||
The '''Rainmaker shield''', or '''Rainmaker barrier''', is a protective bubble surrounding the [[Rainmaker (weapon)|Rainmaker]]. Players must attack the shield to pop it and reach the Rainmaker weapon. As the player attacks it, the Rainmaker shield grows in size and changes to the player's ink color. Attacking a shield enlarged by enemy ink shrinks it back towards its neutral state; thus, if opposing players are dealing equal damage to the shield, no progress is made. After | The '''Rainmaker shield''', or '''Rainmaker barrier''', is a protective bubble surrounding the [[Rainmaker (weapon)|Rainmaker]]. Players must attack the shield to pop it and reach the Rainmaker weapon. As the player attacks it, the Rainmaker shield grows in size and changes to the player's ink color. Attacking a shield enlarged by enemy ink shrinks it back towards its neutral state; thus, if opposing players are dealing equal damage to the shield, no progress is made. After 1000 damage is dealt to the shield by one team, it explodes and releases a blast of ink that is lethal to any member of the opposing team who is standing too close, dealing 900 damage. Players of either team may then pick up the unshielded Rainmaker regardless of which team popped its shield. A player touching the Rainmaker shield receives 10.0 damage every three frames. | ||
If a player carrying the Rainmaker falls out of bounds or into the water, or if the Rainmaker is left untouched for too long after the shield is broken, the Rainmaker shield always respawns in its original state in the center of the map. | If a player carrying the Rainmaker falls out of bounds or into the water on their own half of the stage, or if the Rainmaker is left untouched for too long after the shield is broken, the Rainmaker shield always respawns in its original state in the center of the map. | ||
== | ==Popping the shield== | ||
The Rainmaker shield has 1000 HP, but many weapon types have a damage multiplier applied when they hit the shield. The multiplier values are detailed in the tables below. | The Rainmaker shield has 1000 HP, but many weapon types have a damage multiplier applied when they hit the shield. The multiplier values are detailed in the tables below. | ||
[[Roller]]-type weapons such as the | [[Roller]]-type weapons such as the [[Splat Roller]] or [[Inkbrush]] cannot deal any damage to the shield by rolling towards it. | ||
[[ | Bomb [[sub weapon]]s instantly detonate on contact with the shield. | ||
===''Splatoon''=== | ===''Splatoon''=== | ||
| Line 21: | Line 21: | ||
! Main weapon !! Multiplier | ! Main weapon !! Multiplier | ||
|- | |- | ||
| [[Shooter]]s || | | [[Shooter]]s || ×1 (?) | ||
|- | |- | ||
| {{Weapon|S|Main|L-3 Nozzlenose}} || | | {{Weapon|S|Main|L-3 Nozzlenose}} || ×1.20000005 | ||
|- | |- | ||
| {{Weapon|S|Main|H-3 Nozzlenose}} || | | {{Weapon|S|Main|H-3 Nozzlenose}} || ×1.39999998 | ||
|- | |- | ||
| [[Splatling]]s || | | [[Splatling]]s || ×1 (?) | ||
|- | |- | ||
| [[Shooter|Blasters]] || | | [[Shooter|Blasters]] || ×2.4 (?) | ||
|- | |- | ||
| [[Roller#Brushes|Brushes]] || | | [[Roller#Brushes|Brushes]] || ×0.5 | ||
|- | |- | ||
| {{Weapon|S|Main|Carbon Roller}} || | | {{Weapon|S|Main|Carbon Roller}} || ×0.23684210 | ||
|- | |- | ||
| {{Weapon|S|Main|Splat Roller}} || | | {{Weapon|S|Main|Splat Roller}} || ×0.30000001 | ||
|- | |- | ||
| {{Weapon|S|Main|Dynamo Roller}} || | | {{Weapon|S|Main|Dynamo Roller}} || ×0.28799999 | ||
|- | |- | ||
| [[Slosher]]s || | | [[Slosher]]s || ×2.4 (?) | ||
|- | |- | ||
| [[Charger]]s || | | [[Charger]]s || ×2.8 (?) | ||
|} | |} | ||
{|class="wikitable sitecolor-s" style="float:left; margin-right: 1em;" | {|class="wikitable sitecolor-s" style="float:left; margin-right: 1em;" | ||
| Line 47: | Line 47: | ||
! Sub weapon !! Multiplier | ! Sub weapon !! Multiplier | ||
|- | |- | ||
| {{Weapon|S|Sub|Sprinkler}} || | | {{Weapon|S|Sub|Sprinkler}} || ×1 (?) | ||
|- | |- | ||
| {{Weapon|S|Sub| | | {{Weapon|S|Sub|Seeker}} || ×3 (?) | ||
|- | |- | ||
| | | Other [[sub weapon]]s || ×2 (?) | ||
|} | |} | ||
{|class="wikitable sitecolor-s" style="float:left; margin-right: 1em;" | {|class="wikitable sitecolor-s" style="float:left; margin-right: 1em;" | ||
| Line 57: | Line 57: | ||
! Special weapon !! Multiplier | ! Special weapon !! Multiplier | ||
|- | |- | ||
| | | {{Weapon|S|Special|Kraken}} || ×3.5 (?) | ||
|- | |- | ||
| | | Other [[special weapon]]s || ×2 (?) | ||
|} | |} | ||
{{clr}} | {{clr}} | ||
====With Damage Up==== | ====With Damage Up==== | ||
Unlike against [[Inkling]]s, weapons do not have a [[Damage#Benefits of reaching damage cap|damage cap]] when hitting the Rainmaker shield with | Unlike against [[Inkling]]s, weapons do not have a [[Damage#Benefits of reaching damage cap|damage cap]] when hitting the Rainmaker shield with [[Damage Up]] buffs. This means that Damage Up can be used to pop the shield faster than normal.<ref>[http://squidboards.com/threads/ranked-battle-splat-zones-tower-control-and-rainmaker-discussion.1447/page-11#post-121789 Ranked Battle (Splat Zones, Tower Control and Rainmaker) Discussion | Page 11 | Squidboards]</ref> The time gains for each weapon can be seen in the charts below. | ||
<gallery> | <gallery> | ||
| Line 80: | Line 74: | ||
===''Splatoon 2''=== | ===''Splatoon 2''=== | ||
The | The [[Object Shredder]] ability increases damage output against the Rainmaker shield by 10%. The damage multipliers each weapon has against the Rainmaker shield are detailed below.<ref>[https://leanny.github.io/splat2new/damagetable.html ''Splatoon 2'' - Damage Multipliers]</ref> | ||
{|class="wikitable sitecolor-s2" style="float:left; margin-right: 1em;" | {|class="wikitable sitecolor-s2" style="float:left; margin-right: 1em;" | ||
| Line 136: | Line 130: | ||
{|class="wikitable sitecolor-s2" style="float:left; margin-right: 1em;" | {|class="wikitable sitecolor-s2" style="float:left; margin-right: 1em;" | ||
|- | |- | ||
! Special weapon !! Multiplier | ! Special weapon !! Multiplier !! Damage | ||
|- | |- | ||
| {{Weapon|S2|Special|Bubble Blower}} || 1× | | {{Weapon|S2|Special|Bubble Blower}} || 1× || 0.5 per frame (Contact)<br> | ||
50 (Min. Splash)<br> | |||
250 (Direct hit) | |||
|- | |- | ||
| {{Weapon|S2|Special|Ink Storm}} || 5× | | {{Weapon|S2|Special|Ink Storm}} || 5× || 2 per frame | ||
|- | |- | ||
| {{Weapon|S2|Special|Sting Ray}} || 2.4× | | {{Weapon|S2|Special|Sting Ray}} || 2.4× || | ||
1.8 per frame (direct)<br> | |||
1.5 per frame (shockwave) | |||
|- | |- | ||
| {{Weapon|S2|Special|Baller}} (explode) || 2.5× | | {{Weapon|S2|Special|Baller}} (explode) || 2.5× || 137.5 (splash)<br> | ||
450 (direct hit) | |||
|- | |- | ||
| {{Weapon|S2|Special|Inkjet}} || 2.8× | | {{Weapon|S2|Special|Inkjet}} || 2.8× || 84 (Min. Splash)<br> | ||
140 (Splash)<br> | |||
336 (Direct hit)<br> | |||
1.4 per frame (Exhaust) | |||
|- | |- | ||
| {{Weapon|S2|Special|Baller}} (touch) || 5× | | {{Weapon|S2|Special|Baller}} (touch) || 5× || 250 | ||
|- | |- | ||
| {{Weapon|S2|Special|Splashdown}} || 5× | | {{Weapon|S2|Special|Splashdown}} || 5× || 275 (Min. Splash)<br> | ||
350 (Splash)<br> | |||
900 (Direct hit) | |||
|- | |- | ||
| {{Weapon|S2|Special|Booyah Bomb}} || | | {{Weapon|S2|Special|Booyah Bomb}} || unknown || 950 | ||
|- | |- | ||
| {{Weapon|S2|Special|Ultra Stamp}} (Stamp) || 3× | | {{Weapon|S2|Special|Ultra Stamp}} (Stamp) || 3× || 120 (stamp splash)<br> | ||
300 (stamp direct hit) | |||
|- | |- | ||
| {{Weapon|S2|Special|Ultra Stamp}} (Throw) || 3.5× | | {{Weapon|S2|Special|Ultra Stamp}} (Throw) || 3.5× || 105 (throw min. splash)<br> | ||
210 (throw splash)<br> | |||
420 (throw direct hit) | |||
|} | |} | ||
<ref>[https://docs.google.com/spreadsheets/d/1ZjI0Fngj1eQTvmwhrv_STt6a2tOc2jr9bdGQ-6XtE6U Spreadsheet of datamined damage modifiers]</ref> | <ref>[https://docs.google.com/spreadsheets/d/1ZjI0Fngj1eQTvmwhrv_STt6a2tOc2jr9bdGQ-6XtE6U Spreadsheet of datamined damage modifiers]</ref> | ||
| Line 163: | Line 170: | ||
==Gallery== | ==Gallery== | ||
<gallery> | <gallery> | ||
Splatted by Rainmaker Shield.jpg|Touching the Rainmaker shield with | Splatted by Rainmaker Shield.jpg|Touching the Rainmaker shield with [[Defense Up]]. | ||
</gallery> | </gallery> | ||
==Trivia== | ==Trivia== | ||
* The Rainmaker shield behaves as a shield in [[Octo Valley]] which carries the [[Zapfish]], but the shield does not respawn nor carries a Zapfish. | * The Rainmaker shield behaves as a shield in [[Octo Valley (mode)|Octo Valley]] which carries the [[Zapfish]], but the shield does not respawn nor carries a Zapfish. | ||
** The shield only respawns when the current player falls into water or out of bounds or gets splatted by an opponent. | ** The shield only respawns when the current player falls into water or out of bounds or gets splatted by an opponent. | ||
* The Rainmaker shield is used in many out of bounds [[glitches]]. Place a | * The Rainmaker shield is used in many out-of-bounds [[glitches]]. Place a [[Squid Beakon]] next to a wall, then splat the Rainmaker next to a Beakon. [[Super Jump]] to the Beakon and the player will clip into the wall. | ||
* The Rainmaker shield can be targeted by [[Tenta Missiles]]. | |||
* It is possible to get splatted by the Rainmaker shield, due to it dealing 10.0 damage every three frames to any player touching it. In ''Splatoon'' and ''Splatoon 2'', this results in the player being shown their own gear and abilities. | |||
** The easiest way to do this is with an [[Ultra Stamp]]. Stamping directly at the shield will splat the player almost instantly. | |||
==See also== | ==See also== | ||
| Line 179: | Line 189: | ||
<references/> | <references/> | ||
[[Category: | [[Category:Game information]] | ||
Latest revision as of 15:41, 10 April 2024

- This article is about the shield. For the weapon that the shield protects, see Rainmaker (weapon). For the mode it is used in, see Rainmaker.
The Rainmaker shield, or Rainmaker barrier, is a protective bubble surrounding the Rainmaker. Players must attack the shield to pop it and reach the Rainmaker weapon. As the player attacks it, the Rainmaker shield grows in size and changes to the player's ink color. Attacking a shield enlarged by enemy ink shrinks it back towards its neutral state; thus, if opposing players are dealing equal damage to the shield, no progress is made. After 1000 damage is dealt to the shield by one team, it explodes and releases a blast of ink that is lethal to any member of the opposing team who is standing too close, dealing 900 damage. Players of either team may then pick up the unshielded Rainmaker regardless of which team popped its shield. A player touching the Rainmaker shield receives 10.0 damage every three frames.
If a player carrying the Rainmaker falls out of bounds or into the water on their own half of the stage, or if the Rainmaker is left untouched for too long after the shield is broken, the Rainmaker shield always respawns in its original state in the center of the map.
Popping the shield
The Rainmaker shield has 1000 HP, but many weapon types have a damage multiplier applied when they hit the shield. The multiplier values are detailed in the tables below.
Roller-type weapons such as the Splat Roller or Inkbrush cannot deal any damage to the shield by rolling towards it.
Bomb sub weapons instantly detonate on contact with the shield.
Splatoon
The damage multipliers each weapon has against the Rainmaker shield are detailed below.
| Main weapon | Multiplier |
|---|---|
| Shooters | ×1 (?) |
| ×1.20000005 | |
| ×1.39999998 | |
| Splatlings | ×1 (?) |
| Blasters | ×2.4 (?) |
| Brushes | ×0.5 |
| ×0.23684210 | |
| ×0.30000001 | |
| ×0.28799999 | |
| Sloshers | ×2.4 (?) |
| Chargers | ×2.8 (?) |
| Sub weapon | Multiplier |
|---|---|
| ×1 (?) | |
| ×3 (?) | |
| Other sub weapons | ×2 (?) |
| Special weapon | Multiplier |
|---|---|
| ×3.5 (?) | |
| Other special weapons | ×2 (?) |
With Damage Up
Unlike against Inklings, weapons do not have a damage cap when hitting the Rainmaker shield with Damage Up buffs. This means that Damage Up can be used to pop the shield faster than normal.[1] The time gains for each weapon can be seen in the charts below.
-
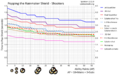
Shooters.
-
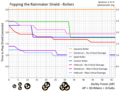
Rollers and brushes.
-
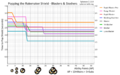
Blasters and sloshers.
-
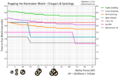
Chargers and splatlings.


Splatoon 2
The Object Shredder ability increases damage output against the Rainmaker shield by 10%. The damage multipliers each weapon has against the Rainmaker shield are detailed below.[2]
| Main weapon | Multiplier |
|---|---|
| Dualies | 1× |
| Shooters | 1× |
| Splatlings | 1× |
| Rollers | 1.8× |
| Blasters | 1.9× |
| Chargers | 2× |
| Brellas | 2.4× |
| Sloshers | 2.4× |
| 1.1× | |
| 1.11× | |
| 1.16× | |
| 1.1× | |
| 2.3× | |
| 2× | |
| 3.2× | |
| 3.6× |
| Sub weapon | Multiplier |
|---|---|
| 0.6× | |
| 2× | |
| 3.6× | |
| 4× | |
| 2× | |
| 0.2× |
| Special weapon | Multiplier | Damage |
|---|---|---|
| 1× | 0.5 per frame (Contact) 50 (Min. Splash) | |
| 5× | 2 per frame | |
| 2.4× |
1.8 per frame (direct) | |
| 2.5× | 137.5 (splash) 450 (direct hit) | |
| 2.8× | 84 (Min. Splash) 140 (Splash) | |
| 5× | 250 | |
| 5× | 275 (Min. Splash) 350 (Splash) | |
| unknown | 950 | |
| 3× | 120 (stamp splash) 300 (stamp direct hit) | |
| 3.5× | 105 (throw min. splash) 210 (throw splash) |
Gallery
-
Touching the Rainmaker shield with Defense Up.

Trivia
- The Rainmaker shield behaves as a shield in Octo Valley which carries the Zapfish, but the shield does not respawn nor carries a Zapfish.
- The shield only respawns when the current player falls into water or out of bounds or gets splatted by an opponent.
- The Rainmaker shield is used in many out-of-bounds glitches. Place a Squid Beakon next to a wall, then splat the Rainmaker next to a Beakon. Super Jump to the Beakon and the player will clip into the wall.
- The Rainmaker shield can be targeted by Tenta Missiles.
- It is possible to get splatted by the Rainmaker shield, due to it dealing 10.0 damage every three frames to any player touching it. In Splatoon and Splatoon 2, this results in the player being shown their own gear and abilities.
- The easiest way to do this is with an Ultra Stamp. Stamping directly at the shield will splat the player almost instantly.
