Return of the Octarians: Difference between revisions
m (→Sunken Scroll: Oops) |
m (MAINT: broken file links) |
||
| (88 intermediate revisions by 38 users not shown) | |||
| Line 1: | Line 1: | ||
{{OctoCanyonPrevNext | prevnum= | nextnum=2 | prev= | next=Welcome to Octopia }} | {{OctoCanyonPrevNext|prevnum=|nextnum=2|prev=|next=Welcome to Octopia}} | ||
{{ | {{Infobox/Mission | ||
|color | |color={{SiteColor|Splatoon 2}} | ||
|subtitle = ˜ Rescue the Zapfish! ˜ | |subtitle=˜ Rescue the Zapfish! ˜ | ||
|number | |number=1 | ||
|area | |area=1 | ||
|items | |items=1 [[Sunken Scroll|Scroll]], 1 [[Sardinium]], 2 [[Armor]], 2 [[Tenta Missiles]] | ||
|music | |music=''[[Octo Eight-Step]]'' | ||
|amiibo | |amiibo= | ||
|image | |image=OC Return of the Octarians beginning.jpg | ||
}} | }}{{StrategyWiki|Splatoon 2|Return of the Octarians}} | ||
'''Return of the Octarians''' is the first mission in ''[[Splatoon 2]]''{{'s}} single-player [[mode]], [[Octo Canyon (mode)|Octo Canyon]]. it appears to take place on top of some buildings. | |||
'''Return of the Octarians''' is the first mission in {{ | |||
==Octo Canyon== | ==Octo Canyon== | ||
The player must | The player must follow [[Marie]] down a grate in [[Inkopolis Square]] to access [[Octo Canyon (location)|Octo Canyon]]. | ||
The [[kettle]] for this mission is straight across the first | The [[kettle]] for this mission is straight across the first Sector, behind the first boss kettle. | ||
{{ | {{clr}} | ||
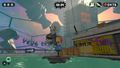
[[File:OctoCanyonlevel1location.jpg|320px|left|thumb|Kettle location]] | |||
{{clr}} | |||
== Gameplay == | |||
<embedvideo service="youtube">https://youtu.be/AUKeZswwV28</embedvideo> | |||
== Walkthrough == | == Walkthrough == | ||
{| class="wikitable sitecolor-s2" style="margin: auto;" | {| class="wikitable sitecolor-s2" style="margin: auto;" | ||
|+ | |+ Return of the Octarians Stats | ||
! Area | ! Area | ||
! Enemies | ! Enemies | ||
! Armor | ! Armor | ||
!Special Weapon | ! Special Weapon | ||
!Sunken Scroll | ! Sunken Scroll | ||
!Sardinium | ! Sardinium | ||
|- | |- | ||
! Beginning Area | ! Beginning Area | ||
| 1x Octotrooper | | 1x Octotrooper<br>1x Shielded Octotrooper | ||
1x Shielded Octotrooper | |||
| {{N/A}} | | {{N/A}} | ||
| {{N/A}} | | {{N/A}} | ||
| Line 60: | Line 56: | ||
|- | |- | ||
! Checkpoint 3 | ! Checkpoint 3 | ||
| | | 8x Blobby Octotroopers | ||
| 1x Armor | | 1x Armor | ||
| {{N/A}} | | {{N/A}} | ||
| {{N/A}} | | {{N/A}} | ||
| Line 67: | Line 63: | ||
|- | |- | ||
! Checkpoint 4 | ! Checkpoint 4 | ||
| 1x Shielded | | 1x Shielded Octotrooper | ||
| {{N/A}} | | {{N/A}} | ||
| {{N/A}} | | {{N/A}} | ||
| Line 74: | Line 70: | ||
|- | |- | ||
! Checkpoint 5 | ! Checkpoint 5 | ||
| 2x Shielded Octotroopers | | 2x Shielded Octotroopers<br>2x Octotroopers | ||
2x Octotroopers | |||
| {{N/A}} | | {{N/A}} | ||
| {{N/A}} | | {{N/A}} | ||
| Line 82: | Line 77: | ||
|- | |- | ||
! Final Checkpoint | ! Final Checkpoint | ||
| 13x Octotroopers | | 13x Octotroopers<br>3x Shielded Octotroopers | ||
3x Shielded Octotroopers | | 1x Armor | ||
| 1x | | 2x Tenta Missiles | ||
| 2x Tenta | |||
| {{N/A}} | | {{N/A}} | ||
| {{N/A}} | | {{N/A}} | ||
| Line 91: | Line 85: | ||
=== Beginning === | === Beginning === | ||
There is a chain of three [[Power Egg]]s in an already inked ramp leading to the first launchpad. | There is a chain of three [[Power Egg]]s in an already-inked ramp leading to the first launchpad. | ||
=== Checkpoint 1 === | === Checkpoint 1 === | ||
Ahead is a downwards slide. Shoot forwards to collect the first four [[Power | Ahead is a downwards slide. Shoot forwards to collect the first four [[Power Egg]]s leading to behind a wall, and to the sides to collect another 2 Eggs on each side (for a total of 8 Eggs). | ||
Heading further down the ramp, collect another two Eggs in front of two walls. The [[Octotrooper]] cannot hit you behind either wall. Ink some turf from the side of the wall | Heading further down the ramp, collect another two Eggs in front of two walls. The [[Octotrooper]] cannot hit you behind either wall. Ink some turf from the side of the wall then, go close to the enemy by going in squid form and then taking it down. | ||
Shoot the Octotrooper. A [[Squid | Shoot the Octotrooper. A [[Squid ring]] will appear. Jump through the ring using {{Button|B|Switch}} to collect a Power Egg from it. | ||
Follow the ink to the next area. A [[Shielded Octotrooper]] is on guard. Use a bomb to distract the trooper, then shoot him from behind. A launchpad appears, but before launching, break the boxes to the left for a Power Egg. Use the launchpad. | Follow the ink to the next area. A [[Shielded Octotrooper]] is on guard. Use a bomb to distract the trooper, then shoot him from behind. A launchpad appears, but before launching, break the boxes to the left for a Power Egg. Use the launchpad. | ||
| Line 110: | Line 104: | ||
=== Checkpoint 3 === | === Checkpoint 3 === | ||
You land on the platform just above. Shoot the orange box to the left for a Power Egg. Ahead is a [[Balloon Fish]] with eight Power Eggs around. Simply pop it. Further ahead | You land on the platform just above. Shoot the orange box to the left for a Power Egg. Ahead is a [[Balloon Fish]] with eight Power Eggs around. Simply pop it. Further ahead are another two Octotroopers, one with a balloon attached, and a [[Vault]]. Popping the balloon grants five Power Eggs. | ||
After splatting the two troopers, head to the left, collecting the two Eggs on the way. Swim through the [[grate]] using squid form ({{Button|ZL}}). Use the Balloon Fish to break the crates to get six Power Eggs and release an ambush of 3 Octotroopers. Splat them easily by popping the Balloon Fish again. Swim back towards the Vault and across, collecting the two Eggs on the way and swim through the grate. Smash all the boxes for three Power Eggs and release another three Octotroopers. Splat them. Behind all the boxes is a taped orange box which is stronger than the other ones. Destroy that to get the [[Key]]. Pick up the key and swim back to the vault, and launch. | After splatting the two troopers, head to the left, collecting the two Eggs on the way. Swim through the [[grate]] using squid form ({{Button|ZL|Switch}}). Use the Balloon Fish to break the crates to get six Power Eggs and release an ambush of 3 Octotroopers. Splat them easily by popping the Balloon Fish again. Swim back towards the Vault and across, collecting the two Eggs on the way and swim through the grate. Smash all the boxes for three Power Eggs and release another three Octotroopers. Splat them. Behind all the boxes is a taped orange box which is stronger than the other ones. Destroy that to get the [[Key]]. Pick up the key and swim back to the vault, and launch. | ||
=== Checkpoint 4 === | === Checkpoint 4 === | ||
Head off the top to behind the row of boxes, collecting the two Power Eggs on each side. Break the two orange boxes for a Power Egg and an [[Armor]]. | Head off the top to behind the row of boxes, collecting the two Power Eggs on each side. Break the two orange boxes for a Power Egg and an [[Armor]]. | ||
Ahead are six Octotroopers. Use bombs to splat them. If you run low on health, hide behind the wall or pillars. Collect the six Power Eggs around, and one on top of each pillar. There is also a taped orange box containing a tin can for another 10 Eggs. | Ahead are six Octotroopers. Use bombs to splat them. If you run low on health, hide behind the wall or pillars. Collect the six Power Eggs around, and one on top of each pillar. There is also a taped orange box containing a tin can for another 10 Eggs. | ||
After collecting these, head to the back of the purple inked area where the final Octotrooper was. Two more Octotroopers spawn in. Splat them. | After collecting these, head to the back of the purple-inked area where the final Octotrooper was. Two more Octotroopers spawn in. Splat them. | ||
=== Checkpoint 5 === | === Checkpoint 5 === | ||
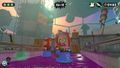
Destroy the orange box to the left for an Egg | [[File:ReturnoftheOctariansSardiniumGetTo.jpg|320px|thumb|Ink the wall and climb up]] | ||
[[File:ReturnoftheOctariansSardinium.jpg|320px|thumb|Location of the Sardinium]] | |||
Destroy the orange box to the left for an Egg and the small one to the right for another. Collect the three Power Eggs on the field. Ahead is a [[Shielded Octotrooper]]. Toss a bomb to distract him, then shoot him in the back. If you find this hard, continue shooting the trooped and eventually the shield will break. | |||
A | A launchpad appears, but before launching, ink a path up the sides to above the launch pad. A box on top contains a '''[[Sardinium]]'''. Then use the launchpad. | ||
{{clr}} | |||
=== Checkpoint 6 === | === Checkpoint 6 === | ||
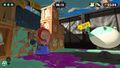
Jump through the Squid Ring. Three balloons appear. Shoot them, and three more appear. Destroy those too (Marie will comment on it!). Continue along the path and shoot the Balloon Fish ahead. Fall through the grate in squid form through the three Squid Rings. Do a U-turn around the corner facing where you came from. There is a hidden T-ledge down the bottom. The metal grate in the center is inkable; ink it, swim up | [[File:ReturnoftheOctariansSunkenScroll.jpg|320px|thumb|Jump down on the ledge below]] | ||
[[File:ReturnoftheOctariansSunkenScrollshown.jpg|320px|thumb|Sunken Scroll location]] | |||
Jump through the Squid Ring. Three balloons appear. Shoot them, and three more appear. Destroy those too (Marie will comment on it!). Continue along the path and shoot the Balloon Fish ahead. Fall through the grate in squid form through the three Squid Rings. Do a U-turn around the corner facing where you came from. There is a hidden T-ledge down the bottom. The metal grate in the center is inkable; ink it, swim up and break the orange crate for the [[Sunken Scroll]]. Head back through. A Shielded Octotrooper is patrolling that you can see through the glass window. Sneak up behind or use a bomb to splat him. | |||
Continue forward, destroy the three brown boxes ahead. Ahead is a Balloon Fish, use it to destroy the boxes and release two Octotroopers and one Shielded Octotrooper. Splat them easily using the Balloon Fish and a bomb. | Continue forward, destroy the three brown boxes ahead. Ahead is a Balloon Fish, use it to destroy the boxes and release two Octotroopers and one Shielded Octotrooper. Splat them easily using the Balloon Fish and a bomb. Behind them is a launchpad appears. Launch. | ||
{{clr}} | |||
=== Final Checkpoint === | === Final Checkpoint === | ||
Ahead are two orange boxes; the one on the left contains [[Tenta Missiles]], and the right contains Armor. Collect them. Splat the four Octotroopers guarding the vault. Do not use your special for this for additional Eggs at the end of the level. When they are dead, one will drop a key. | Ahead are two orange boxes; the one on the left contains [[Tenta Missiles]], and the right contains Armor. Collect them. Splat the four Octotroopers guarding the vault. Do not use your special for this for additional Eggs at the end of the level. When they are dead, one will drop a key. | ||
You can use the special on the 12 Octotroopers ahead. Head back, unlock the vault, collect the other Tenta Missiles special inside. Finish off any remaining troopers ahead. Each set drops one key, to unlock each of the three vaults. The front two vaults contain cans for 10 Eggs each, and the last is the launchpad. | You can use the special on the 12 Octotroopers ahead. Head back, unlock the vault, and collect the other Tenta Missiles special inside. Finish off any remaining troopers ahead. Each set drops one key, to unlock each of the three vaults. The front two vaults contain cans for 10 Eggs each, and the last is the launchpad. | ||
Launch, and grab the [[Zapfish]] by smashing the shield (easiest by throwing a bomb to break it instantly). | Launch, and grab the [[Zapfish]] by smashing the shield (easiest by throwing a bomb to break it instantly). | ||
== Collectibles== | ==Collectibles== | ||
===Sunken Scroll=== | ===Sunken Scroll=== | ||
[[File:S2 Sunken Scroll 1.png| | [[File:S2 Sunken Scroll 1.png|frameless|center|300px]] | ||
{{Quote|A shock wave struck while one young lady was performing at the recent Youth Folk-Singing contest, doing damage to the venue. Fortunately no one was injured.|[[Sunken Scroll]] {{color|1|green}} }} | {{Quote|A shock wave struck while one young lady was performing at the recent Youth Folk-Singing contest, doing damage to the venue. Fortunately no one was injured.|[[Sunken Scroll]] {{color|1|green}} }} | ||
'''Location:''' Return of the Octarians's [[Sunken Scroll]] can be found after jumping down the tower and making a U-turn at Checkpoint 6. It is located inside | '''Location:''' Return of the Octarians's [[Sunken Scroll]] can be found after jumping down the tower and making a U-turn at Checkpoint 6. It is located inside an orange [[crate]]. | ||
===Sardinium=== | ===Sardinium=== | ||
| Line 151: | Line 153: | ||
Return of the Octarians has 2 pieces of armor to collect. | Return of the Octarians has 2 pieces of armor to collect. | ||
'''Armor 1 Location:''' | '''Armor 1 Location:''' In front of the checkpoint, there's a row of boxes and the very right orange box contains the armor. | ||
'''Armor 2 Location:''' | '''Armor 2 Location:''' At the final checkpoint, there are two boxes, the right one containing the armor. | ||
===Special Weapon=== | ===Special Weapon=== | ||
'''Tenta Missiles 1 Location''' The box to the left | '''Tenta Missiles 1 Location:''' The box to the left of the final checkpoint. | ||
'''Tenta Missiles 2 Location''' After you defeat an Octarian that has a Key, | '''Tenta Missiles 2 Location:''' After you defeat an Octarian amongst the four on the first platform after the final checkpoint that has a Key, go to the Vault to reveal the canned Special. | ||
{{Clr}} | |||
==Enemies and Mechanics== | |||
===First Introduced=== | |||
<gallery> | |||
Splatoon 2 Octotrooper 3D.png|[[Octotrooper]] | |||
Splatoon 2 Octotrooper variant.png|[[Blobby Octotrooper]] | |||
Shielded Octotrooper Splatoon 2.jpg|[[Shielded Octotrooper]] | |||
S2 Balloon Fish.jpg|[[Balloon Fish]] | |||
Splat2Can.jpg|[[Canned special]] | |||
Launchpad Render.jpg|[[Launchpad]] | |||
Vault Render.jpg|[[Vault]] and [[Key]] | |||
</gallery> | |||
==Quotes== | |||
{{collapse| | |||
==={{flag|us}} English=== | |||
{{Clr}} | {{Clr}} | ||
| | |||
{{MissionQuote|OC|Marie|Press {{Button|ZL|Switch}} to enter squid form, and swim through that ink!}} | |||
{{MissionQuote|OC|Marie|Cover {{color|enemy ink|orange}} with your ink to move through it.}} | |||
{{MissionQuote|OC|Marie|Hide in your ink with {{Button|ZL|Switch}}. You'll {{color|recover ink|orange}} while hiding.}} | |||
{{MissionQuote|OC|Marie|Jump through that {{color|squid ring|orange}} with {{button|B|Switch}}.}} | |||
{{MissionQuote|OC|Marie|Not a lot of cover here. Hide in the ink with {{Button|ZL|Switch}} and move slowly so it doesn't see you.}} | |||
{{MissionQuote|OC|Marie|Toss a {{color|bomb|orange}} with {{Button|R|Switch}} to distract that shielded slob, then splat him in the back!}} | |||
{{MissionQuote|OC|Marie|Ah, a {{color-link|Launchpad|orange}}.}} | |||
{{MissionQuote|OC|Marie|Hmm...Not bad.}} | |||
{{MissionQuote|OC|Marie|Remember, you can look around with {{Button|RS|Switch}}!}} | |||
{{MissionQuote|OC|Marie|Woo! I'm impressed. Now hop onto that {{color-link|Launchpad|orange}}.}} | |||
{{MissionQuote|OC|Marie|Hit that {{color-link|Balloon Fish|orange}} with some ink to pop it!}} | |||
{{MissionQuote|OC|Marie|Ah, a {{color-link|vault|orange}}. We'll need to find a {{color-link|key|orange}} to open that.}} | |||
{{MissionQuote|OC|Marie|You can turn into a squid ({{Button|ZL|Switch}}) to {{color|slip through grates}}.}} | |||
{{MissionQuote|OC|Marie|There's the {{color-link|key|orange}}.}} | |||
{{MissionQuote|OC|Marie|Now use the {{color-link|key|orange}} to open the {{color-link|vault|orange}}!}} | |||
{{MissionQuote|OC|Marie|You're a natural. Onward!}} | |||
{{MissionQuote|OC|Marie|You want that {{color-link|armor|orange}}. Trust me.}} | |||
{{MissionQuote|OC|Marie|If you're hurt or overwhelmed, retreat and catch your breath. That's combat 101!}} | |||
{{MissionQuote|OC|Marie|Nice.}} | |||
{{MissionQuote|OC|Marie|Don't forget to strafe and backstep while you're shooting.}} | |||
{{MissionQuote|OC|Marie|You... You're still alive! This crazy plan might work after all.}} | |||
{{MissionQuote|OC|Marie|Toss a {{color|bomb|orange}} with {{Button|R|Switch}} to distract enemies, then attack while their backs are turned!}} | |||
{{MissionQuote|OC|Marie|Well done.}} | |||
{{MissionQuote|OC|Marie|Don't look down. Or do. Whatever.}} | |||
{{MissionQuote|OC|Marie|Wow. You must REALLY hate balloons.}} | |||
{{MissionQuote|OC|Marie|Pro tip: you can {{color|slip through grates}} in squid form ({{Button|ZL|Switch}}).}} | |||
{{MissionQuote|OC|Marie|Remember: you can {{color|reset the camera|orange}} with {{Button|Y|Switch}}!}} | |||
{{MissionQuote|OC|Marie|Stay alert. You never know what might be on the other side of a wall.}} | |||
{{MissionQuote|OC|Marie|AMBUSH! Cook these clowns!}} | |||
{{MissionQuote|OC|Marie|{{color-link|Tenta Missiles|orange}}! Click {{Button|RS|Switch}} to activate 'em, then fire 'em with {{Button|ZR|Switch}}.}} | |||
{{MissionQuote|OC|Marie|Well done.}} | |||
{{MissionQuote|OC|Marie|Now we're cookin'!}} | |||
{{MissionQuote|OC|Marie|There it is! Bust in and grab that {{color-link|Zapfish|orange}}!}} | |||
}} | |||
== Quotes == | === {{flag|jp}} Japanese === | ||
{{Translation needed|Translate Japanese dialogue. Add and translate Spanish (NOE) dialogue}} {{Collapse| | |||
====[[File:OC Icon Marie.png|45px]] {{color|ホタル's Quotes|green}}==== | |||
{{Clr}}|{{Quote|{{Button|ZL|Switch}} で{{color|イカ|orange}}になって、{{color|インクの中|orange}}を泳げるよ}} | |||
{{Quote|{{color|ちがう色のインク|orange}}は、塗り返して}} | |||
{{Quote|周囲を見わたして、{{Button|ZR|Switch}} でうつ!}} | |||
{{Quote|{{Button|ZL|Switch}}でかくれて、{{color|インク|orange}}回復ね}} | |||
{{Quote|あ {{color|イカフライ|orange}}! {{Button|B|Switch}} ジャンプで くぐってみよ~<br> A Squid Ring! Press {{Button|B|Switch}} to jump through it~}} | |||
{{Quote|タテ持ちは {{Button|R|Switch}} {{color|ボム|orange}}で気を引き 背中うつ!}} | |||
{{Quote|{{color|ジャンプポイント|orange}}、はっけ~ん}} | |||
{{Quote|やるね~、4号}} | |||
{{Quote|{{Button|Right Stick Click|Switch}}かたむけ 左右を見回す!戦場の鉄則ゥ}} | |||
{{Quote|イイネ! …からの{{color|ジャンプポイント|orange}}}} | |||
{{Quote|{{color|ボム風船|orange}}、割ってド~ンね }} | |||
{{Quote|{{color|ドア|orange}}だ、{{color|カギ|orange}}探そ~}} | |||
{{Quote|{{color|カナアミ|orange}}は、{{Button|ZL|Switch}}{{color|イカ|orange}}で ぬけられるっしょ}} | |||
{{Quote|{{color|カギ|orange}}発見!確認されたし}} | |||
{{Quote|{{color|カギ|orange}}取ったら {{color|ドア|orange}}に向かって}} | |||
{{Quote|やるねぇ、んじゃ次}} | |||
{{Quote|{{color|アーマー|orange}}だ、取っちゃえ}} | |||
{{Quote|カベにかくれて深呼吸!戦場の鉄則ゥ}} | |||
{{Quote|うちながら下がって!これぞ、退きうち!}} | |||
{{Quote|お見事!}} | |||
{{Quote|ふ~、危ない危ない… }} | |||
{{Quote|{{Button|R|Switch}}{{color|ボム|orange}}で注意をそらしてから、背中をうつ!}} | |||
{{Quote|エクセレント♪<br>Excellent ♪}} | |||
{{Quote|落ちないように足元、注意ね}} | |||
{{Quote|見てて ヒヤヒヤするし}} | |||
{{Quote|{{color|カナアミ|orange}}は、{{Button|ZL|Switch}}イカで{{color|くぐる|orange}}んよ}} | |||
{{Quote|{{color|カメラ正面|orange}}は、{{Button|Y|Switch}}で{{color|リセット|orange}}できるかんね}} | |||
{{Quote|カベの向こうは注意だな~}} | |||
{{Quote|ワナか?! 落ち着いて対処ね!}} | |||
{{Quote|{{color|マルチミサイル|orange}}だ!{{Button|Right Stick Click|Switch}}押して発動、{{Button|ZR|Switch}}で発射ね!}} | |||
{{Quote|エクセレント♪<br>Excellent ♪}} | |||
{{Quote|ナイスナイス~、この調子で よろ~}} | |||
{{Quote|{{color|デンチナマズ|orange}}は、割ってゲットね }} | |||
}} | |||
==={{flag|nl}} Dutch=== | |||
{{collapse| | {{collapse| | ||
===[[File:Marie | ====[[File:OC Icon Marie.png|45px]] {{color|Marie's Quotes|green}}==== | ||
{{Clr}} | |||
|{{Quote|''"Druk op {{Button|ZL|Switch}} om een {{color|inktvis|orange}} te worden en {{color|door de inkt te zwemmen|orange}}!"''<br>(Press {{Button|ZL|Switch}} to become a {{color|squid|orange}} and {{color|to swim through the ink|orange}}!)}} | |||
{{Quote|''"Bedek {{color|vijandelijke inkt|orange}} met je eigen inkt om er sneller door te kunnen bewegen."''<br>(Cover {{color|enemy ink|orange}} with your own ink to move through it faster.)}} | |||
{{Quote|''"Waarschijnlijk weet je dit al, maar met {{Button|ZR|Switch}} schiet je inkt!"''<br>(You probably know this already, but you shoot ink with {{Button|ZR|Switch}}!)}} | |||
{{Quote|''"Verstop je in je inkt met {{Button|ZL|Switch}}. Je {{color|inkt vult zich bij|orange}} terwijl je verstopt zit."''<br>(Hide yourself in your ink with {{Button|ZL|Switch}}. Your {{color|ink refills itself|orange}} while you are hiding.}} | |||
{{Quote|''"Spring met {{button|B|Switch}} door die {{color|inktvisring|orange}}."''<br>(Jump with {{button|B|Switch}} through that {{color|squid ring|orange}}.)}} | |||
{{Quote|''"Je hebt hier geen dekking... Verstop je in de inkt met {{Button|ZL|Switch}} en besluip 'm voorzichtig!"''<br>(You have no cover here... Hide yourself in the ink with {{Button|ZL|Switch}} and sneak up on him carefully!)}} | |||
{{Quote|''"Gooi een {{color|bom|orange}} met {{Button|R|Switch}} om die schildknaap af te leiden, en val hem dan in zijn rug aan!"''<br>(Throw a {{color|bomb|orange}} with {{Button|R|Switch}} to distract that shield boy, and then attack him in his back!)<br>'''''NOTE:''' 'schildknaap' is Dutch for "squire" and is a pun on 'schild' ("shield").''}} | |||
{{Quote|''"Kijk nou! Een {{color|lanceerpunt|orange}}!"''<br>(Look! A {{color|Launchpad|orange}}!)}} | |||
{{Quote|''"Je hebt het voor elkaar! En zo koel als een zeekomkommer!"''<br>(You have done it! And as cool as a sea cucumber!)}} | |||
{{Quote|''"Kijk om je heen met {{Button|RS|Switch}}!"''<br>(Look around with {{Button|RS|Switch}}!)}} | |||
{{Quote|''"Zo, da's ook weer voor elkaar. En daar is het volgende {{color|lanceerpunt|orange}}!"''<br>(So, that's done as well. And there is the next {{color|Launchpad|orange}}!)}} | |||
{{Quote|''"Raak de {{color|ballonvis|orange}} met inkt om hem te laten ploffen!"''<br>(Touch the {{color|Balloon Fish|orange}} with ink to let him burst!)}} | |||
{{Quote|''"Een {{color|kluis|orange}}... Dan moet er hier ook ergens een {{color|sleutel|orange}} zijn."''<br>(A {{color|vault|orange}}... Then there must be a {{color|key|orange}} somewhere here as well.)}} | |||
{{Quote|''"Als inktvis {{Button|ZL|Switch}} kun je {{color|door hekken glippen|orange}}!"''<br>(As a squid {{Button|ZL|Switch}} you can {{color|slip through fences|orange}}!)}} | |||
{{Quote|''"Daar heb je de {{color|sleutel|orange}}!"''<br>(There you have the {{color|key|orange}}!)}} | |||
{{Quote|''"Met de {{color|sleutel|orange}} kun je de {{color|kluis|orange}} openmaken!"''<br>(With the {{color|key|orange}} you can open the {{color|vault|orange}}!)}} | |||
{{Quote|''"Je bent een natuurtalent, ga zo door!"''<br>(You are a natural, keep it up!)}} | |||
{{Quote|''"Die {{color|bepantsering|orange}} wil je hebben, geloof me nou maar."''<br>(You want to have that {{color|armor|orange}}, believe me.)}} | |||
{{Quote|''"Als het je te veel wordt, verstop je dan even en kom op adem. Regel nummer één!"''<br>(If it becomes too much for you, then hide for a bit and catch your breath. Rule number one!)}} | |||
{{Quote|''"Vergeet niet dat je tijdens het schieten ook achteruit en zijwaarts kunt bewegen!"''<br>(Don't forget that while you shoot you can move backwards and sidewards!)}} | |||
{{Quote|''"Je... Je leeft nog! Misschien werkt dit idiote plan toch wel..."''<br>(You... You're still alive! Maybe this idiotic plan does work...)}} | |||
{{Quote|''"Hé leuk, je bent nog heel. Had ik niet gedacht."''<br>(Hey nice, you are still in one piece. I wouldn't have thought.)}} | |||
{{Quote|''"Gooi een {{color|bom|orange}} met {{Button|R|Switch}} om tegenstanders af te leiden, en val ze dan in de rug aan!"''<br>(Throw a {{color|bomb|orange}} with {{Button|R|Switch}} to distract opponents, and then attack them in the back!)}} | |||
{{Quote|''"Geweldig!"''<br>(Awesome!)}} | |||
{{Quote|''"Niet naar beneden kijken, straks val je! Of je kijkt lekker wel, moet jij weten."''<br>(Don't look down, you might fall! Or you do look, it's your choice.)}} | |||
{{Quote|''"Wauw, heb jij iets tegen ballonnen?"''<br>(Wow, do you have something against balloons?)}} | |||
{{Quote|''"Gratis tip: in je inktvisvorm ({{Button|ZL|Switch}}) kun je {{color|dwars door hekken zwemmen|orange}}."''<br>(Free tip: in squid form ({{Button|ZL|Switch}}) you can {{color|swim right through fences|orange}}.)}} | |||
{{Quote|''"Vergeet niet: om de {{color|camera te centreren|orange}} druk je op {{Button|Y|Switch}}!"''<br>(Don't forget: you press {{Button|Y|Switch}} {{color|to center|orange}} the {{color|camera|orange}}!)}} | |||
{{Quote|''"Blijf alert! Wie weet wat er zich aan de andere kant van een muur bevindt."''<br>(Stay alert! Who knows what is found on the other side of a wall.)}} | |||
{{Quote|''"Een VALSTRIK! Val aan!"''<br>(A TRAP! Attack!)}} | |||
{{Quote|''"Druk op {{Button|RS|Switch}} om je {{color|Spetterraketten|orange}} op scherp te zetten, en schiet met {{Button|ZR|Switch}}!"''<br>(Press {{Button|RS|Switch}} to ready your {{color|Tenta Missiles|orange}}, and shoot with {{Button|ZR|Switch}}!)}} | |||
{{Quote|''"Geweldig!"''<br>(Awesome!)}} | |||
{{Quote|''"Mooi! Die Octosloebers heb je flink in de pan gehakt!"''<br>(Beautiful! You really cooked those Octo slobs!)}} | |||
{{Quote|''"Daar is ie! Breek de barrière en grijp die {{color|voltvis|orange}}!"''<br>(There he is! Break the barrier and grab that {{color|Zapfish|orange}}!)}} | |||
;'''After beating the mission for the first time:''' | |||
{{Quote|*''"Goed gedaan, agent 4. Misschien is er toch nog hoop voor Inkopolis!"''<br>(Well done, Agent 4. Maybe there is still hope for Inkopolis yet!)}}}} | |||
==={{flag|mx}}Spanish (NOA)=== | |||
{{Collapse| | |||
====[[File:OC Icon Marie.png|45px]] {{color|Tina's Quotes|green}}==== | |||
{{Clr}} | |||
|{{Quote|''"Oprime {{Button|ZL|Switch}} para {{color|nadar por la tinta|orange}} en forma de {{color|calamar|orange}}."''<br>(Press {{Button|ZL|Switch}} to {{color|swim though the enemy ink|orange}} in your {{color|squid|orange}} form.)}} | |||
{{Quote|''"Cubre la {{color|tinta enemiga|orange}} con la tuya."''<br>(Cover the {{color|enemy ink|orange}} with yours.)}} | |||
{{Quote|''"Me imagino que ya lo sabrás, pero puedes usar {{Button|ZR|Switch}} para lanzar tinta con tu arma."''<br>(I imagine you might already know, but you can use {{Button|ZR|Switch}} to shoot ink with your weapon.)}} | |||
{{Quote|''"Ocúltate con {{Button|ZL|Switch}} y aprovecha para recargar la {{color|tinta|orange}}."''<br>(Hide with {{Button|ZL|Switch}} and take the opportunity to recharge the {{color|ink|orange}}.)}} | |||
{{Quote|''"Oprime {{button|B|Switch}} para saltar a través de ese {{color|anillo|orange}}."''<br>(Press {{button|B|Switch}} to jump through that {{color|ring|orange}}.)}} | |||
{{Quote|''"Aquí no puedes cubrirte. Ocúltate en la tinta con {{Button|ZL|Switch}} y acércate con cuidado."''<br>(Here you can't cover yourself. Hide in the ink with {{Button|ZL|Switch}} and approach carefully.)}} | |||
{{Quote|''"¡Lanza una {{color|bomba|orange}} con {{Button|R|Switch}} para distraerlo y ataca por la espalda!"''<br>(Throw a {{color|bomb|orange}} with {{Button|R|Switch}} to distract him and attack from behind!)}} | |||
{{Quote|''"¡Al {{color|propulsor|orange}}!"''<br>(To the {{color|Launchpad|orange}}!)}} | |||
{{Quote|''"Ya agarraste la onda, ¿eh?"''<br>(You already got a hold of it, huh?)}} | |||
{{Quote|''"¡Usa {{Button|RS|Switch}} para mirar alrededor!"''<br>(Use {{Button|RS|Switch}} to look around!)}} | |||
{{Quote|''"¡Impresionante! Ahora, al {{color|propulsor|orange}}."''<br>(Impressive! Now, to the {{color|Launchpad|orange}}.)}} | |||
{{Quote|''"¡Revienta al {{color|pez bomba|orange}}!"''<br>(Pop the {{color|Balloon Fish|orange}}!)}} | |||
{{Quote|''"Si hay una {{color|bóveda|orange}}, tiene que haber una {{color|llave|orange}} por aquí cerca."''<br>(If there is a {{color|vault|orange}}, there has to be a {{color|key|orange}} near here.)}} | |||
{{Quote|''"{{color|Atraviesa rejillas|orange}} en forma de calamar {{Button|ZL|Switch}}."''<br>({{color|Go through grates|orange}} in squid form {{Button|ZL|Switch}}.)}} | |||
{{Quote|''"¡Ahi está la {{color|llave|orange}}!"''<br>(There's the {{color|key|orange}}!)}} | |||
{{Quote|''"Ahora usa la {{color|llave|orange}} para abrir la {{color|bóveda|orange}}."''<br>(Now use the {{color|key|orange}} to open the {{color|vault|orange}}.)}} | |||
{{Quote|''"Excelente. ¡Seguimos!"''<br>(Excellent. Let's continue!)}} | |||
{{Quote|*''"Vas a querer esa {{color|armadura|orange}}. Te lo garantizo."''<br>You're going to want that {{color|armor|orange}}. I can guarantee you.)}} | |||
{{Quote|''"Si te metes en problemas, escóndete y recupera el aliento. ¡Es fundamental!"''<br>(If you get in trouble, hide and catch your breath. It's fundamental!)}} | |||
{{Quote|''"¡Sigues de una pieza! ¿Quién lo hubiera dicho?"''<br>(You're still in one piece! Who could've guessed it?)}} | |||
{{Quote|''"Sigue moviéndote hacia los lados o hacia atrás mientras disparas."''<br>(Keep moving sideways or backward while you shoot.)}} | |||
{{Quote|''"¡Sobreviviste! Puede que al final esta misión no sea un fracaso terrible."''<br>(You survived! This mission may not be a terrible failure in the end.)}} | |||
{{Quote|''"Lanza {{color|bombas|orange}} con {{Button|R|Switch}} para distraer a los enemigos y luego ataca por la espalda."''<br>(Throw {{color|bombs|orange}} with {{Button|R|Switch}} to distract enemies then attack from behind.)}} | |||
{{Quote|''"¡Bien hecho!"''<br>(Well done!)}} | |||
{{Quote|''"¡No te resbales!"''<br>(Don't slip!)}} | |||
{{Quote|''"No te gustan los globos, ¿eh?"''<br>(You don't like balloons, huh?)}} | |||
{{Quote|''"{{color|Atraviesa rejillas|orange}} en forma de calamar {{Button|ZL|Switch}}."''<br>({{color|Go through grates|orange}} in squid form {{Button|ZL|Switch}}.)}} | |||
{{Quote|''"Oprime {{Button|Y|Switch}} para {{color|reajustar la vista|orange}}."''<br>(Press {{Button|Y|Switch}} to {{color|readjust sight|orange}}.)}} | |||
{{Quote|''"Hay que estar alerta siempre. Nunca sabes lo que puede haber detrás de los muros."''<br>(Be alert always. You never know what may be behind the walls.)}} | |||
{{Quote|''"¡UNA EMBOSCADA! ¡Acaba con ellos!"''<br>(AN AMBUSH! End them!)}} | |||
{{Quote|''"¡{{color|Lanzamisiles|orange}}! ¡Oprime {{Button|RS|Switch}} para activarlo y dispara con {{Button|ZR|Switch}} cuando fijes un objetivo."''<br>({{color|Tenta Missiles|orange}}! Press {{Button|RS|Switch}} to activate it and shoot with {{Button|ZR|Switch}} once you set a target)}} | |||
{{Quote|''"¡Bien hecho!"''<br>(Well done!)}} | |||
{{Quote|''"¡Bravo! Sigue así."''<br>(Bravo! Keep it up.)}} | |||
{{Quote|''"¡Ahí está! ¡Rompe la barrera y agarra el {{color|volbagre|orange}}!"''<br>(There it is! Break the barrier and grab the {{color|Zapfish|orange}}!)}} | |||
;'''After beating the mission for the first time:''' | |||
{{Quote|''"¡Me alegro de verte por aquí de nuevo! Sabía que lograrías recuperar el volvagre."''<br>(Glad to see you here again! I knew you'd get the Zapfish back.)}}}} | |||
==={{flag|es}}Spanish (NOE)=== | |||
{{Collapse| | |||
====[[File:OC Icon Marie.png|45px]] {{color|Tina's Quotes|green}}==== | |||
{{Clr}} | {{Clr}} | ||
| | |{{Quote|''"Pulsa {{Button|ZL|Switch}} para {{color|nadar por la tinta|orange}} en forma de {{color|calamar|orange}}."''<br>}} | ||
{{Quote| | |||
{{Quote|''"Cubre la {{color|tinta enemiga|orange}} con la tuya."'''<br>}} | |||
{{Quote| | {{Quote|''"Supongo que ya lo sabes, pero puedes pulsar {{Button|ZR|Switch}} para lanzar tinta.}}"'' | ||
{{Quote|''"Ocúltate con {{Button|ZL|Switch}} y aprovecha para recargar {{color|tinta|orange}}.}}"'' | |||
{{Quote| | |||
{{Quote|''"Pulsa {{button|B|Switch}} y atraviesa el {{color|octocírculo|orange}}.}}"'' | |||
{{Quote| | |||
{{Quote|''"Aquí no haya ninguna pared para ocultarse... Usa {{Button|ZL|Switch}} para acercarte con cuidado.}}"'' | |||
{{Quote| | {{Quote|''"Lanza algunas {{color|bomba|orange}} con {{Button|R|Switch}} como distracción y luego ataca por la espalda.}}"'' | ||
{{Quote| | |||
{{Quote|''"¡Al {{color|lanzador|orange}}!}}"'' | |||
{{Quote| | |||
{{Quote|''"Así se hace, Agente 4!''"}} | |||
{{Quote| | |||
{{Quote| | {{Quote|''"¡Recuerda que puedes usar {{Button|RS|Switch}} para mirar a tu alrededor!"''}} | ||
{{Quote| | |||
{{ | {{Quote|''"¡Increíble! Venga, ahora al {{color|lanzador|orange}}."''}} | ||
{{Quote|''"¡Haz explotar el {{color|pez bomba|orange}}!"'')}} | |||
{{Quote| | {{Quote|''"Si hay un {{color|cerrojo|orange}}, tiene que haber una {{color|llave|orange}} por aquí cerca."'}}}} | ||
==Gallery== | |||
{{Quote| | <gallery> | ||
OC Return of the Octarians mission icon.png|Level icon | |||
Return of the Octarians 1.jpg|First Shielded Octotrooper seen in-game. | |||
{{Quote|{{color | Return of the Octarians 2.jpg | ||
Return of the Octarians 4.jpg | |||
== Gallery == | |||
<gallery | |||
</gallery> | </gallery> | ||
==Trivia== | ==Trivia== | ||
*This level has the most enemies out of all Octo Canyon missions (not counting enemies that spawn infinitely), having 48 enemies. | |||
*[[Popalicious Station]] from the ''[[Octo Expansion]]'' takes place on a replica of this level but in reverse. | |||
==Names in other languages== | ==Names in other languages== | ||
{{ | {{Localized name | ||
|color=Splatoon 2 | |color=Splatoon 2 | ||
|Jap=オクタリアンふたたび... # 取りもどせデンチナマズ | |Jap=オクタリアンふたたび... #<br>取りもどせデンチナマズ | ||
|JapR=Okutarian Futatabi... # Torimodose Denchi Namazu | |JapR=Okutarian Futatabi... #<br>Torimodose Denchi Namazu | ||
|JapM=Octarians Again...: Take the Zapfish Back | |JapM=Octarians Again...:<br>Take the Zapfish Back | ||
|Dut=De terugkeer van de Octarianen | |Dut=De terugkeer van de Octarianen | ||
|DutM=The return of the Octarians | |DutM=The return of the Octarians | ||
|FreA=- Retours des octariens -<br>Sauvez le poisson-charge | |||
|FreAM=- Return of the Octarians -<br>Save the Zapfish | |||
|FreE=- Le retour des octariens -<br>Cap sur le poisson-charge | |FreE=- Le retour des octariens -<br>Cap sur le poisson-charge | ||
|FreEM=- The return of the Octarians -<br>Cape of the Zapfish | |FreEM=- The return of the Octarians -<br>Cape of the Zapfish | ||
|Ger=Die Oktarianer können's nicht lassen! | |Ger=Die Oktarianer können's nicht lassen! | ||
|GerM=The Octarians just won't quit! | |GerM=The Octarians just won't quit!<ref group="note">''nicht lassen können'' is a German expression</ref> | ||
|Ita=Pescescossa smarrito:<br>il ritorno degli Octariani! | |Ita=Pescescossa smarrito:<br>il ritorno degli Octariani! | ||
|ItaM=Lost Zapfish:<br>the return of the Octarians! | |ItaM=Lost Zapfish:<br>the return of the Octarians! | ||
| Line 230: | Line 464: | ||
|RusR=Os'maryanie opyat' atakuyut!<br>«Spaseniye vol'toryba» | |RusR=Os'maryanie opyat' atakuyut!<br>«Spaseniye vol'toryba» | ||
|RusM=The Octarians attack again!<br>«Rescue of the Zapfish» | |RusM=The Octarians attack again!<br>«Rescue of the Zapfish» | ||
|SpaA=Regresan los octarianos<br> | |SpaA=Regresan los octarianos<br> ˜ ¡Rescata al volbagre! ˜ | ||
|SpaAM=The Octarians return<br> | |SpaAM=The Octarians return<br> ˜ Save the Zapfish! ˜ | ||
|SpaE=¡Los octarianos vuelven al ataque! | |SpaE=¡Los octarianos vuelven al ataque! | ||
|SpaEM=The Octarians attack again! | |SpaEM=The Octarians attack again! | ||
}} | }} | ||
===Translation notes=== | |||
<references group="note" /> | |||
{{Navbox/Octo Canyon}} | {{Navbox/Octo Canyon}} | ||
[[Category:Octo Canyon]] | |||
[[Category:Octo Canyon missions]] | |||
Latest revision as of 17:44, 31 January 2024
|
|
|
|
˜ Rescue the Zapfish! ˜

| Number | 1 |
| Area | 1 |
| Items | 1 Scroll, 1 Sardinium, 2 Armor, 2 Tenta Missiles |
| Music | Octo Eight-Step |
| StrategyWiki has an article about: Return of the Octarians |
Return of the Octarians is the first mission in Splatoon 2's single-player mode, Octo Canyon. it appears to take place on top of some buildings.
Octo Canyon
The player must follow Marie down a grate in Inkopolis Square to access Octo Canyon.
The kettle for this mission is straight across the first Sector, behind the first boss kettle.

Gameplay
Walkthrough
| Area | Enemies | Armor | Special Weapon | Sunken Scroll | Sardinium |
|---|---|---|---|---|---|
| Beginning Area | 1x Octotrooper 1x Shielded Octotrooper |
N/A | N/A | N/A | N/A |
| Checkpoint 1 | 9x Octotroopers | N/A | N/A | N/A | N/A |
| Checkpoint 2 | 8x Octotroopers | N/A | N/A | N/A | N/A |
| Checkpoint 3 | 8x Blobby Octotroopers | 1x Armor | N/A | N/A | N/A |
| Checkpoint 4 | 1x Shielded Octotrooper | N/A | N/A | N/A | Yes |
| Checkpoint 5 | 2x Shielded Octotroopers 2x Octotroopers |
N/A | N/A | Yes | N/A |
| Final Checkpoint | 13x Octotroopers 3x Shielded Octotroopers |
1x Armor | 2x Tenta Missiles | N/A | N/A |
Beginning
There is a chain of three Power Eggs in an already-inked ramp leading to the first launchpad.
Checkpoint 1
Ahead is a downwards slide. Shoot forwards to collect the first four Power Eggs leading to behind a wall, and to the sides to collect another 2 Eggs on each side (for a total of 8 Eggs).
Heading further down the ramp, collect another two Eggs in front of two walls. The Octotrooper cannot hit you behind either wall. Ink some turf from the side of the wall then, go close to the enemy by going in squid form and then taking it down.
Shoot the Octotrooper. A Squid ring will appear. Jump through the ring using to collect a Power Egg from it.
Follow the ink to the next area. A Shielded Octotrooper is on guard. Use a bomb to distract the trooper, then shoot him from behind. A launchpad appears, but before launching, break the boxes to the left for a Power Egg. Use the launchpad.
Checkpoint 2
The launchpad lands you above three Octotroopers. Do not jump down; simply shoot or throw a bomb from above. When dead, a line of three squid rings appears. Jump through them to the bottom.
Follow the path around to the left. There is an orange box, break it for a Power Egg. Around the corner is an Octotrooper and another orange box with a Power Egg. Splat the trooper, and continue following the path left.
There are five Octotroopers in a pyramid shape on top of boxes. You can easily splat them by throwing a couple of Splat Bombs. You can get another three Power Eggs on the side and the boxes give another two. A launchpad appears after splatting the troopers. Launch!
Checkpoint 3
You land on the platform just above. Shoot the orange box to the left for a Power Egg. Ahead is a Balloon Fish with eight Power Eggs around. Simply pop it. Further ahead are another two Octotroopers, one with a balloon attached, and a Vault. Popping the balloon grants five Power Eggs.
After splatting the two troopers, head to the left, collecting the two Eggs on the way. Swim through the grate using squid form (). Use the Balloon Fish to break the crates to get six Power Eggs and release an ambush of 3 Octotroopers. Splat them easily by popping the Balloon Fish again. Swim back towards the Vault and across, collecting the two Eggs on the way and swim through the grate. Smash all the boxes for three Power Eggs and release another three Octotroopers. Splat them. Behind all the boxes is a taped orange box which is stronger than the other ones. Destroy that to get the Key. Pick up the key and swim back to the vault, and launch.
Checkpoint 4
Head off the top to behind the row of boxes, collecting the two Power Eggs on each side. Break the two orange boxes for a Power Egg and an Armor.
Ahead are six Octotroopers. Use bombs to splat them. If you run low on health, hide behind the wall or pillars. Collect the six Power Eggs around, and one on top of each pillar. There is also a taped orange box containing a tin can for another 10 Eggs.
After collecting these, head to the back of the purple-inked area where the final Octotrooper was. Two more Octotroopers spawn in. Splat them.
Checkpoint 5


Destroy the orange box to the left for an Egg and the small one to the right for another. Collect the three Power Eggs on the field. Ahead is a Shielded Octotrooper. Toss a bomb to distract him, then shoot him in the back. If you find this hard, continue shooting the trooped and eventually the shield will break.
A launchpad appears, but before launching, ink a path up the sides to above the launch pad. A box on top contains a Sardinium. Then use the launchpad.
Checkpoint 6


Jump through the Squid Ring. Three balloons appear. Shoot them, and three more appear. Destroy those too (Marie will comment on it!). Continue along the path and shoot the Balloon Fish ahead. Fall through the grate in squid form through the three Squid Rings. Do a U-turn around the corner facing where you came from. There is a hidden T-ledge down the bottom. The metal grate in the center is inkable; ink it, swim up and break the orange crate for the Sunken Scroll. Head back through. A Shielded Octotrooper is patrolling that you can see through the glass window. Sneak up behind or use a bomb to splat him.
Continue forward, destroy the three brown boxes ahead. Ahead is a Balloon Fish, use it to destroy the boxes and release two Octotroopers and one Shielded Octotrooper. Splat them easily using the Balloon Fish and a bomb. Behind them is a launchpad appears. Launch.
Final Checkpoint
Ahead are two orange boxes; the one on the left contains Tenta Missiles, and the right contains Armor. Collect them. Splat the four Octotroopers guarding the vault. Do not use your special for this for additional Eggs at the end of the level. When they are dead, one will drop a key.
You can use the special on the 12 Octotroopers ahead. Head back, unlock the vault, and collect the other Tenta Missiles special inside. Finish off any remaining troopers ahead. Each set drops one key, to unlock each of the three vaults. The front two vaults contain cans for 10 Eggs each, and the last is the launchpad.
Launch, and grab the Zapfish by smashing the shield (easiest by throwing a bomb to break it instantly).
Collectibles
Sunken Scroll

| “ | A shock wave struck while one young lady was performing at the recent Youth Folk-Singing contest, doing damage to the venue. Fortunately no one was injured. | ” |
— Sunken Scroll 1
| ||
Location: Return of the Octarians's Sunken Scroll can be found after jumping down the tower and making a U-turn at Checkpoint 6. It is located inside an orange crate.
Sardinium
Location: Return of the Octarians's Sardinium can be found before jumping the launchpad from Checkpoint 5 to 6 by first inking to the top above the launchpad.
Armor
Return of the Octarians has 2 pieces of armor to collect.
Armor 1 Location: In front of the checkpoint, there's a row of boxes and the very right orange box contains the armor.
Armor 2 Location: At the final checkpoint, there are two boxes, the right one containing the armor.
Special Weapon
Tenta Missiles 1 Location: The box to the left of the final checkpoint.
Tenta Missiles 2 Location: After you defeat an Octarian amongst the four on the first platform after the final checkpoint that has a Key, go to the Vault to reveal the canned Special.
Enemies and Mechanics
First Introduced


Quotes
 English
 Japanese
 ホタル's Quotes
| “ | でイカになって、インクの中を泳げるよ | ” |
| “ | ちがう色のインクは、塗り返して | ” |
| “ | 周囲を見わたして、 でうつ! | ” |
| “ | でかくれて、インク回復ね | ” |
| “ | あ イカフライ! ジャンプで くぐってみよ~ A Squid Ring! Press to jump through it~ |
” |
| “ | タテ持ちは ボムで気を引き 背中うつ! | ” |
| “ | ジャンプポイント、はっけ~ん | ” |
| “ | やるね~、4号 | ” |
| “ | かたむけ 左右を見回す!戦場の鉄則ゥ | ” |
| “ | イイネ! …からのジャンプポイント | ” |
| “ | ボム風船、割ってド~ンね | ” |
| “ | ドアだ、カギ探そ~ | ” |
| “ | カナアミは、イカで ぬけられるっしょ | ” |
| “ | カギ発見!確認されたし | ” |
| “ | カギ取ったら ドアに向かって | ” |
| “ | やるねぇ、んじゃ次 | ” |
| “ | アーマーだ、取っちゃえ | ” |
| “ | カベにかくれて深呼吸!戦場の鉄則ゥ | ” |
| “ | うちながら下がって!これぞ、退きうち! | ” |
| “ | お見事! | ” |
| “ | ふ~、危ない危ない… | ” |
| “ | ボムで注意をそらしてから、背中をうつ! | ” |
| “ | エクセレント♪ Excellent ♪ |
” |
| “ | 落ちないように足元、注意ね | ” |
| “ | 見てて ヒヤヒヤするし | ” |
| “ | カナアミは、イカでくぐるんよ | ” |
| “ | カメラ正面は、でリセットできるかんね | ” |
| “ | カベの向こうは注意だな~ | ” |
| “ | ワナか?! 落ち着いて対処ね! | ” |
| “ | マルチミサイルだ!押して発動、で発射ね! | ” |
| “ | エクセレント♪ Excellent ♪ |
” |
| “ | ナイスナイス~、この調子で よろ~ | ” |
| “ | デンチナマズは、割ってゲットね | ” |
 Dutch
Dutch
Marie's Quotes
| “ | "Druk op om een inktvis te worden en door de inkt te zwemmen!" (Press to become a squid and to swim through the ink!) |
” |
| “ | "Bedek vijandelijke inkt met je eigen inkt om er sneller door te kunnen bewegen." (Cover enemy ink with your own ink to move through it faster.) |
” |
| “ | "Waarschijnlijk weet je dit al, maar met schiet je inkt!" (You probably know this already, but you shoot ink with !) |
” |
| “ | "Verstop je in je inkt met . Je inkt vult zich bij terwijl je verstopt zit." (Hide yourself in your ink with . Your ink refills itself while you are hiding. |
” |
| “ | "Spring met door die inktvisring." (Jump with through that squid ring.) |
” |
| “ | "Je hebt hier geen dekking... Verstop je in de inkt met en besluip 'm voorzichtig!" (You have no cover here... Hide yourself in the ink with and sneak up on him carefully!) |
” |
| “ | "Gooi een bom met om die schildknaap af te leiden, en val hem dan in zijn rug aan!" (Throw a bomb with to distract that shield boy, and then attack him in his back!) NOTE: 'schildknaap' is Dutch for "squire" and is a pun on 'schild' ("shield"). |
” |
| “ | "Kijk nou! Een lanceerpunt!" (Look! A Launchpad!) |
” |
| “ | "Je hebt het voor elkaar! En zo koel als een zeekomkommer!" (You have done it! And as cool as a sea cucumber!) |
” |
| “ | "Kijk om je heen met !" (Look around with !) |
” |
| “ | "Zo, da's ook weer voor elkaar. En daar is het volgende lanceerpunt!" (So, that's done as well. And there is the next Launchpad!) |
” |
| “ | "Raak de ballonvis met inkt om hem te laten ploffen!" (Touch the Balloon Fish with ink to let him burst!) |
” |
| “ | "Een kluis... Dan moet er hier ook ergens een sleutel zijn." (A vault... Then there must be a key somewhere here as well.) |
” |
| “ | "Als inktvis kun je door hekken glippen!" (As a squid you can slip through fences!) |
” |
| “ | "Daar heb je de sleutel!" (There you have the key!) |
” |
| “ | "Met de sleutel kun je de kluis openmaken!" (With the key you can open the vault!) |
” |
| “ | "Je bent een natuurtalent, ga zo door!" (You are a natural, keep it up!) |
” |
| “ | "Die bepantsering wil je hebben, geloof me nou maar." (You want to have that armor, believe me.) |
” |
| “ | "Als het je te veel wordt, verstop je dan even en kom op adem. Regel nummer één!" (If it becomes too much for you, then hide for a bit and catch your breath. Rule number one!) |
” |
| “ | "Vergeet niet dat je tijdens het schieten ook achteruit en zijwaarts kunt bewegen!" (Don't forget that while you shoot you can move backwards and sidewards!) |
” |
| “ | "Je... Je leeft nog! Misschien werkt dit idiote plan toch wel..." (You... You're still alive! Maybe this idiotic plan does work...) |
” |
| “ | "Hé leuk, je bent nog heel. Had ik niet gedacht." (Hey nice, you are still in one piece. I wouldn't have thought.) |
” |
| “ | "Gooi een bom met om tegenstanders af te leiden, en val ze dan in de rug aan!" (Throw a bomb with to distract opponents, and then attack them in the back!) |
” |
| “ | "Geweldig!" (Awesome!) |
” |
| “ | "Niet naar beneden kijken, straks val je! Of je kijkt lekker wel, moet jij weten." (Don't look down, you might fall! Or you do look, it's your choice.) |
” |
| “ | "Wauw, heb jij iets tegen ballonnen?" (Wow, do you have something against balloons?) |
” |
| “ | "Gratis tip: in je inktvisvorm () kun je dwars door hekken zwemmen." (Free tip: in squid form () you can swim right through fences.) |
” |
| “ | "Vergeet niet: om de camera te centreren druk je op !" (Don't forget: you press to center the camera!) |
” |
| “ | "Blijf alert! Wie weet wat er zich aan de andere kant van een muur bevindt." (Stay alert! Who knows what is found on the other side of a wall.) |
” |
| “ | "Een VALSTRIK! Val aan!" (A TRAP! Attack!) |
” |
| “ | "Druk op om je Spetterraketten op scherp te zetten, en schiet met !" (Press to ready your Tenta Missiles, and shoot with !) |
” |
| “ | "Geweldig!" (Awesome!) |
” |
| “ | "Mooi! Die Octosloebers heb je flink in de pan gehakt!" (Beautiful! You really cooked those Octo slobs!) |
” |
| “ | "Daar is ie! Breek de barrière en grijp die voltvis!" (There he is! Break the barrier and grab that Zapfish!) |
” |
- After beating the mission for the first time:
| “ | *"Goed gedaan, agent 4. Misschien is er toch nog hoop voor Inkopolis!" (Well done, Agent 4. Maybe there is still hope for Inkopolis yet!) |
” |
 Spanish (NOA)
Tina's Quotes
| “ | "Oprime para nadar por la tinta en forma de calamar." (Press to swim though the enemy ink in your squid form.) |
” |
| “ | "Cubre la tinta enemiga con la tuya." (Cover the enemy ink with yours.) |
” |
| “ | "Me imagino que ya lo sabrás, pero puedes usar para lanzar tinta con tu arma." (I imagine you might already know, but you can use to shoot ink with your weapon.) |
” |
| “ | "Ocúltate con y aprovecha para recargar la tinta." (Hide with and take the opportunity to recharge the ink.) |
” |
| “ | "Oprime para saltar a través de ese anillo." (Press to jump through that ring.) |
” |
| “ | "Aquí no puedes cubrirte. Ocúltate en la tinta con y acércate con cuidado." (Here you can't cover yourself. Hide in the ink with and approach carefully.) |
” |
| “ | "¡Lanza una bomba con para distraerlo y ataca por la espalda!" (Throw a bomb with to distract him and attack from behind!) |
” |
| “ | "¡Al propulsor!" (To the Launchpad!) |
” |
| “ | "Ya agarraste la onda, ¿eh?" (You already got a hold of it, huh?) |
” |
| “ | "¡Usa para mirar alrededor!" (Use to look around!) |
” |
| “ | "¡Impresionante! Ahora, al propulsor." (Impressive! Now, to the Launchpad.) |
” |
| “ | "¡Revienta al pez bomba!" (Pop the Balloon Fish!) |
” |
| “ | "Si hay una bóveda, tiene que haber una llave por aquí cerca." (If there is a vault, there has to be a key near here.) |
” |
| “ | "Atraviesa rejillas en forma de calamar ." (Go through grates in squid form .) |
” |
| “ | "¡Ahi está la llave!" (There's the key!) |
” |
| “ | "Ahora usa la llave para abrir la bóveda." (Now use the key to open the vault.) |
” |
| “ | "Excelente. ¡Seguimos!" (Excellent. Let's continue!) |
” |
| “ | *"Vas a querer esa armadura. Te lo garantizo." You're going to want that armor. I can guarantee you.) |
” |
| “ | "Si te metes en problemas, escóndete y recupera el aliento. ¡Es fundamental!" (If you get in trouble, hide and catch your breath. It's fundamental!) |
” |
| “ | "¡Sigues de una pieza! ¿Quién lo hubiera dicho?" (You're still in one piece! Who could've guessed it?) |
” |
| “ | "Sigue moviéndote hacia los lados o hacia atrás mientras disparas." (Keep moving sideways or backward while you shoot.) |
” |
| “ | "¡Sobreviviste! Puede que al final esta misión no sea un fracaso terrible." (You survived! This mission may not be a terrible failure in the end.) |
” |
| “ | "Lanza bombas con para distraer a los enemigos y luego ataca por la espalda." (Throw bombs with to distract enemies then attack from behind.) |
” |
| “ | "¡Bien hecho!" (Well done!) |
” |
| “ | "¡No te resbales!" (Don't slip!) |
” |
| “ | "No te gustan los globos, ¿eh?" (You don't like balloons, huh?) |
” |
| “ | "Atraviesa rejillas en forma de calamar ." (Go through grates in squid form .) |
” |
| “ | "Oprime para reajustar la vista." (Press to readjust sight.) |
” |
| “ | "Hay que estar alerta siempre. Nunca sabes lo que puede haber detrás de los muros." (Be alert always. You never know what may be behind the walls.) |
” |
| “ | "¡UNA EMBOSCADA! ¡Acaba con ellos!" (AN AMBUSH! End them!) |
” |
| “ | "¡Lanzamisiles! ¡Oprime para activarlo y dispara con cuando fijes un objetivo." (Tenta Missiles! Press to activate it and shoot with once you set a target) |
” |
| “ | "¡Bien hecho!" (Well done!) |
” |
| “ | "¡Bravo! Sigue así." (Bravo! Keep it up.) |
” |
| “ | "¡Ahí está! ¡Rompe la barrera y agarra el volbagre!" (There it is! Break the barrier and grab the Zapfish!) |
” |
- After beating the mission for the first time:
| “ | "¡Me alegro de verte por aquí de nuevo! Sabía que lograrías recuperar el volvagre." (Glad to see you here again! I knew you'd get the Zapfish back.) |
” |
 Spanish (NOE)
Tina's Quotes
| “ | "Pulsa para nadar por la tinta en forma de calamar." |
” |
| “ | "Cubre la tinta enemiga con la tuya."' |
” |
| “ | "Supongo que ya lo sabes, pero puedes pulsar para lanzar tinta. | ” |
| “ | "Ocúltate con y aprovecha para recargar tinta. | ” |
| “ | "Pulsa y atraviesa el octocírculo. | ” |
| “ | "Aquí no haya ninguna pared para ocultarse... Usa para acercarte con cuidado. | ” |
| “ | "Lanza algunas bomba con como distracción y luego ataca por la espalda. | ” |
| “ | "¡Al lanzador! | ” |
| “ | "Así se hace, Agente 4!" | ” |
| “ | "¡Recuerda que puedes usar para mirar a tu alrededor!" | ” |
| “ | "¡Increíble! Venga, ahora al lanzador." | ” |
| “ | "¡Haz explotar el pez bomba!") | ” |
| “ | "Si hay un cerrojo, tiene que haber una llave por aquí cerca."' | ” |
Gallery
-
Level icon
-
First Shielded Octotrooper seen in-game.
-
-


Trivia
- This level has the most enemies out of all Octo Canyon missions (not counting enemies that spawn infinitely), having 48 enemies.
- Popalicious Station from the Octo Expansion takes place on a replica of this level but in reverse.
Names in other languages
| Language | Name | Meaning |
|---|---|---|
| オクタリアンふたたび... # 取りもどせデンチナマズ Okutarian Futatabi... # Torimodose Denchi Namazu |
Octarians Again...: Take the Zapfish Back | |
| De terugkeer van de Octarianen | The return of the Octarians | |
| - Retours des octariens - Sauvez le poisson-charge |
- Return of the Octarians - Save the Zapfish | |
| - Le retour des octariens - Cap sur le poisson-charge |
- The return of the Octarians - Cape of the Zapfish | |
| Die Oktarianer können's nicht lassen! | The Octarians just won't quit![note 1] | |
| Pescescossa smarrito: il ritorno degli Octariani! |
Lost Zapfish: the return of the Octarians! | |
| Осьморяние опять атакуют! «Спасение вольторыба» Os'maryanie opyat' atakuyut! «Spaseniye vol'toryba» |
The Octarians attack again! «Rescue of the Zapfish» | |
| Regresan los octarianos ˜ ¡Rescata al volbagre! ˜ |
The Octarians return ˜ Save the Zapfish! ˜ | |
| ¡Los octarianos vuelven al ataque! | The Octarians attack again! |
Translation notes
- ↑ nicht lassen können is a German expression
