Octo Canyon (mode): Difference between revisions
(→Gallery: add image) |
(Used a flexible layout to display the levels) |
||
| Line 1: | Line 1: | ||
:''This article is about the [[mode]]. For the location by the same name, see [[Octo Canyon]].'' | :''This article is about the [[mode]]. For the location by the same name, see [[Octo Canyon]].'' | ||
{{SpoilerW2}} | {{SpoilerW2}} | ||
{{InfoboxMode | {{InfoboxMode | ||
| color = {{SiteColor|Splatoon 2}} | | color = {{SiteColor|Splatoon 2}} | ||
| Line 25: | Line 24: | ||
===Mechanics=== | ===Mechanics=== | ||
Many [[:Category:Mechanics|mechanics]] make a return in Octo Canyon that made their first appearance in Octo Valley, with the addition of various new [[:Category:Mechanics|mechanics]]. These include [[Ride Rail]]s, [[Inkfurler]]s, and [[Bounce Pad]]s. | Many [[:Category:Mechanics|mechanics]] make a return in Octo Canyon that made their first appearance in Octo Valley, with the addition of various new [[:Category:Mechanics|mechanics]]. These include [[Ride Rail]]s, [[Inkfurler]]s, and [[Bounce Pad]]s. | ||
| Line 31: | Line 29: | ||
For equipment data, see [[Octo Canyon data]]. | For equipment data, see [[Octo Canyon data]]. | ||
== Missions == | |||
'''Sector 1 | '''Sector 1: [[Tentakeel Outpost]]''' | ||
{{level list box|S2| | |||
{{level list item|level id=1.|level name=Return of the Octarians|image=Hm2 m1.jpg}} | |||
{{level list item|level id=2.|level name=Welcome to Octopia|image=Hm2 m2.jpg}} | |||
| | {{level list item|level id=3.|level name=Sunset Octocopter|image=Hm2 m3.jpg}} | ||
{{level list item|level id=[[File:S2 font - octopus glyph.svg|14px|link=Boss]] 1:|level name=Into the Octo Oven|image=Hm2 b1.jpg}} | |||
}} | |||
| 1. | |||
| | |||
'''Sector 2 | '''Sector 2: [[Suction-Cup Lookout]]''' | ||
{{level list box|S2| | |||
{{level list item|level id=4.|level name=Enter the Octohurler|image=Hm2 m4.jpg}} | |||
{{level list item|level id=5.|level name=The Octopark|image=Hm2 m5.jpg}} | |||
| | {{level list item|level id=6.|level name=Octozeppelin Invasion|image=Hm2 m6.jpg}} | ||
{{level list item|level id=7.|level name=Back-Alley Cleanup|image=Hm2 m7.jpg}} | |||
| | {{level list item|level id=8.|level name=Spinning Campground|image=Hm2 m8.jpg}} | ||
| 4. | {{level list item|level id=9.|level name=Octoling Strike|image=Hm2 m9.jpg}} | ||
| | {{level list item|level id=[[File:S2 font - octopus glyph.svg|14px|link=Boss]] 2:|level name=Fear the Octo Samurai|image=Hm2 b2.jpg}} | ||
| | }} | ||
'''Sector 3 | '''Sector 3: [[Beaker's Depot]]''' | ||
{{level list box|S2| | |||
{{level list item|level id=10.|level name=Octoseeker Shakedown|image=Hm2 m10.jpg}} | |||
{{level list item|level id=11.|level name=The Floating Garden|image=Hm2 m11.jpg}} | |||
| | {{level list item|level id=12.|level name=Octo-Resort Spring|image=Hm2 m12.jpg}} | ||
| | {{level list item|level id=13.|level name=Dancing Floors|image=Hm2 m13.jpg}} | ||
{{level list item|level id=14.|level name=Parking Garage|image=Hm2 m14.jpg}} | |||
{{level list item|level id=15.|level name=Octoling Assault (Octo Canyon){{!}}Octoling Assault|image=Hm2 m15.jpg}} | |||
| | {{level list item|level id=[[File:S2 font - octopus glyph.svg|14px|link=Boss]] 3:|level name=The Octostomp Returns|image=Hm2 b3.jpg}} | ||
}} | |||
| | |||
'''Sector 4 | '''Sector 4: [[Slimeskin Garrison]]''' | ||
{{level list box|S2| | |||
{{level list item|level id=16.|level name=Secret Bowling Alley|image=Hm2 m16.jpg}} | |||
{{level list item|level id=17.|level name=Octocommander Fortress|image=Hm2 m17.jpg}} | |||
| | {{level list item|level id=18.|level name=Towering Heights|image=Hm2 m18.jpg}} | ||
| | {{level list item|level id=19.|level name=The Experimentorium|image=Hm2 m19.jpg}} | ||
{{level list item|level id=20.|level name=Propellerland|image=Hm2 m20.jpg}} | |||
| 16. | {{level list item|level id=21.|level name=Octolings Ahoy!|image=Hm2 m21.jpg}} | ||
| | {{level list item|level id=[[File:S2 font - octopus glyph.svg|14px|link=Boss]] 4:|level name=The Octo Shower|image=Hm2 b4.jpg}} | ||
| | }} | ||
'''Sector 5 | '''Sector 5: [[Cephalon HQ]]''' | ||
{{level list box|S2| | |||
{{level list item|level id=22.|level name=Underground Expressway|image=Hm2 m22.jpg}} | |||
{{level list item|level id=23.|level name=The Octogalaxy|image=Hm2 m23.jpg}} | |||
| | {{level list item|level id=24.|level name=Transfer Junction|image=Hm2 m24.jpg}} | ||
| | {{level list item|level id=25.|level name=Platform Madhouse|image=Hm2 m25.jpg}} | ||
{{level list item|level id=26.|level name=Paradise Lanes|image=Hm2 m26.jpg}} | |||
{{level list item|level id=27.|level name=Octoling Workout|image=Hm2 m27.jpg}} | |||
| | {{level list item|level id=[[File:S2 font - octopus glyph.svg|14px|link=Boss]] 5:|level name=Tide Goes Out|image=Hm2 b5.jpg}} | ||
| | }} | ||
== Equipment == | == Equipment == | ||
Revision as of 02:14, 23 July 2018
- This article is about the mode. For the location by the same name, see Octo Canyon.
Template:SpoilerW2 Template:InfoboxMode
Octo Canyon (also known as Hero Mode) is a singleplayer game mode in Splatoon 2. It involves the player donning the Hero Suit handed down from Agent 3 (although both Hero Suits look dissimilar) and venturing into a hidden, underground canyon where the Octarians have relocated to since the events of Splatoon, to rescue Inkopolis Squares' stolen Great Zapfish and re-defeat the Octarian army.
Story
After the Great Zapfish is stolen a second time by the Octarians, Marie recruits Agent 4 (Captain Cuttlefish and Agent 3 were out on a mission) to find the Great Zapfish and her missing cousin Callie. Agent 4 travels the underground lairs known as Octo Canyon to recover the Zapfish. Eventually , Agent 4 confronts DJ Octavio, who has brainwashed Callie. With Marie's help, Agent 4 is able to free Callie from Octavio's mind control shades and defeats him once more.
Gameplay
Octo Canyon functions in the almost exact same way as Octo Valley did, with the addition of new enemies and new mechanics. The Player is given many different weapon choices as the story progresses in Octo Canyon. They are given to Agent 4 from Sheldon, and they include the Hero Shot, the Hero Roller, the Hero Charger, the Hero Dualies, the Hero Brella, the Hero Splatling, the Hero Blaster, the Hero Slosher, and the Herobrush.
Mechanics
Many mechanics make a return in Octo Canyon that made their first appearance in Octo Valley, with the addition of various new mechanics. These include Ride Rails, Inkfurlers, and Bounce Pads.
Data
For equipment data, see Octo Canyon data.
Missions
Sector 1: Tentakeel Outpost
1. Return of the Octarians
2. Welcome to Octopia
3. Sunset Octocopter
![]() 1: Into the Octo Oven
1: Into the Octo Oven
Sector 2: Suction-Cup Lookout
4. Enter the Octohurler
5. The Octopark
6. Octozeppelin Invasion
7. Back-Alley Cleanup
8. Spinning Campground
9. Octoling Strike
![]() 2: Fear the Octo Samurai
2: Fear the Octo Samurai
Sector 3: Beaker's Depot
10. Octoseeker Shakedown
11. The Floating Garden
12. Octo-Resort Spring
13. Dancing Floors
14. Parking Garage
15. Octoling Assault (Octo Canyon)|Octoling Assault
![]() 3: The Octostomp Returns
3: The Octostomp Returns
Sector 4: Slimeskin Garrison
16. Secret Bowling Alley
17. Octocommander Fortress
18. Towering Heights
19. The Experimentorium
20. Propellerland
21. Octolings Ahoy!
![]() 4: The Octo Shower
4: The Octo Shower
Sector 5: Cephalon HQ
22. Underground Expressway
23. The Octogalaxy
24. Transfer Junction
25. Platform Madhouse
26. Paradise Lanes
27. Octoling Workout
![]() 5: Tide Goes Out
5: Tide Goes Out
Equipment
Similar to Octo Valley, players wear the Hero Suit and use a wide variety of weapons.
Hero Suit
A new Hero Suit is worn by Agent 4. It is primarily neon-yellow and has headphones similarly shaped to that of the first hero suit. This suit acts like an armor collectible in that it allows the player to take damage that would normally kill them once- then it needs to regenerate. While regenerating the suit, the player is slowed down. While in certain missions, Agent 4 can find Armour. It comes in cases found in various parts of the level. You can have up to two cases on at a time and it allows you to take damage that would normally kill you. If you finish a mission with any amount of armour on, you are rewarded with 10 extra power eggs.
Hero Weapons
- Hero Shot - The default weapon given and a P90-esque shooter-type weapon. It is similar to the Splattershot, but fires slower than it if it is not upgraded. It can be upgraded twice using Power Eggs and Sardinium, increasing the fire rate.
- Hero Roller - A modified Splat Roller with a build type of a Carbon Roller. Can be upgrade once with Power Eggs and Sardinium to increase its damage and fling speed.
- Hero Charger - A modified Splat Charger. Can be upgrade once with Power Eggs and Sardinium to increase its charge speed.
- Hero Dualies - A modified Splat Dualies. Can be upgrade once with Power Eggs and Sardinium to increase its firing rate.
- Hero Slosher - A modified Slosher. Can be upgrade once with Power Eggs and Sardinium to increase its firing speed and damage.
- Hero Splatling - A modified Heavy Splatling. Can be upgrade once with Power Eggs and Sardinium to increase its charge speed.
- Hero Blaster - A modified Blaster. Can be upgrade once with Power Eggs and Sardinium to increase its firing rate.
- Hero Brella - A modified Splat Brella. Can be upgrade once with Power Eggs and Sardinium to increase its durability and brella recovery time.
- Herobrush - A modified Octobrush. Can be upgrade once with Power Eggs and Sardinium to increase its swiping speed, damage, and mobility.
Ink Tank
The Ink Tank contains the ink consumed when using Main Weapons or Sub Weapons. Its ink supply can be replenished by swimming in ink. It can be upgraded twice with Power Eggs and Sardinium, increasing its capacity.
Splat Bomb
Octo Canyon's Splat Bombs functions like those found in Inkopolis. They are four-sided and look almost identical to those in Octo Valley. They explode a short while after hitting the ground.
Curling Bomb
The Curling Bomb works like Inkopolis' ones. They travel across the ground, bouncing off walls, and explode after a set amount of time. Holding down ![]() will make them travel for a shorter distance before exploding. They can be unlocked with Sardinium and Power Eggs.
will make them travel for a shorter distance before exploding. They can be unlocked with Sardinium and Power Eggs.
Autobomb
The Autobomb works just like the ones in Inkopolis. After hitting the ground, they will run towards any target they find in a certain radius, then start to explode. If they don't find a target, they will start exploding right away. They can be unlocked using Sardinium and Power Eggs.
Special Weapons
Special Weapons can be found throughout Octo Canyon in the form of a Canned Special, Upon collecting a Canned Special, a certain Special Weapon is immediately fully charged.
Collectibles
Unlike Octo Valley, there are three types of Collectibles.
Power Eggs
Power Eggs appear to be small, orange fish eggs that can be found throughout Octo Canyon. They can be collected by killing enemies, destroying crates, and shooting or running near individual ones scattered around the environment. They are used for upgrading equipment and weapons.
Sunken Scrolls
Sunken Scrolls are rolled up pieces of paper that can be found in Octo Canyon. They are long-lost drawings and other pieces of information that depict the history and lore of Inkopolis. One Sunken Scroll can be found in each level of Octo Canyon.
Sardinium
Sardinium is a new form of collectible in Octo Canyon. One can be found in each level, after each boss, and in each hub area. They are used to upgrade equipment and weapons with the Ammo Knights Enhancifier along side Power Eggs.
Rewards
After watching the Credits, the player will unlock the full set of Hero Suit Replica Gear for use in online play. After completing all levels with a certain weapon, the player will unlock a replica of that weapon for use online.
As of Version 3.0.0, Callie also appears within Octo Canyon following the credits; when spoken to, she and Marie will share a variety of statistics relating to the player's most recent multiplayer matches and Salmon Run jobs.
Trivia
- If the player enters Octo Canyon as an Octoling they will revert back to their latest Inkling they used, and switch back to an Octoling once the player returns to Inkopolis.
- The Hero Suit Replica Gear will not be unlocked unless you finish watching the Credits. Skipping the Credits will not unlock the Gear, forcing you to re-watch them to unlock the Gear.
Gallery
-
A promotional poster for Octo Canyon mode.
-
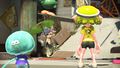
An Inkling looking at Marie standing on the Octo Canyon entrance.
-
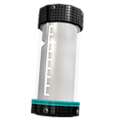
The ink tank.
-
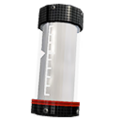
The ink tank upgraded once.
-
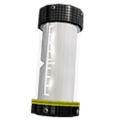
The ink tank upgraded twice.
-
The drone that delivers new weapons to the player.


|
