Clam Blitz: Difference between revisions
m (Added Category) |
(→Collecting Clams: Added distinction between Splatoon 2 and 3) |
||
| (111 intermediate revisions by 59 users not shown) | |||
| Line 1: | Line 1: | ||
{{ | {{Infobox/Mode | ||
| color | |color = {{SiteColor|Generic}} | ||
| title | |title = Clam Blitz | ||
| image | |image = ClamBlitzOfficial.jpg | ||
| caption = Clam Blitz | |caption = Clam Blitz | ||
| type | |type = Online multiplayer [[mode]] | ||
| players = 2-8 | |players = 2-8 | ||
| ranked | |ranked = Yes | ||
| weapons = All | |weapons = All | ||
| controllers = {{Joy-Con}} Joy-Con | |controllers = {{Joy-Con}} Joy-Con | ||
| release = | {{Pro controller}} Nintendo Switch Pro Controller | ||
|release = {{date|2017-12-13}} | |||
}} | }} | ||
{{Quote|Fill the enemy's clam basket!|Objective quote seen before battle in ''Splatoon 2''}} | |||
'''Clam Blitz''' is one of the four [[Ranked Battle]] modes in ''[[Splatoon 2]]'', alongside [[Splat Zones]], [[Rainmaker]], and [[Tower Control]]. Clam Blitz is the | '''Clam Blitz''' is one of the four [[Ranked Battle]]/[[Anarchy Battle]] modes in ''[[Splatoon 2]]'' and ''[[Splatoon 3]]'', alongside [[Splat Zones]], [[Rainmaker]], and [[Tower Control]]. Clam Blitz is the only ranked mode introduced in ''Splatoon 2'' that was not in ''[[Splatoon]]''. | ||
== History == | ==History== | ||
Clam Blitz was announced on | Clam Blitz was announced on {{date|2017-11-21}} when Nintendo released a video showing the updates for the coming weeks. | ||
On | On {{date|2017-12-13}} at {{time|2017-12-13 02:00 UTC}}, Version {{Ver|S2|2.1.0}} made Clam Blitz playable. | ||
On 10 August 2022, Nintendo revealed Clam Blitz returns for ''Splatoon 3'' for [[Anarchy Battle|Anarchy Battles]]. This time the number of clams required to form a Power Clam is eight instead of ten. | |||
== | ==Gameplay== | ||
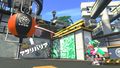
The objective of Clam Blitz is to pick up clams, which are scattered around the stage, and deposit them into the goal near the opposing team's base. Once a player picks up ten/eight clams, it transforms into a Power Clam, which is used to destroy the barrier around the other team's goal when thrown towards it. | |||
=== Collecting Clams === | |||
At the beginning of the match, thirty clams are scattered all around the center of the stage and towards the teams' bases. They can be picked up by getting close enough to them. After picking up clams, they start to trail along behind the player in humanoid form and disappear when swimming. When standing still in humanoid form, the clams form a pyramid shape. A Power Clam is formed by picking up ten clams in ''[[Splatoon 2]]'', and eight clams in ''[[Splatoon 3]]''. Clams and Power Clams can be thrown by pressing {{Button|A}} or {{Button|L}}. Clams can be passed to any player on the field, but Power Clams are distinct to each team and can only be picked up by members of the same team. A Power Clam, when thrown to the ground, inks the ground. Picking up a Power Clam fumble while holding clams will force the player to drop all of them. A player can only hold one Power Clam at a time and cannot pick up additional clams while holding one. A player that gets splatted while holding clams drops up to four clams in ''[[Splatoon 2]]'', and three clams in ''[[Splatoon 3]]''. It is possible to [[Super Jump]] to a teammate or a [[Squid Beakon]] and keep all held clams intact. If a player returns to their spawn point in ''[[Splatoon 2]]'', all clams or Power Clam gathered will break. Throwing clams at the spawn also breaks them. After using the [[Splashdown]], [[Baller]], [[Reefslider]], or [[Kraken Royale]], the player drops all the clams they were holding. | |||
Any clams dropped or Power Clam fumbles disappear after ten seconds if not picked up. After a Power Clam disappears or enough clams have disintegrated, new clams appear in the stage in selected locations at groups of four/three clams. | |||
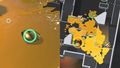
[[File:Map Ancho-V Games Clam Blitz locations.png|thumb|Thirty clams, scattered around the stage.]] | |||
Clams on the player's team [[ink]] color appear as pulsating circular markers on-screen (even through walls) and as dots surrounded by pulsating circles on the map. Both these markers are shown in the neutral color for the current match. | |||
All players can see the position of both teams' Power Clams at all times on both the screen and the map, shown as a [[Ranked Battle]] symbol in white over their appropriate color. Once a player holds a Power Clam, it follows the player and can be seen even when swimming. A dropped Power Clam (or the one that spawns when the barrier regenerates) is similarly shown on all players' maps and screens in inverted colors (team color logo on white background). If the player is holding a Power Clam, or if the opponent's goal is open and the player is holding any clams, a marker shaped like a Power Clam in the opponent's color appears on-screen, showing the location of the opponent's goal. | |||
Any friendly players holding clams have a numbered marker showing how many they are holding above their name. Also, the scoreboard on the top of the screen shows the total number of clams currently held by each team, with Power Clams counted as ten/eight clams. | |||
===Scoring=== | |||
Breaking the opponent's barrier with a Power Clam awards twenty points and lifts the team's barrier, preventing the enemy team to score points. If several Power Clams hit the closed basket simultaneously, these points are awarded for each one. When clams are thrown in the opposing team's open basket, three points are earned for each clam, while a Power Clam is worth twenty. If a team's barrier closes with the same point total as the opposing team, the last team to score loses one point, a feature which is done to avoid tied scores. | |||
The barrier stays open for ten seconds, and throwing a clam into it extends the timer by three seconds, but cannot make the remaining time go over ten seconds. Throwing a Power Clam into an open basket resets the timer to ten seconds. When the barrier timer runs out, the enemy team's basket lifts to regenerate the barrier for ten seconds, while the scoring team's barrier drops immediately, making it easier for a counter-attack. When the player's barrier is open, it is impossible to open the enemy's barrier, as any Power Clam thrown at the goal goes back into the end zone as if the player had dropped it. If both teams have thrown a Power Clam at the goal, the team that threw the Power Clam first will score, and the other team's Power Clam will fall out of the barrier. | |||
When | |||
Overtime | If the barrier goes back up before the scoring team gets to 100 points, a penalty of half the points scored, rounded down, is imposed on the team, similar to the penalty for ceding control to the other team in [[Splat Zones]]. The total for this calculation includes the twenty points for breaking the barrier, as well as any points that made up for previous penalties. If a point was deducted for the barrier closing with a tied score, the penalty does not change (e.g. if the team only ended up scoring nineteen points, the penalty is still +10). Also, a Power Clam for the team whose barrier got broken spawns by their goal and does not time out until picked up. No additional Power Clams spawn if the previous one was not picked up and the barrier got broken and returned. | ||
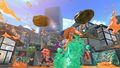
[[File:S2 Mode Clam Blitz Bump to the Barrier.jpg|thumb|A bump to the basket barrier in [[Kelp Dome]].]] | |||
Several stages have a bump near the basket that makes it easier to score and measure the distance needed to score a Power Clam. The baskets and bumps have the [[Weapon brand#Sorella|Sorella]] logo marked on them. | |||
{| class="wikitable sitecolor-s2" | |||
|+Bump to the goal | |||
!Stage !!Bump to<br>the goal !!Stage !!Bump to<br>the goal | |||
|- | |||
|[[The Reef]] || {{yea}} ||[[MakoMart]] || {{yea}} | |||
|- | |||
|[[Musselforge Fitness]] || {{yea}} ||[[Walleye Warehouse]] || {{yea}} | |||
|- | |||
|[[Starfish Mainstage]] || {{yea}} || [[Shellendorf Institute]] || {{yea}} | |||
|- | |||
|[[Humpback Pump Track]] || {{yea}} || [[Arowana Mall]] || {{nay}} | |||
|- | |||
|[[Inkblot Art Academy]] || {{yea}} || [[Goby Arena]] || {{nay}} | |||
|- | |||
|[[Moray Towers]] || {{nay}} || [[Piranha Pit]] || {{nay}} | |||
|- | |||
|[[Port Mackerel]] || {{nay}} || [[Camp Triggerfish]] || {{yea}} | |||
|- | |||
|[[Sturgeon Shipyard]] || {{yea}} || [[Wahoo World]] || {{nay}} | |||
|- | |||
|[[Manta Maria]] || {{nay}} || [[New Albacore Hotel]] || {{nay}} | |||
|- | |||
|[[Kelp Dome]]* || {{yea}} || [[Ancho-V Games]] || {{nay}} | |||
|- | |||
|[[Snapper Canal]] || {{nay}} || [[Skipper Pavilion]] || {{nay}} | |||
|- | |||
|[[Blackbelly Skatepark]] || {{nay}} | |||
! !! | |||
|} | |||
<nowiki>*</nowiki>Kelp Dome has two bumps. | |||
{| class="wikitable sitecolor-s3" | |||
|+Bump to the goal | |||
!Stage !!Bump to<br>the goal !!Stage !!Bump to<br>the goal | |||
|- | |||
|[[Scorch Gorge]] || {{yea}} ||[[Wahoo World]]||{{Nay}} | |||
|- | |||
|[[Eeltail Alley]]|| {{yea}} ||[[Brinewater Springs]]|| {{yea}} | |||
|- | |||
|[[Hagglefish Market]]|| {{nay}} || [[Flounder Heights]]|| {{yea}} | |||
|- | |||
|[[Undertow Spillway]]|| {{yea}} ||[[Um'ami Ruins]]|| {{Nay}} | |||
|- | |||
|[[Mincemeat Metalworks]]|| {{yea}} ||[[Manta Maria]]|| {{Nay}} | |||
|- | |||
|[[Hammerhead Bridge]]|| {{yea}} ||[[Barnacle & Dime]]|| {{Yea}} | |||
|- | |||
|[[Museum d'Alfonsino]]|| {{yea}} ||[[Humpback Pump Track]]*|| {{Nay}} | |||
|- | |||
|[[Mahi-Mahi Resort]]||{{Yea}}||[[Crableg Capital]]|| {{Yea}} | |||
|- | |||
|[[Inkblot Art Academy]] | |||
|{{Yea}} | |||
|[[Shipshape Cargo Co.]] | |||
|{{Yea}} | |||
|- | |||
|[[Sturgeon Shipyard]] | |||
|{{Yea}} | |||
| [[Robo ROM-en]] | |||
|{{Yea}} | |||
|- | |||
|[[MakoMart]] | |||
|{{Yea}} | |||
|[[Bluefin Depot]] | |||
|{{Yea}} | |||
|} | |||
<nowiki>*</nowiki>Humpback Pump Track has a formation similar to a bump but isn't uniform at the base and doesn't match colors | |||
==[[Overtime]] Rules== | |||
When time runs out and at least one team has scored, overtime begins when either: | |||
* The losing team has a Power Clam in their possession, or on the field that have not yet disappeared.<ref group="notes">Including the free one gained from the barrier coming back up</ref> | |||
*The winning team's barrier is open. | |||
* The losing team's barrier is open but they were winning when it was opened. | |||
Overtime ends when either: | |||
* The winning team scores. | |||
*The winning team's barrier closes. | *The winning team's barrier closes. | ||
*The losing team's barrier | *The losing team loses all of their Power Clams before opening the winning team's barrier. | ||
* | *The losing team fails to open the winning team's barrier within twenty seconds. | ||
* | *The losing team takes the lead, giving them the victory. | ||
* | |||
If time runs out and neither team has scored, special overtime begins, lasting for three minutes and ends when either team scores with a 20-0 victory. Should neither team manage to score after three minutes of overtime, the team who formed the most Power Clams is chosen as the winner with one point; should both teams form the same number of Power Clams, then Team Alpha is awarded the victory. Take note that Team Alpha and Team Bravo are assigned randomly at the start of each match, and are not noticed directly to the players. | |||
==Passive Special Charge== | |||
Players' special gauges will fill automatically under certain conditions. | |||
*When one team is holding one or more Power Clams and the other team is not, the special gauges of the team holding one or more Power Clams will fill at 3p per second. | |||
**The Power Clam must be held by a player. A Power Clam on the field, including the Power Clam produced from the basket closing, will not count. | |||
*When both teams are holding one or more Power Clams, the special gauges of the losing team will fill at 3p per second. | |||
*When neither team is holding a Power Clam, the special gauges of the losing team will fill at 3p per second. | |||
==Badges== | |||
{{Main|Badge#Battle}} | |||
Winning a certain amount of battles will reward the player with special [[badge]]s that they can use on their [[Splashtag]]. | |||
{| class="wikitable sitecolor-s3" | |||
! colspan="3" |Clam Blitz [[Badge]]s | |||
|- | |||
|[[File:S3 Badge Clam Blitz 100.png|32x32px]]||100 Clam Blitz Wins | |||
|- | |||
|[[File:S3 Badge Clam Blitz 1000.png|32x32px]]||1,000 Clam Blitz Wins | |||
|} | |||
== Gallery == | ==Gallery == | ||
===''Splatoon 2''=== | |||
<gallery> | <gallery> | ||
Clam Blitz.jpg|Clam Blitz. | Clam Blitz.jpg|Clam Blitz. | ||
Clam Blitz S2 clams and power clam.jpg|Clams and a | Clam Blitz S2 clams and power clam.jpg|Clams and a Power Clam. | ||
Clam Blitz S2 toy set.jpg| | Clam Blitz S2 toy set.jpg|[[Inkling]]s playing with a miniature version of the game. | ||
Clam Blitz S2 clams.jpg|Clams. | Clam Blitz S2 clams.jpg|Clams. | ||
Clam Blitz S2 clams following Inkling.jpg|Clams following an Inkling. | Clam Blitz S2 clams following Inkling.jpg|Clams following an Inkling. | ||
Clam Blitz S2 map.jpg|The map, showing the location of each clam that is on friendly ink. | Clam Blitz S2 map.jpg|The map, showing the location of each clam that is on friendly ink. | ||
Clam Blitz S2 splatted inkling dropping clams.jpg|An Inkling dropping their clams after getting splatted. | Clam Blitz S2 splatted inkling dropping clams.jpg|An Inkling dropping their clams after getting splatted. | ||
Clam Blitz S2 power clam behind Inkling girl.jpg|A | Clam Blitz S2 power clam behind Inkling girl.jpg|A Power Clam behind an Inkling. | ||
Clam Blitz S2 clam bouncing off goal barrier.jpg|A clam bouncing off the protective barrier around the goal. | Clam Blitz S2 clam bouncing off goal barrier.jpg|A clam bouncing off the protective barrier around the goal. | ||
Clam Blitz S2 power clam being thrown at goal.jpg|A | Clam Blitz S2 power clam being thrown at goal.jpg|A Power clam being thrown at the goal. | ||
Clam Blitz S2 goal barrier exploding.jpg|The goal's barrier exploding after being hit with a | Clam Blitz S2 goal barrier exploding.jpg|The goal's barrier exploding after being hit with a Power Clam. | ||
Clam Blitz S2 goal without barrier.jpg|The goal without a protective barrier. | Clam Blitz S2 goal without barrier.jpg|The goal without a protective barrier. | ||
Clam Blitz S2 goal with barrier.jpg|The goal with its barrier intact. | Clam Blitz S2 goal with barrier.jpg|The goal with its barrier intact. | ||
Clam Blitz Concept Art.jpg|Concept art of Power Clams and the goal. | Clam Blitz Concept Art.jpg|Concept art of Power Clams and the goal. | ||
Mode Icon Clam Blitz.png|Mode icon. | Mode Icon Clam Blitz Splatoon 2.png|Artwork | ||
S2 icon Clam Blitz.png|Mode icon | |||
S2 Mem Cake Power Clam.png|The [[Mem cake]] of a clam. | |||
</gallery> | </gallery> | ||
<gallery widths="320px" heights="180px"> | <gallery widths="320px" heights="180px"> | ||
ClamBlitz Return to Spawn demo.mp4|Example of a player with clams returning to spawn. ([[:File:ClamBlitz Return to Spawn demo.mp4|link to file]]) | ClamBlitz Return to Spawn demo.mp4|Example of a player with clams returning to spawn. ([[:File:ClamBlitz Return to Spawn demo.mp4|link to file]]) | ||
ClamBlitz Splashdown demo.mp4|Example of a player with clams using Splashdown. ([[:File:ClamBlitz Splashdown demo.mp4|link to file]]) | ClamBlitz Splashdown demo.mp4|Example of a player with clams using the [[Splashdown]]. ([[:File:ClamBlitz Splashdown demo.mp4|link to file]]) | ||
ClamBlitz Baller demo1.mp4|Example of a player with a | ClamBlitz Baller demo1.mp4|Example of a player with a Power Clam using the [[Baller]]. ([[:File:ClamBlitz Baller demo1.mp4|link to file]]) | ||
</gallery> | |||
===''Splatoon 3''=== | |||
<gallery> | |||
S3 icon Clam Blitz.png|Mode icon | |||
S3 Decoration clam.png|Locker decoration of a clam from Clam Blitz | |||
S3 Decoration power clam.png|Locker decoration of a Power Clam | |||
</gallery> | </gallery> | ||
== Trivia == | ==Trivia == | ||
*The Power Clam resembles an [[wikipedia:American football|American football]]. | *The Power Clam resembles an [[wikipedia:American football|American football]] and has clams inside of it. Additionally, the goalpost supporting the barrier and basket resembles an American football goalpost. | ||
* | *There are only two scenarios in which a team can have a non-zero score below twenty points. | ||
**If both teams have broken the opponent's barrier once, but have not scored any further clams, the last team to score will lose one point upon the first team's barrier closing (leading to a score of 20-19), to prevent a tie. | |||
**If neither team breaks the other team's barrier after 8 minutes, the team which formed the most power clams (or, in case of this being tied, Team Alpha) will be granted a point (leading to a final score of 1-0). | |||
* The maximum number of clams that can be on the field while not held by players is fifty. | |||
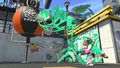
*At some time early in development, it appeared that splatting an opponent who was carrying clams would cause them to drop a maximum of six clams, instead of a maximum of four. | |||
**This can be seen during the Version {{Ver|S2|2.0.0}} update trailer, at the 1:05 mark,<ref>[https://www.youtube.com/watch?v=U1gyg1HjPOY&t=65s {{YT}} YouTube: ''Splatoon 2'' - Huge Holiday Updates! - Nintendo Switch]</ref> where the green [[Inkling]] (carrying eight clams) is seen dropping six clams upon getting splatted. | |||
== Names in other languages == | ==Names in other languages== | ||
{{ | {{Localized name | ||
| | |title=Clam Blitz | ||
|Jap=ガチアサリ | |Jap=ガチアサリ | ||
|JapR= | |JapR=Gachi-asari | ||
|JapM=Competitive [ | |JapM=Competitive [[Wikipedia:Lajonkairia lajonkairii|Japanese-littleneck]] | ||
|Dut=Schelpenstrijd | |Dut=Schelpenstrijd | ||
|DutM=Shell battle | |DutM=Shell battle | ||
| Line 99: | Line 209: | ||
|Ger=Muschelchaos | |Ger=Muschelchaos | ||
|GerM=Clam chaos | |GerM=Clam chaos | ||
|Ita= | |Ita=Vongol gol | ||
|ItaM=Clam goal | |||
|Rus=Устробол | |||
|RusR=Ustrobol | |||
|RusM=Clamball | |||
|Spa=Asalto Almeja | |||
|SpaM=Clam Assault | |||
|Chi=真格蛤蜊 | |||
|ChiR=zhēn'gé gélí (Mandarin) | |||
|ChiM=Real clam | |||
|Kor=랭크 바지락 | |||
|KorR=raengkeu bajirak | |||
|KorM=Rank Manila-clam | |||
}} | |||
<div style="display:flex;gap:30px;justify-content:flex-start;flex-wrap:wrap;align-items:flex-start"> | |||
{{Localized name | |||
|title=Clam | |||
|Jap=アサリ | |||
|JapR=Asari | |||
|JapM=[[Wikipedia:Lajonkairia lajonkairii|Japanese-littleneck]] | |||
|Dut=Schelp | |||
|DutM=Shell | |||
|Fre=Palourde | |||
|FreM= | |||
|FreA=<!--French (NoA) and (NoE) share the same name--> | |||
|FreAM= | |||
|Ger=Muschel | |||
|GerM= | |||
|Ita=Vongola | |||
|ItaM= | |||
|Rus=Устрица | |||
|RusR=Ustritsa | |||
|RusM=Clam | |||
|Spa=Almeja | |||
|SpaM=Clam | |||
|SpaA=<!--Spanish (NoA) and (NoE) share the same name--> | |||
|SpaAM= | |||
|Chi=蛤蜊 | |||
|ChiR= | |||
|ChiM= | |||
|ChiS=<!--Chinese (Simplified) and (Traditional) share the same name--> | |||
|ChiSR= | |||
|ChiSM= | |||
|Kor=바지락 | |||
|KorR= | |||
|KorM= | |||
|Internal=VS_Obj_11 <ref name="Leanny GitHub">[https://github.com/Leanny/splat3/blob/main/data/language/EUen.json {{GH}} Leanny on GitHub]</ref> | |||
|InternalM= | |||
}} | |||
{{Localized name | |||
|title=Power Clam | |||
|Jap=ガチアサリ | |||
|JapR=Gachi-asari | |||
|JapM=Big asari | |||
|Dut=Superschelp | |||
|DutM=Super shell | |||
|Fre=Super palourde | |||
|FreM= | |||
|FreA=<!--French (NoA) and (NoE) share the same name--> | |||
|FreAM= | |||
|Ger=Powermuschel | |||
|GerM= | |||
|Ita=Super vongola | |||
|ItaM= | |ItaM= | ||
|Rus= | |Rus=Круть-устрица | ||
|RusR= | |RusR=Krut'-ustritsa | ||
|RusM= | |RusM=Cool-clam | ||
| | |SpaA=Almejón | ||
| | |SpaAM=Big-clam <ref group="notes">The suffix ''-ón'' is used to describe a noun that is large. In this case, they added ''-ón'' to the word ''almeja'' meaning clam.</ref> | ||
|SpaE=Superalmeja | |||
|SpaEM=Superclam | |||
|Chi=真格蛤蜊 | |||
|ChiR= | |||
|ChiM= | |||
|ChiS=<!--Chinese (Simplified) and (Traditional) share the same name--> | |||
|ChiSR= | |||
|ChiSM= | |||
|Kor=랭크 바지락 | |||
|KorR= | |||
|KorM= | |||
|Internal=VS_Obj_10 <ref name="Leanny GitHub"/> | |||
|InternalM= | |||
}} | }} | ||
</div> | |||
==Notes== | |||
{{note list}} | |||
==References== | |||
<references /> | |||
{{Navbox/S2 Modes}} | |||
{{Navbox/S3 Modes}} | |||
[[Category:Splatoon 2]] | [[Category:Splatoon 2]] | ||
[[Category:Modes]] | |||
[[Category:Multiplayer]] | |||
[[Category:Post-release content]] | |||
Latest revision as of 00:02, 22 April 2024

Clam Blitz
| Type | Online multiplayer mode |
| Players | 2-8 |
| Ranked | Yes |
| Weapons | All |
| Controllers |
|
| Release Date | 13 December 2017 |
| “ | Fill the enemy's clam basket! | ” |
— Objective quote seen before battle in Splatoon 2
| ||
Clam Blitz is one of the four Ranked Battle/Anarchy Battle modes in Splatoon 2 and Splatoon 3, alongside Splat Zones, Rainmaker, and Tower Control. Clam Blitz is the only ranked mode introduced in Splatoon 2 that was not in Splatoon.
History
Clam Blitz was announced on 21 November 2017 when Nintendo released a video showing the updates for the coming weeks.
On 13 December 2017 at 02:00 UTC, Version 2.1.0 made Clam Blitz playable.
On 10 August 2022, Nintendo revealed Clam Blitz returns for Splatoon 3 for Anarchy Battles. This time the number of clams required to form a Power Clam is eight instead of ten.
Gameplay
The objective of Clam Blitz is to pick up clams, which are scattered around the stage, and deposit them into the goal near the opposing team's base. Once a player picks up ten/eight clams, it transforms into a Power Clam, which is used to destroy the barrier around the other team's goal when thrown towards it.
Collecting Clams
At the beginning of the match, thirty clams are scattered all around the center of the stage and towards the teams' bases. They can be picked up by getting close enough to them. After picking up clams, they start to trail along behind the player in humanoid form and disappear when swimming. When standing still in humanoid form, the clams form a pyramid shape. A Power Clam is formed by picking up ten clams in Splatoon 2, and eight clams in Splatoon 3. Clams and Power Clams can be thrown by pressing ![]() or
or ![]() . Clams can be passed to any player on the field, but Power Clams are distinct to each team and can only be picked up by members of the same team. A Power Clam, when thrown to the ground, inks the ground. Picking up a Power Clam fumble while holding clams will force the player to drop all of them. A player can only hold one Power Clam at a time and cannot pick up additional clams while holding one. A player that gets splatted while holding clams drops up to four clams in Splatoon 2, and three clams in Splatoon 3. It is possible to Super Jump to a teammate or a Squid Beakon and keep all held clams intact. If a player returns to their spawn point in Splatoon 2, all clams or Power Clam gathered will break. Throwing clams at the spawn also breaks them. After using the Splashdown, Baller, Reefslider, or Kraken Royale, the player drops all the clams they were holding.
. Clams can be passed to any player on the field, but Power Clams are distinct to each team and can only be picked up by members of the same team. A Power Clam, when thrown to the ground, inks the ground. Picking up a Power Clam fumble while holding clams will force the player to drop all of them. A player can only hold one Power Clam at a time and cannot pick up additional clams while holding one. A player that gets splatted while holding clams drops up to four clams in Splatoon 2, and three clams in Splatoon 3. It is possible to Super Jump to a teammate or a Squid Beakon and keep all held clams intact. If a player returns to their spawn point in Splatoon 2, all clams or Power Clam gathered will break. Throwing clams at the spawn also breaks them. After using the Splashdown, Baller, Reefslider, or Kraken Royale, the player drops all the clams they were holding.
Any clams dropped or Power Clam fumbles disappear after ten seconds if not picked up. After a Power Clam disappears or enough clams have disintegrated, new clams appear in the stage in selected locations at groups of four/three clams.

Clams on the player's team ink color appear as pulsating circular markers on-screen (even through walls) and as dots surrounded by pulsating circles on the map. Both these markers are shown in the neutral color for the current match.
All players can see the position of both teams' Power Clams at all times on both the screen and the map, shown as a Ranked Battle symbol in white over their appropriate color. Once a player holds a Power Clam, it follows the player and can be seen even when swimming. A dropped Power Clam (or the one that spawns when the barrier regenerates) is similarly shown on all players' maps and screens in inverted colors (team color logo on white background). If the player is holding a Power Clam, or if the opponent's goal is open and the player is holding any clams, a marker shaped like a Power Clam in the opponent's color appears on-screen, showing the location of the opponent's goal.
Any friendly players holding clams have a numbered marker showing how many they are holding above their name. Also, the scoreboard on the top of the screen shows the total number of clams currently held by each team, with Power Clams counted as ten/eight clams.
Scoring
Breaking the opponent's barrier with a Power Clam awards twenty points and lifts the team's barrier, preventing the enemy team to score points. If several Power Clams hit the closed basket simultaneously, these points are awarded for each one. When clams are thrown in the opposing team's open basket, three points are earned for each clam, while a Power Clam is worth twenty. If a team's barrier closes with the same point total as the opposing team, the last team to score loses one point, a feature which is done to avoid tied scores.
The barrier stays open for ten seconds, and throwing a clam into it extends the timer by three seconds, but cannot make the remaining time go over ten seconds. Throwing a Power Clam into an open basket resets the timer to ten seconds. When the barrier timer runs out, the enemy team's basket lifts to regenerate the barrier for ten seconds, while the scoring team's barrier drops immediately, making it easier for a counter-attack. When the player's barrier is open, it is impossible to open the enemy's barrier, as any Power Clam thrown at the goal goes back into the end zone as if the player had dropped it. If both teams have thrown a Power Clam at the goal, the team that threw the Power Clam first will score, and the other team's Power Clam will fall out of the barrier.
If the barrier goes back up before the scoring team gets to 100 points, a penalty of half the points scored, rounded down, is imposed on the team, similar to the penalty for ceding control to the other team in Splat Zones. The total for this calculation includes the twenty points for breaking the barrier, as well as any points that made up for previous penalties. If a point was deducted for the barrier closing with a tied score, the penalty does not change (e.g. if the team only ended up scoring nineteen points, the penalty is still +10). Also, a Power Clam for the team whose barrier got broken spawns by their goal and does not time out until picked up. No additional Power Clams spawn if the previous one was not picked up and the barrier got broken and returned.

Several stages have a bump near the basket that makes it easier to score and measure the distance needed to score a Power Clam. The baskets and bumps have the Sorella logo marked on them.
| Stage | Bump to the goal |
Stage | Bump to the goal |
|---|---|---|---|
| The Reef | ✓ | MakoMart | ✓ |
| Musselforge Fitness | ✓ | Walleye Warehouse | ✓ |
| Starfish Mainstage | ✓ | Shellendorf Institute | ✓ |
| Humpback Pump Track | ✓ | Arowana Mall | ✗ |
| Inkblot Art Academy | ✓ | Goby Arena | ✗ |
| Moray Towers | ✗ | Piranha Pit | ✗ |
| Port Mackerel | ✗ | Camp Triggerfish | ✓ |
| Sturgeon Shipyard | ✓ | Wahoo World | ✗ |
| Manta Maria | ✗ | New Albacore Hotel | ✗ |
| Kelp Dome* | ✓ | Ancho-V Games | ✗ |
| Snapper Canal | ✗ | Skipper Pavilion | ✗ |
| Blackbelly Skatepark | ✗ |
*Kelp Dome has two bumps.
| Stage | Bump to the goal |
Stage | Bump to the goal |
|---|---|---|---|
| Scorch Gorge | ✓ | Wahoo World | ✗ |
| Eeltail Alley | ✓ | Brinewater Springs | ✓ |
| Hagglefish Market | ✗ | Flounder Heights | ✓ |
| Undertow Spillway | ✓ | Um'ami Ruins | ✗ |
| Mincemeat Metalworks | ✓ | Manta Maria | ✗ |
| Hammerhead Bridge | ✓ | Barnacle & Dime | ✓ |
| Museum d'Alfonsino | ✓ | Humpback Pump Track* | ✗ |
| Mahi-Mahi Resort | ✓ | Crableg Capital | ✓ |
| Inkblot Art Academy | ✓ | Shipshape Cargo Co. | ✓ |
| Sturgeon Shipyard | ✓ | Robo ROM-en | ✓ |
| MakoMart | ✓ | Bluefin Depot | ✓ |
*Humpback Pump Track has a formation similar to a bump but isn't uniform at the base and doesn't match colors
Overtime Rules
When time runs out and at least one team has scored, overtime begins when either:
- The losing team has a Power Clam in their possession, or on the field that have not yet disappeared.[a]
- The winning team's barrier is open.
- The losing team's barrier is open but they were winning when it was opened.
Overtime ends when either:
- The winning team scores.
- The winning team's barrier closes.
- The losing team loses all of their Power Clams before opening the winning team's barrier.
- The losing team fails to open the winning team's barrier within twenty seconds.
- The losing team takes the lead, giving them the victory.
If time runs out and neither team has scored, special overtime begins, lasting for three minutes and ends when either team scores with a 20-0 victory. Should neither team manage to score after three minutes of overtime, the team who formed the most Power Clams is chosen as the winner with one point; should both teams form the same number of Power Clams, then Team Alpha is awarded the victory. Take note that Team Alpha and Team Bravo are assigned randomly at the start of each match, and are not noticed directly to the players.
Passive Special Charge
Players' special gauges will fill automatically under certain conditions.
- When one team is holding one or more Power Clams and the other team is not, the special gauges of the team holding one or more Power Clams will fill at 3p per second.
- The Power Clam must be held by a player. A Power Clam on the field, including the Power Clam produced from the basket closing, will not count.
- When both teams are holding one or more Power Clams, the special gauges of the losing team will fill at 3p per second.
- When neither team is holding a Power Clam, the special gauges of the losing team will fill at 3p per second.
Badges
- Main article: Badge#Battle
Winning a certain amount of battles will reward the player with special badges that they can use on their Splashtag.
| Clam Blitz Badges | ||
|---|---|---|
| 100 Clam Blitz Wins | ||
| 1,000 Clam Blitz Wins | ||
Gallery
Splatoon 2
-
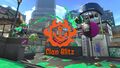
Clam Blitz.
-

Clams and a Power Clam.
-
Inklings playing with a miniature version of the game.
-
Clams.
-
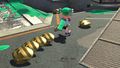
Clams following an Inkling.
-
The map, showing the location of each clam that is on friendly ink.
-
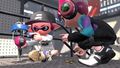
An Inkling dropping their clams after getting splatted.
-

A Power Clam behind an Inkling.
-
A clam bouncing off the protective barrier around the goal.
-
A Power clam being thrown at the goal.
-

The goal's barrier exploding after being hit with a Power Clam.
-

The goal without a protective barrier.
-

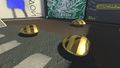
The goal with its barrier intact.
-
Concept art of Power Clams and the goal.
-

Artwork
-

Mode icon
-

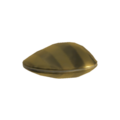
The Mem cake of a clam.


-
Example of a player with clams returning to spawn. (link to file)
-
Example of a player with clams using the Splashdown. (link to file)
-
Example of a player with a Power Clam using the Baller. (link to file)
Splatoon 3
-

Mode icon
-
Locker decoration of a clam from Clam Blitz
-
Locker decoration of a Power Clam


Trivia
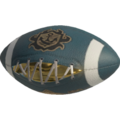
- The Power Clam resembles an American football and has clams inside of it. Additionally, the goalpost supporting the barrier and basket resembles an American football goalpost.
- There are only two scenarios in which a team can have a non-zero score below twenty points.
- If both teams have broken the opponent's barrier once, but have not scored any further clams, the last team to score will lose one point upon the first team's barrier closing (leading to a score of 20-19), to prevent a tie.
- If neither team breaks the other team's barrier after 8 minutes, the team which formed the most power clams (or, in case of this being tied, Team Alpha) will be granted a point (leading to a final score of 1-0).
- The maximum number of clams that can be on the field while not held by players is fifty.
- At some time early in development, it appeared that splatting an opponent who was carrying clams would cause them to drop a maximum of six clams, instead of a maximum of four.
Names in other languages
| Language | Name | Meaning |
|---|---|---|
| ガチアサリ Gachi-asari |
Competitive Japanese-littleneck | |
| Schelpenstrijd | Shell battle | |
| Pluie de palourdes | Clam rain | |
| Muschelchaos | Clam chaos | |
| Vongol gol | Clam goal | |
| Устробол Ustrobol |
Clamball | |
| Asalto Almeja | Clam Assault | |
| 真格蛤蜊 zhēn'gé gélí (Mandarin) |
Real clam | |
| 랭크 바지락 raengkeu bajirak |
Rank Manila-clam |
| Language | Name | Meaning |
|---|---|---|
| アサリ Asari |
Japanese-littleneck | |
| Schelp | Shell | |
| Palourde | ||
| Muschel | ||
| Vongola | ||
| Устрица Ustritsa |
Clam | |
| Almeja | Clam | |
| 蛤蜊 | ||
| 바지락 | ||
| VS_Obj_11 [2] |
| Language | Name | Meaning |
|---|---|---|
| ガチアサリ Gachi-asari |
Big asari | |
| Superschelp | Super shell | |
| Super palourde | ||
| Powermuschel | ||
| Super vongola | ||
| Круть-устрица Krut'-ustritsa |
Cool-clam | |
| Almejón | Big-clam [b] | |
| Superalmeja | Superclam | |
| 真格蛤蜊 | ||
| 랭크 바지락 | ||
| VS_Obj_10 [2] |
Notes
References
|
|
