Alterna Space Center: Entrance: Difference between revisions
GloverMist (talk | contribs) (Added lots of quotes!) |
m (corrected name) |
||
| (16 intermediate revisions by 8 users not shown) | |||
| Line 1: | Line 1: | ||
{{RotMPrevNext|site1=Alterna|prevnum=06-Boss|prev=The Obscurest Chiaroscurist|site2=Rocket|nextnum=02|next=Alterna Space Center Hangar}} | {{RotMPrevNext|site1=Alterna|prevnum=06-Boss|prev=The Obscurest Chiaroscurist|site2=Rocket|nextnum=02|next=Alterna Space Center Hangar}} | ||
{{ | {{Infobox/Mission/RotM | ||
|mission=Calm yourself, then watch and learn. | |mission=Calm yourself, then watch and learn. | ||
|image=Alterna Space Center Entrance.jpg | |image=Alterna Space Center Entrance.jpg | ||
| Line 7: | Line 7: | ||
|lives=1 | |lives=1 | ||
|sub1=Smallfry | |sub1=Smallfry | ||
| | |ftbreward1=None | ||
| | |screward1=None | ||
|music=''[[In Filtration]]'' | |music=''[[In Filtration]]'' | ||
}} | }}{{StrategyWiki|Splatoon 3|Alterna Space Center: Entrance}} | ||
{{Quote|All weaponry is strictly prohibited beyond this point. Pets and/or sidekicks are allowed.|[[O.R.C.A.]] describing the level}} | {{Quote|All weaponry is strictly prohibited beyond this point. Pets and/or sidekicks are allowed.|[[O.R.C.A.]] describing the level}} | ||
[[File:RotM Rocket Map 1.jpg|thumb]] | [[File:RotM Rocket Map 1.jpg|thumb]] | ||
'''Alterna Space Center: Entrance''' is the first section in the finale leading up to the final boss in [[Return of the Mammalians]]. | '''Alterna Space Center: Entrance''' is the first section in the finale leading up to the final boss in [[Return of the Mammalians]]. | ||
== Description == | ==Description== | ||
The player has their [[Hero Gear]] confiscated by [[O.R.C.A.]] upon entering the section. Because of this, to get to the next section in the [[Alterna Space Center]], the player will need to defeat enemies using only [[Smallfry (character)|Smallfry]]. The player is returned their weapon and gear after making their way through the section. | The player has their [[Hero Gear]] confiscated by [[O.R.C.A.]] upon entering the section. Because of this, to get to the next section in the [[Alterna Space Center]], the player will need to defeat enemies using only [[Smallfry (character)|Smallfry]]. The player is returned their weapon and gear after making their way through the section. | ||
== Walkthrough == | ==Walkthrough== | ||
=== | ===Landing=== | ||
At the beginning of the section, the player can see two pads in front of them and a closed door further out. While standing on one pad, the player can throw their Smallfry onto the other and that will cause the door to open, furthering progression. The next room requires the player to take out a group of Octarians, either by throwing Smallfry on them or the [[Balloon Fish]] in the center to take them out. | At the beginning of the section, the player can see two pads in front of them and a closed door further out. While standing on one pad, the player can throw their Smallfry onto the other and that will cause the door to open, furthering progression. The next room requires the player to take out a group of Octarians, either by throwing Smallfry on them or the [[Balloon Fish]] in the center to take them out. | ||
Immediately to the right of entering the next room, the player is met with a [[Flooder]] blocking the way. Throwing Smallfry onto it will stun it and prevent it from showering ink, allowing the player to pass under it. After making it to the other side and riding the Flooder to another room (with two key vaults visible upon entering), the player should make their way to the next checkpoint, which is located directly to the side of the room's entrance. | Immediately to the right of entering the next room, the player is met with a [[Flooder]] blocking the way. Throwing Smallfry onto it will stun it and prevent it from showering ink, allowing the player to pass under it. After making it to the other side and riding the Flooder to another room (with two key vaults visible upon entering), the player should make their way to the next checkpoint, which is located directly to the side of the room's entrance. | ||
=== Checkpoint | ===Checkpoint 1=== | ||
While on the [[propeller]] lifts and throwing Smallfry onto their propellers, the player will eventually be on top of a structure with a square grate in the middle. Dropping through, the next checkpoint is visible but blocked by a glass wall. Make your way to another grate platform and drop through, and another one, before being on a floor with two [[Gusher]]s. Throwing Smallfry on one and going up will take you to a room with a box containing ten [[Power Egg]]s while going up the other one will place you in a room with an Octarian to take out and another Gusher to ride. That will take you to the final checkpoint. | While on the [[propeller]] lifts and throwing Smallfry onto their propellers, the player will eventually be on top of a structure with a square grate in the middle. Dropping through, the next checkpoint is visible but blocked by a glass wall. Make your way to another grate platform and drop through, and another one, before being on a floor with two [[Gusher]]s. Throwing Smallfry on one and going up will take you to a room with a box containing ten [[Power Egg]]s while going up the other one will place you in a room with an Octarian to take out and another Gusher to ride. That will take you to the final checkpoint. | ||
=== Final Checkpoint === | ===Final Checkpoint=== | ||
Grabbing the key and slipping through yet another grate, the player is greeted with a Flooder blocking a hallway and an [[ink wheel]] in front. When the Flooder is a sizable distance away, throwing Smallfry onto the ink wheel, removing them, and throwing them again onto the Flooder will allow it to roll under and break some crates. After going through and riding the propeller lift, the player will need to ride the Flooder back. | Grabbing the key and slipping through yet another grate, the player is greeted with a Flooder blocking a hallway and an [[ink wheel]] in front. When the Flooder is a sizable distance away, throwing Smallfry onto the ink wheel, removing them, and throwing them again onto the Flooder will allow it to roll under and break some crates. After going through and riding the propeller lift, the player will need to ride the Flooder back. | ||
| Line 38: | Line 36: | ||
<gallery> | <gallery> | ||
File:OE Pressure Switch Screenshot.jpg|[[Switch]] | File:OE Pressure Switch Screenshot.jpg|[[Switch]] | ||
Checkpoint | S2 Checkpoint.png|[[Checkpoint]] | ||
RotM render Octotrooper.png|[[Octotrooper]] | |||
S3 Tableturf | S3 Tableturf Battle card Shielded Octotrooper.png|[[Shielded Octotrooper]] | ||
FuzzyBlobbyOctotrooper.jpg|[[Blobby Octotrooper]] | FuzzyBlobbyOctotrooper.jpg|[[Blobby Octotrooper]] | ||
Balloon Fish.jpg|[[Balloon Fish]] | S2 Balloon Fish.jpg|[[Balloon Fish]] | ||
S3 Tableturf | S3 Tableturf Battle card Flooder.png|[[Flooder]] | ||
S2 Icon Gusher.png|[[Gusher]] | |||
Vault Render.jpg|[[Vault]] | Vault Render.jpg|[[Vault]] | ||
Balloon Artwork.jpg|[[Balloon]] | Balloon Artwork.jpg|[[Balloon]] | ||
Propeller Render.jpg|[[Propeller]] | Propeller Render.jpg|[[Propeller]] | ||
Ink Wheel.png|[[Ink wheel]] | |||
Crate Artwork.jpg|[[Crate]] | Crate Artwork.jpg|[[Crate]] | ||
Squid ring.png|[[Squid Ring]] | Squid ring.png|[[Squid Ring]] | ||
ViewPad.jpg|[[View Pad]] | ViewPad.jpg|[[View Pad]] | ||
S3 Tableturf | S3 Tableturf Battle card Octocommander.png|[[Octocommander]] | ||
S3 Tableturf | S3 Tableturf Battle card Octosniper.png|[[Octosniper]] | ||
</gallery> | |||
==Gallery== | |||
<gallery> | |||
RotM Alterna Space Center Entrance Weapon Select.jpg|The weapon selection screen. | |||
RotM Alterna Space Center Entrance Checkpoint 1.jpg|The first [[checkpoint]]. | |||
RotM Alterna Space Center Entrance Checkpoint 2.jpg|The second and final checkpoint. | |||
</gallery> | </gallery> | ||
| Line 59: | Line 64: | ||
==={{flag|us}}English=== | ==={{flag|us}}English=== | ||
{{collapse| | {{collapse| | ||
====[[File: | ====[[File:RotM Icon Agent 1.png|45px]] [[Callie|Agent 1]]{{color|'s Quotes|green}}==== | ||
{{Clr}} | {{Clr}} | ||
| | | | ||
| Line 86: | Line 91: | ||
{{collapse| | {{collapse| | ||
====[[File: | ====[[File:RotM Icon Agent 2.png|45px]] [[Marie|Agent 2]]{{color|'s Quotes|green}}==== | ||
{{Clr}} | {{Clr}} | ||
| | | | ||
| Line 112: | Line 117: | ||
{{collapse| | {{collapse| | ||
====[[File: | ====[[File:RotM Icon Shiver.png|45px]] [[Shiver]]{{color|'s Quotes|green}}==== | ||
{{Clr}} | {{Clr}} | ||
| | | | ||
| Line 124: | Line 129: | ||
{{collapse| | {{collapse| | ||
====[[File: | ====[[File:RotM Icon Frye.png|45px]] [[Frye]]{{color|'s Quotes|green}}==== | ||
{{Clr}} | {{Clr}} | ||
| | | | ||
| Line 143: | Line 148: | ||
{{collapse| | {{collapse| | ||
====[[File: | ====[[File:RotM Icon Big Man.png|45px]] [[Big Man]]{{color|'s Quotes|green}}==== | ||
{{Clr}} | {{Clr}} | ||
| | | | ||
| Line 161: | Line 166: | ||
==Names in other languages== | ==Names in other languages== | ||
{{ | {{Translation needed|Add names in Italian and Korean.}} | ||
{{Localized name | |||
|color=Splatoon 3 | |color=Splatoon 3 | ||
|Jap= | |Jap=オルタナ宇宙センター・エントランス<br>大人しく見学しましょう | ||
|JapR= | |JapR=Orutana uchū sentā: entoransu<br>Otonashiku kengaku shimashou. | ||
|JapM= | |JapM=Alterna Space Center: Entrance<br>Be quiet and observe. | ||
|Dut=Alterna-ruimtebasis (ingang)<br>Blijf rustig, observeer en leer. | |Dut=Alterna-ruimtebasis (ingang)<br>Blijf rustig, observeer en leer. | ||
|DutM=Alterna space base (entrance)<br>Keep calm, observe and learn. | |DutM=Alterna space base (entrance)<br>Keep calm, observe and learn. | ||
| Line 172: | Line 178: | ||
|FraA= | |FraA= | ||
|FraAM= | |FraAM= | ||
|Ger= | |Ger=Raumfahrtzentrum Alterna: Eingang<br>Bewahre Ruhe.<br>Beobachte. Lerne. | ||
|GerM= | |GerM=Alterna Space Center: Entrance<br>Keep calm.<br>Observe. Learn. | ||
|Ita= | |Ita= | ||
|ItaM= | |ItaM= | ||
Latest revision as of 16:12, 22 February 2024
|
|
|
Calm yourself, then watch and learn.

| Site | Alterna Space Center | |||
| Fee | ||||
| Lives | 1 | |||
| Weapons |
| |||
| First-time Clear Rewards |
| |||
| Subsequent Clear Rewards |
| |||
| Music | In Filtration |
| StrategyWiki has an article about: Alterna Space Center: Entrance |
| “ | All weaponry is strictly prohibited beyond this point. Pets and/or sidekicks are allowed. | ” |
— O.R.C.A. describing the level
| ||

Alterna Space Center: Entrance is the first section in the finale leading up to the final boss in Return of the Mammalians.
Description
The player has their Hero Gear confiscated by O.R.C.A. upon entering the section. Because of this, to get to the next section in the Alterna Space Center, the player will need to defeat enemies using only Smallfry. The player is returned their weapon and gear after making their way through the section.
Walkthrough
Landing
At the beginning of the section, the player can see two pads in front of them and a closed door further out. While standing on one pad, the player can throw their Smallfry onto the other and that will cause the door to open, furthering progression. The next room requires the player to take out a group of Octarians, either by throwing Smallfry on them or the Balloon Fish in the center to take them out.
Immediately to the right of entering the next room, the player is met with a Flooder blocking the way. Throwing Smallfry onto it will stun it and prevent it from showering ink, allowing the player to pass under it. After making it to the other side and riding the Flooder to another room (with two key vaults visible upon entering), the player should make their way to the next checkpoint, which is located directly to the side of the room's entrance.
Checkpoint 1
While on the propeller lifts and throwing Smallfry onto their propellers, the player will eventually be on top of a structure with a square grate in the middle. Dropping through, the next checkpoint is visible but blocked by a glass wall. Make your way to another grate platform and drop through, and another one, before being on a floor with two Gushers. Throwing Smallfry on one and going up will take you to a room with a box containing ten Power Eggs while going up the other one will place you in a room with an Octarian to take out and another Gusher to ride. That will take you to the final checkpoint.
Final Checkpoint
Grabbing the key and slipping through yet another grate, the player is greeted with a Flooder blocking a hallway and an ink wheel in front. When the Flooder is a sizable distance away, throwing Smallfry onto the ink wheel, removing them, and throwing them again onto the Flooder will allow it to roll under and break some crates. After going through and riding the propeller lift, the player will need to ride the Flooder back.
After obtaining the next key, going into the room with the two key vaults and unlocking them will reveal a pad and an ink wheel. Standing on the pad and throwing Smallfry onto the ink wheel will cause it to go up a wall. Then, throwing Smallfry again onto the pad the player was on and making your way up the inked path will lead to a room with two Octocommanders. Taking them out and entering the next room will make an Octosniper spawn behind the player. Splatting that one and unlocking the vault will lead to a terminal to regain your Hero Gear, and an opened air vent to the next section.
Enemies and Mechanics
Previously Introduced


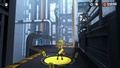
Gallery
-
The weapon selection screen.
-
The first checkpoint.
-
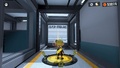
The second and final checkpoint.


Quotes
 English
 Agent 1's Quotes
- Introduction:
| “ | Whoa! They took everything! All of your Hero Gear! | ” |
| “ | What do you think, Agent 3? You have your Smallfry. Are you good to give it a try? | ” |
- First checkpoint:
| “ | Careful, Agent 3! Ever heard of "death by committee"? You're looking at it! | ” |
- Second checkpoint:
| “ | Now I just hope there are some keys nearby... | ” |
| “ | What do you mean? I don't smell anything... | ” |
| “ | ...Oh. I thought it was going to be a snack. I should have eaten something before this. | ” |
- Final checkpoint:
| “ | Wait. This looks awfully familiar... | ” |
| “ | It worked! You found the second key! | ” |
| “ | Never fear - Agent 3 and Smallfry are here! After everything we've seen, I KNOW they've got this. | ” |
| “ | Gah! Another trap! | ” |
| “ | Nice teamwork, you two! | ” |
- After reaching the equipper:
| “ | Ooo, you got your gear back! | ” |
 Agent 2's Quotes
- Introduction:
| “ | Oof. I mean, we didn't exactly surprise them, did we? We just charged right in. | ” |
| “ | Would YOU be going in there fresh out of ink? Who am I kidding? Of course you would! | ” |
- First checkpoint:
| “ | Well, look at that! Between Agent 3 and Smallfry, who needs fancy weapons? | ” |
- Second checkpoint:
| “ | That's one key in your pocket! Now, where could the other one be... | ” |
- Final checkpoint:
| “ | Yeah, but I don't think the same trick is going to work twice. | ” |
| “ | (D-double floop? Blorble?!) | ” |
| “ | Finally. I'm dying to see what's in those vaults! | ” |
| “ | We must be getting close to the exit... | ” |
| “ | Wait a second... | ” |
| “ | Niiice. | ” |
- After reaching the equipper:
| “ | Careful, Agent 3. We've already seen a few traps - there could be more. | ” |
 Shiver's Quotes
- First checkpoint:
| “ | At least they sent a welcoming committee. How thoughtful! | ” |
- Final checkpoint:
| “ | Oh, you need help with this? Just do a double floop and skim the blorble, stealth-style. EZ! | ” |
| “ | They look like candies! Gonna feed 'em to Smallfry? | ” |
 Frye's Quotes
- Introduction:
| “ | If I were setting a trap for you, I'd be doing the "yay, the trap worked" dance right now. I may do it anyway... It's a fun dance! | ” |
- First checkpoint:
| “ | OK, that was cool, but let's not get ahead of ourselves. I like fancy weapons! | ” |
- Second checkpoint:
| “ | OH! What is that smell?! | ” |
- Final checkpoint:
| “ | Ooo, balloons! | ” |
| “ | Uh, they seem overly excited to see you. What are you gonna do?! | ” |
| “ | Haha! That little thing really has an appetite. | ” |
 Big Man's Quotes
- Introduction:
| “ | Ay! Ay! (I see your gear! You should be able to get it back if you make it through this.) | ” |
- First checkpoint:
| “ | Ay... (Huh... two vaults. But are there any keys?!) | ” |
- Second checkpoint:
| “ | AY! (I think that's Frye's way of sniffing out a key!) | ” |
- Final checkpoint:
| “ | Ay! (Smart! Great plan, Shiver.) | ” |
| “ | Ay! (Eating contest when, little guy?) | ” |
Names in other languages
| Language | Name | Meaning |
|---|---|---|
| オルタナ宇宙センター・エントランス 大人しく見学しましょう Orutana uchū sentā: entoransu Otonashiku kengaku shimashou. |
Alterna Space Center: Entrance Be quiet and observe. | |
| Alterna-ruimtebasis (ingang) Blijf rustig, observeer en leer. |
Alterna space base (entrance) Keep calm, observe and learn. | |
| Centre spatial d'Alterna : entrée Retrouve ton calme, puis observe et apprends. |
Alterna Space Center: Entrance Regain your calm, then watch and learn. | |
| Raumfahrtzentrum Alterna: Eingang Bewahre Ruhe. Beobachte. Lerne. |
Alterna Space Center: Entrance Keep calm. Observe. Learn. | |
| Вход в космоцентр Альтерны Не нервничайте, смотрите в оба и учитесь. Vkhod v kosmotsentr Al'terny Ne nervnichayte, smotrite v oba i uchites'. |
Alterna space center entrance Don't worry, keep your eyes open and learn. | |
| Centro espacial de Alterna (entrada) Cálmate, observa y aprende |
Alverna space center (entrance) Calm yourself, observe and learn | |
| 幻界宇宙中心·入口 乖乖参观。 Huànjiè yǔzhòu·zhōngxīn rùkǒu guāiguāi cānguān. |
Alterna Space Center: Entrance Visit well-behaved. | |
| 幻界宇宙中心.入口 >>乖乖地見習吧 huànjiè yǔjòu jūngshīn rùkǒu >>guāiguāidì jiànshī bā |
Alterna Space Center: Entrance >>be a well-behaved trainee |
