The Mighty Octostomp!: Difference between revisions
mNo edit summary |
m (layout improvements) |
||
| Line 16: | Line 16: | ||
==Octo Valley== | ==Octo Valley== | ||
[[File: Boss 1 Kettle.png|thumb| | [[File: Boss 1 Kettle.png|thumb|left|The Octostomp's kettle.]] | ||
The Mighty Octostomp's [[kettle]] can be found in the center of [[Octo Valley]]'s Zone 1. It rests on a large, purple pillow, and does not need to be sprayed with [[ink]] to become visible. | The Mighty Octostomp's [[kettle]] can be found in the center of [[Octo Valley]]'s Zone 1. It rests on a large, purple pillow, and does not need to be sprayed with [[ink]] to become visible. | ||
{{clr}} | |||
==Boss appearance== | |||
==Boss | |||
{{Main|Octostomp}} | {{Main|Octostomp}} | ||
[[File:Concept Art - Octostomp and Octonozzle.png|left|thumb|225px|Concept art of the Octostomp.]] | [[File:Concept Art - Octostomp and Octonozzle.png|left|thumb|225px|Concept art of the Octostomp.]] | ||
| Line 37: | Line 34: | ||
==Walkthrough== | ==Walkthrough== | ||
<embedvideo service="youtube" dimensions="400" alignment="center">https://www.youtube.com/watch?v=d3mM2JsDrLs</embedvideo> | |||
You will start off in the Octostomp’s lair on a platform with a spawn point and a launcher straight ahead of you. This is simply a small, safe place to prepare for the fight ahead, so there isn't anything to do other than blast off to the main platform and start the fight. As your [[Inkling]] is in the air, the camera will give you a nice view of the whole arena you'll have to fight on. It's a large circle with a podium towards the back [[File:Octostomp Arena Highview.png|thumb|298px|Birdseye view of the arena]]and strong flood lights all aimed at the centre. When you land you will be given a couple of seconds to see the arena from a ground perspective before the screen will fade to black automatically and a cutscene begins. | You will start off in the Octostomp’s lair on a platform with a spawn point and a launcher straight ahead of you. This is simply a small, safe place to prepare for the fight ahead, so there isn't anything to do other than blast off to the main platform and start the fight. As your [[Inkling]] is in the air, the camera will give you a nice view of the whole arena you'll have to fight on. It's a large circle with a podium towards the back [[File:Octostomp Arena Highview.png|thumb|298px|Birdseye view of the arena]]and strong flood lights all aimed at the centre. When you land you will be given a couple of seconds to see the arena from a ground perspective before the screen will fade to black automatically and a cutscene begins. | ||
Revision as of 20:39, 19 July 2018
|
|
|
- This article is about the mission. For the character by the same name, see Octostomp. For the mission in Splatoon 2, see The Octostomp Returns.
The Mighty Octostomp! is the first boss mission in Splatoon's single-player mode, Octo Valley.
Octo Valley
The Mighty Octostomp's kettle can be found in the center of Octo Valley's Zone 1. It rests on a large, purple pillow, and does not need to be sprayed with ink to become visible.
Boss appearance
- Main article: Octostomp

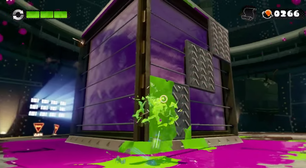
The Mighty Octostomp is a large cube, with four different layers to its face being the main base, another square which comes out slightly more, the main face area which sticks out more than the second layer, and the eyes and mouth which both stick out of the face. When on the ground face-first, the Octostomp’s face will flatten, but during combat it will have all four layers stick out; each more than the last.
It is mostly metal with a grey body. The Octostomp’s face is covered in purple ink, with its lips being a slightly darker purple and its eyes being green.
The Octostomp has two amusingly small legs with black socks, which are somehow able to make the massive body jump, although they aren't very useful for getting back onto its feet. Underneath it also has some hanging wires.
On the back of the Octostomp is a small circle filled with ink, where a tentacle can emerge. It can use this to steal Zapfish, but unfortunately also works as its weak point which the Inklings use to destroy it.
The Octostomp's sides and top are comprised of 9 different panels each, which the Inkling can use to get onto its back once the Octostomp is stuck on its face. However, as the battle continues the amount of panels will decrease, leaving empty gaps with electric currents coming out of them.
Walkthrough
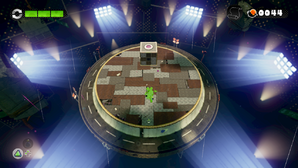
You will start off in the Octostomp’s lair on a platform with a spawn point and a launcher straight ahead of you. This is simply a small, safe place to prepare for the fight ahead, so there isn't anything to do other than blast off to the main platform and start the fight. As your Inkling is in the air, the camera will give you a nice view of the whole arena you'll have to fight on. It's a large circle with a podium towards the back

and strong flood lights all aimed at the centre. When you land you will be given a couple of seconds to see the arena from a ground perspective before the screen will fade to black automatically and a cutscene begins.
As the cutscene starts, you will see a Zapfish slowly float down towards the podium at the back, shortly before being grabbed by a tentacle hiding in some purple ink. The tentacle will then disappear into the podium along with the Zapfish. The camera then zooms out as the podium begins to spark electricity before a few lights flash on its side, and it jumps up to reveal a large, ink covered face which was flat on the ground, and you will realize it is The Mighty Octostomp. Its face then expands outwards, and its eyes and mouth move forward more than the rest of its face which was originally flat. The Octostomp lets out a loud cry and the battle commences.
Phase 1
You will be thrown straight into the action as the camera goes back behind your Inkling, and the large pink-faced cube ahead of you charges in your direction, leaving a trail of purple ink wherever it treads. Your first reaction it most likely to shoot it, but this won't actually do anything. The Octostomp will then try to quickly jump on you, so making use of your own ink to swim and avoid it is the best option here. As it lands on its face in a poor attempt to crush you, the Octostomp will spray its own ink around it, so be careful not to get stuck there and waste time.

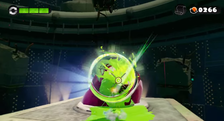
While it's stuck on its face, wiggling its little legs around pathetically, splat your ink up its side and use your squid form to get on top of it. Here you will find a large tentacle sticking out of its back; the same one that took the Zapfish, although it's nowhere to be seen. Shoot the tentacle with your ink and it will expand multiple times until it eventually explodes, spraying pink ink out of the Octostomp’s back like a fountain and forcing you to retreat automatically via Super Jump to a safe part of the arena. The Octostomp will then re-grow the tentacle in its back and jump into its feet before turning around, expanding its face, and pulling its face back in, causing some of the metal plates on its side fall off. Again, the Octostomp will let out a cry, this time removing all the ink on the ground and the fight continues.

Phase 2
Like before, shooting the Octostomp in the face will be ineffective, so wait for it to jump, avoid it, and aim to climb onto its back once it gets stuck. This time, however, there will be open gaps in its side since the metal plates fell off before. Now you will have to take a specific route upward, avoiding the electric currents coming from the gaps. The Octostomp will also get up more quickly now, leaving you less time to get to the top before it rolls back onto its feet. When you manage to climb up, shoot the tentacle until it explodes like before. Again, you will automatically Super Jump back to a safe area.
Phase 3
The third phase is just like the second, but the Octostomp will lose even more panels from its side, meaning you'll have to get across three diagonal squares to reach the top; the two on the sides moving up and down and the middle one staying in place. The Octostomp lets out a cry, the ink is removed, and the battle continues.
Once it's jumped onto its face again, the best way to traverse the side now is to cover all three panels in ink, go into squid form on the first panel and wait for it to be in-line with the middle panel before moving

onto it. Then wait until the third panel is in-line with the middle one, move onto that, swim onto its back to destroy the tentacle for the third time.
The Inkling will now Super Jump away again and the camera will go back to the Octostomp, showing it stuck on its face with its legs now spinning in a circle as it malfunctions. A light will emit from the creature as its legs speed up more before coming to a complete halt. The Mighty Octostomp will then explode, throwing ink everywhere and covering your screen. After the ink clears, you will be rewarded with 10 Power Eggs circling the Zapfish you were after right in front of you. Now the arena is completely covered in your ink , so you can easily swim around. Collect the Power Eggs and the Sunken Scroll, destroy the light bulb the Zapfish is stuck in and retrieve it. Mission complete.
Gallery
-
In-game map
-
Names in other languages
|

