{{OctoExpansionPrevNext|line1=J|prev1=Cool Your Jets Station|prevnum1=01|next1=Girl Power Station|nextnum1=03}}
{{OctoExpansionPrevNext|line1=J|prev1=Cool Your Jets Station|prevnum1=01|next1=Girl Power Station|nextnum1=03}}
{{InfoboxMission/OctoExpansion
{{Infobox/Mission/OctoExpansion
|subtitle = "Break it down!"
|subtitle = "Break it down!"
|mission = Match the shape!
|mission = Match the shape!
Line 15:
Line 15:
|rec = 1
|rec = 1
|music = ''[[4 dunno|#4 dunno]]''
|music = ''[[4 dunno|#4 dunno]]''
|image = Dm mJ02.jpg
|image = OE Deepsea Metro Matchmaster Station.jpg
|memcake = King Tank
|memcake = King Tank
}}
}}
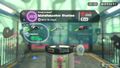
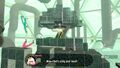
'''Matchmaster Station''' is a mission in the ''[[Octo Expansion]]''.
'''Matchmaster Station''' is a test in {{S2}}{{'s}} paid downloadable content, {{OE}}. This station is unlocked after clearing [[Cool Your Jets Station]] or [[Girl Power Station]].
==Gameplay==
==Access==
The player must clear either {{OctoExpansionStation|J|01}}{{OctoExpansionStation|H|07}} [[Cool Your Jets Station]] or {{OctoExpansionStation|J|03}}{{OctoExpansionStation|D|08}} [[Girl Power Station]] to access this test. The shortest way to access this station is to clear {{OctoExpansionStation|J|03}}{{OctoExpansionStation|D|08}} Girl Power Station.
==Walkthrough==
{{stub|Add table with checkpoints, enemies, other information.}}
=== Overview ===
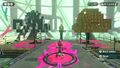
Players must carve a sculpture on the right to match a copy of the octopus-shaped sculpture on the left. Unlike {{OctoExpansionStation|F|07}}{{OctoExpansionStation|C|12}} [[Matchmaker Station]] where players must compare the two sculptures constantly, all the crates that need to be destroyed in this mission are item crates, while all the ones which should not be destroyed are normal crates. Despite this, the sculpture is very large and various [[Grapplink]]s are located throughout the structure to get around.
Players must carve a sculpture on the right to match a copy of the octopus-shaped sculpture on the left. Unlike {{OctoExpansionStation|F|07}}{{OctoExpansionStation|C|12}} [[Matchmaker Station]] where players must compare the two sculptures constantly, all the crates that need to be destroyed in this mission are item crates, while all the ones which should not be destroyed are normal crates. Despite this, the sculpture is very large and various [[Grapplink]]s are located throughout the structure to get around.
Line 27:
Line 32:
After successfully matching the sculptures, the top of the left sculpture will raise, revealing the goal.
After successfully matching the sculptures, the top of the left sculpture will raise, revealing the goal.
==Gallery==
=== Tips ===
==== Squeezer ====
Choosing the [[Squeezer]] allows to face the mission relatively faster than doing it with the other provided weapons. The single-tap fire mode provides a precise, long-ranged projectile that can destroy quickly and safely the target crates. This [[Shooter]]-class weapon doesn't lose accuracy while jumping, so the player can hit without risks further crates from below.
==== Splat Charger ====
Ink economy, decent aim and paying attention to the charge are necessary to beat this mission while using the [[Splat Charger]]. In fact, it cannot be used to its maximum potential, because a fully-charged projectile will penetrate through the crates and break both the target and the normal ones. To complete this mission properly, after choosing this weapon, the player must take advantage of the Splat Charger's range and precision and they have to be careful to not shoot a fully-charged shot: however, a three-quarters of charge can create a projectile that can one-shot a crate without touching the ones behind it, allowing to complete the mission faster (the player has to be careful, because the interval between the three-quarters and the maximum charge is very short). It's recommended to find the key for the second checkpoint and use it at least halfway. After taking the checkpoint, respawning from it restores the normal crates, previously ink-stained, to a non-damaged state.
==== Rapid Blaster Pro ====
The [[Rapid Blaster Pro]] is certainly the most risky choice. Despite having pretty long range and a precise aim, the explosiveness of the shots increases the chance to damage the normal crates, especially when they "surround" the target crates. Concentration, a perfect aim and damage awareness are a must to avoid a failure. Even aiming badly for Grapplinks can lead to a fatal mistake. The best strategy to adopt, in addition to keep calm, is to aim for the edges and for the angles of the boxes: doing this will weaken the blasts and minimize possible damage to the other crates. Doing this is easier at the top of the statue, when more crates have their angles exposed, and more difficult (but more necessary too) when facing the lower crates, which are enveloped within the tentacles of the statue.
The best way to face this mission is to destroy every crate on the top, because they are easier to destroy, and then to focus on the lower ones, trying to find the key for the checkpoint. After destroying more than half of the crates, it's recommended to reach the checkpoint to avoid restarting from the beginning (and to restore the crates if the player fails). Think about disabling motion controls for extra precision.
== Collectibles ==
=== Mem cake ===
[[File:S2 Mem Cake King Tank.png|center|100x100px]]
{{Quote|This swells a stir of royal pride.<br>In small or large, you lead the charge.<br>The ink of nobles flows inside.|[[Mem cake#Line J series (gear)|King Tank mem cake]]}}
Completing this test awards the player with the [[King Tank]] mem cake.
=== Mem medal ===
[[File:OE Icon Mem medal.png|center]]
<center>The player is awarded a [[mem medal]] from this station after completing {{OE}}.</center>
==Enemies and mechanics==
===Previously introduced===
<gallery>
<gallery>
File:OE J02 menu.jpg| The weapon selection screen.
Grapplink Splatoon 2.jpg|[[Grapplink]]
File:FirstcheckpointJ02.jpg|The first checkpoint.
Vault Render.jpg|[[Vault]] and [[Key]]
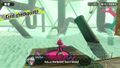
File:HalfwayJ02.jpg|Cap'n Cuttlefish dialogue indicating the half-way status.
File:SecondcheckpointJ02.jpg|The second checkpoint with Marina dialogue.
File:ExitJ02.jpg|The revealed [[goal]] with Pearl dialogue.
File:MemJ02.jpg|The [[Navy King Tank|King Tank]] Mem cake rewarded for completing the Matchmaster Station.
HalfwayJ02.jpg|[[Cap'n Cuttlefish]] dialogue indicating the half-way status.
SecondcheckpointJ02.jpg|The second checkpoint with [[Marina]] dialogue.
ExitJ02.jpg|The revealed [[goal]] with Pearl dialogue.
OE Matchmaster Station Mem Cake.jpg|Agent 8 being awarded the [[Navy King Tank|King Tank]] [[Mem cake|mem cake]] upon completing the station.
</gallery>
{{clr}}
==Trivia==
==Trivia==
* The subtitle might be a reference to a line in the song ''[[Wikipedia:U Can't Touch This|U Can't Touch This]]'', which is also referred to in {{OctoExpansionStation|I|04}} [[Can't Touch This Station]].
*Both the title and subtitle in the Spanish (NOA) translation are a reference to Pinky and The Brain, characters from the animated TV show Animaniacs
* There are slingshots floating around in the background of this station.
* There are slingshots floating around in the background of this station.
* When the player is using a [[launchpad]] to get to the center of the stage, the word <nowiki>''OCT''</nowiki> is visible under the [[crate]]s , this is likely a reference to the word {{OE}} or [[Octoling]].
==Names in other languages==
==Etymology==
{{todo|Add/complete Japanese, French (NoA and NoE), Italian and Spanish (NoE) translations}}
The subtitle, "Break it down!", is a reference to a line in the song 1990 ''[[Wikipedia:U Can't Touch This|U Can't Touch This]]'' by [[Wikipedia:MC Hammer|MC Hammer]]. This song is also referred to in {{OctoExpansionStation|I|04}} [[Can't Touch This Station]].
{{Foreignname
===Names in other languages===
|color=Splatoon 2
{{translation needed|Add/complete Japanese and French (NoA and NoE) translations.}}
{{Localized name
|color=Octo Expansion
|Jap=
|Jap=
|JapR=
|JapR=
|JapM=
|JapM=
|Dut=Een boom van een uitdaging<br>Niet te hard van stapel<br>Maak het voorbeeld na!
|Dut=Een boom van een uitdaging<br>Niet te hard van stapel<br>Maak het voorbeeld na!
|DutM=A tree of a challenge<ref group="note">Comes from ''"een boom van een vent"'', a Dutch expression meaning ''"a man that is very large"'', and ''"uitdaging"'' (challenge).</ref><br>Not too hard from stocks<ref group="note">Comes from ''"te hard van stapel lopen"'', a Dutch expression meaning ''"to do things immediately without a plan."'' It is a pun on ''"stapel"'' also meaning ''"stack"''.</ref><br>Copy the example!
|DutM=A tree of a challenge<ref group="note">Comes from ''"een boom van een vent"'', a Dutch expression meaning "a man that is very large", and ''"uitdaging"'' (challenge).</ref><br>Not too hard from stocks<ref group="note">Comes from ''"te hard van stapel lopen"'', a Dutch expression meaning "to do things immediately without a plan." It is a pun on ''"stapel"'' also meaning "stack".</ref><br>Copy the example!
|FreA=
|FreA=
|FreAM=
|FreAM=
Line 112:
Line 147:
|Ger=Was will der Künstler sagen?<br>Kunstmuseum<br>Baue die Vorgabe nach!
|Ger=Was will der Künstler sagen?<br>Kunstmuseum<br>Baue die Vorgabe nach!
|GerM=What does the artist want to say?<br>Art museum<br>Reconstruct to the specifications!
|GerM=What does the artist want to say?<br>Art museum<br>Reconstruct to the specifications!
|Ita=
|Ita=Capisci l'arte contemporanea?<br>Fiordo Fionda<br>Crea la stessa forma!
|ItaM=
|ItaM=Do you understand contemporary art?<br>Slingshot Fjord<ref group="note">The Italian name "''Fiordo Fionda''" plays on the assonance between "''Fiordo''" (fjord) and "''Fionda''" (slingshot). It is also a reference to the slingshots which float around the level.</ref><br>Create the same shape!
|RusM=...Real octarian quality!<br>Cthulhu-Sculpting<br>Copy the statue!
|RusM=...True Octarian quality!<br>Cthulhu-Sculpting Town Station<br>Copy the statue!
|SpaA=¿Qué vamos a hacer esta noche?<br>Pulpo y Cerebro<br>Crea una forma idéntica.
|SpaA=¿Qué vamos a hacer esta noche?<br>Pulpo y Cerebro<br>Crea una forma idéntica.
|SpaAM=What are we going to do tonight?<br>Octopus and the Brain<br>Create an identical shape
|SpaAM=What are we going to do tonight?<ref group="note" name="Pinky and the Brain">A reference to Pinky and the Brain, characters from the 1990s animated TV show ''[[Wikipedia:Animaniacs|Animaniacs]]''.</ref><br>Octopus and the Brain<ref group="note" name="Pinky and the Brain" /><br>Create an identical shape
|SpaE=
|SpaE=Visitas rompedoras<br>Arroyohermoso<br>Crea una forma idéntica.
|SpaEM=
|SpaEM=Breaking views<br>Beautifulcreek<br>Create an identical shape
The player must clear either J01H07Cool Your Jets Station or J03D08Girl Power Station to access this test. The shortest way to access this station is to clear J03D08 Girl Power Station.
You can help the wiki by adding to it. Reason: Add table with checkpoints, enemies, other information.
Overview
Players must carve a sculpture on the right to match a copy of the octopus-shaped sculpture on the left. Unlike F07C12Matchmaker Station where players must compare the two sculptures constantly, all the crates that need to be destroyed in this mission are item crates, while all the ones which should not be destroyed are normal crates. Despite this, the sculpture is very large and various Grapplinks are located throughout the structure to get around.
Various item crates contain ink refills. One crate, however, contains a key and using this key on the vault at the center of the map gives access to a single checkpoint which saves any progress made to the sculpture. If a player were to fail the mission, they would be reset to that point rather than having to restart from scratch.
After successfully matching the sculptures, the top of the left sculpture will raise, revealing the goal.
Tips
Squeezer
Choosing the Squeezer allows to face the mission relatively faster than doing it with the other provided weapons. The single-tap fire mode provides a precise, long-ranged projectile that can destroy quickly and safely the target crates. This Shooter-class weapon doesn't lose accuracy while jumping, so the player can hit without risks further crates from below.
Splat Charger
Ink economy, decent aim and paying attention to the charge are necessary to beat this mission while using the Splat Charger. In fact, it cannot be used to its maximum potential, because a fully-charged projectile will penetrate through the crates and break both the target and the normal ones. To complete this mission properly, after choosing this weapon, the player must take advantage of the Splat Charger's range and precision and they have to be careful to not shoot a fully-charged shot: however, a three-quarters of charge can create a projectile that can one-shot a crate without touching the ones behind it, allowing to complete the mission faster (the player has to be careful, because the interval between the three-quarters and the maximum charge is very short). It's recommended to find the key for the second checkpoint and use it at least halfway. After taking the checkpoint, respawning from it restores the normal crates, previously ink-stained, to a non-damaged state.
Rapid Blaster Pro
The Rapid Blaster Pro is certainly the most risky choice. Despite having pretty long range and a precise aim, the explosiveness of the shots increases the chance to damage the normal crates, especially when they "surround" the target crates. Concentration, a perfect aim and damage awareness are a must to avoid a failure. Even aiming badly for Grapplinks can lead to a fatal mistake. The best strategy to adopt, in addition to keep calm, is to aim for the edges and for the angles of the boxes: doing this will weaken the blasts and minimize possible damage to the other crates. Doing this is easier at the top of the statue, when more crates have their angles exposed, and more difficult (but more necessary too) when facing the lower crates, which are enveloped within the tentacles of the statue.
The best way to face this mission is to destroy every crate on the top, because they are easier to destroy, and then to focus on the lower ones, trying to find the key for the checkpoint. After destroying more than half of the crates, it's recommended to reach the checkpoint to avoid restarting from the beginning (and to restore the crates if the player fails). Think about disabling motion controls for extra precision.
Agent 8 being awarded the King Tankmem cake upon completing the station.
Trivia
There are slingshots floating around in the background of this station.
When the player is using a launchpad to get to the center of the stage, the word ''OCT'' is visible under the crates , this is likely a reference to the word Octo Expansion or Octoling.
...True Octarian quality! Cthulhu-Sculpting Town Station Copy the statue!
Spanish (NOA)
¿Qué vamos a hacer esta noche? Pulpo y Cerebro Crea una forma idéntica.
What are we going to do tonight?[note 4] Octopus and the Brain[note 4] Create an identical shape
Spanish (NOE)
Visitas rompedoras Arroyohermoso Crea una forma idéntica.
Breaking views Beautifulcreek Create an identical shape
Translation notes
↑Comes from "een boom van een vent", a Dutch expression meaning "a man that is very large", and "uitdaging" (challenge).
↑Comes from "te hard van stapel lopen", a Dutch expression meaning "to do things immediately without a plan." It is a pun on "stapel" also meaning "stack".
↑The Italian name "Fiordo Fionda" plays on the assonance between "Fiordo" (fjord) and "Fionda" (slingshot). It is also a reference to the slingshots which float around the level.
↑ 4.04.1A reference to Pinky and the Brain, characters from the 1990s animated TV show Animaniacs.


