Slimeskin Garrison: Difference between revisions
(Added loctations) |
|||
| (33 intermediate revisions by 22 users not shown) | |||
| Line 1: | Line 1: | ||
[[File:Slimeskin Garrison overview.jpg||320px|thumb|Slimeskin Garrison]] | |||
'''Slimeskin Garrison''' is the fourth sector of [[Octo Canyon (mode)|Octo Canyon]] of ''[[Splatoon 2]]''. The area holds 5 [[Kettle]]s and one boss kettle. | |||
'''Slimeskin Garrison''' is the fourth sector of [[Octo Canyon (mode)|Octo Canyon]] of | |||
==Missions== | ==Missions== | ||
* Mission #16: [[ | * Mission #16: [[Secret Bowling Alley]] | ||
** '''Location''': From the section's starting point head to the left where there is a Bounce Pad and use the Inkfurler to reach the platform on top, where the kettle resides. | ** '''Location''': From the section's starting point head to the left where there is a Bounce Pad and use the Inkfurler to reach the platform on top, where the kettle resides. | ||
[[File:Octo Canyon Level 16 location.jpg|320px|thumb|left|Kettle location]] | |||
{{clr}} | |||
* Mission #17: [[ | * Mission #17: [[Octocommander Fortress]] | ||
** '''Location''': From the section's starting point head to the right where there are two Bounce Pads and use them to reach the platform on top, where the kettle resides. | ** '''Location''': From the section's starting point head to the right where there are two Bounce Pads and use them to reach the platform on top, where the kettle resides. | ||
[[File:Octo Canyon Level 17 location.jpg|320px|thumb|left|Kettle location]] | |||
{{clr}} | |||
* Mission #18: [[ | * Mission #18: [[Towering Heights]] | ||
** '''Location''': From the section's starting point head down to the middle lower area and take the Gusher to the left to reach the platform with two Inkfurlers. Take the one in front, which leads to another Inkfurler going to the side that reaches a platform. Climb up to the upper platform to reach the kettle. | ** '''Location''': From the section's starting point head down to the middle lower area and take the Gusher to the left to reach the platform with two Inkfurlers. Take the one in front, which leads to another Inkfurler going to the side that reaches a platform. Climb up to the upper platform to reach the kettle. | ||
[[File:Octo Canyon Level 18 location.jpg|320px|thumb|left|Kettle location]] | |||
{{clr}} | |||
* Mission #19: [[The Experimentorium]] | * Mission #19: [[The Experimentorium]] | ||
** '''Location''': From the section's starting point head down to the middle lower area and go to the right wall to reach the platform with two Inkfurlers. Ink the one to the left that leads to another wall and climb on top. There, use the two Bounce Pads to reach the upper platform that's otherwise blocked off with small walls, where the kettle can be found. | ** '''Location''': From the section's starting point head down to the middle lower area and go to the right wall to reach the platform with two Inkfurlers. Ink the one to the left that leads to another wall and climb on top. There, use the two Bounce Pads to reach the upper platform that's otherwise blocked off with small walls, where the kettle can be found. | ||
[[File:Octo Canyon Level 19 location.jpg|320px|thumb|left|Kettle location]] | |||
{{clr}} | |||
* Mission #20: [[Propellerland]] | * Mission #20: [[Propellerland]] | ||
** '''Location''': From the section's starting point head down to the middle lower area and continue forward, where there are some crates blocking off a wall. Destroy these crates to climb up and go to the side with the Bounce Pads. Navigate these series of Bounce Pads to reach the lower platform where the kettle resides. | ** '''Location''': From the section's starting point head down to the middle lower area and continue forward, where there are some crates blocking off a wall. Destroy these crates to climb up and go to the side with the Bounce Pads. Navigate these series of Bounce Pads to reach the lower platform where the kettle resides. | ||
[[File:Octo Canyon Level 20 location.jpg|320px|thumb|left|Kettle location]] | |||
{{clr}} | |||
* Mission #21: [[Octolings Ahoy!]] | * Mission #21: [[Octolings Ahoy!]] | ||
** '''Location''': From the section's starting point head down to the middle lower area and continue forward, where there are some crates blocking off a wall. Destroy these crates to climb up and go to the side with the Inkfurler. There, destroy the next set of crates that block the path, where the kettle can be found at the end. | ** '''Location''': From the section's starting point head down to the middle lower area and continue forward, where there are some crates blocking off a wall. Destroy these crates to climb up and go to the side with the Inkfurler. There, destroy the next set of crates that block the path, where the kettle can be found at the end. | ||
[[File:Octo Canyon Level 21 location.jpg|320px|thumb|left|Kettle location]] | |||
{{clr}} | |||
* Mission 4B: [[ | * Mission 4B: [[Sanitizarium]] | ||
** '''Location''': From the section's starting point head down to the middle lower area and go to the right wall to reach the platform with two Inkfurlers. Ink the one to the left that leads to another wall and climb on top. There, take the path to the right and use the dash track to reach the boss kettle. | ** '''Location''': From the section's starting point head down to the middle lower area and go to the right wall to reach the platform with two Inkfurlers. Ink the one to the left that leads to another wall and climb on top. There, take the path to the right and use the dash track to reach the boss kettle. | ||
==Collectables== | ==Collectables== | ||
===[[Sardinium]]=== | ===[[Sardinium]]=== | ||
From the section's starting point head down to the middle lower area and take the Gusher to the left to reach the platform with two Inkfurlers. Ink the one to the left and get to its end, where another Inkfurler can be spotted close by. Ink and jump to the other Inkfurler to reach a grated platform with some crates, where the | From the section's starting point head down to the middle lower area and take the Gusher to the left to reach the platform with two Inkfurlers. Ink the one to the left and get to its end, where another Inkfurler can be spotted close by. Ink and jump to the other Inkfurler to reach a grated platform with some crates, where the Sardinium is inside the orange one. | ||
[[file:SardiniumBoxx.png|320px|thumb|left|Sardinium Location]] | |||
{{clr}} | |||
===[[Sunken Scroll]]=== | === [[Sunken Scroll]] === | ||
From the section's starting point head down to the middle lower area and continue forward, where there are some crates blocking off a wall. Destroy these crates to climb up and go to the left where a green | [[File:S2 Sunken Scroll Sticker Slimeskin Garrison.png|thumb|right|100px|The sticker awarded for popping the balloons.]] | ||
From the section's starting point head down to the middle lower area and continue forward, where there are some crates blocking off a wall. Destroy these crates to climb up and go to the left where a green balloon can be found. Pop all the green balloons to reveal the Sunken Scroll. The next one appears to the right above a Bounce Pad, and the third set spawn close to the Inkfurler near the Bounce Pad. The fourth set of three balloons appear across the platform to the right with two Inkfurlers. After popping these, one ballon will spawn under the platform connected to the section's starting point. Take the Gusher close by to reach the sixth set of two balloons that hover around the Inkfurlers. The last green balloon will appear on the tall platform to the right that holds Mission 18, where the Sunken Scroll will land on the small grate. Take the Inkfurler that reaches this tall platform, ink the side wall with the grating and jump from the Inkfurler to climb the wall to reach the Sunken Scroll. | |||
{{More images}} | |||
{{ | ==Quotes== | ||
==={{flag|nl}} Dutch=== | |||
{{collapse| | |||
====[[File:OC Icon Marie.png|45px]] Marie's Quotes==== | |||
{{Clr}} | |||
| | |||
''For the general quotes, see [[Tentakeel Outpost]].'' | |||
<!--Talk_Free_400-->{{Quote|''"Je wordt al een ervaren Octarianenklopper, agent 4."''<br>(You are already becoming an experienced Octarian beater, Agent 4.)}} | |||
<!--Talk_Free_401-->{{Quote|''"En, agent 4, heb je al een favoriet wapen?"''<br>(Well, Agent 4, do you already have a favorite weapon?)}} | |||
<!--Talk_Free_402-->{{Quote|''"O jee... Ik ben zoveel repetities aan het missen..."''<br>(Oh dear... I am missing so many rehearsals...)}} | |||
<!--Talk_Free_403-->{{Quote|''"Ik weet zeker dat we waarschijnlijk dichter bij de Megavoltvis komen. Zou kunnen, toch?"''<br>(I am sure we are probably getting closer to the Great Zapfish. Could be, right?)}} | |||
<!--Talk_Free_404-->{{Quote|''"Hé, kijk me niet zo aan. Heb ik soms spinazie tussen m'n tanden?"''<br>(Hey, don't look at me like that. Do I happen to have spinach between my teeth?)}} | |||
<!--Talk_W4Guide_100-->{{Quote|''"O, een kaart van de zone... Dat is handig."''<br>(Oh, a map of the zone... That is handy.)}} | |||
<!--Talk_W4Guide_200-->{{Quote|''""Verboden toegang voor Inklings." Uh... dat hadden we al begrepen..."''<br>("Forbidden access for Inklings." Uh... we already understood that...)}} | |||
<!--Talk_W4Guide_300-->{{Quote|''"Hé, een klimmuur. Doet me denken aan Vinvis Fitness."''<br>(Hey, a climbing wall. That makes me think of Musselforge Fitness.)}} | |||
<!--Talk_W4Guide_900-->{{Quote|''"Volgens mij is dit de Zeekatkazerne."''<br>(I believe this is the Slimeskin Garrison.)}} | |||
<!--Talk_Uza_400-->{{Quote|''"{{color|(Zouden al die inkttoeters betekenen dat Octarianen... feestvissen zijn?)|grey}}"''<br>({{color|(Would all those Inkfurlers mean that Octarians are... party fish?)|grey}})}} | |||
<!--Talk_Uza_401-->{{Quote|''"{{color|(O nee! Ben ik vergeten de deur van het Kraakkot op slot te doen?!|grey}}''{{sic}}<ref group="notes">Missing parenthesis</ref>''"''<br>({{color|(Oh no! Did I forget to lock the door of the Cuttlefish Cabin?)|grey}})}} | |||
<!--Talk_Uza_402-->{{Quote|''"{{color|(Het lukt me gewoon niet om een gesprek in stand te houden met iemand anders dan Callie...)|grey}}"''<br>({{color|(I just can't manage to keep up a conversation with anyone other than Callie...)|grey}})}} | |||
}} | |||
==Trivia== | |||
*It is revealed in [[Marina's chat room]] that [[Marina]] enrolled in an elementary training program for the [[Octarian]] military at Slimeskin Garrison. | |||
==Names in other languages== | ==Names in other languages== | ||
{{ | {{translation needed|Add French (NOE). Complete Japanese and Spanish translations}} | ||
{{Localized name | |||
|color=Splatoon 2 | |color=Splatoon 2 | ||
|Jap= | |Jap=ツケネ訓練所 | ||
|JapR= | |JapR=Tsukene Kunrenjo | ||
|JapM= | |JapM= | ||
|Dut= | |Dut=Zeekatkazerne | ||
|DutM= | |DutM=Cuttlefish barracks | ||
|FreA=Garnison Siphon | |||
|FreAM=Siphon Garrison | |||
|FreE= | |FreE= | ||
|FreEM= | |FreEM= | ||
|Ger= | |Ger=Glibber-Garnison | ||
|GerM= | |GerM=Goo Garrison | ||
|Ita= | |Ita=Presidio Mollusco | ||
|ItaM= | |ItaM=Mollusk Garrison | ||
|Rus= | |Rus=Лагерь «Мантия» | ||
|RusR= | |RusR=Lager' «Mantiya» | ||
|RusM= | |RusM=Camp «Mantle» | ||
|SpaE= | |SpaA=Baluarte Manto | ||
|SpaAM= | |||
|SpaE=Pabellón Manto | |||
|SpaEM= | |SpaEM= | ||
}} | }} | ||
==Notes== | |||
{{Note list}} | |||
{{Navbox/S2 Locations}} | |||
{{Navbox/Octo Canyon}} | |||
[[Category:Octo Canyon]] | [[Category:Octo Canyon]] | ||
[[Category: | [[Category:Splatoon 2 locations]] | ||
Latest revision as of 21:38, 3 February 2024

Slimeskin Garrison is the fourth sector of Octo Canyon of Splatoon 2. The area holds 5 Kettles and one boss kettle.
Missions
- Mission #16: Secret Bowling Alley
- Location: From the section's starting point head to the left where there is a Bounce Pad and use the Inkfurler to reach the platform on top, where the kettle resides.
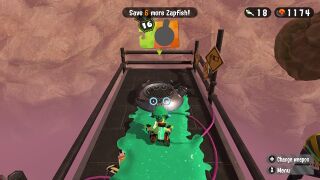
- Mission #17: Octocommander Fortress
- Location: From the section's starting point head to the right where there are two Bounce Pads and use them to reach the platform on top, where the kettle resides.
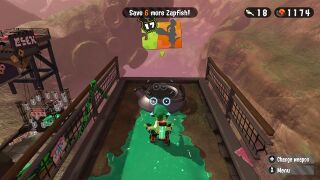
- Mission #18: Towering Heights
- Location: From the section's starting point head down to the middle lower area and take the Gusher to the left to reach the platform with two Inkfurlers. Take the one in front, which leads to another Inkfurler going to the side that reaches a platform. Climb up to the upper platform to reach the kettle.
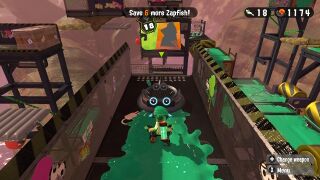
- Mission #19: The Experimentorium
- Location: From the section's starting point head down to the middle lower area and go to the right wall to reach the platform with two Inkfurlers. Ink the one to the left that leads to another wall and climb on top. There, use the two Bounce Pads to reach the upper platform that's otherwise blocked off with small walls, where the kettle can be found.
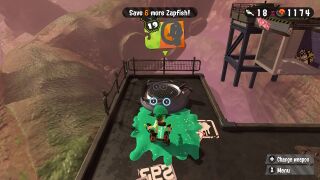
- Mission #20: Propellerland
- Location: From the section's starting point head down to the middle lower area and continue forward, where there are some crates blocking off a wall. Destroy these crates to climb up and go to the side with the Bounce Pads. Navigate these series of Bounce Pads to reach the lower platform where the kettle resides.
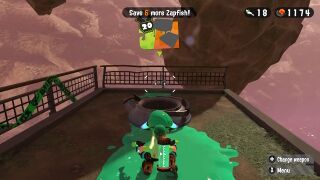
- Mission #21: Octolings Ahoy!
- Location: From the section's starting point head down to the middle lower area and continue forward, where there are some crates blocking off a wall. Destroy these crates to climb up and go to the side with the Inkfurler. There, destroy the next set of crates that block the path, where the kettle can be found at the end.
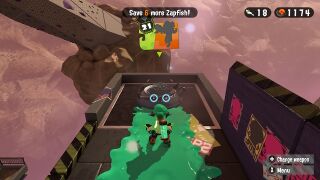
- Mission 4B: Sanitizarium
- Location: From the section's starting point head down to the middle lower area and go to the right wall to reach the platform with two Inkfurlers. Ink the one to the left that leads to another wall and climb on top. There, take the path to the right and use the dash track to reach the boss kettle.
Collectables
Sardinium
From the section's starting point head down to the middle lower area and take the Gusher to the left to reach the platform with two Inkfurlers. Ink the one to the left and get to its end, where another Inkfurler can be spotted close by. Ink and jump to the other Inkfurler to reach a grated platform with some crates, where the Sardinium is inside the orange one.
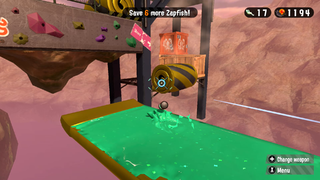
Sunken Scroll
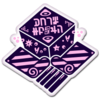
From the section's starting point head down to the middle lower area and continue forward, where there are some crates blocking off a wall. Destroy these crates to climb up and go to the left where a green balloon can be found. Pop all the green balloons to reveal the Sunken Scroll. The next one appears to the right above a Bounce Pad, and the third set spawn close to the Inkfurler near the Bounce Pad. The fourth set of three balloons appear across the platform to the right with two Inkfurlers. After popping these, one ballon will spawn under the platform connected to the section's starting point. Take the Gusher close by to reach the sixth set of two balloons that hover around the Inkfurlers. The last green balloon will appear on the tall platform to the right that holds Mission 18, where the Sunken Scroll will land on the small grate. Take the Inkfurler that reaches this tall platform, ink the side wall with the grating and jump from the Inkfurler to climb the wall to reach the Sunken Scroll.

Quotes
 Dutch
Dutch
 Marie's Quotes
For the general quotes, see Tentakeel Outpost.
| “ | "Je wordt al een ervaren Octarianenklopper, agent 4." (You are already becoming an experienced Octarian beater, Agent 4.) |
” |
| “ | "En, agent 4, heb je al een favoriet wapen?" (Well, Agent 4, do you already have a favorite weapon?) |
” |
| “ | "O jee... Ik ben zoveel repetities aan het missen..." (Oh dear... I am missing so many rehearsals...) |
” |
| “ | "Ik weet zeker dat we waarschijnlijk dichter bij de Megavoltvis komen. Zou kunnen, toch?" (I am sure we are probably getting closer to the Great Zapfish. Could be, right?) |
” |
| “ | "Hé, kijk me niet zo aan. Heb ik soms spinazie tussen m'n tanden?" (Hey, don't look at me like that. Do I happen to have spinach between my teeth?) |
” |
| “ | "O, een kaart van de zone... Dat is handig." (Oh, a map of the zone... That is handy.) |
” |
| “ | ""Verboden toegang voor Inklings." Uh... dat hadden we al begrepen..." ("Forbidden access for Inklings." Uh... we already understood that...) |
” |
| “ | "Hé, een klimmuur. Doet me denken aan Vinvis Fitness." (Hey, a climbing wall. That makes me think of Musselforge Fitness.) |
” |
| “ | "Volgens mij is dit de Zeekatkazerne." (I believe this is the Slimeskin Garrison.) |
” |
| “ | "(Zouden al die inkttoeters betekenen dat Octarianen... feestvissen zijn?)" ((Would all those Inkfurlers mean that Octarians are... party fish?)) |
” |
| “ | "(O nee! Ben ik vergeten de deur van het Kraakkot op slot te doen?![sic][a]" ((Oh no! Did I forget to lock the door of the Cuttlefish Cabin?)) |
” |
| “ | "(Het lukt me gewoon niet om een gesprek in stand te houden met iemand anders dan Callie...)" ((I just can't manage to keep up a conversation with anyone other than Callie...)) |
” |
Trivia
- It is revealed in Marina's chat room that Marina enrolled in an elementary training program for the Octarian military at Slimeskin Garrison.
Names in other languages
| Language | Name | Meaning |
|---|---|---|
| ツケネ訓練所 Tsukene Kunrenjo |
||
| Zeekatkazerne | Cuttlefish barracks | |
| Garnison Siphon | Siphon Garrison | |
| Glibber-Garnison | Goo Garrison | |
| Presidio Mollusco | Mollusk Garrison | |
| Лагерь «Мантия» Lager' «Mantiya» |
Camp «Mantle» | |
| Baluarte Manto | ||
| Pabellón Manto |
Notes
- ↑ Missing parenthesis
Octo Canyon missions
| ||||||||||
|
