Slammin' Lid

Slammin' Lids are Boss Salmonids that appear in Salmon Run Next Wave in Splatoon 3.
Description
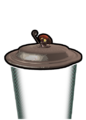
The Slammin' Lid is a flying saucer-shaped aircraft that floats through the air, piloted by a Salmonid in its top center. It creates a force field beneath it similar to the Big Bubbler that protects Salmonids. It also deploys Lesser Salmonids from its underside. It attacks by slamming into the ground when a player passes underneath it, but it takes a moment to fly back upwards after attacking, giving the player an opportunity to get on top of it and splat its pilot. If there is high ground available, the pilot can be attacked directly as well. The pilot is equipped with a soup ladle, which it uses to perform a 360-degree swipe to hit players off its saucer if they stand atop it for too long.
The Slammin' Lid is one of the few Salmonids that can splat other Salmonids, including most Boss Salmonids. When it slams onto a Salmonid, the player who triggered the slam gets the Power Eggs from the splats. This can be used to take down certain foes instantaneously, meaning that it is not always a good idea to neutralize the Slammin' Lid right away.
While deploying the Lesser Salmonids, the Slammin' Lid has an animation of the perforated doors on the underside of the machine opening. This can be viewed in-game when looking at the bottom of the Boss Salmonid while it is dropping the lesser Salmonids.
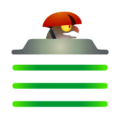
The Slammin' Lid drivers also have a peculiar appearance. The dark red top is often labeled as a hatch, but this is in fact the hairstyle of the driver Salmonid. The real hatch is visible behind the driver when standing on the Slammin' Lid. This is probably the reason why the driver is still vulnerable despite seemingly having a headpiece that would be able to protect it.

Quotes
The following text is quoted from the Salmonid Field Guide.[1]
Basic Information
- It's a pilot riding on a hovering, saucer-shaped craft.
- These provide support for other Salmonids by creating a circular force field that ink cannot pass through.
Attack Behavior
- Lesser Salmonids will be deployed from the hole on the bottom of the saucer.
- It will try to squash targets who walk into the force field.
Elimination
- There is a pilot stationed on top of the craft. Defeating the pilot will destroy the craft.
- Walk into the barrier under the Slammin' Lid, then quickly dodge when the craft drops down to splat you. Once it's down, that's your chance to get on top and attack the pilot.
Supporting Information
- The cutting-edge technology incorporated into the craft was obtained by trading with Octarians.
- Because of the high cost to build these, only highly experienced veterans are allowed to pilot them.
- To save on weight, the craft has no weapons. This is why it attacks by trying to smash enemies beneath it.
Statistics
- See also: Salmon Run Next Wave data
Tips
- Slammin' Lids can splat almost any Salmonid, including Boss Salmonids.
- Bringing down a Slammin' Lid on a Steelhead causes a large explosion, wiping out any Lesser Salmonids in the area.
- If a Slammin' Lid is stationed above a chokepoint, such as the right side path on Sockeye Station, it may be wiser to keep it alive for its boss splatting capability. This is especially effective against Steelheads, Steel Eels, Scrappers, Goldies, and even Flyfish if they happen to be under it. This is less effective on high tide, as generally fewer chokepoints are present.
- However, avoid keeping a Slammin' Lid alive for too long as the it will spawn lesser Salmonids that will make the stage more crowded.
- Players can walk and push against the pilot during its ladle swing attack to cancel most of the momentum from being hit and stay on the lid. The pilot repeatedly uses the ladle swing at set intervals until all players are knocked off or the Slammin' Lid is shot down.
- A player can stay above the ground by jumping between two or more Slammin' Lids.
- Getting on top of a Slammin' Lid can be useful for the increase in height. Instead of immediately splatting the boss, the extra range can allow the player to revive teammates more easily or splat certain bosses such as Flyfish or Fish Sticks. Note that the Slammin' Lid will knock the player off automatically after a few seconds.
- The high ground provided by elevated areas or even the platforms left behind by Fish Sticks can be used to splat the Slammin' Lid when its force field is surrounded by other Salmonids or it is simply too dangerous to approach the Slammin' Lid. This prevents players from becoming overwhelmed by swarms of Lesser Salmonids and allows them to deal major damage to all Salmonids below the Slammin' Lid.
- Certain weapons, such as Blasters and Splat Bombs, can also be used to deal chip damage to the Slammin' Lid if it is impossible to get above its location and impossible to safely approach it.
Badges
- Main article: Badge#Salmon Run
Splatting Slammin' Lids a specific number of times in Salmon Run: Next Wave will reward the player with special badges that they can use on their Splashtag.
| Slammin' Lid Badges | ||
|---|---|---|
| Slammin' Lid Splats x 100 | ||
| Slammin' Lid Splats x 1,000 | ||
| Slammin' Lid Splats x 10,000 | ||
Gallery

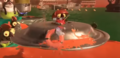
-
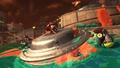
A Slammin' Lid after slamming down
-
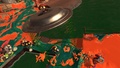
A Slammin' Lid levitating on Sockeye Station
-
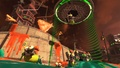
A Slammin' Lid summoning several Lesser Salmonids
-
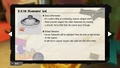
The Salmonid Field Guide entry for the Slammin' Lid.
-
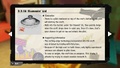
The Salmonid Field Guide entry for the Slammin' Lid.
-
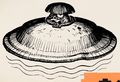
The illustration in the field guide.
-

A Slammin' Lid in-game.
-
A Slammin' Lid generating a shield below it in a cylinder.
-
A player jumping onto a post-slam Slammin' Lid.
-
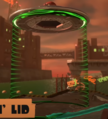
The Slammin' Lid's icon.
-
-
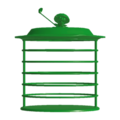
The Slammin' Lid locker decoration.


Trivia
- Prior to version 2.0.0, if players managed to stay on the Slammin' Lid after the pilot tries to hit them off with the ladle, the second swing would go through the players as if it had no hitbox. From then on, subsequent swings would alternate between hitting and not hitting the players.
- The Slammin' Lid's crushing behavior is similar to that of the Octoseeker.
- The Slammin' Lid is the only Boss Salmonid and one of the two Salmonid species as a whole along with Megalodontia that can deliberately damage other Salmonids.
- While the Steelhead's explosion also does damage other Salmonids, it is a side effect of being defeated by a player.
- The Slammin' Lid is the only Boss Salmonid not exclusive to a Known Occurrence which can spawn other Salmonids.
Etymology
Slammin' Lid is a pun on "Salmonid". Additionally, the saucer resembles a pot's lid and slams down on players beneath it.
Names in other languages
| Language | Name | Meaning |
|---|---|---|
| ナベブタ nabe-buta |
From 鍋 nabe ("pot") and 蓋 futa ("lid") | |
| Dreksel | From drek ("goo") and deksel ("lid") | |
| Couverclard | From Couvercle ("lid") and the suffix -ard implying a negative connotation | |
| Deckler | From Deckel ("lid") | |
| Coperchiotto | From coperchio ("lid") | |
| Мокрышка Mokryshka |
From мокрый mokryy ("wet") and крышка kryshka ("lid") | |
| Tapaollas | From tapa ("lid") and ollas ("pots") | |
| 锅盖鱼 guō gài yú (Mandarin) |
Pot Lid Fish | |
| 鍋蓋魚 guō gài yú (Mandarin) |
Pot Lid Fish | |
| 냄비 뚜껑 naembi ttukkeong |
Pot Lid | |
| SakeSaucer [2] |
