Shifty Station: Difference between revisions
m (`) |
(→Trivia) |
||
| Line 564: | Line 564: | ||
** As Marina mentions often in the news segments, she was raised around [[Octarian]] machinery, which would explain why many of the Shifty Station variants contain at least one of the [[Octo Valley]] / [[Octo Canyon]] [[Mechanics|stage gimmicks]]. | ** As Marina mentions often in the news segments, she was raised around [[Octarian]] machinery, which would explain why many of the Shifty Station variants contain at least one of the [[Octo Valley]] / [[Octo Canyon]] [[Mechanics|stage gimmicks]]. | ||
*The stage seems to be set somewhere in one of [[Octo Canyon]]'s domes or [[Deepsea Metro]], as can be deduced by the decorations scattered throughout the stage types as well as the floating objects in the background. | *The stage seems to be set somewhere in one of [[Octo Canyon]]'s domes or [[Deepsea Metro]], as can be deduced by the decorations scattered throughout the stage types as well as the floating objects in the background. | ||
* Not all Shifty Stations actually shift. Layouts 3, 7 and 9 are static, and 10, 11 and | * Not all Shifty Stations actually shift. Layouts 3, 7 and 9 are static, and 10, 11, 12 and 13 only move when interacted with. | ||
* [[Shifty Station#Layout_3|Layout 3]] has been used for the most Splatfests, with a grand total of 5. | * [[Shifty Station#Layout_3|Layout 3]] has been used for the most Splatfests, with a grand total of 5. | ||
* The internal codename for this stage in the game files is "Deli". | * The internal codename for this stage in the game files is "Deli". | ||
Revision as of 11:54, 26 August 2018

| Added in | 4 August 2017 |
| Features | Variable layout |
-Marina
| ||||
-Pearl
|
Shifty Station is a multiplayer stage in Splatoon 2. It is only available during Splatfests and has a variable layout. The layout does not change over the course of a single Splatfest.
| Layout | Introduced | Total BP | Features | Accessible enemy spawn platform? |
|---|---|---|---|---|
| 1 | 4 August 2017 | 2,011p | Moving platforms | Template:Na |
| 2 | 1 September 2017 | 1,885p | Moving platforms | Template:Na |
| 3 | 9 September 2017 | 1,900p | Inkrails, sponges | Template:Na |
| 4 | 13 October 2017 | 2,061p | Rotating platforms | Template:Ya |
| 5 | 9 December 2017 | 2,455p | Spinning spreaders | Template:Ya |
| 6 | 13 January 2018 | 2,027p | Invisible platforms, a moving platform, and Squee-Gs | Template:Na |
| 7 | 3 February 2018 | 2,390p | Ink Cannons | Template:Ya |
| 8 | 3 March 2018 | 2,770p | Containtment areas, launchpads | Template:Na |
| 9 | 24 March 2018 | 2,199p | Grapplinks | Template:Ya |
| 10 | 21 April 2018 | 2,185p | Ink Switches | Template:Ya |
| 11 | 18 May 2018 | 2,300p | Weight-sensitive platforms, sponges | Template:Ya |
| 12 | 21 July 2018 | 2,593p | Breakable tentacles, opening gates, sponges | Template:Na |
| 13 | 18 August 2018 | 2,362p | Splat-Switchs, sponges | Template:Na |
Version history
| Version | Adjustments |
|---|---|
| 2.2.0 |
|
| 2.3.0 |
|
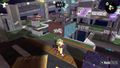
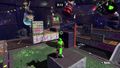
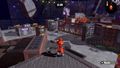
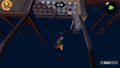
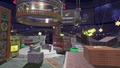
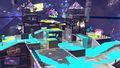
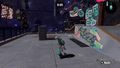
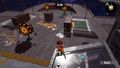
Layout 1

Description
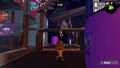
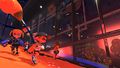
Players spawn on either end of the stage, on raised platforms that lead down to sequentially shorter platforms connected by ramps. To the right is a large open area, and straight ahead is a small passage connecting the two halves of the map. In the gaps between each half of the map are two medium-sized platforms that periodically move side-to-side.
Total BP: 2,011p
Splatfests


 Mayo vs.
  Ketchup on 4 August 2017
Gallery
-
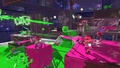
Promo image.
-
Another promo image.
-
A frontal view of the map, seen from a spawn point.
-
The large area right of the spawn point, looking towards the spawn.
-
In front of the spawn point, looking toward the center of the stage.


-
Animation of the moving platforms (link to file)
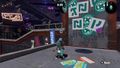
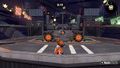
Layout 2


Description
Players spawn on either end of the stage, on raised platforms that lead down to to a central area. There are two small raised platforms on either side of the central area that periodically move up and down, and a large platform topped with a small inkable block in the middle that moves opposite the side platforms. Various walls are placed about the level to use as cover.
When this layout was re-used in May 2018, the small inkable block on the middle platform was removed, some walls were repositioned at the canyon of the spawn point and the tall wall near the spawn points became inkable on one side and significantly shorter, while the rest of the layout was identical to the original incarnation.
Total BP: 1,885p
Splatfests
-
 Flight vs.
  Invisibility on 1 September 2017
 -
 With Lemon vs.
  Without Lemon on 11 November 2017
 -
 Raph vs.
  Leo on 5 May 2018
Gallery
-
Promo image.
-
A frontal view of the map, seen from a spawn point.
-
The rightmost corner of the stage, looking towards the center.
-
The center platform, looking towards the spawn point.
-

Team Raph on Shifty Station.


-
Animation of the moving platforms (link to file)
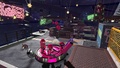
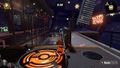
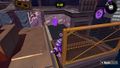
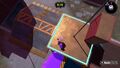
Layout 3


Description
Players spawn on either end of the stage, on raised platforms that lead down to to a central area. To the right, there is a raised platform that is accessible via sponge. To the left, there is an ink rail on an isolated platform that the player can jump to in squid form. Towards the center of the stage are two more ink rails, which can be used to get on their corresponding platforms. Sponges, walls, and crates in the center area can be used for cover.
When this layout was re-used in May 2018, more sponges were added to allow greater movement to key areas. For example, a sponge was added alongside the left side ink rail platform to allow a route to the inkrail that doesn't involve jumping. Some sponges had their sizes changed, as the centre sponges allowed to get on both towers, and the sponge near the right Inkrail was made into a cube. Also, the crates centrally placed in the platform just below spawn were rotated 90 degrees clockwise.
Total BP: 1,900p
Splatfests
-
 Fries vs.
  McNuggets on 9 September 2017
 -
 Front Roll vs.
  Back Roll on 7 October 2017
 -
 Sci-Fi vs.
  Fantasy on 18 November 2017
 -
 Mikey vs.
  Donnie on 11 May 2018
 -
 Hello Kitty vs.
  Cinnamoroll on 19 May 2018
Gallery
-
Promo image.
-
Image showing changes.

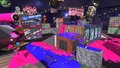
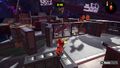
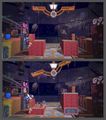
Layout 4


Description
Players spawn on either end of the stage, on raised platforms that lead down to to a central area. Each side has rotating platform that the walls of it can be covered to climb on it and not fall to the abyss. At the center, There's a big wall and 2 uncoverable rotating platforms, and only can be crossed to the other side by going through the rotating platforms.
When this stage was re-used during the Sanrio Splatfest tournament, the central revolving doors were skewed with the left one (per player point of view) moved closer to the spawn. The middle has also been opened up, allowing free movement from one side to the other. The right side of the spawn point has also been expanded.
Total BP: 2,061p
Splatfests
-
 Vampire vs.
  Werewolf on 13 October 2017
 - File:S2 Splatfest Icon Agility.png Agility vs. File:S2 Splatfest Icon Endurance.png Endurance on 14 October 2017
- File:S2 Splatfest Icon Warm.png Warm vs. File:S2 Splatfest Icon Cold.png Cold on 4 November 2017
-
 My Melody vs.
  Pompompurin on 26 May 2018
Gallery
-
Promo image.
-
A frontal view of the map, seen from a spawn point.
-
To the right of the spawn point, looking towards the center.
-
To the left of the spawn point, looking towards the center.
-
Image showing changes.


-
Animation of the moving platforms. (link to file)
Layout 5

Description
Players spawn on either end of the stage, on raised platforms that lead down to to a central area. Each side has uninkable ramp near spawn and spinning spreader with their ink color. At the right side of each spawn point there's an area to paint and an uninkable spinning spreader on the wall that leads to bigger platform. At the left side of each spawn point there's long paths that lead to the center where's there's platform with a wall and a box on the left. At the center, there's a large spinning spreader with each team's colors that can be climbed on that stops spinning at the 15 seconds left mark.
Total BP: 2,455p
Splatfests
- File:S2 Splatfest Icon Warm Inner Wear.png Warm Inner Wear vs. File:S2 Splatfest Icon Warm Outer Wear.png Warm Outer Wear on 9 December 2017
-
 Film vs.
  Book on 9 December 2017
 -
 Sweater vs.
  Sock on 15 December 2017
Gallery
-
Promo image.
-
Another promo image.
-
Spawn Point.
-
Middle with the large spinning spreader.
-
Right side of each spawn.


-
Animation of the moving platforms (link to file)
Layout 6

Description
The spawn point for each team is on a raised invisible platform which ramps down to a wider open area. These areas connect via more invisible inclines to a central area dominated by a platform that rises and sinks back into the floor periodically. This platform's walls are also invisible, and each time it sinks into the floor all ink on the walls disappears. To the sides of the central area are two smaller "courtyards", in the middle of each of them is an invisible block with ink-able top flats which is constantly circled by long, flat Squee-Gs, shaped like Spreaders which wipe off all ink (leaving the top inked but cleaning the walls of the block).
Total BP: 2,027p
Splatfests
-
 Action vs.
  Comedy on 13 January 2018
Gallery
-
Promo image.
-
Spawn point
-
Looking down at the invisible incline leading down from the spawn point.
-
An invisible wall in front of the team's open area.
-
The same wall, with some ink on it.
-
Overlooking the center area from atop an invisible incline.
-
The central platform.
-
The Squee-Gs in one of the side areas.


-
The center platform lowering and raising. (link to file)
-
The long Squee-Gs in action. (link to file)
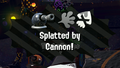
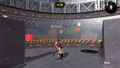
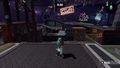
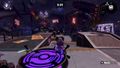
Layout 7

Description
This layout is made of a valley between two inclines. The spawn points are at the top of each incline, with an Ink Cannon (the same as Salmon Run) atop a steep, uninkable cliff on the right side just below the spawn. The cannon nest is flanked by a tall wall, so that an enemy climbing up the slope to reach it has go almost all the way up to the spawn point to get behind the cannon.
The stage is dotted with small walls that can be used for cover. The center of the stage has a small hill with another Ink Cannon on it. The base cannons cannot reach each other, but they can reach and be reached by the center cannon. To the sides of the central hill are two tall blocks which can only be inked / climbed from the closer team's side, and can serve as sniper's nests overlooking the center.
When an Inkling is occupying a cannon, the are positioned on top of the sphere which makes up the cannon's body. This means that high-accuracy weapons such as Chargers have to aim a little above the cannon to hit the Inkling inside it. When an Inkling leaves the cannon they are dropped behind it relative to the way they are currently facing. In the case of the base cannons, if facing backwards, the inkling will fall down the cliffside, allowing for a quick escape if flanked.
Total BP: 2,390p
Splatfests
- File:S2 Splatfest Icon Champion.png Champion vs. File:S2 Splatfest Icon Challenger.png Challenger on 3 February 2018
-
 Gherk-OUT vs.
  Gherk-IN on 10 February 2018
 -
 Money vs.
  Love on 17 February 2018
Gallery
-
A view from one team's base cannon on to the center area. The other team's base cannon is visible behind the start of the blue cannon shot trail.
-
The splat cam showing the message "Splatted by Cannon!".
-

Standing near an Ink Cannon.
-
Standing on the spawn point.


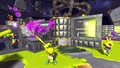
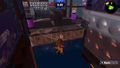
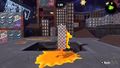
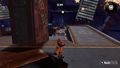
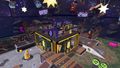
Layout 8

Description
This layout contains a large center area with a glass dome suspended above it. There are also two glass boxes on each side of the stage. These three serve as containment chambers.
When the remaining match time is 1:50, a warning will appear saying the side areas are about to seal off. At 1:40, the boxes will descend to seal off the side areas, preventing access to them for the remainder of the match, finally closing entirely at 1:30. Two platforms at the large center area will also descend to ground level, making more room for combat and inkable turf. At 0:55, another message will appear, warning the center area is about to close. At 0:50, the central dome will start descending and by 0:45 it will seal off the center area, finally closing entirely at 0:40. Shortly after descending, a launchpad will appear in the secluded areas, to allow players to get out, only if players from one team remain in those areas, with the color of the launchpad matching that team.
Players can Super Jump to the secluded areas if a teammate or a Squid Beakon is inside. Tenta Missiles and the Sting Ray can penetrate the glass barriers, but not the Ink Storm.
| Time | English message | Japanese messagenote | Dutch message | NOA French message | NOE French message |
|---|---|---|---|---|---|
| 1:50 | Stage-1 containment imminent! | 左右のカクリがはじまる! Sayū no kakuri ga hajimaru! (Sides isolation will be initialized!) |
Indammingsfase 1 op komst! (Containment phase 1 upcoming!) |
1re restriction d’accès imminente... (The first restriction of access is imminent...) | |
| 1:40 | Commencing stage-1 containment! | 左右のカクリを開始! Sayū no kakuri o kaishi! (Sides isloation start!) |
Indammingsfase 1 begint! (Containment phase 1 begins!) |
1re restriction d’accès enclenchée! (The first restriction of access engages!) | |
| 0:55 | Stage-2 containment imminent! | 中央のカクリがはじまる! Chūō no kakuri ga hajimaru! (Center isolation will be initialized!) |
Indammingsfase 2 op komst! (Containment phase 2 upcoming!) |
2e restriction d’accès imminente... (The second restriction of access is imminent...) | |
| 0:50 | Commencing stage-2 containment! | 中央のカクリを開始! Chūō no kakuri o kaishi! (Center isolation start!) |
Indammingsfase 2 begint! (Containment phase 2 begins!) |
2e restriction d’accès enclenchée! (The second restriction of access engages!) | |
| 0:40 | Containment complete! | 全エリアのカクリ完了! Zen eria no kakuri kanryō! (All areas isolation complete!) |
Indamming voltooid! (Containment completed!) |
Restriction d’accès en place! (Restriction of access in place!) | |
| Time | German | Italian | Russian | NOA Spanish message | NOE Spanish message |
| 1:50 | 1. Eindämmung steht bevor! (1. Containment arises!) |
Contenimento livello 1 imminente! (Containment level 1 imminent!) |
Берегитесь ловушек по бокам! Beregites' lovushek po bokam! (Beware of traps on the sides!) |
¡Aislamiento inicial inminente! (Initial isolation imminent!) |
¡Se acerca el primer confinamiento! (The first confinement approaches!) |
| 1:40 | 1. Eindämmung beginnt! (1. Containment begins!) |
Inizio contenimento livello 1! (Start containment level 1!) |
Ловушки опускаются! Lovushki opuskayutsya! (The traps go down!) |
¡Aislamiento inicial en curso! (Initial isolation in progress!) |
¡Comienza el primer confinamiento! (The first confinement begins!) |
| 0:55 | 2. Eindämmung steht bevor! (2. Containment arises!) |
Contenimento livello 2 imminente! (Containment level 2 imminent!) |
Берегитесь ловушки в центре! Beregites' lovushki v tsentre! (Beware of the trap in the center!) |
¡Aislamiento final inminente! (Final isolation imminent!) |
¡Se acerca el segundo confinamiento! (The second confinement approaches!) |
| 0:50 | 2. Eindämmung beginnt! (2. Containment begins!) |
Inizio contenimento livello 2! (Start containment level 2!) |
Ловушка опускается! Lovushka opuskayetsya! (The trap goes down!) |
¡Aislamiento final en curso! (Final isolation in progress!) |
¡Comienza el segundo confinamiento! (The second confinement begins!) |
| 0:40 | Eindämmung abgeschlossen! (Containment completed!) |
Contenimento completato! (Containment completed!) |
Все ловушки опустились! Vse lovushki opustilis'! (All traps have descended!) |
¡Aislamiento finalizado! (Isolation finished!) |
¡Confinamiento completado! (Confinement completed!) |
Total BP: 2,770p
Splatfests
- File:S2 Splatfest Icon Flower.png Flower vs. File:S2 Splatfest Icon Dumpling.png Dumpling on 3 March 2018
-
 Chicken vs.
  Egg on 10 March 2018
Gallery
-
Promo Image.
-
Image showing the Dome when closed.
-
Another promo image.
-

View from the Spawn Point
-
The inside of the center containment chamber after it is sealed


-
Containment chambers closing (link to file)
-
Super Jumping from the center containment chamber. (link to file)
-
Super Jumping from a side containment chamber. (link to file)
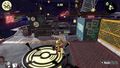
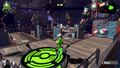
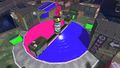
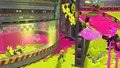
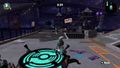
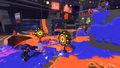
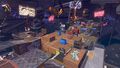
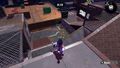
Layout 9

Description
This layout contains many obstacles and ramps, making walking around the floor very difficult and providing limited visibility. Above many of the raised platforms, there are floating Grapplinks, which allow players to quickly travel along the higher areas. The central area is a high, narrow bridge over a gap, that can only be scaled via a ramp from each team's left flank, a wall on each side near the middle, or using the Grapplinks. It stands between two canyons that separate it from the team base areas. Throwing a bomb or Point Sensor, or using the Sting Ray links you to the Grapplink. Your Sting Ray runs out immediately once you teleport there.
Blocking the right flank of each team's canyon, right before the center area, is a tower with a triangular roof, that seems to be taken from Camp Triggerfish.
Total BP: 2,199p
Splatfests
- File:S2 Splatfest Icon Latest Model.png Latest Model vs. File:S2 Splatfest Icon Popular Model.png Popular Model on 24 March 2018
-
 Baseball vs.
  Soccer on 7 April 2018
 -
 Salty vs.
  Sweet on 7 April 2018
Gallery
-
Promo image
-
Promo image
-
View from the Spawn Point
-
The canyon on each team's side, seen form the raised area to the right of the spawn
-
Inside the canyon, looking across the gap below the bridge
-
The open area on the left flank - the ramp leading up the bridge can be seen on the right
-
View from the left flank onto the opposing team's canyon area - the Grapplink on the enemy side can be reached with most weapons and can also be triggered by landing a bomb under it - which allows infiltration of the enemy side of the map
-
View from atop the bridge


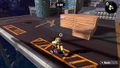
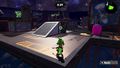
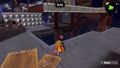
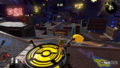
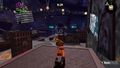
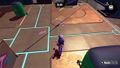
Layout 10

Description
This layout is laterally-symmetrical like Saltspray Rig. It contains many ramps and long narrow corridors. The spawn points are located near each other but seperated with a tall glass wall that extends all the way to the center (however, splats against the junction where this wall meets the floor may cause a small amount to leech to the other side). From spawn, is a downhill that leads to the center where are three Ink Switches are placed. The center one rises an un-inkable wall in the middle while the two others lift climbable platforms on each side respectively. The platforms, when raised, allow full access to that side's respective home base.
Team Alpha (Pearl's team) always spawns on the right side, while Team Bravo (Marina's team) always spawns on the left.
- However, when the same team is fighting each other in Splatfest, the rule above won’t affect spawn positions, so there is a possibility to spawn on either side.
Total BP: 2,185p
Splatfests
- File:S2 Splatfest Icon Unknown Creature.png Unknown Creature vs.
 Advanced Technology on 21 April 2018
 -
 Pulp vs. File:S2 Splatfest Icon No-Pulp.png No-Pulp on 23 June 2018
Gallery
-
Promo image.
-
Another promo image.
-
View from the right (Alpha) spawn point.
-
The small courtyard where both team's paths connect.
-
View of the central area from above.
-
The far area and Ink Switches.
-
Reverse view of the entire stage from the end of the far area.


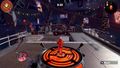
Layout 11

Description
The main mechanic of this stage is a large double balance beam scale with a large pad near each spawn point and a pair of smaller pads near the center. The pads are balanced against their same-sized counterparts and are not connected between them. The scales tip based on the number of Inklings and Sub Weapons on them, with the heavier side lowering and the lighter side raising accordingly. While moving up or down a pattern on the top of the pad will glow light blue and a grinding metal sound effect will be heard. Between each spawn point and the larger pads is a lower area with many horizontal and vertical grates and a sponge that can be used to climb back on the left flank. The smaller pads in the middle are each flanked by a pit hazard on the left side and a short ramp providing cover on the right.
- Sub weapons also affect platform weight. Their weight is half that of an Inkling, which makes the platforms go down by half the distance they would when unbalanced by the weight of an Inkling.
- Three Sub weapons don’t follow this rule, being
 Ink Mine,
  Point Sensor and
  Toxic Mist. This is likely due to these subs not having any material value.
- Three Sub weapons don’t follow this rule, being
- Swimming on a wall of the platforms counts as being on the platform, and will affect it whether the character is ascending, descending or swimming at a set height.
- Accordingly,
 Suction Bombs and
  Sprinklers (when placed on the walls of the platform) affect the balance by half an Inkling's weight.
- Accordingly,
- Certain parts of the bottom areas of the moving platforms are covered by uninkable walls taller than the maximum jump height, so when fully raised, the platforms can only be climbed from certain directions.
Total BP: 2,300p
Splatfests
- Raph vs. Donnie on 18 May 2018
- Hello Kitty vs. My Melody on 9 June 2018
Gallery
-
Promo image.
-
Another promo image.
-
View from the spawn point
-
View of the area between the spawn and the larger pad
-

The larger pad
-
The pattern on the larger pad lighting up when activated
-
View of the scales
-
The sponge on the left flank
-
Standing on the smaller pad
-

View of how when one platform is being stood on, the other lifts


-
Animation of the moving platforms at the start of a match (link to file)
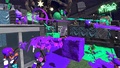
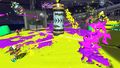
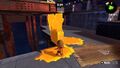
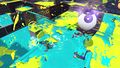
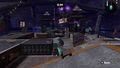
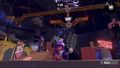
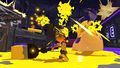
Layout 12

Description
This layout's main mechanic revolves around tentacles that stick out of the floor. There are three octopus tentacles and three squid tentacles, even during Team Octopus vs. Team Octopus or Team Squid vs. Team Squid matches. The octopus tentacles resemble those that are seen in boss battles, and the squid tentacles resemble a larger version of the Squid Bumpers seen in the Shooting Range.
Each team's spawn point is on a raised platform with a lower area in front and to the right and a walkway going off to the left. Past the lower area are a wall numbered 3 on the left, a ramp to a raised platform in the middle, and a tall, uninkable wall to the right. Beyond these is a large courtyard divided by both teams' number 1 walls and an S-shaped inkable platform between them. On each team's side, the number 1 tentacle is on the right, near the S-Shaped platform. Further to the right of each team's side is a small pit hazard and a blocked-off area containing the team's number 2 tentacle. To the left of the team's side of the center is their number 2 wall, and beyond it a small enclosed area. This area contains the team's number 3 tentacle and can be reached by following the left walkway from the team's spawn. The number 2 wall is flanked by a raised platform with Sponges at each end, allowing friendly team members to go around the wall without opening it.
The background of this layout features drinking jars with straws filled with a clear liquid. The backgound also has fireworks going off, some of them in the shape of the ![]() squid and
squid and ![]() octopus icons from the game can be seen in the sky, colored to match the teams currently playing.
octopus icons from the game can be seen in the sky, colored to match the teams currently playing.
Tentacles
Players can splat their enemy team's corresponding numbered tentacles (denoted by the Inkling language numbers 1, 2 and 3). Doing so will lower a barrier with the same number, giving access to other areas, displaying a message and playing the "objective captured" / "objective lost" sound effect from Ranked Battle. Each tentacle is connected to a certain barrier and they do not heal damage or regenerate once splatted. There is a lighted path on the floor leading from each tentacle to the gate it opens, and once the tentacle is splatted, the lights turn off as the gate opens.
The tentacles do not need to be splatted in any particular order, as number 2 is accessible from the start, and number 3, while hidden behind the number 2 gate, can still be accessed using long-ranged weapons and ones that provide more mobility, such as ![]() Inkjet or
Inkjet or ![]() Sting Ray; or by standing on a Sponge and having it be expanded by an enemy team member.
Sting Ray; or by standing on a Sponge and having it be expanded by an enemy team member.
The first tentacle will suffer 600 damage before being splatted, the second 3000, and the third 2000. Certain weapons do more damage to the tentacles, with the game applying the same damage multipliers as when attacking tentacles in Octo Expansion boss fights. The Object Shredder ability does not work on the tentacles.[1]
| Gate Opened | English message | Japanese message | Dutch message | NOA French message | NOE French message |
|---|---|---|---|---|---|
| Ours | We opened gate #! | 第◯ゲートがひらく! Dai ___ gēto ga hiraku! (Opened gate #!) |
Poort # gaat open! (Gate # goes open!) |
On a ouvert la porte #! (We opened gate #!) | |
| Theirs | They opened gate #! | 第◯ゲートがひらかれる! Dai ___ gēto ga hirakareru! (Gate # has been opened!) |
Ze openen poort #! (They open gate #!) |
Ils ont ouvert la porte #! (They opened gate #!) | |
| Gate Opened | German message | Italian message | Russian message | NOA Spanish message | NOE Spanish message |
| Ours | Tor # öffnet sich! | ¡Abrimos la puerta #! (We opened gate #!) |
¡Se abre el portal número #! (Gate number # is opened!) | ||
| Theirs | Gegner öffnet Tor #! | ¡El rival abrió la puerta 2! (The rival opened gate #!) |
¡Portal número # abierto! (Gate number # opened!) | ||
Total BP: 2,593
Splatfests
-
 Squid vs.
  Octopus on 20 July 2018
Gallery
-
Aerial view
-
Attacking an octopus tentacle
-

Attacking a squid tentacle


-
Attacking all the tentacles. (link to file)
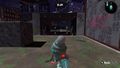
Layout 13

Description
This layout's main mechanic revolves around the Splat-Switches. There are 2 switches on each side, and one on the center. If the switches on the player's team side are activated, the wall near them will rise, make the section behind them keep away from the opponents' attacks. If the center switch is activated, the platform on the player's side will rise up, while the platform on the opponent's side will drop down, make the platform on the player's side safer while make the platform on the opponent's side being easier to cover in ink. If the player reaches the opponents' side and activate the switches on their side, the wall near them will go away and make the player's team easier to combat the opponents and cover ink on their side.
Total BP: 2,362p
Splatfests
- File:S2 Splatfest Icon Mushroom Mountain.png Mushroom Mountain vs. File:S2 Splatfest Icon Bamboo Shoot Village.png Bamboo Shoot Village on 18 August 2018
-
 Adventure vs.
  Relax on 18 August 2018
 -
 Fork vs.
  Spoon on 24 August 2018
Gallery
-
Aerial view
-
Inking the Splat-Switch in the centre.


Trivia
- Marina claims to have helped make the stage herself, which is shown by her symbol appearing on the stage image.
- As Marina mentions often in the news segments, she was raised around Octarian machinery, which would explain why many of the Shifty Station variants contain at least one of the Octo Valley / Octo Canyon stage gimmicks.
- The stage seems to be set somewhere in one of Octo Canyon's domes or Deepsea Metro, as can be deduced by the decorations scattered throughout the stage types as well as the floating objects in the background.
- Not all Shifty Stations actually shift. Layouts 3, 7 and 9 are static, and 10, 11, 12 and 13 only move when interacted with.
- Layout 3 has been used for the most Splatfests, with a grand total of 5.
- The internal codename for this stage in the game files is "Deli".
- Layout 12, along with two future layouts featuring Ride Rails and Bounce Pads, were found in the game's data after the release of 3.2.0. This was the only complete layout that also had the stage model present. [2][3]
Names in other languages
Template:Foreignname Template:-
References
- ↑ User:Dr. Fetus, a Splatoon analyst, on 21 July 2018 in a Discord chat room
- ↑
 Simonx22 on Twitter
- ↑ 0xRed on Twitter
