Steel Eel: Difference between revisions
(Updated tables and boxes to use salmon run color) |
|||
| (13 intermediate revisions by 10 users not shown) | |||
| Line 32: | Line 32: | ||
==Statistics== | ==Statistics== | ||
{{see also|Salmon Run data}} | {{see also|Salmon Run data}} | ||
{| class="wikitable sitecolor-s2" | |||
{| class="wikitable sitecolor- | |||
|- | |- | ||
! HP !! Damage !! Attack/Defeat/Total {{Cost|S2| |pe}} !! {{Cost|S2| |ge}} | ! HP !! Damage !! Attack/Defeat/Total {{Cost|S2| |pe}} !! {{Cost|S2| |ge}} | ||
| Line 45: | Line 44: | ||
<br> | <br> | ||
{{see also|Salmon Run Next Wave data}} | {{see also|Salmon Run Next Wave data}} | ||
{{Salmon Run hits to splat|Steel Eel}} | |||
{ | |||
| | |||
==Tips== | ==Tips== | ||
| Line 248: | Line 50: | ||
** The player being targeted should coordinate their movement with the work crew's location, keeping crewmates safe and exposing the Steel Eel's weak point to them. | ** The player being targeted should coordinate their movement with the work crew's location, keeping crewmates safe and exposing the Steel Eel's weak point to them. | ||
** If the targeted player travels behind the Steel Eel, the Steel Eel will do a U-turn and potentially trap the player or a crewmate. | ** If the targeted player travels behind the Steel Eel, the Steel Eel will do a U-turn and potentially trap the player or a crewmate. | ||
** The Steel Eel's pilot looks directly at the player it is targeting | ** The Steel Eel's pilot looks directly at the player it is targeting. | ||
**If a player is being chased and gets on a propeller platform, or the chased player is splatted, the Steel Eel will immediately start chasing another crewmate. | **If a player is being chased and gets on a propeller platform, or the chased player is splatted, the Steel Eel will immediately start chasing another crewmate. | ||
* Steel Eels are tall enough that they are still capable of splatting [[Inkjet]] users. However, players are capable of getting over a Steel Eel if they boost. | * Steel Eels are tall enough that they are still capable of splatting [[Inkjet]] users. However, players are capable of getting over a Steel Eel if they boost. | ||
* | * Steel Eels are tall enough that they are still capable of splatting someone using a [[Booyah Bomb]]. The Steel Eel can completely shred through the armor, so players should be careful when activating a Booyah Bomb when close to a Steel Eel. | ||
*Splat Bombs explode instantly on contact with the Steel Eel's ink spray. | *Splat Bombs explode instantly on contact with the Steel Eel's ink spray. Players can use this to their advantage if they want to quickly dispatch weaker or weakened Salmonids. | ||
*Steel Eels drop their eggs where the pilot is located. | *Steel Eels drop their eggs where the pilot is located. | ||
**When luring a Steel Eel towards the basket, make sure the Steel Eel is destroyed when the pilot is closest to the basket. | **When luring a Steel Eel towards the basket, players should make sure the Steel Eel is destroyed when the pilot is closest to the basket. | ||
==Badges== | ==Badges== | ||
| Line 279: | Line 81: | ||
Steel eel tutorial.png|A Steel Eel after moving closer to its target. | Steel eel tutorial.png|A Steel Eel after moving closer to its target. | ||
Steel eel surrounded by chum.png|A Steel Eel surrounded by [[Chum]]s. | Steel eel surrounded by chum.png|A Steel Eel surrounded by [[Chum]]s. | ||
S2 Steel Eel Salmonid Field Guide.jpg|The Steel Eel [[Salmonid Field Guide]] | S2 Steel Eel Salmonid Field Guide.jpg|The [[Salmonid Field Guide]] entry for the Steel Eel in ''Splatoon 2''. | ||
S3 Steel Eel Salmonid Field Guide Page 1.jpg|The [[Salmonid Field Guide]] entry for the Steel Eel in ''Splatoon 3''. | |||
S3 Steel Eel Salmonid Field Guide Page 2.jpg|The [[Salmonid Field Guide]] entry for the Steel Eel in ''Splatoon 3''. | |||
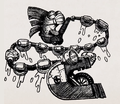
Steel Eel Draw.png|The illustration in the field guide. | Steel Eel Draw.png|The illustration in the field guide. | ||
S2 Mem Cake Steel Eel.png|The [[Mem cake]] of a Steel Eel. | S2 Mem Cake Steel Eel.png|The [[Mem cake]] of a Steel Eel. | ||
Steel Eel Model.png|Unofficial render of the Steel Eel's game model from ''Splatoon 2''. | S2 Steel Eel Model.png|Unofficial render of the Steel Eel's game model from ''Splatoon 2''. | ||
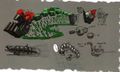
Steel eel concept art.jpg|Concept art of the Steel Eel from [[The Art of Splatoon 2|The Art Of ''Splatoon 2'']]. | Steel eel concept art.jpg|Concept art of the Steel Eel from [[The Art of Splatoon 2|The Art Of ''Splatoon 2'']]. | ||
S2 Salmon Run boss Steel Eel.png|The icon for the Steel Eel used in [[SplatNet 2]] and in the ''Splatoon 2'' relationship chart. | S2 Salmon Run boss Steel Eel.png|The icon for the Steel Eel used in [[SplatNet 2]] and in the ''Splatoon 2'' relationship chart. | ||
S3 Steel Eel | S3 Icon Steel Eel.png|The Steel Eel's icon in ''Splatoon 3''. | ||
S3 Tableturf Battle card Steel Eel.png|The [[Tableturf Battle|Tableturf]] [[List of Tableturf Battle cards in Splatoon 3|card]] icon of the Steel Eel. | S3 Tableturf Battle card Steel Eel.png|The [[Tableturf Battle|Tableturf]] [[List of Tableturf Battle cards in Splatoon 3|card]] icon of the Steel Eel. | ||
S3 Decoration Steel Eel.png|The Steel Eel locker decoration. | S3 Decoration Steel Eel.png|The Steel Eel locker decoration. | ||
| Line 294: | Line 98: | ||
* The pilot of the Steel Eel has a reflective marking on its fin that resembles a stylized [[Golden Egg]]. | * The pilot of the Steel Eel has a reflective marking on its fin that resembles a stylized [[Golden Egg]]. | ||
* Its design could be a reference to the real-life [[Wikipedia:Pelican eel|Eurypharynx pelecanoides]], also known as Pelican or Gulper Eel. | * Its design could be a reference to the real-life [[Wikipedia:Pelican eel|Eurypharynx pelecanoides]], also known as Pelican or Gulper Eel. | ||
* Steel Eels will go out of their way to avoid [[Flipper-Flopper]] rings that are filled in with the players' ink. | |||
==Names in other languages== | ==Names in other languages== | ||
| Line 313: | Line 118: | ||
|Rus=Громыхариус | |Rus=Громыхариус | ||
|RusR=Gromykharius | |RusR=Gromykharius | ||
|RusM=From громыхать ''gromykhat'' ("to rumble, to make loud noises") and хариус ''kharius'' ("grayling") | |RusM=From громыхать ''gromykhat' '' ("to rumble", "to make loud noises") and хариус ''kharius'' ("grayling") | ||
|SpaA=Anguiladera | |SpaA=Anguiladera | ||
|SpaAM=From ''anguila'' ("eel") | |SpaAM=From ''anguila'' ("eel") | ||
|SpaE=Raspoide | |SpaE=Raspoide | ||
|SpaEM= From ''raspa'' ("fishbone, spine") | |SpaEM= From ''raspa'' ("fishbone", "spine") | ||
|ChiS=蛇鱼 | |ChiS=蛇鱼 | ||
|ChiSR=shé yú ''(Mandarin) | |ChiSR=shé yú ''(Mandarin) | ||
| Line 337: | Line 142: | ||
<references/> | <references/> | ||
{{Navbox/Salmonids}} | {{Navbox/Salmonids}} | ||
[[Category:Boss Salmonid]] | [[Category:Boss Salmonid]] | ||
Latest revision as of 23:53, 3 April 2024

Steel Eels are Boss Salmonids that appear in Salmon Run in Splatoon 2 and Splatoon 3.
Description
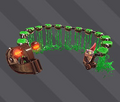
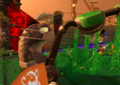
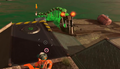
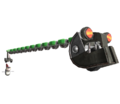
The Steel Eel consists of a Salmonid piloting the machine at the tail and a giant steel fish head and jerrycans shooting down ink, similarly to a Splash Wall. Steel Eels are very long, making it easy to get cornered. The jerrycans on its body can instantly kill players with direct hits and block attacks. The only way to destroy this machine is to splat the Salmonid piloting it at the rear.
Quotes
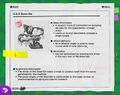
The following text is quoted from the Salmonid Field Guide.
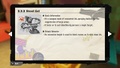
- Basic Information
- It's a weapon made of connected ink-spraying devices for the suppression of large areas.
- It locks on to and relentlessly pursues a single target.
- Attack Behavior
- Its extensive length is used to block routes as it rains down ink.
- Elimination
- It can be neutralized by shooting the driver in the very rear of the Steel Eel.
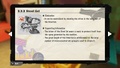
- Supporting Information
- The driver of the Steel Eel wears a mask to protect itself from the spray generated by the machine.
- The great length of the Steel Eel is attributable to the large number of interconnected ink sprayers used to create it.
Statistics
- See also: Salmon Run data
| HP | Damage | Attack/Defeat/Total |
|
|---|---|---|---|
| 500 | 50 | 13 / 3 / 16 | 3 |
- See also: Salmon Run Next Wave data
Tips
- A Steel Eel only targets one player.
- The player being targeted should coordinate their movement with the work crew's location, keeping crewmates safe and exposing the Steel Eel's weak point to them.
- If the targeted player travels behind the Steel Eel, the Steel Eel will do a U-turn and potentially trap the player or a crewmate.
- The Steel Eel's pilot looks directly at the player it is targeting.
- If a player is being chased and gets on a propeller platform, or the chased player is splatted, the Steel Eel will immediately start chasing another crewmate.
- Steel Eels are tall enough that they are still capable of splatting Inkjet users. However, players are capable of getting over a Steel Eel if they boost.
- Steel Eels are tall enough that they are still capable of splatting someone using a Booyah Bomb. The Steel Eel can completely shred through the armor, so players should be careful when activating a Booyah Bomb when close to a Steel Eel.
- Splat Bombs explode instantly on contact with the Steel Eel's ink spray. Players can use this to their advantage if they want to quickly dispatch weaker or weakened Salmonids.
- Steel Eels drop their eggs where the pilot is located.
- When luring a Steel Eel towards the basket, players should make sure the Steel Eel is destroyed when the pilot is closest to the basket.
Badges
- Main article: Badge#Salmon Run Next Wave
Splatting Steel Eels a specific number of times in Salmon Run: Next Wave will reward the player with special badges that they can use on their Splashtag.
| Steel Eel Badges | ||
|---|---|---|
| Steel Eel Splats x 100 | ||
| Steel Eel Splats x 1,000 | ||
| Steel Eel Splats x 10,000 | ||
Gallery
-

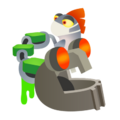
Render.
-
3D artwork.
-
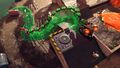
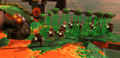
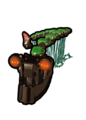
A Steel Eel slinking away from the shoreline.
-
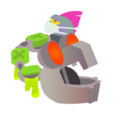
Close-up of the pilot of the Steel Eel.
-
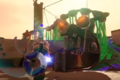
A Steel Eel about to splat an Inkling.
-
A Steel Eel in the tutorial.
-
A Steel Eel after moving closer to its target.
-
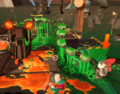
A Steel Eel surrounded by Chums.
-
The Salmonid Field Guide entry for the Steel Eel in Splatoon 2.
-
The Salmonid Field Guide entry for the Steel Eel in Splatoon 3.
-
The Salmonid Field Guide entry for the Steel Eel in Splatoon 3.
-
The illustration in the field guide.
-

The Mem cake of a Steel Eel.
-
Unofficial render of the Steel Eel's game model from Splatoon 2.
-
Concept art of the Steel Eel from The Art Of Splatoon 2.
-
The icon for the Steel Eel used in SplatNet 2 and in the Splatoon 2 relationship chart.
-
The Steel Eel's icon in Splatoon 3.
-
-

The Steel Eel locker decoration.


Trivia
- The mask worn by the Salmonid driver of a Steel Eel is a typical mask worn in Japan when a person is ill.
- The pilot of the Steel Eel has a reflective marking on its fin that resembles a stylized Golden Egg.
- Its design could be a reference to the real-life Eurypharynx pelecanoides, also known as Pelican or Gulper Eel.
- Steel Eels will go out of their way to avoid Flipper-Flopper rings that are filled in with the players' ink.
Names in other languages
| Language | Name | Meaning |
|---|---|---|
| ヘビ Hebi |
From 蛇 hebi ("snake") | |
| Staal | From staal ("steel") and aal ("eel") | |
| Carnacier | From carnage and acier ("steel") [a] | |
| Staal | From Stahl ("steel") and Aal ("eel") | |
| Anguilmone | From anguilla ("eel") and salmone ("salmon") | |
| Громыхариус Gromykharius |
From громыхать gromykhat' ("to rumble", "to make loud noises") and хариус kharius ("grayling") | |
| Anguiladera | From anguila ("eel") | |
| Raspoide | From raspa ("fishbone", "spine") | |
| 蛇鱼 shé yú (Mandarin) |
Snake Fish | |
| 蛇魚 shé yú (Mandarin) |
Snake Fish | |
| 뱀 baem |
Snake | |
| SakelienSnake [1] |
Translation notes
- ↑ possibly a pun on carnassier ("carnivorous predator")
