Girl Power Station: Difference between revisions
(Added extra information.) |
(Moved relevant Trivia points into Etymology + Translation notes) |
||
| (52 intermediate revisions by 31 users not shown) | |||
| Line 1: | Line 1: | ||
{{OctoExpansionPrevNext | {{OctoExpansionPrevNext|line1=J|prev1=Matchmaster Station|prevnum1=02|next1=Footloose Station|nextnum1=04 | ||
|line1=J|prev1=Matchmaster Station|prevnum1=02|next1=Footloose Station|nextnum1=04 | |||
|line2=D|prev2=Targetbuster Station|prevnum2=07|next2=Goose Station|nextnum2=09}} | |line2=D|prev2=Targetbuster Station|prevnum2=07|next2=Goose Station|nextnum2=09}} | ||
{{Infobox/Mission/OctoExpansion | |||
{{ | |||
|subtitle = "Ink-a-zig-ah..." | |subtitle = "Ink-a-zig-ah..." | ||
|mission = Defend the orb! | |mission = Defend the orb! | ||
| Line 20: | Line 18: | ||
|reward3 = 3,000 | |reward3 = 3,000 | ||
|rec = 1 | |rec = 1 | ||
|music = [[Octoling Rendezvous]] | |music = ''[[Octoling Rendezvous]]'' | ||
|image = | |image = OE Deepsea Metro Girl Power Station.jpg | ||
|memcake = Skalop Hoodie | |memcake = Skalop Hoodie | ||
}} | }} | ||
'''Girl Power Station''' is a mission | '''Girl Power Station''' is a test in {{S2}}{{'s}} paid downloadable content, {{OE}}. This station is unlocked after clearing [[Targetbuster Station]], [[Goose Station]], [[Matchmaster Station]], or [[Footloose Station]]. | ||
==Access== | |||
The player must clear {{OctoExpansionStation|D|07}} [[Targetbuster Station]], {{OctoExpansionStation|D|09}} [[Goose Station]], {{OctoExpansionStation|J|02}} [[Matchmaster Station]], or {{OctoExpansionStation|J|04}} [[Footloose Station]] to access this test. The shortest way to access this station is to clear {{OctoExpansionStation|D|07}} [[Targetbuster Station]]. | |||
==Walkthrough== | |||
=== Overview === | |||
In addition to a [[sub weapon]] of their choice from the [[equipper]], at the start of the mission [[Agent 8]] is provided nine [[canned weapon]]s that correspond to the nine hero weapons from [[Octo Canyon (mode)|Octo Canyon]], among which to choose before entering the mission proper: | |||
* {{Weapon|S2|Main|Slosher}} | |||
* {{Weapon|S2|Main|Splattershot}} | |||
* {{Weapon|S2|Main|Splat Dualies}} | |||
* {{Weapon|S2|Main|Splat Charger}} | |||
* {{Weapon|S2|Main|Splat Brella}} | |||
* {{Weapon|S2|Main|Heavy Splatling}} | |||
* {{Weapon|S2|Main|Blaster}} | |||
* {{Weapon|S2|Main|Splat Roller}} | |||
* {{Weapon|S2|Main|Octobrush}} | |||
The main arena also features two pieces of [[armor]], and several [[canned special]]s: | |||
* {{Weapon|S2|Special|Ink Armor}} | |||
*{{Weapon|S2|Special|Ink Armor}} | * {{Weapon|S2|Special|Baller}} | ||
*{{Weapon|S2|Special|Baller}} | * {{Weapon|S2|Special|Splashdown}} | ||
*{{Weapon|S2|Special|Splashdown}} | * {{Weapon|S2|Special|Inkjet}} | ||
*{{Weapon|S2|Special|Inkjet}} | * {{Weapon|S2|Special|Splat-Bomb Launcher}} | ||
*{{Weapon|S2|Special|Splat-Bomb Launcher}} | * {{Weapon|S2|Special|Curling-Bomb Launcher}} | ||
*{{Weapon|S2|Special|Curling-Bomb Launcher}} | * {{Weapon|S2|Special|Bubble Blower}} | ||
*{{Weapon|S2|Special|Bubble Blower}} | |||
To complete Girl Power Station, the player must defend the [[orb]] in the center of the stage for ninety seconds against a squad of seven [[Sanitized Octarian|Sanitized]] [[Octoling (enemy)|Octolings]], followed by eight [[Octoling (enemy)#Elite Octolings|Sanitized Elite Octolings]], who arrive onto the stage in waves at five specific locations relative to the stage around certain times: | |||
{| class="wikitable sitecolor-oe" | {| class="wikitable sitecolor-oe" | ||
! colspan=6 | <center>'''Waves'''</center> | ! colspan=6 | <center>'''Waves'''</center> | ||
|- align="center" | |- align="center" | ||
! Time !! | ! Time !! West !! North-West !! North !! North-East !! East | ||
|- align="center" | |- align="center" | ||
! colspan=6 | Octolings | ! colspan=6 | Octolings | ||
|- align="center" | |- align="center" | ||
| ~1:25 || || || {{Weapon|S2|Main|Octo Shot Replica|icononly}}{{Weapon|S2|Sub|Splat Bomb|icononly}}{{Weapon|S2|Special|Ink Armor|icononly}} || || | | ~1:25 || || || {{Weapon|S2|Main|Octo Shot Replica|icononly}}{{Weapon|S2|Sub|Splat Bomb|icononly}}{{Weapon|S2|Special|Ink Armor|icononly}} || || | ||
|- align="center" | |- align="center" | ||
| ~1:15 || || || {{Weapon|S2|Main|Hero Slosher|icononly}}{{Weapon|S2|Sub|Autobomb|icononly}}{{Weapon|S2|Special|Sting Ray|icononly}} / {{Weapon|S2|Main|Hero Blaster|icononly}}{{Weapon|S2|Sub|Autobomb|icononly}}{{Weapon|S2|Special|Inkjet|icononly}} || || | | ~1:15 || || || {{Weapon|S2|Main|Hero Slosher|icononly}}{{Weapon|S2|Sub|Autobomb|icononly}}{{Weapon|S2|Special|Sting Ray|icononly}} / {{Weapon|S2|Main|Hero Blaster|icononly}}{{Weapon|S2|Sub|Autobomb|icononly}}{{Weapon|S2|Special|Inkjet|icononly}} || || | ||
|- align="center" | |- align="center" | ||
| ~1:05 || || {{Weapon|S2|Main|Hero Brella|icononly}}{{Weapon|S2|Sub|Splat Bomb|icononly}}{{Weapon|S2|Special|Ink Storm|icononly}} || || {{Weapon|S2|Main|Hero Dualies|icononly}}{{Weapon|S2|Sub|Burst Bomb|icononly}}{{Weapon|S2|Special|Tenta Missiles|icononly}} || | | ~1:05 || || {{Weapon|S2|Main|Hero Brella|icononly}}{{Weapon|S2|Sub|Splat Bomb|icononly}}{{Weapon|S2|Special|Ink Storm|icononly}} || || {{Weapon|S2|Main|Hero Dualies|icononly}}{{Weapon|S2|Sub|Burst Bomb|icononly}}{{Weapon|S2|Special|Tenta Missiles|icononly}} || | ||
|- align="center" | |- align="center" | ||
| ~0:55 || || {{Weapon|S2|Main|Hero Roller|icononly}}{{Weapon|S2|Sub|Splat Bomb|icononly}}{{Weapon|S2|Special|Splat Bomb Launcher|icononly}} || || {{Weapon|S2|Main|Herobrush|icononly}}{{Weapon|S2|Sub|Splat Bomb|icononly}}{{Weapon|S2|Special|Splashdown|icononly}} || | | ~0:55 || || {{Weapon|S2|Main|Hero Roller|icononly}}{{Weapon|S2|Sub|Splat Bomb|icononly}}{{Weapon|S2|Special|Splat-Bomb Launcher|icononly}} || || {{Weapon|S2|Main|Herobrush|icononly}}{{Weapon|S2|Sub|Splat Bomb|icononly}}{{Weapon|S2|Special|Splashdown|icononly}} || | ||
|- align="center" | |- align="center" | ||
! colspan=6 | Elite Octolings | ! colspan=6 | Elite Octolings | ||
| Line 67: | Line 72: | ||
| ~0:45 || {{Weapon|S2|Main|Hero Slosher|icononly}}{{Weapon|S2|Sub|Burst Bomb|icononly}}{{Weapon|S2|Special|Ink Armor|icononly}} || || {{Weapon|S2|Main|Octo Shot Replica|icononly}}{{Weapon|S2|Sub|Splat Bomb|icononly}}{{Weapon|S2|Special|Inkjet|icononly}} || || {{Weapon|S2|Main|Hero Blaster|icononly}}{{Weapon|S2|Sub|Burst Bomb|icononly}}{{Weapon|S2|Special|Sting Ray|icononly}} | | ~0:45 || {{Weapon|S2|Main|Hero Slosher|icononly}}{{Weapon|S2|Sub|Burst Bomb|icononly}}{{Weapon|S2|Special|Ink Armor|icononly}} || || {{Weapon|S2|Main|Octo Shot Replica|icononly}}{{Weapon|S2|Sub|Splat Bomb|icononly}}{{Weapon|S2|Special|Inkjet|icononly}} || || {{Weapon|S2|Main|Hero Blaster|icononly}}{{Weapon|S2|Sub|Burst Bomb|icononly}}{{Weapon|S2|Special|Sting Ray|icononly}} | ||
|- align="center" | |- align="center" | ||
| ~0:30 || || {{Weapon|S2|Main|Hero Brella|icononly}}{{Weapon|S2|Sub|Splat Bomb|icononly}}{{Weapon|S2|Special|Ink Storm|icononly}} || || {{Weapon|S2|Main|Octo Shot Replica|icononly}}{{Weapon|S2|Sub|Burst Bomb|icononly}}{{Weapon|S2|Special|Tenta Missiles|icononly}} || | | ~0:30 || || {{Weapon|S2|Main|Hero Brella|icononly}}{{Weapon|S2|Sub|Splat Bomb|icononly}}{{Weapon|S2|Special|Ink Storm|icononly}} || || {{Weapon|S2|Main|Octo Shot Replica|icononly}}{{Weapon|S2|Sub|Burst Bomb|icononly}}{{Weapon|S2|Special|Tenta Missiles|icononly}} || | ||
|- align="center" | |- align="center" | ||
| ~0:20 || {{Weapon|S2|Main|Herobrush|icononly}}{{Weapon|S2|Sub|Splat Bomb|icononly}}{{Weapon|S2|Special|Splashdown|icononly}} || || {{Weapon|S2|Main|Hero Dualies|icononly}}{{Weapon|S2|Sub|Splat Bomb|icononly}}{{Weapon|S2|Special|Splat Bomb Launcher|icononly}} || || {{Weapon|S2|Main|Hero Roller|icononly}}{{Weapon|S2|Sub|Splat Bomb|icononly}}{{Weapon|S2|Special|Sting Ray|icononly}} | | ~0:20 || {{Weapon|S2|Main|Herobrush|icononly}}{{Weapon|S2|Sub|Splat Bomb|icononly}}{{Weapon|S2|Special|Splashdown|icononly}} || || {{Weapon|S2|Main|Hero Dualies|icononly}}{{Weapon|S2|Sub|Splat Bomb|icononly}}{{Weapon|S2|Special|Splat-Bomb Launcher|icononly}} || || {{Weapon|S2|Main|Hero Roller|icononly}}{{Weapon|S2|Sub|Splat Bomb|icononly}}{{Weapon|S2|Special|Sting Ray|icononly}} | ||
|} | |} | ||
== | === Tips === | ||
*Select the main weapon among those available that you are most comfortable with. | * Select the main weapon among those available that you are most comfortable with. However, note that the two available [[Community Glossary#Backline|backline]] weapons, the [[Splat Charger]] and [[Heavy Splatling]], can leave a player relatively immobile, and the [[Sanitized Octarian|Sanitized]] [[Octoling (enemy)|Octoling]]s will try to attack you and the [[orb]] from several different directions at once. | ||
*Collecting the | * Collecting the [[Ink Armor]] and the two sets of armor provide you extra layers of protection, allowing you to safely engage the Sanitized Octolings more aggressively. | ||
*Especially early on, it can be very beneficial to actively eliminate each Sanitized Octoling before | * Especially early on, it can be very beneficial to actively eliminate each Sanitized Octoling before they reach the orb. This reduces the possibility of being overwhelmed by multiple Octolings while also preventing them from using their [[special weapon]]s. | ||
*Sanitized Octolings arrive onto the stage via [[Super Jump | * Sanitized Octolings arrive onto the stage via [[Super Jump]]ing, so their landing points are marked. A well-timed [[Splat Bomb]] or [[Curling Bomb]] on their landing points can eliminate Octolings right after they land. | ||
*[[Community Glossary#Turfing|Turfing]] the Sanitized Octolings' landing points before they arrive will impede their movement, slowing their advance towards the orb and leaving them easier targets to eliminate. | * [[Community Glossary#Turfing|Turfing]] the Sanitized Octolings' landing points before they arrive will impede their movement, slowing their advance towards the orb and leaving them easier targets to eliminate. | ||
*The Sanitized Octolings will try to destroy the [[ | * The Sanitized Octolings will try to destroy the [[crate]]s surrounding the orb rather than taking the time to move around them. Keeping as many crates intact as possible – especially the [[Crate#Armored crates|armored crates]] – will help you stall for time. However, do not hesitate to break through the regular crates if you have to make an emergency defensive stop. | ||
*Firing at the orb with weapons or bombs will refill its health, but usually not fast enough to negate enemy attacks. Eliminate as many Sanitized Octolings as you can before healing the orb. | * Firing at the orb with weapons or bombs will refill its health, but usually not fast enough to negate enemy attacks. Eliminate as many Sanitized Octolings as you can before healing the orb. The Bomb Launchers are a fast way to heal the orb. | ||
*The Octolings can still be harmed before they | * The seven non-Elite Octolings can still be harmed before they Super Jump onto the battlefield, being completely vulnerable while standing on the ledge. However, attempting to attack them will automatically make them Super Jump and start their attack on the orb early, even if the attack misses. | ||
**The | ** The Splat Charger, [[Inkjet]] and [[Blaster]] are both capable of splatting the Octolings before they are able to enter the battlefield. It should be noted that the laser sight of the Splat Charger will cause the Octolings to Super Jump, but they can still be splatted if done quick enough. | ||
**They will also automatically jump out of the way if you try to swing at them with a | ** They will also automatically jump out of the way if you try to swing at them with a [[Splat Roller]]. | ||
*The Splashdown and Baller are invaluable for turning the tables when the Sanitized Octolings have you surrounded. | * The [[Splashdown]] and [[Baller]] are invaluable for turning the tables when the Sanitized Octolings have you surrounded. Note that this will very likely destroy any remaining crates. | ||
==Collectibles== | |||
===Mem cake=== | |||
[[File:S2 Mem Cake Skalop Hoodie.png|center|100px]] | |||
{{Quote|On colder days, I like these clothes.<br>With other threads I'd stay in bed— <br>It's too frigid to be exposed!|[[Mem cake#Line J series (gear)|Skalop Hoodie mem cake]]}} | |||
Completing this test awards the player with the [[Gray Hoodie|Skalop Hoodie]] mem cake. | |||
==Enemies and mechanics== | |||
===Previously introduced=== | |||
<gallery> | |||
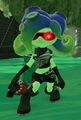
Sanitized Elite Octoling Standby.jpg|[[Sanitized Octarian|Sanitized]] [[Octoling (enemy)|Elite Octoling]] | |||
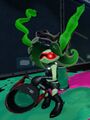
Sanitized Octoling Standby.jpg|Sanitized [[Octoling (enemy)|Octoling]] | |||
</gallery> | |||
==Quotes== | ==Quotes== | ||
==={{flag|us}}{{flag|uk}} English=== | |||
{{collapse| | {{collapse| | ||
; '''Before the mission:''' | |||
{{Clr}} | {{Clr}} | ||
| | | | ||
{{ | {{MissionQuote|OE|CQ Cumber|Please defend the orb.}} | ||
{{ | {{MissionQuote|OE|CQ Cumber|If the orb is destroyed, you will fail.}} | ||
{{ | {{MissionQuote|OE|CQ Cumber|Shooting the orb will help it recover some health, so keep that in mind.}} | ||
{{ | {{MissionQuote|OE|CQ Cumber|I recommend taking the enemies down one by one before they pile up too much.}} | ||
}} | }} | ||
{{collapse| | {{collapse| | ||
; '''During the mission:''' | |||
{{Clr}} | {{Clr}} | ||
| | | | ||
{{ | {{MissionQuote|OE|Cap'n Cuttlefish|Ahoy! Looks like the bad guys are ready and waiting for you.}} | ||
{{ | {{MissionQuote|OE|Cap'n Cuttlefish|Choose the main weapon that you trust yourself with the most.}} | ||
{{ | {{MissionQuote|OE|Pearl|Yeah—take 'em all down!}} | ||
{{ | {{MissionQuote|OE|Marina|Protecting the orb is priority one!}} | ||
{{ | {{MissionQuote|OE|Cap'n Cuttlefish|With my trusty Bamboozler, I'd have 20 splats by now!}} | ||
}} | {{MissionQuote|OE|Pearl|Defensive tip one: target enemies as soon as you can after they land!}} | ||
{{MissionQuote|OE|Marina|Defensive tip two: keep a close eye on your perimeter!}} | |||
{{MissionQuote|OE|Pearl|Defensive tip three: keep your ears open! Was that a crate breaking?}} | |||
{{MissionQuote|OE|Pearl|You're not done yet—hang tough!}} | |||
{{MissionQuote|OE|Marina|Just hang in a bit longer!}} | |||
{{MissionQuote|OE|Pearl|That damage is stacking up!}} | |||
{{MissionQuote|OE|Marina|Oh no—shoot the orb to recover some of its health!}} | |||
{{MissionQuote|OE|Cap'n Cuttlefish|Booyah! Looks like you got 'em all.}} | |||
; '''If the orb breaks:''' | |||
{{MissionQuote|OE|CQ Cumber|The orb broke—test failed.}} | |||
{{ | |||
}} | }} | ||
==Gallery== | ==Gallery== | ||
<gallery> | <gallery> | ||
OE J03D08 menu.jpg|The weapon selection menu. | |||
Agent8 in-game promo image4.jpg|Agent 8 being thrown out of the entrance. | |||
FirstcheckpointJ03.jpg|The first checkpoint, displaying all [[canned weapon]]s. | |||
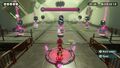
Mainareview J03.jpg|View of the [[orb]] and various [[canned special]]s. | |||
Octolings!J03.jpg|View of [[Sanitized Octarian|Sanitized]] [[Octoling (enemy)|Octolings]] with Cap'n Cuttlefish dialogue. | |||
OE Girl Power Station Mem Cake.jpg|Agent 8 being awarded the [[Gray Hoodie|Skalop Hoodie]] [[Mem cake|mem cake]] upon completing the station. | |||
</gallery> | </gallery> | ||
==Trivia== | == Trivia == | ||
*This station has a computer (more specifically the [[Wikipedia:X68000|X68000]]) and its peripheral devices floating in the background. | |||
**{{OctoExpansionStation|C|03}}{{OctoExpansionStation|A|08}} [[Bumpin' 8-Ball Station]] and {{OctoExpansionStation|I|02}} [[Dinky Ink Station]] have the X68000 and peripheral devices floating in the background as well. | |||
* This station has | *Some of the Sanitized Octolings use combinations that make their weapons similar to multiplayer weapons. | ||
** [[Bumpin' 8-Ball Station]] and [[Dinky Ink Station]] have the X68000 and peripheral devices floating in the background as well | ** One uses the [[Hero Blaster]] with [[Autobomb]]s and the [[Inkjet]], similar to the [[Custom Blaster]]. | ||
**Another one uses the [[Hero Dualies]] with [[Burst Bomb]]s and the [[Tenta Missiles]], similar to the [[Splat Dualies]] and [[Hero Dualie Replicas]]. | |||
**The third uses the [[Octo Shot]] with [[Splat Bomb]]s and the [[Inkjet]], similar to the [[Tentatek Splattershot]] and [[Octo Shot Replica]]. | |||
* Some of the Sanitized Octolings | |||
** One uses the | |||
** Another one uses the | |||
** The third uses the | |||
== Names in other languages == | ==Etymology== | ||
{{ | The English name of this station is a reference to the catchphrase of the 1990s pop band [[Wikipedia:Spice Girls|Spice Girls]]. | ||
|color= | |||
The subtitle, "Ink-a-zig-ah...", references the lyric "zig-a-zig-ah" from the band's song ''[[Wikipedia:Wannabe|Wannabe]]''. | |||
===Names in other languages=== | |||
{{Localized name | |||
|color=Octo Expansion | |||
|Jap=ワタシ達が お相手ヨ!<br>ジョシリョ区駅<br>エイトカプセルを 守りきれ! | |Jap=ワタシ達が お相手ヨ!<br>ジョシリョ区駅<br>エイトカプセルを 守りきれ! | ||
|JapR=Watashi-tachi ga o aite yo!<br>Joshiryo-ku Eki<br>Eitokapuseru o mamorikire! | |JapR=Watashi-tachi ga o aite yo!<br>Joshiryo-ku Eki<br>Eitokapuseru o mamorikire! | ||
|JapM=We are your opponents!<br>Joshiryo District<ref group="note"> | |JapM=We are your opponents!<br>Joshiryo District Station<ref group="note">A pun on the term 女子力 ''joshiryoku'', meaning "girl power".</ref><br>Defend the eight capsule! | ||
|Dut=Invasie van de Octo-amazones<br>De digitale revolutie<br>Verdedig de missiecapsule! | |Dut=Invasie van de Octo-amazones<br>De digitale revolutie<br>Verdedig de missiecapsule! | ||
|DutM=Invasion of the Octo-amazones<br>The digital revolution<br>Defend the mission capsule! | |DutM=Invasion of the Octo-amazones<br>The digital revolution<ref group="note">Alludes to the X68000 computers in the level.</ref><br>Defend the mission capsule! | ||
|FreA= | |FreA=L'antre des dures à cuire<br>Tunnel Courant d'air<br>Protège la capsule 8! | ||
|FreAM= | |FreAM=The lair of the tough ones<br>Air flow tunnel<br>Protect the 8 capsule! | ||
|FreE=L'antre des dures à cuire<br>Tunnel Courant d'air<br>Protège la capsule 8 ! | |FreE=L'antre des dures à cuire<br>Tunnel Courant d'air<br>Protège la capsule 8 ! | ||
|FreEM=The lair of the tough ones<br>Air flow tunnel<br>Protect the 8 capsule! | |FreEM=The lair of the tough ones<br>Air flow tunnel<br>Protect the 8 capsule! | ||
| Line 172: | Line 179: | ||
|Rus=...Действуйте, сестры!<br>Герл-Паверово<br>Защити шарокапсулу! | |Rus=...Действуйте, сестры!<br>Герл-Паверово<br>Защити шарокапсулу! | ||
|RusR=...Deystvuyte, sestry!<br>Gerl-Paverovo<br>Zashchiti sharokapsulu! | |RusR=...Deystvuyte, sestry!<br>Gerl-Paverovo<br>Zashchiti sharokapsulu! | ||
|RusM=...Take action, sisters!<ref group="note"> | |RusM=...Take action, sisters!<ref group="note">A reference to the movie ''[[Wikipedia:Sister Act|Sister Act]]'', whose Russian title is ''"Действуй, сестра!"''.</ref><br>Girl-Power Town Station<br>Defend the ball capsule! | ||
|SpaA=¡Oh mamá! Ella me ha entintado<ref group="note"> | |SpaA=¡Oh mamá! Ella me ha entintado<br>Malosvientos<br>¡Protege la cápsula ocho! | ||
|SpaAM=Oh mother! She has inked me<ref group="note">A reference to the song ''¡Oh mamá! (Ella me ha besado)'', originally sung by Tejano band [[Wikipedia:Selena_y_Los_Dinos|Selena y Los Dinos]], made famous by Argentine singer [[Wikipedia:Pablo Ruiz (singer)|Pablo Ruíz]].</ref><br>Badwinds<ref group="note" name="malos">''"Correr malos vientos"'' is a Spanish idiom for ''"to be a bad time"''.</ref><br>Protect the eight capsule! | |||
|SpaE=Zona de octoamazonas<br>Malosvientos<br>Protege la cápsula ocho. | |||
|SpaEM= | |SpaEM=Octoling zone<br>Badwinds<ref group="note" name="malos"/><br>Protect the eight capsule. | ||
}} | }} | ||
=== Translation notes === | |||
<references group="note"/> | ===Translation notes=== | ||
<references group="note" /> | |||
{{Navbox/Octo Expansion}} | {{Navbox/Octo Expansion}} | ||
Latest revision as of 20:13, 23 April 2024
|
|
| |||||
|
|
|
Girl Power Station
Defend the orb!

| Station | J03D08 | ||||||||
| Test Fee | |||||||||
| Lives | |||||||||
| Time Limit | |||||||||
| Weapons and rewards |
| ||||||||
| Mem cake | |||||||||
| Music | Octoling Rendezvous |
Girl Power Station is a test in Splatoon 2's paid downloadable content, Octo Expansion. This station is unlocked after clearing Targetbuster Station, Goose Station, Matchmaster Station, or Footloose Station.
Access
The player must clear D07 Targetbuster Station, D09 Goose Station, J02 Matchmaster Station, or J04 Footloose Station to access this test. The shortest way to access this station is to clear D07 Targetbuster Station.
Walkthrough
Overview
In addition to a sub weapon of their choice from the equipper, at the start of the mission Agent 8 is provided nine canned weapons that correspond to the nine hero weapons from Octo Canyon, among which to choose before entering the mission proper:
 Slosher
 Splattershot
 Splat Dualies
 Splat Charger
 Splat Brella
 Heavy Splatling
 Blaster
 Splat Roller
 Octobrush
The main arena also features two pieces of armor, and several canned specials:
To complete Girl Power Station, the player must defend the orb in the center of the stage for ninety seconds against a squad of seven Sanitized Octolings, followed by eight Sanitized Elite Octolings, who arrive onto the stage in waves at five specific locations relative to the stage around certain times:
| Time | West | North-West | North | North-East | East |
|---|---|---|---|---|---|
| Octolings | |||||
| ~1:25 | |||||
| ~1:15 | |||||
| ~1:05 | |||||
| ~0:55 | |||||
| Elite Octolings | |||||
| ~0:45 | |||||
| ~0:30 | |||||
| ~0:20 | |||||
Tips
- Select the main weapon among those available that you are most comfortable with. However, note that the two available backline weapons, the Splat Charger and Heavy Splatling, can leave a player relatively immobile, and the Sanitized Octolings will try to attack you and the orb from several different directions at once.
- Collecting the Ink Armor and the two sets of armor provide you extra layers of protection, allowing you to safely engage the Sanitized Octolings more aggressively.
- Especially early on, it can be very beneficial to actively eliminate each Sanitized Octoling before they reach the orb. This reduces the possibility of being overwhelmed by multiple Octolings while also preventing them from using their special weapons.
- Sanitized Octolings arrive onto the stage via Super Jumping, so their landing points are marked. A well-timed Splat Bomb or Curling Bomb on their landing points can eliminate Octolings right after they land.
- Turfing the Sanitized Octolings' landing points before they arrive will impede their movement, slowing their advance towards the orb and leaving them easier targets to eliminate.
- The Sanitized Octolings will try to destroy the crates surrounding the orb rather than taking the time to move around them. Keeping as many crates intact as possible – especially the armored crates – will help you stall for time. However, do not hesitate to break through the regular crates if you have to make an emergency defensive stop.
- Firing at the orb with weapons or bombs will refill its health, but usually not fast enough to negate enemy attacks. Eliminate as many Sanitized Octolings as you can before healing the orb. The Bomb Launchers are a fast way to heal the orb.
- The seven non-Elite Octolings can still be harmed before they Super Jump onto the battlefield, being completely vulnerable while standing on the ledge. However, attempting to attack them will automatically make them Super Jump and start their attack on the orb early, even if the attack misses.
- The Splat Charger, Inkjet and Blaster are both capable of splatting the Octolings before they are able to enter the battlefield. It should be noted that the laser sight of the Splat Charger will cause the Octolings to Super Jump, but they can still be splatted if done quick enough.
- They will also automatically jump out of the way if you try to swing at them with a Splat Roller.
- The Splashdown and Baller are invaluable for turning the tables when the Sanitized Octolings have you surrounded. Note that this will very likely destroy any remaining crates.
Collectibles
Mem cake

| “ | On colder days, I like these clothes. With other threads I'd stay in bed— It's too frigid to be exposed! |
” |
Completing this test awards the player with the Skalop Hoodie mem cake.
Enemies and mechanics
Previously introduced
-
-
Sanitized Octoling


Quotes

 English
- Before the mission:
- During the mission:
- If the orb breaks:
Gallery
-
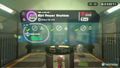
The weapon selection menu.
-

Agent 8 being thrown out of the entrance.
-
The first checkpoint, displaying all canned weapons.
-

View of the orb and various canned specials.
-
-

Agent 8 being awarded the Skalop Hoodie mem cake upon completing the station.


Trivia
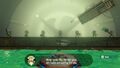
- This station has a computer (more specifically the X68000) and its peripheral devices floating in the background.
- C03A08 Bumpin' 8-Ball Station and I02 Dinky Ink Station have the X68000 and peripheral devices floating in the background as well.
- Some of the Sanitized Octolings use combinations that make their weapons similar to multiplayer weapons.
- One uses the Hero Blaster with Autobombs and the Inkjet, similar to the Custom Blaster.
- Another one uses the Hero Dualies with Burst Bombs and the Tenta Missiles, similar to the Splat Dualies and Hero Dualie Replicas.
- The third uses the Octo Shot with Splat Bombs and the Inkjet, similar to the Tentatek Splattershot and Octo Shot Replica.
Etymology
The English name of this station is a reference to the catchphrase of the 1990s pop band Spice Girls.
The subtitle, "Ink-a-zig-ah...", references the lyric "zig-a-zig-ah" from the band's song Wannabe.
Names in other languages
| Language | Name | Meaning |
|---|---|---|
| ワタシ達が お相手ヨ! ジョシリョ区駅 エイトカプセルを 守りきれ! Watashi-tachi ga o aite yo! Joshiryo-ku Eki Eitokapuseru o mamorikire! |
We are your opponents! Joshiryo District Station[note 1] Defend the eight capsule! | |
| Invasie van de Octo-amazones De digitale revolutie Verdedig de missiecapsule! |
Invasion of the Octo-amazones The digital revolution[note 2] Defend the mission capsule! | |
| L'antre des dures à cuire Tunnel Courant d'air Protège la capsule 8! |
The lair of the tough ones Air flow tunnel Protect the 8 capsule! | |
| L'antre des dures à cuire Tunnel Courant d'air Protège la capsule 8 ! |
The lair of the tough ones Air flow tunnel Protect the 8 capsule! | |
| Bring den Gästen Benehmen bei! Kapselhotel Verteidige die Achterkapsel! |
Teach the guests manners! Capsule hotel Defend the 8-capsule! | |
| Prova a batterci! Galleria del vento Proteggi il capsulotto! |
Try to beat us! Wind tunnel Protect the eightcapsule! | |
| ...Действуйте, сестры! Герл-Паверово Защити шарокапсулу! ...Deystvuyte, sestry! Gerl-Paverovo Zashchiti sharokapsulu! |
...Take action, sisters![note 3] Girl-Power Town Station Defend the ball capsule! | |
| ¡Oh mamá! Ella me ha entintado Malosvientos ¡Protege la cápsula ocho! |
Oh mother! She has inked me[note 4] Badwinds[note 5] Protect the eight capsule! | |
| Zona de octoamazonas Malosvientos Protege la cápsula ocho. |
Octoling zone Badwinds[note 5] Protect the eight capsule. |
Translation notes
- ↑ A pun on the term 女子力 joshiryoku, meaning "girl power".
- ↑ Alludes to the X68000 computers in the level.
- ↑ A reference to the movie Sister Act, whose Russian title is "Действуй, сестра!".
- ↑ A reference to the song ¡Oh mamá! (Ella me ha besado), originally sung by Tejano band Selena y Los Dinos, made famous by Argentine singer Pablo Ruíz.
- ↑ 5.0 5.1 "Correr malos vientos" is a Spanish idiom for "to be a bad time".
