Steelhead: Difference between revisions
m (→Tips: rewriting from second person) |
|||
| (65 intermediate revisions by 38 users not shown) | |||
| Line 1: | Line 1: | ||
{{ | {{Infobox/Character | ||
|color={{SiteColor| | |color={{SiteColor|Salmon Run}} | ||
|title=Steelhead | |title=Steelhead | ||
|image= | |image=S3 Tableturf Battle card Steelhead.png | ||
|caption= | |caption= | ||
|species=[[Salmonid]] | |species=[[Salmonid]] | ||
|location=[[Salmon Run]] | |location=[[Salmon Run]], [[Salmon Run Next Wave]] | ||
|hp=300 (bomb)<br>1,000 (direct, Salmon Run)<br>500 (direct, Salmon Run Next Wave) | |||
}} | }} | ||
The '''Steelheads''' are [[Boss Salmonid]]s that appear in [[Salmon Run]] in ''[[Splatoon 2]]''. | The '''Steelheads''' are [[Boss Salmonid]]s that appear in [[Salmon Run]] and [[Salmon Run Next Wave]] in ''[[Splatoon 2]]'' and ''[[Splatoon 3]]''. | ||
==Description== | ==Description== | ||
The Steelhead's only attack is to inflate a bomb on top of its head, then throw it in front of itself. The bombs resemble green inflatable bags and can instantly splat players, with a much larger blast radius than normal bombs. The Steelhead shuffles forward very slowly when idle, and it only throws bombs once a player is in range. A Steelhead's entire body is covered in invulnerable armor; the only way to damage it is to attack the Steelhead's bomb before it throws it. Splatting a Steelhead creates a large explosion that deals colossal damage to any other Salmonids nearby. | |||
==Quotes== | ==Quotes== | ||
| Line 16: | Line 17: | ||
;Basic Information | ;Basic Information | ||
* An extraordinarily large specimen, it moves very slowly. | *An extraordinarily large specimen, it moves very slowly. | ||
* Its body is covered in hard, protective scales. Shooting it with ink has no effect. | *Its body is covered in hard, protective scales. Shooting it with ink has no effect. | ||
;Attack Behavior | ;Attack Behavior | ||
* Generates bombs from its head, which it throws at enemies. It can't throw these bombs very far. | *Generates bombs from its head, which it throws at enemies. It can't throw these bombs very far. | ||
* The resulting explosion covers a large area. | *The resulting explosion covers a large area. | ||
;Elimination | ;Elimination | ||
* The only way to defeat the Steelhead is to shoot ink at the bomb on its head as it inflates. | *The only way to defeat the Steelhead is to shoot ink at the bomb on its head as it inflates. | ||
;Supporting Information | ; Supporting Information | ||
* The company commander of a Salmonid troop. | *The company commander of a Salmonid troop. | ||
* Its powerful physique capable of supporting heavy armor and its ink-resistant scales are the result of arduous conditioning. | *Its powerful physique capable of supporting heavy armor and its ink-resistant scales are the result of arduous conditioning. | ||
* It forms the bomb on its head by collecting its own explosive saliva. | *It forms the bomb on its head by collecting its own explosive saliva. | ||
==Statistics== | ==Statistics== | ||
{{see also|Salmon Run data}} | {{see also|Salmon Run data}} | ||
{| class="wikitable sitecolor-s2" | {| class="wikitable sitecolor-s2" | ||
|- | |- | ||
! HP !! Damage !! Attack/Defeat/Total {{Cost|S2| |pe}} !! {{Cost|S2| |ge}} | !HP!!Damage !!Attack/Defeat/Total {{Cost|S2| |pe}}!!{{Cost|S2| |ge}} | ||
|- | |- | ||
| 300/1000 <ref group="Sal.">The Steelhead's bomb has 300 HP. The Steelhead itself has 1000 HP for the purposes of directly hitting it with | |300/1000 <ref group="Sal.">The Steelhead's bomb has 300 HP. The Steelhead itself has 1000 HP for the purposes of directly hitting it with the [[Sting Ray]], [[Grizzco Slosher]], or [[Grizzco Splatana]].</ref> | ||
| 180 / 80 / 30 <ref group="Sal.">The damage dealt by the Steelhead's bomb depends on how far away the player is from the explosion.</ref> | |180 / 80 / 30 <ref group="Sal.">The damage dealt by the Steelhead's bomb depends on how far away the player is from the explosion.</ref> | ||
| 8 / 7 / 15 | |8 / 7 / 15 | ||
| 3 | |3 | ||
|- | |- | ||
|} | |} | ||
====Notes==== | ====Notes==== | ||
<references group="Sal."/> | <references group="Sal." /> | ||
<br> | |||
{{see also|Salmon Run Next Wave data}} | |||
{{Salmon Run hits to splat|Steelhead}} | |||
==Tips== | == Tips== | ||
*Due to its slow movement, Steelheads can be ignored for a while if there are higher-priority Boss Salmonids on the battlefield. | *Due to its slow movement, Steelheads can be ignored for a while if there are higher-priority Boss Salmonids on the battlefield. | ||
*New bombs made by the Steelhead retain any damage that was done to previous bombs it launched. | *New bombs made by the Steelhead retain any damage that was done to previous bombs it launched. | ||
*It takes three to four seconds for Steelheads to throw a new bomb. | *It takes three to four seconds for Steelheads to throw a new bomb, time should be balanced from killing lessers for 3 seconds, and killing the Steelhead next. | ||
*The bomb is very small and is located high up compared to other Boss Salmonid weak points. | *The bomb is very small and is located high up compared to other Boss Salmonid weak points, so players must positions themselves correctly to take it down. | ||
**Short-range weapons are not suited to attacking the Steelhead. | **Short-range weapons are not suited to attacking the Steelhead, but can easily kill them on maps like [[Ark Polaris]], [[Salmonid Smokeyard]], and [[Spawning Grounds]]. | ||
**[[Charger]]s, [[splatling]]s, and [[slosher]]s are the most appropriate weapons for dealing with the Steelhead. | **[[Charger]]s, [[splatling]]s, and [[slosher]]s are the most appropriate weapons for dealing with the Steelhead. | ||
*** | ***If timed right, sloshing straight up in the air can kill a Steelhead. | ||
*It is safe to stay right next to the Steelhead because it cannot directly attack players near it. Its only method of attack is the bomb that it throws. | |||
*It is safe to stay right next to the Steelhead | |||
**[[Roller]]s deal variable damage based on distance from the target. Therefore, roller players should get close to the Steelhead and jump before every attack to deal the most damage. | **[[Roller]]s deal variable damage based on distance from the target. Therefore, roller players should get close to the Steelhead and jump before every attack to deal the most damage. | ||
*Using the | *Using the [[Splashdown]] while the Steelhead has the bomb exposed can instantly splat the boss. | ||
*Upon being defeated, they explode, dealing damage to any Salmonids around them. | *During [[Cohock Charge]], shooting the Steelhead with an [[Ink Cannon]] instantly defeats it if its bomb is inflating. | ||
*Despite what the employee manual says, Steelheads are actually vulnerable to | *Upon being defeated, they explode, dealing damage to any Salmonids around them. Thus, it can help to target Steelheads first. | ||
*Despite what the employee manual says, Steelheads are actually vulnerable to a few sources of direct damage; the [[Rare weapon|rare weapons]] [[Grizzco Slosher]] and [[Grizzco Splatana]] and [[special weapons]] [[Sting Ray]], [[Booyah Bomb]], [[Triple Inkstrike]] and [[Killer Wail 5.1]] all pierce armor and can deal direct damage to a Steelhead without having to detonate the bomb on its head. | |||
**Note, however, that Steelheads have notably higher health than their bombs, and thus, this method may take slightly longer. | **Note, however, that Steelheads have notably higher health than their bombs, and thus, this method may take slightly longer. | ||
*Steelheads can't target or see players that are directly above their model, so it is possible to lure it using [[Inkjet]] and being on a platform that is higher than the boss. | |||
**If the current map does not have platforms that make players high enough, being on top of the basket works too. | |||
**The walls on [[Lost Outpost]] won't work, but the walls in the back outside will. | |||
**This should only be done if other bosses/lessers are coming up and can be killed quickly. | |||
*Steelheads will only attack once fully on land. If they are still partially in the water, they will not attack. | |||
**Due to this, unless using the [[Grizzco Slosher]], do not swarm a Steelhead that is spawning. This is time consuming and the eggs are away from the egg basket. | |||
*A direct hit with a [[Grizzco Slosher]] at the bomb on its head can instantly splat the Steelhead, although this method could be tricky. The trick is to aim slightly higher at the bomb so it directly hits the bomb and not the Steelhead itself. | |||
== | ==Badges== | ||
{{Main|Badge#Salmon Run}} | |||
Splatting Steelheads a specific number of times in Salmon Run: Next Wave will reward the player with special [[badge]]s that they can use on their [[Splashtag]]. | |||
{| class="wikitable sitecolor-sr" | |||
! colspan="3" |Steelhead [[Badge]]s | |||
|- | |||
|[[File:S3_Badge_Steelhead_100.png|32x32px]]||Steelhead Splats x 100 | |||
|- | |||
|[[File:S3_Badge_Steelhead_1000.png|32x32px]]||Steelhead Splats x 1,000 | |||
|- | |||
|[[File:S3_Badge_Steelhead_10000.png|32x32px]]||Steelhead Splats x 10,000 | |||
|} | |||
==Gallery== | ==Gallery== | ||
<gallery> | <gallery> | ||
S2 | S2 salmonid steelhead.png|''Splatoon 2'' render. | ||
NSO icon S3 Characters 2022-12-07 05.png|''Splatoon 3'' render. | |||
Lostoutpost3.jpg|A Steelhead with some [[Chum]] in [[Lost Outpost]]. | |||
Steelhead | Steelhead.jpg|A Steelhead launching its bomb. | ||
Steelhead. | Steelhead pink bomb.png|The bomb of a Steelhead after receiving damage. | ||
Inkling boy with steelhead.jpg|A Steelhead | S3 Steelhead.png|A screenshot of a Steelhead in Salmon Run Next Wave. | ||
Steelhead | S3 Wahoo World Big Run Steelhead.jpg|A Steelhead on Wahoo World during a Big Run | ||
Steelhead concept art. | Inkling boy with steelhead.jpg|A size comparison between a Steelhead and an [[Inkling]]. | ||
S2 Steelhead Salmonid Field Guide.jpg|The [[Salmonid Field Guide]] entry for the Steelhead in [[Splatoon 2]]. | |||
S3 Steelhead Salmonid Field Guide Page 1.jpg|The [[Salmonid Field Guide]] entry for the Steelhead in [[Splatoon 3]]. | |||
S3 Steelhead Salmonid Field Guide Page 2.jpg|The [[Salmonid Field Guide]] entry for the Steelhead in [[Splatoon 3]]. | |||
S2 Steelhead Monochrome Artwork.png|The illustration in the field guide. | |||
S2 Mem Cake Steelhead.png|The [[mem cake]] of a Steelhead. | |||
S2 Steelhead Model.png|Unofficial render of the Steelhead's game model from ''Splatoon 2''. | |||
Steelhead concept art.jpg|Concept art of a Steelhead, from [[The Art of Splatoon 2|The Art of ''Splatoon 2'']]. | |||
S2 Salmon Run boss Steelhead.png|The icon for the Steelhead used in [[SplatNet 2]] and in the ''Splatoon 2'' relationship chart. | |||
S3 Icon Steelhead.png|The Steelhead's icon in ''Splatoon 3''. | |||
S3 Tableturf Battle card Steelhead.png|The [[Tableturf Battle|Tableturf]] [[List of Tableturf Battle cards in Splatoon 3|card]] icon of the Steelhead. | |||
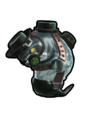
S3 Decoration Steelhead.png|The Steelhead locker decoration. | |||
</gallery> | </gallery> | ||
==Names in other languages== | ==Trivia== | ||
{{ | *Steelheads were the first Boss Salmonid to be revealed, shown in the {{date|2017-04-12}} [[Nintendo Direct]]. | ||
|color= | *It is possible to splat the Steelhead on the exact frame that it throws its bomb. Doing so makes the bomb act and appear as if it had been successfully thrown, even though it exploded and splatted the Steelhead. | ||
==Etymology== | |||
"Steelhead" is derived from the metallic body of the Salmonid, as well as [[Wikipedia:Steelhead|steelheads]], a form of [[wikipedia:rainbow trout|rainbow trout]], a fish similar to salmon. | |||
===Names in other languages=== | |||
{{Localized name | |||
|color=Salmon Run | |||
|Jap=バクダン | |Jap=バクダン | ||
|JapR=Bakudan | |JapR=Bakudan | ||
|JapM= | |JapM=From 爆弾 ''bakudan'' ("bomb") | ||
|Dut=Staalkop | |Dut=Staalkop | ||
|DutM=Steelhead | |DutM=Steelhead | ||
| | |Fre=Tête-de-pneu | ||
| | |FreM=Tire head (A pun with the expression "Tête de nœud" meaning "Fool") | ||
|FreA=<!--French (NoA) and (NoE) share the same name--> | |||
|FreAM= | |||
|Ger=Bäm | |Ger=Bäm | ||
|GerM=Onomatopoeia for an explosion | |GerM=Onomatopoeia for an explosion | ||
|Ita=Bomber | |Ita=Bomber | ||
|ItaM=Bomber | |ItaM=Bomber | ||
|Rus=Дядя | |Rus=Дядя Семг | ||
|RusR=Dyadya Semg | |RusR=Dyadya Semg | ||
|RusM=Uncle Salmon | |RusM=Uncle Salmon | ||
|Spa=Ferroz | |Spa=Ferroz | ||
|SpaM=From ''ferroso'' ( | |SpaM=From ''ferroso'' ("from iron") and ''feroz'' ("fierce") | ||
|SpaA=<!--Spanish (NoA) and (NoE) share the same name--> | |||
|SpaAM= | |||
|ChiS=炸弹鱼 | |||
|ChiSR=zhàdàn yú ''(Mandarin) | |||
|ChiSM=Bomb Fish | |||
|ChiT=炸彈魚 | |||
|ChiTR=zhàdàn yú ''(Mandarin) | |||
|ChiTM=Bomb Fish | |||
|Kor=폭탄 | |||
|KorR=poktan | |||
|KorM=From 爆彈 ''poktan'' ("bomb") | |||
|Internal=SakelienBomber <ref name="Leanny GitHub">[https://github.com/Leanny/splat3/blob/main/data/language/EUen.json {{GH}} Leanny on GitHub]</ref> | |||
|InternalM= | |||
}} | }} | ||
==References== | |||
<references /> | |||
{{Navbox/Salmonids}} | {{Navbox/Salmonids}} | ||
[[Category:Boss Salmonid]] | [[Category:Boss Salmonid]] | ||
Latest revision as of 20:15, 5 April 2024

| Species | Salmonid |
| Location | Salmon Run, Salmon Run Next Wave |
| HP | 300 (bomb) 1,000 (direct, Salmon Run) 500 (direct, Salmon Run Next Wave) |
The Steelheads are Boss Salmonids that appear in Salmon Run and Salmon Run Next Wave in Splatoon 2 and Splatoon 3.
Description
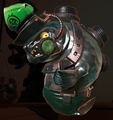
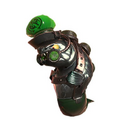
The Steelhead's only attack is to inflate a bomb on top of its head, then throw it in front of itself. The bombs resemble green inflatable bags and can instantly splat players, with a much larger blast radius than normal bombs. The Steelhead shuffles forward very slowly when idle, and it only throws bombs once a player is in range. A Steelhead's entire body is covered in invulnerable armor; the only way to damage it is to attack the Steelhead's bomb before it throws it. Splatting a Steelhead creates a large explosion that deals colossal damage to any other Salmonids nearby.
Quotes
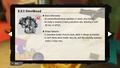
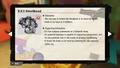
The following text is quoted from the Salmonid Field Guide.
- Basic Information
- An extraordinarily large specimen, it moves very slowly.
- Its body is covered in hard, protective scales. Shooting it with ink has no effect.
- Attack Behavior
- Generates bombs from its head, which it throws at enemies. It can't throw these bombs very far.
- The resulting explosion covers a large area.
- Elimination
- The only way to defeat the Steelhead is to shoot ink at the bomb on its head as it inflates.
- Supporting Information
- The company commander of a Salmonid troop.
- Its powerful physique capable of supporting heavy armor and its ink-resistant scales are the result of arduous conditioning.
- It forms the bomb on its head by collecting its own explosive saliva.
Statistics
- See also: Salmon Run data
| HP | Damage | Attack/Defeat/Total |
|
|---|---|---|---|
| 300/1000 [Sal. 1] | 180 / 80 / 30 [Sal. 2] | 8 / 7 / 15 | 3 |
Notes
- ↑ The Steelhead's bomb has 300 HP. The Steelhead itself has 1000 HP for the purposes of directly hitting it with the Sting Ray, Grizzco Slosher, or Grizzco Splatana.
- ↑ The damage dealt by the Steelhead's bomb depends on how far away the player is from the explosion.
- See also: Salmon Run Next Wave data
Tips
- Due to its slow movement, Steelheads can be ignored for a while if there are higher-priority Boss Salmonids on the battlefield.
- New bombs made by the Steelhead retain any damage that was done to previous bombs it launched.
- It takes three to four seconds for Steelheads to throw a new bomb, time should be balanced from killing lessers for 3 seconds, and killing the Steelhead next.
- The bomb is very small and is located high up compared to other Boss Salmonid weak points, so players must positions themselves correctly to take it down.
- Short-range weapons are not suited to attacking the Steelhead, but can easily kill them on maps like Ark Polaris, Salmonid Smokeyard, and Spawning Grounds.
- Chargers, splatlings, and sloshers are the most appropriate weapons for dealing with the Steelhead.
- If timed right, sloshing straight up in the air can kill a Steelhead.
- It is safe to stay right next to the Steelhead because it cannot directly attack players near it. Its only method of attack is the bomb that it throws.
- Rollers deal variable damage based on distance from the target. Therefore, roller players should get close to the Steelhead and jump before every attack to deal the most damage.
- Using the Splashdown while the Steelhead has the bomb exposed can instantly splat the boss.
- During Cohock Charge, shooting the Steelhead with an Ink Cannon instantly defeats it if its bomb is inflating.
- Upon being defeated, they explode, dealing damage to any Salmonids around them. Thus, it can help to target Steelheads first.
- Despite what the employee manual says, Steelheads are actually vulnerable to a few sources of direct damage; the rare weapons Grizzco Slosher and Grizzco Splatana and special weapons Sting Ray, Booyah Bomb, Triple Inkstrike and Killer Wail 5.1 all pierce armor and can deal direct damage to a Steelhead without having to detonate the bomb on its head.
- Note, however, that Steelheads have notably higher health than their bombs, and thus, this method may take slightly longer.
- Steelheads can't target or see players that are directly above their model, so it is possible to lure it using Inkjet and being on a platform that is higher than the boss.
- If the current map does not have platforms that make players high enough, being on top of the basket works too.
- The walls on Lost Outpost won't work, but the walls in the back outside will.
- This should only be done if other bosses/lessers are coming up and can be killed quickly.
- Steelheads will only attack once fully on land. If they are still partially in the water, they will not attack.
- Due to this, unless using the Grizzco Slosher, do not swarm a Steelhead that is spawning. This is time consuming and the eggs are away from the egg basket.
- A direct hit with a Grizzco Slosher at the bomb on its head can instantly splat the Steelhead, although this method could be tricky. The trick is to aim slightly higher at the bomb so it directly hits the bomb and not the Steelhead itself.
Badges
- Main article: Badge#Salmon Run
Splatting Steelheads a specific number of times in Salmon Run: Next Wave will reward the player with special badges that they can use on their Splashtag.
| Steelhead Badges | ||
|---|---|---|
| Steelhead Splats x 100 | ||
| Steelhead Splats x 1,000 | ||
| Steelhead Splats x 10,000 | ||
Gallery
-
Splatoon 2 render.
-
Splatoon 3 render.
-
A Steelhead with some Chum in Lost Outpost.
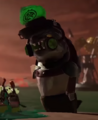
-
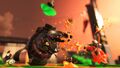
A Steelhead launching its bomb.
-
The bomb of a Steelhead after receiving damage.
-
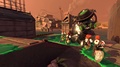
A screenshot of a Steelhead in Salmon Run Next Wave.
-
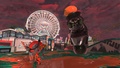
A Steelhead on Wahoo World during a Big Run
-

A size comparison between a Steelhead and an Inkling.
-
The Salmonid Field Guide entry for the Steelhead in Splatoon 2.
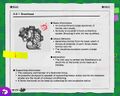
-
The Salmonid Field Guide entry for the Steelhead in Splatoon 3.
-
The Salmonid Field Guide entry for the Steelhead in Splatoon 3.
-
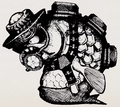
The illustration in the field guide.
-

The mem cake of a Steelhead.
-
Unofficial render of the Steelhead's game model from Splatoon 2.
-
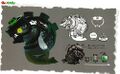
Concept art of a Steelhead, from The Art of Splatoon 2.
-

The icon for the Steelhead used in SplatNet 2 and in the Splatoon 2 relationship chart.
-

The Steelhead's icon in Splatoon 3.
-
-

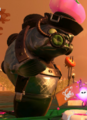
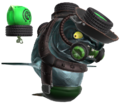
The Steelhead locker decoration.


Trivia
- Steelheads were the first Boss Salmonid to be revealed, shown in the 12 April 2017 Nintendo Direct.
- It is possible to splat the Steelhead on the exact frame that it throws its bomb. Doing so makes the bomb act and appear as if it had been successfully thrown, even though it exploded and splatted the Steelhead.
Etymology
"Steelhead" is derived from the metallic body of the Salmonid, as well as steelheads, a form of rainbow trout, a fish similar to salmon.
Names in other languages
| Language | Name | Meaning |
|---|---|---|
| バクダン Bakudan |
From 爆弾 bakudan ("bomb") | |
| Staalkop | Steelhead | |
| Tête-de-pneu | Tire head (A pun with the expression "Tête de nœud" meaning "Fool") | |
| Bäm | Onomatopoeia for an explosion | |
| Bomber | Bomber | |
| Дядя Семг Dyadya Semg |
Uncle Salmon | |
| Ferroz | From ferroso ("from iron") and feroz ("fierce") | |
| 炸弹鱼 zhàdàn yú (Mandarin) |
Bomb Fish | |
| 炸彈魚 zhàdàn yú (Mandarin) |
Bomb Fish | |
| 폭탄 poktan |
From 爆彈 poktan ("bomb") | |
| SakelienBomber [1] |
