Griller: Difference between revisions
m (→Names in other languages: generic color due to appearance in 2 games) |
m (→Tips: Spelling/grammar correction) |
||
| (41 intermediate revisions by 28 users not shown) | |||
| Line 1: | Line 1: | ||
{{ | {{Infobox/Character | ||
|color = {{SiteColor| | |color = {{SiteColor|Salmon Run}} | ||
|title = Griller | |title = Griller | ||
|image = | |image = S3 Tableturf Battle card Griller.png | ||
|caption = | |caption = | ||
|species = [[Salmonid]] | |species = [[Salmonid]] | ||
|location = [[Salmon Run]], [[Salmon Run Next Wave]] | |location = [[Salmon Run]], [[Salmon Run Next Wave]] | ||
|hp = 401 (to stun)<br>2,200 (total) | |||
}} | }} | ||
{{for|the [[Known Occurrence]]|The Griller}} | {{for|the [[Known Occurrence]]|The Griller}} | ||
| Line 12: | Line 13: | ||
==Description== | ==Description== | ||
A Griller is a giant barbecue grill | A Griller is a giant armored barbecue grill with Salmonids inside that moves along a path while [[ink]] falls beneath it (similar to a [[Flooder]]). It chases after a randomly chosen player, designated by a laser pointer on its underside. The Griller will relentlessly pursue the player the tracking laser is pointed at. It is accompanied by [[Smallfry (species)|Smallfry]] swarms that spawn beneath it. | ||
To destroy a Griller, players must first hit its exposed tail on its back to stun it, then attack the spinning tails which appear while it is stunned. Most of the Griller is covered in armor, so hitting any point that isn't the tail with most regular weapons will not damage the Griller. Upon getting run over, the player will be [[Splat (occurrence)|splatted]] instantly by its ink. Grillers are fast and can be unpredictable, so players have to be careful and wary of both the boss and the Smallfry swarms. | |||
Grillers only show up | Grillers only show up during the [[The Griller]] special wave. The only [[Salmonid|Salmonids]] that can spawn during this wave are Grillers and large groups of Smallfry. Grillers show up one at a time, and later on in the wave, they show up in pairs of two. Mr. Grizz warns the players when the Grillers start spawning in pairs. | ||
==Quotes== | ==Quotes== | ||
| Line 43: | Line 44: | ||
! HP !! Damage !! Attack/Defeat/Total {{Cost|S2| |pe}} !! {{Cost|S2| |ge}} | ! HP !! Damage !! Attack/Defeat/Total {{Cost|S2| |pe}} !! {{Cost|S2| |ge}} | ||
|- | |- | ||
| 2200 <ref group="Sal.">Dealing | | 2200<ref group="Sal.">Dealing 401 damage to a Griller will stun it for five seconds.</ref> | ||
| | | | ||
| 60 / 10 / 70 | | 60 / 10 / 70 | ||
| Line 52: | Line 53: | ||
====Notes==== | ====Notes==== | ||
<references group="Sal."/> | <references group="Sal."/> | ||
<br> | |||
{{see also|Salmon Run Next Wave data}} | |||
{{Salmon Run hits to splat|Griller}} | |||
==Tips== | ==Tips== | ||
* | *Grillers should be lured close to the Egg basket as they drop five Eggs each. | ||
**However, be careful when luring two Grillers toward the Egg basket at a time. They can instantly overwhelm players and may splat the whole crew. | |||
** | *Since Grillers cannot step on or off ledges as players can, the targeted player should maneuver around walls and ledges to manipulate its path and the direction it is facing, taking care not to lead the Griller in the path of other players, so that the rest of the crew can attack its tail. | ||
* Since | *While staying on a wall when targeted may help the rest of the crew aim at the Griller's tail, beware that Smallfry may jump up and splat any player clinging on a wall for too long. They can also follow players on [[propeller]] platforms. | ||
* | *Weapons with high damage per second are the best for stunning Grillers. | ||
** Smallfry | **A single shot from an [[E-liter 4K]] will immobilize it. | ||
* | **A single charged slash from a [[Grizzco Splatana]] will destroy a Griller in one hit and can be aimed at any part of its lid, not just in the tail. | ||
* [[Bomb Launcher]] | **A [[Grizzco Slosher]] is able to pierce shot through Grillers, and one direct hit is almost enough to stun them. | ||
* | *There are some spots on some maps that allow a [[roller]] to roll over the Griller's weak point.{{Citation needed}} | ||
* | **Rolling over it with a [[Dynamo Roller]] will instantly stun it. | ||
*Always have at least one player who's focused on dealing with Smallfry. Weapons with a high fire rate or a wide ink spread are good for it. | |||
** | **Rollers and [[brella]]s work well with this, given that they can roll over or use the shield against a large group of Smallfry. | ||
***Rollers consume less ink the slower the player moves while rolling, making it more favored to roll forward as slowly as possible to protect the teammates from Smallfry if the situation allows to safely do so. | |||
***It's not recommended to launch the brella's shield, as the brella player will be vulnerable against Smallfry and the shield will break as soon as it touches a Griller. | |||
* | **[[Brush]]es, [[slosher]]s, and [[blaster]]s are good for splatting big groups of Smallfry due to their wide range. | ||
**In a desperate situation, the [[Wave Breaker]] can also be used to destroy Smallfry. | |||
* The [[Sting Ray]], [[Booyah Bomb]], [[Killer Wail 5.1]], and [[Triple Inkstrike]] can pierce through a Griller to stun it and deal damage, so it's recommended using these specials on two Grillers at once when they're close to each other if possible. | |||
*[[Bomb Launcher|Splat-Bomb Launchers]] can be used on a stunned Griller to damage it further. | |||
*In [[Spawning Grounds]], stand on the elevated platform near the Egg basket and splat Grillers while they're passing the basket from the left side. If Grillers are approaching from the right side, the targeted player should move down and lure Grillers near the basket where the rest of the crew can easily splat them. | |||
*In [[Marooner's Bay]], locate the team on the middle platform north of the Egg basket from where they can splat Grillers with lower risk of a wipeout. Use the propeller lifts to take Griller away from the team if needed. Unless the quota is met, avoid splatting Grillers on the bottom floor, the crew will have a hard time trying to collect the Eggs. | |||
**In [[Salmon Run Next Wave]], allow [[Snatcher]]s to pick up the Golden Eggs if any were dropped at the bottom floor. There's a possibility that Snatchers will pass the Egg basket when flying away with the Eggs, where players can splat them and drop the Eggs much closer to the Egg basket, making them easy to collect. | |||
*In [[Lost Outpost]], the targeted player can climb up the walls near the Egg basket to stall Grillers while other players can focus on stunning them and dealing with Smallfry. If the team struggles to survive or collect the Eggs, the targeted player can drop down from the right side of the platform to change the Griller's trajectory. They must be aware of Smallfry though, as they can drop down after the player as well. | |||
*In [[Salmonid Smokeyard]], the group should position itself on one of the elevated platforms west or east of the Egg basket, preferably on the east one. Players may stay on a propeller platform to get themselves off Grillers' sights in a pinch, however, doing so will cause Grillers to target the rest of the crew not on the platform immediately, putting them at risk. | |||
*In [[Ruins of Ark Polaris]], Grillers can predict where the targeted player will land when they jump on the [[ride rail]]s and will instantly move to that position. However, if the targeted player jumps off the middle of the rail, Griller will start moving to this player's current position, which can be used to manipulate the Griller's trajectory. | |||
*At [[Sockeye Station]], the safest position is the spiral tower, from which it's easy to splat Grillers, taking the height advantage. Stalling Grillers is possible by moving up and down using the wall under the grate, but it's not recommended to stick to it long enough for a Griller to approach the targeted player since the wall is relatively low and there's a big risk to be splatted if the player isn't sticking to the wall high enough. If the team needs to run out of clock, the outer wall can be used instead. | |||
**At the higher levels of play where the quota is too big for tossing eggs from the spiral tower, the team should locate itself near the Egg basket and splat Grillers while they're trying to get around the elevation. The targeted player should move up and down to maneuver the Griller's trajectory. Long ranged [[charger]]s and [[splatling]]s can stay on the tower safe from Smallfry, but once they're targeted, they should move down to stun the Griller near the basket and let teammates to deal with Smallfry. | |||
*In [[Gone Fission Hydroplant]], the upper platform located north-east of the Egg basket is highly recommended. By standing near the angle close to the basket, the crew will have an easy time splatting Grillers and Smallfry passing the Egg basket, taking the height advantage. If Griller approaches from the east, the targeted player can move down to lure the Griller near the basket, and then climb back up to safely splat it and deal with Smallfry. | |||
==Gallery== | ==Gallery== | ||
<gallery> | <gallery> | ||
S3 Griller Salmonid Field Guide Page 1.jpg|The [[Salmonid Field Guide]] entry detailing the Griller in ''Splatoon 3''. | |||
S3 Griller Salmonid Field Guide Page 2.jpg|The [[Salmonid Field Guide]] entry detailing the Griller in ''Splatoon 3''. | |||
Griller.jpg|A Griller and some Smallfry. | |||
Splatoon 2 Famitsu Guide - Griller.jpg|3D Artwork. | |||
S2 Salmon Run Inside Moving Griller.jpg|Vegetables seen inside a Griller. | |||
S2 Salmon Run Inside Stunned Griller.jpg|Spinning [[Salmonid]]s and vegetables seen inside a stunned Griller. | |||
S2-Salmon-Run-Sting-Raying-Grillers.jpg|Side view of a [[Sting Ray]] stunning two Grillers at once. | |||
S2-Salmon-Run-Specials-on-Grillers.jpg|Players using an [[Inkjet]] and Sting Ray to stun each Griller. | |||
S2 Griller Model.png|Unofficial render of the Griller's game model from ''Splatoon 2''. | |||
S2 Salmon Run boss Griller.png|The icon for the Griller used in [[SplatNet 2]]. | |||
S3 Icon Griller.png|The Griller's icon in ''Splatoon 3''. | |||
S3 Tableturf Battle card Griller.png|The [[Tableturf Battle|Tableturf]] [[List of Tableturf Battle cards in Splatoon 3|card]] icon of the Griller. | |||
</gallery> | </gallery> | ||
==Trivia== | ==Trivia== | ||
* | * Vegetables such as corn, tomato, and zucchini, as well as pink [[Chum]]-sized [[Salmonid]]s, can be seen inside the Griller when zoomed in. | ||
* Grillers can only travel on flat surfaces or smooth ramps, and cannot move up or down ledges without making a detour. | * Grillers can only travel on flat surfaces or smooth ramps, and cannot move up or down ledges without making a detour. | ||
* Grillers cannot land on a [[propeller|propeller platform]] (such as the lifts in [[Marooner's Bay]] and the horizontal platforms in [[Salmonid Smokeyard]]). | * Grillers cannot land on a [[propeller|propeller platform]] (such as the lifts in [[Marooner's Bay]] and the horizontal platforms in [[Salmonid Smokeyard]]). | ||
** If a targeted player enters a propeller platform, Grillers will either instantaneously target another active player not on said platform, or linger in place with laser sights off, not targeting anyone (if all active players are on a propeller platform). | ** If a targeted player enters a propeller platform, Grillers will either instantaneously target another active player not on said platform, or linger in place with laser sights off, not targeting anyone (if all active players are on a propeller platform). | ||
***[[Steel Eel]]s behave in a similar way. | ***[[Steel Eel]]s behave in a similar way. | ||
* Grillers are very similar to [[Flooder]]s from the [[Octarian]] army. They distinguish themselves from Flooders in two ways | * Grillers are very similar to [[Flooder]]s from the [[Octarian]] army. They distinguish themselves from Flooders in two ways: Grillers can be destroyed while Flooders cannot, and Flooders can be ridden while Grillers cannot. | ||
** This | ** This may be related to how Octarians trade their technology with the Salmonids for eggs. | ||
==Names in other languages== | ==Names in other languages== | ||
{{ | {{Localized name | ||
|color=Salmon Run | |||
|Jap=グリル | |Jap=グリル | ||
|JapR=Guriru | |JapR=Guriru | ||
|JapM=Grill | |JapM=Grill | ||
|Dut=Griller | |Dut=Griller | ||
|DutM= | |DutM=- | ||
|Fre=Barbeurk | |Fre=Barbeurk | ||
|FreM=From ''barbecue'', ''barbare'' (barbarian) and ''beurk'' (yuck, as in disgust) | |FreM=From ''barbecue'', ''barbare'' ("barbarian"), and ''beurk'' ("yuck", as in disgust) | ||
|FreA=<!--French (NoA) and (NoE) share the same name--> | |||
|FreAM= | |||
|Ger=Killgrill | |Ger=Killgrill | ||
|GerM=Killgrill | |GerM=Killgrill | ||
| Line 105: | Line 129: | ||
|Rus=Жаровнер | |Rus=Жаровнер | ||
|RusR=Zharovner | |RusR=Zharovner | ||
|RusM=From жаровня ''zharovnya'' (brazier) | |RusM=From жаровня ''zharovnya'' ("brazier") | ||
|SpaA=Brasaleta | |||
|SpaAM=From ''aleta'' ("fin") and ''brasa'' ("hot coal, ember") | |||
|SpaE=Chaparrilla | |SpaE=Chaparrilla | ||
|SpaEM=From ''chapar'' (to plate) and ''parrilla'' (grill) | |SpaEM=From ''chapar'' ("to plate") and ''parrilla'' ("grill") | ||
| | |ChiS=烤架鱼 | ||
| | |ChiSR=kǎo jià yú ''(Mandarin) | ||
|ChiSM=Grill Fish | |||
|ChiT=烤架魚 | |||
|ChiTR=kǎo jià yú ''(Mandarin) | |||
|ChiTM=Grill Fish | |||
|Kor=그릴 | |||
|KorR=geuril | |||
|KorM=Grill | |||
|Internal=Sakedozer <ref name="Leanny GitHub">[https://github.com/Leanny/splat3/blob/main/data/language/EUen.json {{GH}} Leanny on GitHub]</ref> | |||
|InternalM= | |||
}} | }} | ||
==References== | |||
<references/> | |||
{{Navbox/Salmonids}} | {{Navbox/Salmonids}} | ||
[[Category: | [[Category:Event-specific Salmonid]] | ||
Latest revision as of 20:51, 5 April 2024

- For the Known Occurrence, see The Griller.
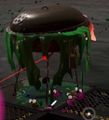
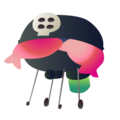
Grillers are Boss Salmonids that appear in Salmon Run in Splatoon 2 and Splatoon 3 at special occasions.
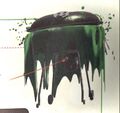
Description
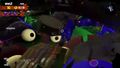
A Griller is a giant armored barbecue grill with Salmonids inside that moves along a path while ink falls beneath it (similar to a Flooder). It chases after a randomly chosen player, designated by a laser pointer on its underside. The Griller will relentlessly pursue the player the tracking laser is pointed at. It is accompanied by Smallfry swarms that spawn beneath it.
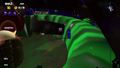
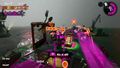
To destroy a Griller, players must first hit its exposed tail on its back to stun it, then attack the spinning tails which appear while it is stunned. Most of the Griller is covered in armor, so hitting any point that isn't the tail with most regular weapons will not damage the Griller. Upon getting run over, the player will be splatted instantly by its ink. Grillers are fast and can be unpredictable, so players have to be careful and wary of both the boss and the Smallfry swarms.
Grillers only show up during the The Griller special wave. The only Salmonids that can spawn during this wave are Grillers and large groups of Smallfry. Grillers show up one at a time, and later on in the wave, they show up in pairs of two. Mr. Grizz warns the players when the Grillers start spawning in pairs.
Quotes

The following text is quoted from the Salmonid Field Guide.
- What Happens
- Armored vehicles called Grillers spawn one after the other. Grillers lock their sights on to a target and will pursue it relentlessly.
- Smallfry are known for hitching a ride on the Griller and interfering with its targeting.
- How to Get Golden Eggs
- Attack the weak spot on the back of the Griller to stun it.
- Stunning Grillers will reveal further weak points. Attacking these weak points is the key to taking down Grillers and getting Golden Eggs.
- Advice from Mr. Grizz
- If the Griller has you in its sights, you're better off running away and letting your friends handle it.
- Supplementary Information
- Operating costs for a single Griller would be enough to deploy 100 regular Salmonid fighters.
Statistics
- See also: Salmon Run data
| HP | Damage | Attack/Defeat/Total |
|
|---|---|---|---|
| 2200[Sal. 1] | 60 / 10 / 70 | 5 |
Notes
- ↑ Dealing 401 damage to a Griller will stun it for five seconds.
- See also: Salmon Run Next Wave data
Tips
- Grillers should be lured close to the Egg basket as they drop five Eggs each.
- However, be careful when luring two Grillers toward the Egg basket at a time. They can instantly overwhelm players and may splat the whole crew.
- Since Grillers cannot step on or off ledges as players can, the targeted player should maneuver around walls and ledges to manipulate its path and the direction it is facing, taking care not to lead the Griller in the path of other players, so that the rest of the crew can attack its tail.
- While staying on a wall when targeted may help the rest of the crew aim at the Griller's tail, beware that Smallfry may jump up and splat any player clinging on a wall for too long. They can also follow players on propeller platforms.
- Weapons with high damage per second are the best for stunning Grillers.
- A single shot from an E-liter 4K will immobilize it.
- A single charged slash from a Grizzco Splatana will destroy a Griller in one hit and can be aimed at any part of its lid, not just in the tail.
- A Grizzco Slosher is able to pierce shot through Grillers, and one direct hit is almost enough to stun them.
- There are some spots on some maps that allow a roller to roll over the Griller's weak point.[Citation needed]
- Rolling over it with a Dynamo Roller will instantly stun it.
- Always have at least one player who's focused on dealing with Smallfry. Weapons with a high fire rate or a wide ink spread are good for it.
- Rollers and brellas work well with this, given that they can roll over or use the shield against a large group of Smallfry.
- Rollers consume less ink the slower the player moves while rolling, making it more favored to roll forward as slowly as possible to protect the teammates from Smallfry if the situation allows to safely do so.
- It's not recommended to launch the brella's shield, as the brella player will be vulnerable against Smallfry and the shield will break as soon as it touches a Griller.
- Brushes, sloshers, and blasters are good for splatting big groups of Smallfry due to their wide range.
- In a desperate situation, the Wave Breaker can also be used to destroy Smallfry.
- Rollers and brellas work well with this, given that they can roll over or use the shield against a large group of Smallfry.
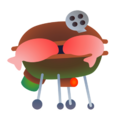
- The Sting Ray, Booyah Bomb, Killer Wail 5.1, and Triple Inkstrike can pierce through a Griller to stun it and deal damage, so it's recommended using these specials on two Grillers at once when they're close to each other if possible.
- Splat-Bomb Launchers can be used on a stunned Griller to damage it further.
- In Spawning Grounds, stand on the elevated platform near the Egg basket and splat Grillers while they're passing the basket from the left side. If Grillers are approaching from the right side, the targeted player should move down and lure Grillers near the basket where the rest of the crew can easily splat them.
- In Marooner's Bay, locate the team on the middle platform north of the Egg basket from where they can splat Grillers with lower risk of a wipeout. Use the propeller lifts to take Griller away from the team if needed. Unless the quota is met, avoid splatting Grillers on the bottom floor, the crew will have a hard time trying to collect the Eggs.
- In Salmon Run Next Wave, allow Snatchers to pick up the Golden Eggs if any were dropped at the bottom floor. There's a possibility that Snatchers will pass the Egg basket when flying away with the Eggs, where players can splat them and drop the Eggs much closer to the Egg basket, making them easy to collect.
- In Lost Outpost, the targeted player can climb up the walls near the Egg basket to stall Grillers while other players can focus on stunning them and dealing with Smallfry. If the team struggles to survive or collect the Eggs, the targeted player can drop down from the right side of the platform to change the Griller's trajectory. They must be aware of Smallfry though, as they can drop down after the player as well.
- In Salmonid Smokeyard, the group should position itself on one of the elevated platforms west or east of the Egg basket, preferably on the east one. Players may stay on a propeller platform to get themselves off Grillers' sights in a pinch, however, doing so will cause Grillers to target the rest of the crew not on the platform immediately, putting them at risk.
- In Ruins of Ark Polaris, Grillers can predict where the targeted player will land when they jump on the ride rails and will instantly move to that position. However, if the targeted player jumps off the middle of the rail, Griller will start moving to this player's current position, which can be used to manipulate the Griller's trajectory.
- At Sockeye Station, the safest position is the spiral tower, from which it's easy to splat Grillers, taking the height advantage. Stalling Grillers is possible by moving up and down using the wall under the grate, but it's not recommended to stick to it long enough for a Griller to approach the targeted player since the wall is relatively low and there's a big risk to be splatted if the player isn't sticking to the wall high enough. If the team needs to run out of clock, the outer wall can be used instead.
- At the higher levels of play where the quota is too big for tossing eggs from the spiral tower, the team should locate itself near the Egg basket and splat Grillers while they're trying to get around the elevation. The targeted player should move up and down to maneuver the Griller's trajectory. Long ranged chargers and splatlings can stay on the tower safe from Smallfry, but once they're targeted, they should move down to stun the Griller near the basket and let teammates to deal with Smallfry.
- In Gone Fission Hydroplant, the upper platform located north-east of the Egg basket is highly recommended. By standing near the angle close to the basket, the crew will have an easy time splatting Grillers and Smallfry passing the Egg basket, taking the height advantage. If Griller approaches from the east, the targeted player can move down to lure the Griller near the basket, and then climb back up to safely splat it and deal with Smallfry.
Gallery
-

The Salmonid Field Guide entry detailing the Griller in Splatoon 3.
-
The Salmonid Field Guide entry detailing the Griller in Splatoon 3.
-
A Griller and some Smallfry.
-
3D Artwork.
-
Vegetables seen inside a Griller.
-
Spinning Salmonids and vegetables seen inside a stunned Griller.
-
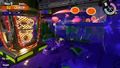
Side view of a Sting Ray stunning two Grillers at once.
-
Players using an Inkjet and Sting Ray to stun each Griller.
-
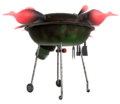
Unofficial render of the Griller's game model from Splatoon 2.
-
The icon for the Griller used in SplatNet 2.
-
The Griller's icon in Splatoon 3.
-


Trivia
- Vegetables such as corn, tomato, and zucchini, as well as pink Chum-sized Salmonids, can be seen inside the Griller when zoomed in.
- Grillers can only travel on flat surfaces or smooth ramps, and cannot move up or down ledges without making a detour.
- Grillers cannot land on a propeller platform (such as the lifts in Marooner's Bay and the horizontal platforms in Salmonid Smokeyard).
- If a targeted player enters a propeller platform, Grillers will either instantaneously target another active player not on said platform, or linger in place with laser sights off, not targeting anyone (if all active players are on a propeller platform).
- Steel Eels behave in a similar way.
- If a targeted player enters a propeller platform, Grillers will either instantaneously target another active player not on said platform, or linger in place with laser sights off, not targeting anyone (if all active players are on a propeller platform).
- Grillers are very similar to Flooders from the Octarian army. They distinguish themselves from Flooders in two ways: Grillers can be destroyed while Flooders cannot, and Flooders can be ridden while Grillers cannot.
- This may be related to how Octarians trade their technology with the Salmonids for eggs.
Names in other languages
| Language | Name | Meaning |
|---|---|---|
| グリル Guriru |
Grill | |
| Griller | - | |
| Barbeurk | From barbecue, barbare ("barbarian"), and beurk ("yuck", as in disgust) | |
| Killgrill | Killgrill | |
| Grill | Grill | |
| Жаровнер Zharovner |
From жаровня zharovnya ("brazier") | |
| Brasaleta | From aleta ("fin") and brasa ("hot coal, ember") | |
| Chaparrilla | From chapar ("to plate") and parrilla ("grill") | |
| 烤架鱼 kǎo jià yú (Mandarin) |
Grill Fish | |
| 烤架魚 kǎo jià yú (Mandarin) |
Grill Fish | |
| 그릴 geuril |
Grill | |
| Sakedozer [1] |
