Crate: Difference between revisions
m (→Names in other languages: Added Italian.) |
|||
| (32 intermediate revisions by 18 users not shown) | |||
| Line 1: | Line 1: | ||
[[File:Crate Artwork.jpg|A crate|thumb|200px]] | [[File:Crate Artwork.jpg|A crate|thumb|200px]] | ||
'''Crates''' are boxes which appear in the {{Ss}}' single-player modes. Crates may contain items such as [[Power Egg]]s, [[Sunken Scroll]]s, [[armor]], [[ | '''Crates''' are boxes which appear in the {{Ss}}' single-player modes. Crates may contain items such as [[Power Egg]]s, [[Sunken Scroll]]s, [[armor]], [[canned special]]s, [[Power Egg#Power Egg pack|Power Egg pack]]s, or nothing at all. Crates are also found in [[Battle Dojo]] battles, where they contain an assortment of effects. | ||
==Description== | ==Description== | ||
Crates are common features found both in single-player modes and the [[Battle Dojo]]. | Crates are common features found both in single-player modes and the [[Battle Dojo]]. Crates often appear solo, in groups, or stacked, and may even support [[Octarian]]s perched on top. Some crates can be submerged in enemy ink and only appear when covered with the player's own ink. Crates can be destroyed easily by being splattered with ink. They come in two sizes, small and large, and in multiple different types. | ||
Plain crates are made of light brown wooden planks. Cuttlegear crates<ref> A [[List of locker decorations in Splatoon 3#Hotlantis and the Shell-Out Machine|locker decoration]] available in {{S3}} that resembles these crates is called the "Cuttlegear crate"</ref>, also known as orange crates<ref>Splatoon 2: Prima Official Guide, on page 16</ref>, are made of darker orange planks and covered in insignias and stickers. In [[Octo Valley (mode)|Octo Valley]] and [[Octo Canyon (mode)|Octo Canyon]] the orange crates have the [[Cuttlegear]] logo on them, while in the ''[[Octo Expansion]]'' they are adorned with the [[Kamabo Corporation|Kamabo Co.]] logo. When broken, Cuttlegear crates may reveal collectibles such as [[Power Egg]]s and [[Sunken Scroll]]s, while plain crates contain nothing. | |||
In the ''Octo Expansion'', a new type of crate is added. This crate is called the Target Crate and functions similar to the new [[balloon|Target Balloons]]. The Target Crates are neon green with a multicolored target printed on each side. Whereas regular crates are made of wood, the Target Crates appear to be some sort of plastic or fabric material stretched across a metal cuboid frame. | |||
Target Crates usually contain nothing and have to be broken to open doors, reveal secrets, or pass tests. | |||
In the ''Octo Expansion'', a new type of crate is added. This crate is called the Target Crate and functions similar to the new Target Balloons. The Target Crates are neon green with a multicolored target printed on each side. Whereas regular crates are made of wood, the Target Crates appear to be some sort of plastic or fabric material stretched across a metal cuboid frame. | |||
===Armored crates=== | ===Armored crates=== | ||
Armored crates | Armored crates are similar to regular crates, but they take more ink to destroy. The crates seem to be armored with tape attached to them. Like regular crates, they come in plain and Cuttlegear varieties. They are sometimes used to block paths. An example of this is the path to the kettle for the mission [[Sunset Octocopter]] in Octo Canyon. | ||
==Appearances== | ==Appearances== | ||
| Line 37: | Line 28: | ||
!Small | !Small | ||
![[File:Crate Artwork.jpg|30px]]<br>Large | ![[File:Crate Artwork.jpg|30px]]<br>Large | ||
![[File:Armored orange crate | ![[File:RotM Armored orange crate.png|30px]]<br>Tough | ||
![[File:Octo Expansion Small Crate.jpg|30px]]<br>Small | ![[File:Octo Expansion Small Crate.jpg|30px]]<br>Small | ||
![[File:Large target crate | ![[File:RotM Large target crate.png|30px]]<br>Large | ||
![[File:Octo Expansion Large Crate. | ![[File:Octo Expansion Large Crate.png|30px]]<br>Tough | ||
|- | |- | ||
| colspan="12" | | | colspan="12" | | ||
===Octo Valley=== | ===Octo Valley=== | ||
|- | |- | ||
|Tutorial | |Tutorial || || {{Yea}} || || || || || || || | ||
| | |||
|{{ | |||
| | |||
| | |||
| | |||
| | |||
| | |||
| | |||
| | |||
|- | |- | ||
| | | | ||
| Line 68: | Line 50: | ||
=== Octo Canyon=== | === Octo Canyon=== | ||
|- | |- | ||
|Tutorial | |Tutorial || {{Yea}} || || || || || || || || | ||
| | |- | ||
| {{ | |[[Tentakeel Outpost]] || {{Yea}} || {{Yea}} || {{Yea}} || {{Yea}} || || || || || | ||
| | |- | ||
| | |[[Return of the Octarians]] || {{Yea}} || {{Yea}} || || {{Yea}} || {{Yea}} || {{Yea}} || || || | ||
| | |- | ||
| | |[[Welcome to Octopia]] || {{Yea}} || {{Yea}} || || {{Yea}} || {{Yea}} || || || || | ||
| | |- | ||
| | |[[Sunset Octocopter]] || {{Yea}} || {{Yea}} || || {{Yea}} || {{Yea}} || || || || | ||
| | |- | ||
|[[Suction-Cup Lookout]] || {{Yea}} || {{Yea}} || || {{Yea}} || {{Yea}} || || || || | |||
|- | |||
|[[Enter the Octohurler]] || {{Yea}} || {{Yea}} || || {{Yea}} || {{Yea}} || || || || | |||
|- | |||
|[[The Octopark]] || || {{Yea}} || || {{Yea}} || || || || || | |||
|- | |||
|[[Octozeppelin Invasion]] || {{Yea}} || {{Yea}}|| || {{Yea}} || || || || || | |||
|- | |||
|[[Back-Alley Cleanup]] || {{Yea}} || {{Yea}} || || {{Yea}} || {{Yea}} || {{Yea}} || || || | |||
|- | |||
|[[Spinning Campground]] || {{Yea}} || {{Yea}}|| || {{Yea}} || {{Yea}} || || || || | |||
|- | |||
|[[Octoling Invasion]] || {{Yea}} || || {{Yea}} || {{Yea}} || {{Yea}} || || || || | |||
|- | |||
|[[Beaker's Depot]] || {{Yea}} || {{Yea}} || {{Yea}} || {{Yea}} || || || || || | |||
|- | |||
|[[Octoseeker Shakedown]] || {{Yea}} || {{Yea}} || || {{Yea}} || {{Yea}} || || || || | |||
|- | |||
|[[The Floating Garden]] || {{Yea}} || {{Yea}} || || {{Yea}} || {{Yea}} || || || || | |||
|- | |||
|[[Octo-Resort Spring]] || {{Yea}} || {{Yea}} || || {{Yea}} || {{Yea}} || || || || | |||
|- | |||
|[[Dancing Floors]] || {{Yea}} || {{Yea}} || || {{Yea}} || {{Yea}} || || || || | |||
|- | |||
|[[Parking Garage]] || || {{Yea}} || || {{Yea}} || {{Yea}} || || || || | |||
|- | |||
|[[Octoling Assault]] || {{Yea}} || || || {{Yea}} || {{Yea}} || {{Yea}} || || || | |||
|- | |||
|[[Slimeskin Garrison]] || {{Yea}} || {{Yea}} || {{Yea}} || || {{Yea}} || || || || | |||
|- | |||
|[[Secret Bowling Alley]] || {{Yea}} || {{Yea}} || || {{Yea}} || {{Yea}} || || || || | |||
|- | |||
|[[Octocommander Fortress]] || {{Yea}} || {{Yea}} || || {{Yea}} || {{Yea}} || || || || | |||
|- | |||
|[[Towering Heights]] || {{Yea}} || {{Yea}} || || {{Yea}} || {{Yea}} || || || || | |||
|- | |||
|[[The Experimentorium]] || || {{Yea}} || || {{yea}} || {{Yea}} || || || || | |||
|- | |||
|[[Propellerland]] || {{Yea}} || {{Yea}} || || {{Yea}} || {{Yea}} || {{Yea}} || || || | |||
|- | |||
|[[Octolings Ahoy!]] || {{Yea}} || {{Yea}} || || {{Yea}} || {{Yea}} || || || || | |||
|- | |||
|[[Underground Expressway]] || {{Yea}} || {{Yea}} || || {{Yea}} || {{Yea}} || || || || | |||
|- | |||
|[[The Octogalaxy]] || || {{Yea}} || || || {{Yea}} || || || || | |||
|- | |||
|[[Transfer Junction]] || {{Yea}} || || || {{Yea}} || || {{Yea}} || || || | |||
|- | |||
|[[Platform Madhouse]] || || {{Yea}} || || {{Yea}} || {{Yea}} || || || || | |||
|- | |||
|[[Paradise Lanes]] || || {{Yea}} || || {{Yea}} || {{Yea}} || || || || | |||
|- | |- | ||
| | |[[Octoling Workout]] || {{Yea}} || {{Yea}} || || {{Yea}} || {{Yea}} || {{Yea}} || || || | ||
| | |||
| | |||
| | |||
| | |||
| | |||
| | |||
| | |||
| | |||
| | |||
|- | |- | ||
| colspan="12" | | | colspan="12" | | ||
===Octo Expansion=== | ===Octo Expansion=== | ||
|- | |- | ||
|{{OctoExpansionStation|E|08}} [[Cratebuster Station]] | | {{OctoExpansionStation|A|00}} [[Abandoned Station]] || {{Yea}} || {{Yea}} || || || {{Yea}} || || {{Yea}} || {{Yea}} || {{Yea}} | ||
| | |- | ||
|{{ | | {{OctoExpansionStation|A|05}} [[Fake Plastic Station]] || {{Yea}} || {{Yea}} || || {{Yea}} || {{Yea}} || || || || | ||
|{{ | |- | ||
| | | {{OctoExpansionStation|A|07}} [[Maverick Station]] || || {{Yea}} || || || {{Yea}} || || || || | ||
| | |- | ||
|{{ | | {{OctoExpansionStation|B|12}} [[Brute Rollup Station]] || {{Yea}} || || || {{Yea}} || || || || || | ||
| | |- | ||
| | | {{OctoExpansionStation|B|13}} [[Phat Splatz Station]] || {{Yea}} || {{Yea}} || || {{Yea}} || {{Yea}} || || || || | ||
| | |- | ||
| {{OctoExpansionStation|B|14}} [[Breakdance Station]] || || {{Yea}} || {{Yea}} || || {{Yea}} || || || || | |||
|- | |||
| {{OctoExpansionStation|C|06}} [[Bust 'n' Move Station]] || || || || || || || {{Yea}} || {{Yea}} || {{Yea}} | |||
|- | |||
| {{OctoExpansionStation|C|08}} [[Right Round Station]] || || || || {{Yea}} || || || || || | |||
|- | |||
| {{OctoExpansionStation|C|11}} [[Abracadabra Station]] || || || || || {{Yea}} || || || || | |||
|- | |||
| {{OctoExpansionStation|D|02}} [[One-Shot Station]] || || {{Yea}} || || || {{Yea}} || || || || | |||
|- | |||
| {{OctoExpansionStation|D|06}}{{OctoExpansionStation|C|01}} [[Radical Rails Station]] || || || || || || || {{Yea}} || {{Yea}} || {{Yea}} | |||
|- | |||
| {{OctoExpansionStation|D|07}} [[Targetbuster Station]] || || || || || || || {{Yea}} || {{Yea}} || {{Yea}} | |||
|- | |||
| {{OctoExpansionStation|D|09}} [[Goose Station]] || {{Yea}} || {{Yea}} || {{Yea}} || || {{Yea}} || || || || | |||
|- | |||
| {{OctoExpansionStation|D|10}} [[Labyrinth Station]] || {{Yea}} || {{Yea}} || {{Yea}} || {{Yea}} || {{Yea}} || || || || | |||
|- | |||
| {{OctoExpansionStation|E|03}} [[Don't Ralph Station]] || || || || {{Yea}} || || || || || | |||
|- | |||
| {{OctoExpansionStation|E|08}} [[Da Bomb Station]] || || || || || || || {{Yea}} || || | |||
|- | |||
| {{OctoExpansionStation|E|09}} [[Squee-G Funk Station]] || || {{Yea}} || || {{Yea}} || {{Yea}} || || || || | |||
|- | |||
| {{OctoExpansionStation|E|10}} [[Cratebuster Station]] || || {{Yea}} || {{Yea}} || || || {{Yea}} || || || | |||
|- | |||
| {{OctoExpansionStation|E|11}} [[Bodacious Rotation Station]] || {{Yea}} || || {{Yea}} || || || {{Yea}} || || || | |||
|- | |||
| {{OctoExpansionStation|F|05}} [[Popalicious Station]] || {{Yea}} || {{Yea}} || {{Yea}} || {{Yea}} || || || || || | |||
|- | |||
| {{OctoExpansionStation|F|07}} {{OctoExpansionStation|C|12}} [[Matchmaker Station]] || {{Yea}} || || || || || || || || | |||
|- | |||
| {{OctoExpansionStation|G|02}} [[Hasta La Vista Station]] || {{Yea}} || || || {{Yea}} || || || || || | |||
|- | |||
| {{OctoExpansionStation|G|03}} [[House Party Station]] || || {{Yea}} || {{Yea}} || || || || || || | |||
|- | |||
| {{OctoExpansionStation|G|04}} {{OctoExpansionStation|B|10}} [[Ink 'n' Slide Station]] || || {{Yea}} || || {{Yea}} || {{Yea}} || {{Yea}} || || || | |||
|- | |||
| {{OctoExpansionStation|G|05}} [[Bustalicious Station]] || || || || || || || {{Yea}} || {{Yea}} || | |||
|- | |||
| {{OctoExpansionStation|G|06}} {{OctoExpansionStation|A|01}} [[Gnarly Rails Station]] || || || || || {{Yea}} || {{Yea}} || || || | |||
|- | |||
| {{OctoExpansionStation|G|09}} {{OctoExpansionStation|B|05}} [[Wack 8-Ball Station]] || {{Yea}} || || || {{Yea}} || {{Yea}} || || || || | |||
|- | |||
| {{OctoExpansionStation|G|10}} {{OctoExpansionStation|E|07}} [[Iceman Station]] || || {{Yea}} || || || {{Yea}} || || || || | |||
|- | |||
| {{OctoExpansionStation|H|01}} {{OctoExpansionStation|D|03}} [[Slap Bracelet Station]] || || {{Yea}} || || || || || || || | |||
|- | |||
| {{OctoExpansionStation|H|02}} [[Ballercise Station]] || || {{Yea}} || || || || || || || | |||
|- | |||
| {{OctoExpansionStation|H|04}} [[Shooter McStation]] || || || || || || || {{Yea}} || || | |||
|- | |||
| {{OctoExpansionStation|H|05}} [[Ink It Station]] || || {{Yea}} || || || {{Yea}} || || || || | |||
|- | |||
| {{OctoExpansionStation|I|02}} [[Dinky Ink Station]] || {{Yea}} || {{Yea}} || {{Yea}} || {{Yea}} || || {{Yea}} || || || | |||
|- | |||
| {{OctoExpansionStation|I|04}} [[Can't Touch This Station]] || {{Yea}} || {{Yea}} || || {{Yea}} || {{Yea}} || || || || | |||
|- | |||
| {{OctoExpansionStation|I|05}} {{OctoExpansionStation|B|08}} [[Righteous Rails Station]] || || || || || || || {{Yea}} || {{Yea}} || | |||
|- | |||
| {{OctoExpansionStation|I|06}} [[All Eyez Station]] || || {{Yea}} || || {{Yea}} || {{Yea}} || || || || | |||
|- | |||
| {{OctoExpansionStation|I|08}} [[Radio Station]] || || {{Yea}} || || {{Yea}} || {{Yea}} || || || || | |||
|- | |||
| {{OctoExpansionStation|J|02}} [[Matchmaster Station]] || || {{Yea}} || || || {{Yea}} || || || || | |||
|- | |||
| {{OctoExpansionStation|J|03}} {{OctoExpansionStation|D|08}} [[Girl Power Station]] || {{Yea}} || {{Yea}} || {{Yea}} || || || || || || | |||
|- | |||
| {{OctoExpansionStation|J|04}} [[Footloose Station]] || || {{Yea}} || {{Yea}} || || {{Yea}} || || || || | |||
|- | |||
| {{OctoExpansionStation|J|06}} {{OctoExpansionStation|D|11}} [[Ink & Watch Station]] || || || || || || || {{Yea}} || || | |||
|- | |||
| {{OctoExpansionStation|J|07}} [[Outrageous Station]] || {{Yea}} || {{Yea}} || {{Yea}} || {{Yea}} || {{Yea}} || {{Yea}} || || || | |||
|- | |||
| {{OctoExpansionStation|Escape|02}} [[Villi Phase]] || || {{Yea}} || || || {{Yea}} || || || || | |||
|- | |- | ||
|{{OctoExpansionStation| | | {{OctoExpansionStation|Escape|03}} [[Belly Phase]] || || {{Yea}} || || || {{Yea}} || || || || | ||
| | |||
| | |||
| | |||
| | |||
| | |||
| | |||
|{{ | |||
| | |||
| | |||
|- | |- | ||
| | | {{OctoExpansionStation|Escape|04}} [[Intestinal Phase]] || || {{Yea}} || || || || {{Yea}} || || || | ||
| | |||
| | |||
| | |||
| | |||
| | |||
| | |||
| | |||
| | |||
| | |||
|- | |- | ||
| colspan="12" | | | colspan="12" | | ||
===Return of the Mammalians=== | ===Return of the Mammalians=== | ||
|- | |- | ||
| [[The Crater]] || {{ | | [[The Crater]] || {{Yea}} || || || || || || || || | ||
|- | |- | ||
| {{RotMMission|Crater|1}} [[Octarians in the Crater? YIKES!]] || {{ | | {{RotMMission|Crater|1}} [[Octarians in the Crater? YIKES!]] || {{Yea}} || {{Yea}} || || {{Yea}} || {{Yea}} || {{Yea}} || || || | ||
|- | |- | ||
| {{RotMMission|Crater|3}} [[Boxes Locked! Keys, Please!]] || {{ | | {{RotMMission|Crater|3}} [[Boxes Locked! Keys, Please!]] || {{Yea}} || {{Yea}} || || {{Yea}} || {{Yea}} || || || || | ||
|- | |- | ||
| {{RotMMission|Crater|4}} [[What Are They? Can We Stop Them?!]] || {{ | | {{RotMMission|Crater|4}} [[What Are They? Can We Stop Them?!]] || {{Yea}} || {{Yea}} || || || {{Yea}} || || || || | ||
|- | |- | ||
| {{RotMMission|01|01}} [[Get to Know Alterna, Your Only Choice]] || || || || {{ | | {{RotMMission|01|01}} [[Get to Know Alterna, Your Only Choice]] || || || || {{Yea}} || {{Yea}} || || || || | ||
|- | |- | ||
| {{RotMMission|01|02}} [[Octopods at Rest Tend to FLIP OUT!]] || || {{ | | {{RotMMission|01|02}} [[Octopods at Rest Tend to FLIP OUT!]] || || {{Yea}} || || || {{Yea}} || || || || | ||
|- | |- | ||
| {{RotMMission|01|03}} [[Splat You on the Flip Side]] || {{ | | {{RotMMission|01|03}} [[Splat You on the Flip Side]] || {{Yea}} || {{Yea}} || || {{Yea}} || {{Yea}} || || || || | ||
|- | |- | ||
| {{RotMMission|01|04}} [[Doors, Doors, Doors! And More! (Doors)]] || || || || || {{ | | {{RotMMission|01|04}} [[Doors, Doors, Doors! And More! (Doors)]] || || || || || {{Yea}} || || || || | ||
|- | |- | ||
| {{RotMMission|01|06}} [[Zip, Splat, and Jump]] || {{ | | {{RotMMission|01|06}} [[Zip, Splat, and Jump]] || {{Yea}} || {{Yea}} || || {{Yea}} || {{Yea}} || || || || | ||
|- | |- | ||
| {{RotMMission|01|07}} [[Become One with Your Smallfry]] || || {{ | | {{RotMMission|01|07}} [[Become One with Your Smallfry]] || || {{Yea}} || || || {{Yea}} || {{Yea}} || || || | ||
|- | |- | ||
| {{RotMMission|01|08}} [[What Caused the Big Bang? YOU!]] || || || || || || || || {{ | | {{RotMMission|01|08}} [[What Caused the Big Bang? YOU!]] || || || || || || || || {{Yea}} || | ||
|- | |- | ||
| {{RotMMission|01|09}} [[The String's the Thing]] || {{ | | {{RotMMission|01|09}} [[The String's the Thing]] || {{Yea}} || {{Yea}} || || {{Yea}} || {{Yea}} || || || || | ||
|- | |- | ||
| {{RotMMission|00|00}} [[After Alterna]] || {{ | | {{RotMMission|00|00}} [[After Alterna]] || {{Yea}} || {{Yea}} || || || {{Yea}} || || || || | ||
|- | |- | ||
| [[Cozy & Safe Factory]] || || || || || {{ | | [[Cozy & Safe Factory]] || || || || || {{Yea}} || {{Yea}} || || || | ||
|- | |- | ||
| {{RotMMission|02|01}} [[Twirling, Swirling, Whirling]] || || || || || {{ | | {{RotMMission|02|01}} [[Twirling, Swirling, Whirling]] || || || || || {{Yea}} || || || || | ||
|- | |- | ||
| {{RotMMission|02|02}} [[Absorbency and You]] || || {{ | | {{RotMMission|02|02}} [[Absorbency and You]] || || {{Yea}} || || || {{Yea}} || || || || | ||
|- | |- | ||
| {{RotMMission|02|03}} [[Soak It to Me!]] || || || || || {{ | | {{RotMMission|02|03}} [[Soak It to Me!]] || || || || || {{Yea}} || {{Yea}} || || || | ||
|- | |- | ||
| {{RotMMission|02|04}} [[Splitting Crosshairs]] || || || || || || || {{ | | {{RotMMission|02|04}} [[Splitting Crosshairs]] || || || || || || || {{Yea}} || {{Yea}} || {{Yea}} | ||
|- | |- | ||
| {{RotMMission|02|05}} [[Tread Heavily]] || || || || || || || || {{ | | {{RotMMission|02|05}} [[Tread Heavily]] || || || || || || || || {{Yea}} || {{Yea}} | ||
|- | |- | ||
| {{RotMMission|02|06}} [[Getting Lost in Three Easy Steps]] || || || || || {{ | | {{RotMMission|02|06}} [[Getting Lost in Three Easy Steps]] || || || || || {{Yea}} || || || || | ||
|- | |- | ||
| {{RotMMission|02|07}} [[The Ink-Conservation Project]] || || {{ | | {{RotMMission|02|07}} [[The Ink-Conservation Project]] || || {{Yea}} || || || {{Yea}} || || || || | ||
|- | |- | ||
| {{RotMMission|02|08}} [[Switching Things Up]] || || {{ | | {{RotMMission|02|08}} [[Switching Things Up]] || || {{Yea}} || || || {{Yea}} || || || || | ||
|- | |- | ||
| [[Cryogenic Hopetown]] || || || || || || {{ | | [[Cryogenic Hopetown]] || || || || || || {{Yea}} || || || | ||
|- | |- | ||
| {{RotMMission|03|01}} [[Climbing the Corporate Splatter]] || || || || || {{ | | {{RotMMission|03|01}} [[Climbing the Corporate Splatter]] || || || || || {{Yea}} || || || || | ||
|- | |- | ||
| {{RotMMission|03|02}} [[They Said We'd Have Flying Cars, and We Do! Kinda!]] || || {{ | | {{RotMMission|03|02}} [[They Said We'd Have Flying Cars, and We Do! Kinda!]] || || {{Yea}} || || {{Yea}} || {{Yea}} || || || || | ||
|- | |- | ||
| {{RotMMission|03|03}} [[Ink | | {{RotMMission|03|03}} [[Ink Wheels—Experience Tomorrow's Technology Today!]] || || {{Yea}} || || {{Yea}} || {{Yea}} || || || || | ||
|- | |- | ||
| {{RotMMission|03|04}} [[Try Curling! Alterna's 11th Most Popular Athleisure Activity!]] || || || || || || || {{ | | {{RotMMission|03|04}} [[Try Curling! Alterna's 11th Most Popular Athleisure Activity!]] || || || || || || || {{Yea}} || {{Yea}} || | ||
|- | |- | ||
| {{RotMMission|03|05}} [[Conveyor-Belt Tightening]] || || || || || || || {{ | | {{RotMMission|03|05}} [[Conveyor-Belt Tightening]] || || || || || || || {{Yea}} || {{Yea}} || {{Yea}} | ||
|- | |- | ||
| {{RotMMission|03|07}} [[Rail Pass]] || || || || || {{ | | {{RotMMission|03|07}} [[Rail Pass]] || || || || || {{Yea}} || {{Yea}} || || || | ||
|- | |- | ||
| [[Landfill Dreamland]] || || {{ | | [[Landfill Dreamland]] || || {{Yea}} || || || {{Yea}} || {{Yea}} || || || | ||
|- | |- | ||
| {{RotMMission|04|01}} [[Propellered to Greatness]] || || || || || {{ | | {{RotMMission|04|01}} [[Propellered to Greatness]] || || || || || {{Yea}} || {{Yea}} || || || | ||
|- | |- | ||
| {{RotMMission|04|02}} [[Octohoppers Don't Have a Sense of Humor (and They Hate Puns)!]] || || || || {{ | | {{RotMMission|04|02}} [[Octohoppers Don't Have a Sense of Humor (and They Hate Puns)!]] || || || || {{Yea}} || {{Yea}} || || || || | ||
|- | |- | ||
| {{RotMMission|04|03}} [[Let's Put a Pin in That]] || || || || || {{ | | {{RotMMission|04|03}} [[Let's Put a Pin in That]] || || || || || {{Yea}} || || || || | ||
|- | |- | ||
| {{RotMMission|04|04}} [[Splash the Block Party]] || || {{ | | {{RotMMission|04|04}} [[Splash the Block Party]] || || {{Yea}} || || || {{Yea}} || {{Yea}} || || || | ||
|- | |- | ||
| {{RotMMission|04|05}} [[Amusing a Bemused Muse]] || || {{ | | {{RotMMission|04|05}} [[Amusing a Bemused Muse]] || || {{Yea}} || || || || || || || | ||
|- | |- | ||
| {{RotMMission|04|06}} [[Those Aren't Birds]] || || || || || || || {{ | | {{RotMMission|04|06}} [[Those Aren't Birds]] || || || || || || || {{Yea}} || || {{Yea}} | ||
|- | |- | ||
| {{RotMMission|04|07}} [[Charge Now, Splat Later]] || || {{ | | {{RotMMission|04|07}} [[Charge Now, Splat Later]] || || {{Yea}} || || || {{Yea}} || || || || | ||
|- | |- | ||
| {{RotMMission|04|09}} [[Flying Worst Class]] || || || || {{ | | {{RotMMission|04|09}} [[Flying Worst Class]] || || || || {{Yea}} || {{Yea}} || || || || | ||
|- | |- | ||
| {{RotMMission|04|11}} [[Stamp 'Em Out]] || || {{ | | {{RotMMission|04|11}} [[Stamp 'Em Out]] || || {{Yea}} || {{Yea}} || {{Yea}} || {{Yea}} || {{Yea}} || || || | ||
|- | |- | ||
| [[Eco-Forest Treehills]] || || || || || || {{ | | [[Eco-Forest Treehills]] || || || || || || {{Yea}} || || || | ||
|- | |- | ||
| {{RotMMission|05|01}} [[Trouble Round Every Corner]] || || {{ | | {{RotMMission|05|01}} [[Trouble Round Every Corner]] || || {{Yea}} || || || {{Yea}} || || || || | ||
|- | |- | ||
| {{RotMMission|05|02}} [[The Upside to Enemy Backsides]] || || {{ | | {{RotMMission|05|02}} [[The Upside to Enemy Backsides]] || || {{Yea}} || || || {{Yea}} || {{Yea}} || || || | ||
|- | |- | ||
| {{RotMMission|05|03}} [[Uh-Oh! Too Many Snipers!]] || || {{ | | {{RotMMission|05|03}} [[Uh-Oh! Too Many Snipers!]] || || {{Yea}} || || {{Yea}} || {{Yea}} || || || || | ||
|- | |- | ||
| {{RotMMission|05|04}} [[Barriers! They've Got You Covered]] || || || || || {{ | | {{RotMMission|05|04}} [[Barriers! They've Got You Covered]] || || || || || {{Yea}} || || || || | ||
|- | |- | ||
| {{RotMMission|05|06}} [[Zipping over the Neighborhood]] || {{ | | {{RotMMission|05|06}} [[Zipping over the Neighborhood]] || {{Yea}} || {{Yea}} || || {{Yea}} || {{Yea}} || || || || | ||
|- | |- | ||
| {{RotMMission|05|07}} [[One-Way Ride through Target Town]] || || || || || || || {{ | | {{RotMMission|05|07}} [[One-Way Ride through Target Town]] || || || || || || || {{Yea}} || {{Yea}} || {{Yea}} | ||
|- | |- | ||
| {{RotMMission|05|08}} [[Making Waves with Splashdowns]] || {{ | | {{RotMMission|05|08}} [[Making Waves with Splashdowns]] || {{Yea}} || {{Yea}} || || || {{Yea}} || || || || | ||
|- | |- | ||
| {{RotMMission|05|09}} [[Low Viz, High Risk]] || || {{ | | {{RotMMission|05|09}} [[Low Viz, High Risk]] || || {{Yea}} || || {{Yea}} || {{Yea}} || || || || | ||
|- | |- | ||
| {{RotMMission|05|11}} [[Simply Zipcastic!]] || || {{ | | {{RotMMission|05|11}} [[Simply Zipcastic!]] || || {{Yea}} || || || {{Yea}} || {{Yea}} || || || | ||
|- | |- | ||
| {{RotMMission|05|12}} [[You'll Go Far If You Shoot Far]] || || {{ | | {{RotMMission|05|12}} [[You'll Go Far If You Shoot Far]] || || {{Yea}} || || {{Yea}} || {{Yea}} || || || || | ||
|- | |- | ||
| {{RotMMission|05|13}} [[Learn to Reflect, and This One Is in the Bank]] || || || || {{ | | {{RotMMission|05|13}} [[Learn to Reflect, and This One Is in the Bank]] || || || || {{Yea}} || {{Yea}} || || || || | ||
|- | |- | ||
| [[Happiness Research Lab]] || || {{ | | [[Happiness Research Lab]] || || {{Yea}} || || || {{Yea}} || {{Yea}} || || || | ||
|- | |- | ||
| {{RotMMission|06|01}} [[Bet You Mist Us!]] || || {{ | | {{RotMMission|06|01}} [[Bet You Mist Us!]] || || {{Yea}} || || || {{Yea}} || || || || | ||
|- | |- | ||
| {{RotMMission|06|02}} [[Octarian Heights]] || || || || || {{ | | {{RotMMission|06|02}} [[Octarian Heights]] || || || || || {{Yea}} || || || || | ||
|- | |- | ||
| {{RotMMission|06|03}} [[Torture Tour]] || || {{ | | {{RotMMission|06|03}} [[Torture Tour]] || || {{Yea}} || || || {{Yea}} || {{Yea}} || || || | ||
|- | |- | ||
| {{RotMMission|06|04}} [[Conserve | | {{RotMMission|06|04}} [[Conserve Ink—Splat Sustainably]] || {{Yea}} || {{Yea}} || || || {{Yea}} || || || || | ||
|- | |- | ||
| {{RotMMission|06|06}} [[Keep It Rolling]] || || || || {{ | | {{RotMMission|06|06}} [[Keep It Rolling]] || || || || {{Yea}} || {{Yea}} || {{Yea}} || || || | ||
|- | |- | ||
| {{RotMMission|06|07}} [[That Sinking Feeling]] || || {{ | | {{RotMMission|06|07}} [[That Sinking Feeling]] || || {{Yea}} || || || {{Yea}} || || || || | ||
|- | |- | ||
| {{RotMMission|06|10}} [[Mission: Fly-Fishin']] || || {{ | | {{RotMMission|06|10}} [[Mission: Fly-Fishin']] || || {{Yea}} || || || {{Yea}} || || || || | ||
|- | |- | ||
| {{RotMMission|06|11}} [[Don't Tease with the Keys]] || {{ | | {{RotMMission|06|11}} [[Don't Tease with the Keys]] || {{Yea}} || {{Yea}} || || {{Yea}} || {{Yea}} || || || || | ||
|- | |- | ||
| {{RotMMission|06|12}} [[Enter the Stamp Gauntlet]] || {{ | | {{RotMMission|06|12}} [[Enter the Stamp Gauntlet]] || {{Yea}} || || || {{Yea}} || || || || || | ||
|- | |- | ||
| [[Alterna Space Center]] || {{ | | [[Alterna Space Center]] || {{Yea}} || {{Yea}} || || || {{Yea}} || {{Yea}} || || || | ||
|- | |- | ||
| {{RotMMission|Rocket|01}} [[Alterna Space Center: Entrance]] || || {{ | | {{RotMMission|Rocket|01}} [[Alterna Space Center: Entrance]] || || {{Yea}} || || {{Yea}} || {{Yea}} || || || || | ||
|- | |- | ||
| {{RotMMission|Rocket|03}} [[Alterna Space Center Lift]] || || || {{ | | {{RotMMission|Rocket|03}} [[Alterna Space Center Lift]] || || || {{Yea}} || {{Yea}} || {{Yea}} || || || || | ||
|- | |- | ||
| {{RotMMission|Rocket|04}} [[The Spirit Lifter: Steerage]] || || || || {{ | | {{RotMMission|Rocket|04}} [[The Spirit Lifter: Steerage]] || || || || {{Yea}} || {{Yea}} || || || || | ||
|- | |- | ||
| {{RotMMission|Rocket|05}} [[The Spirit Lifter: First Class]] || || {{ | | {{RotMMission|Rocket|05}} [[The Spirit Lifter: First Class]] || || {{Yea}} || || || {{Yea}} || || || || | ||
|} | |} | ||
==Gallery== | ==Gallery== | ||
===''Splatoon''=== | |||
<gallery> | <gallery> | ||
Crate1.png|[[Agent 3 (Splatoon)|Agent 3]] approaching a large crate | Crate1.png|[[Agent 3 (Splatoon)|Agent 3]] approaching a large crate | ||
Crate2.jpg|A small | Crate2.jpg|A small Cuttlegear crate containing the [[Sunken Scroll]] in [[Octotrooper Hideout]] | ||
Octosniper Ramparts Sunken Scroll.jpg|A crate containing the Sunken Scroll in [[Octosniper Ramparts]] | Octosniper Ramparts Sunken Scroll.jpg|A crate containing the Sunken Scroll in [[Octosniper Ramparts]] | ||
Inkvisible Avenues Checkpoint 2-Sunken Scroll Location.jpg|Agent 3 next to the crate containing the Sunken Scroll in [[Inkvisible Avenues]] | Inkvisible Avenues Checkpoint 2-Sunken Scroll Location.jpg|Agent 3 next to the crate containing the Sunken Scroll in [[Inkvisible Avenues]] | ||
S Battle Dojo Crate.png|A crate found in the [[Battle Dojo]] | |||
S2 Large plain crate.png|A large plain crate in [[Splatoon 2]] | </gallery> | ||
S2 plain small crate.png|A small plain crate in [[Splatoon 2]] | |||
===''Splatoon 2''=== | |||
Octo Expansion Small Crate.jpg|A small crate from the ''[[ | <gallery> | ||
Small target | S2 Large plain crate.png|A large plain crate in ''[[Splatoon 2]]'' | ||
S2 plain small crate.png|A small plain crate in ''[[Splatoon 2]]'' | |||
</gallery> | |||
====''Octo Expansion''==== | |||
<gallery> | |||
Octo Expansion Kamabo Co logo crate.png|Large orange crate with [[Kamabo Co.]] logo from the ''[[Octo Expansion]]'' | |||
Octo Expansion Small Crate.jpg|A small target crate from the ''Octo Expansion'' | |||
Octo Expansion Large Crate.png|A large target crate from the ''Octo Expansion'' in {{OctoExpansionStation|D|06}}{{OctoExpansionStation|C|01}}[[Radical Rails Station]] | |||
</gallery> | |||
===''Splatoon 3''=== | |||
<gallery> | |||
RotM Armored orange crate.png|A large armored crate in [[Cozy & Safe Factory]] | |||
RotM Small target crates on Octowashers.png|Small target crates on [[Octowasher]]s in {{RotMMission|02|04}} [[Splitting Crosshairs]] | |||
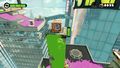
RotM Large target crate.png|A large target crate in {{RotMMission|02|05}} [[Tread Heavily]] | |||
RotM Large target crates side view.png|Large target crates seen from the side in the same mission. | |||
RotM Small target crate flying towards player.png|A small target crate flying in {{RotMMission|04|06}} [[Those Aren't Birds]] | |||
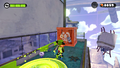
RotM Armored and large plain crates.png|Large plain crates stacked on top of armored plain crates in {{RotMMission|04|11}} [[Stamp 'Em Out]] | |||
</gallery> | </gallery> | ||
{{ | {{More images|Clean symbol/icon of a crate}} | ||
==Trivia== | ==Trivia== | ||
*[[Octarians]] can destroy crates with their own ink. If there are [[Power Egg]]s inside them and the Octarian destroys it, the player will not receive the Power Eggs. | *[[Octarians]] can destroy crates with their own ink. If there are [[Power Egg]]s inside them and the Octarian destroys it, the player will not receive the Power Eggs. | ||
**This is required to progress in one ''Octo Expansion'' level, during the [[Villi Phase]]. | **This is required to progress in one ''Octo Expansion'' level, during the [[Villi Phase]]. | ||
**In [[Octo Canyon (mode)|Octo Canyon]], the [[Octarian]]s' ink does not affect decorated crates but can damage the normal crate | **In [[Octo Canyon (mode)|Octo Canyon]], the [[Octarian]]s' ink does not affect decorated crates but can damage the normal crate. | ||
* Crates are available for purchase at [[Hotlantis]] as decorations for [[Locker room|lockers]]. | * Crates are available for purchase at [[Hotlantis]] as decorations for [[Locker room|lockers]]. | ||
==Names in other languages== | ==Names in other languages== | ||
{{ | <div style="display:flex;gap:30px;justify-content:flex-start;flex-wrap:wrap;align-items:flex-start"> | ||
{{Localized name | |||
|title=Crate | |||
|Dut=Kist | |Dut=Kist | ||
|DutM=Box | |DutM=Box | ||
|Rus=Ящик | |||
|RusR=Yashchik | |||
|RusM=Box | |||
|Spa=Caja | |Spa=Caja | ||
|SpaM=Box | |SpaM=Box | ||
|Jap=木箱|JapM=Wooden Box|JapR=Kibako|Ita=Cassa|ItaM=Box}} | |||
{{Localized name | |||
|title=Target | |||
|Jap=マト | |||
|JapR=Mato | |||
|JapM=Target | |||
|Dut=Doelwit | |||
|DutM=Target | |||
|Fre=Cible | |||
|FreM=Target | |||
|Ger=Ziel | |||
|GerM=Target | |||
|Ita=Bersaglio | |||
|ItaM=Target | |||
|Rus=Мишень | |||
|RusR=Mishen' | |||
|RusM=Target | |||
|Spa=Blanco | |||
|SpaM= | |||
|SpaA=<!--Spanish (NoA) and (NoE) share the same name--> | |||
|SpaAM= | |||
|ChiS=标靶 | |||
|ChiSR= | |||
|ChiSM= | |||
|ChiT=標靶 | |||
|ChiTR= | |||
|ChiTM= | |||
|Kor=과녁 | |||
|KorR= | |||
|KorM=Target | |||
|Internal=Msn_BreakableObj_09 <ref name="Leanny GitHub">[https://github.com/Leanny/splat3/blob/main/data/language/EUen.json {{GH}} Leanny on GitHub]</ref> | |||
|InternalM= | |||
}} | }} | ||
</div> | |||
==References== | |||
<references/> | |||
{{Navbox/Mechanics}} | {{Navbox/Mechanics}} | ||
Latest revision as of 12:49, 7 March 2024

Crates are boxes which appear in the Splatoon series' single-player modes. Crates may contain items such as Power Eggs, Sunken Scrolls, armor, canned specials, Power Egg packs, or nothing at all. Crates are also found in Battle Dojo battles, where they contain an assortment of effects.
Description
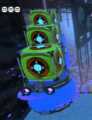
Crates are common features found both in single-player modes and the Battle Dojo. Crates often appear solo, in groups, or stacked, and may even support Octarians perched on top. Some crates can be submerged in enemy ink and only appear when covered with the player's own ink. Crates can be destroyed easily by being splattered with ink. They come in two sizes, small and large, and in multiple different types.
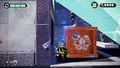
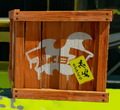
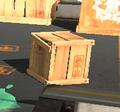
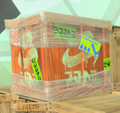
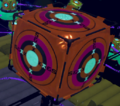
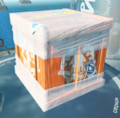
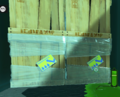
Plain crates are made of light brown wooden planks. Cuttlegear crates[1], also known as orange crates[2], are made of darker orange planks and covered in insignias and stickers. In Octo Valley and Octo Canyon the orange crates have the Cuttlegear logo on them, while in the Octo Expansion they are adorned with the Kamabo Co. logo. When broken, Cuttlegear crates may reveal collectibles such as Power Eggs and Sunken Scrolls, while plain crates contain nothing.
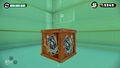
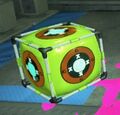
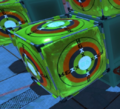
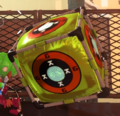
In the Octo Expansion, a new type of crate is added. This crate is called the Target Crate and functions similar to the new Target Balloons. The Target Crates are neon green with a multicolored target printed on each side. Whereas regular crates are made of wood, the Target Crates appear to be some sort of plastic or fabric material stretched across a metal cuboid frame. Target Crates usually contain nothing and have to be broken to open doors, reveal secrets, or pass tests.
Armored crates
Armored crates are similar to regular crates, but they take more ink to destroy. The crates seem to be armored with tape attached to them. Like regular crates, they come in plain and Cuttlegear varieties. They are sometimes used to block paths. An example of this is the path to the kettle for the mission Sunset Octocopter in Octo Canyon.
Appearances

Gallery
Splatoon
-
Agent 3 approaching a large crate
-
A small Cuttlegear crate containing the Sunken Scroll in Octotrooper Hideout
-
A crate containing the Sunken Scroll in Octosniper Ramparts
-
Agent 3 next to the crate containing the Sunken Scroll in Inkvisible Avenues
-
A crate found in the Battle Dojo


Splatoon 2
-

A large plain crate in Splatoon 2
-
A small plain crate in Splatoon 2


Octo Expansion
-
Large orange crate with Kamabo Co. logo from the Octo Expansion
-
A small target crate from the Octo Expansion
-
A large target crate from the Octo Expansion in D06C01Radical Rails Station


Splatoon 3
-
A large armored crate in Cozy & Safe Factory
-
Small target crates on Octowashers in 0204 Splitting Crosshairs
-
A large target crate in 0205 Tread Heavily
-

Large target crates seen from the side in the same mission.
-
A small target crate flying in 0406 Those Aren't Birds
-
Large plain crates stacked on top of armored plain crates in 0411 Stamp 'Em Out


Reason: Clean symbol/icon of a crate
Trivia
- Octarians can destroy crates with their own ink. If there are Power Eggs inside them and the Octarian destroys it, the player will not receive the Power Eggs.
- This is required to progress in one Octo Expansion level, during the Villi Phase.
- In Octo Canyon, the Octarians' ink does not affect decorated crates but can damage the normal crate.
Names in other languages
| Language | Name | Meaning |
|---|---|---|
| 木箱 Kibako |
Wooden Box | |
| Kist | Box | |
| Cassa | Box | |
| Ящик Yashchik |
Box | |
| Caja | Box |
| Language | Name | Meaning |
|---|---|---|
| マト Mato |
Target | |
| Doelwit | Target | |
| Cible | Target | |
| Ziel | Target | |
| Bersaglio | Target | |
| Мишень Mishen' |
Target | |
| Blanco | ||
| 标靶 | ||
| 標靶 | ||
| 과녁 | Target | |
| Msn_BreakableObj_09 [3] |
References
- ↑ A locker decoration available in Splatoon 3 that resembles these crates is called the "Cuttlegear crate"
- ↑ Splatoon 2: Prima Official Guide, on page 16
- ↑
 Leanny on GitHub
Mechanics
| ||||||||||
|
