Headspace: Difference between revisions
Nukleopatra (talk | contribs) m (Text replacement - "{{Foreignname" to "{{Localized name") |
m (changed spelling per localization policy) |
||
| (10 intermediate revisions by 9 users not shown) | |||
| Line 1: | Line 1: | ||
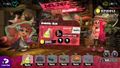
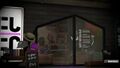
[[File:Headspace.jpg|thumb|right| | [[File:S3 Headspace.jpg|thumb|right|Headspace as it appears in {{S3}}.]] | ||
'''Headspace''' is a shop run by [[Flow | '''Headspace''' is a shop run by [[Flow and Craymond]] in ''[[Splatoon 2]]'' and {{S3}}. It is found to the left of [[Inkopolis Square]], in the center of the [[Galleria]]. | ||
==Description== | ==Description== | ||
Headspace sells | Headspace sells headgear items that can be purchased with [[cash]], which come with their default primary [[Gear ability|ability]], the default number of ability slot(s) (''Splatoon 2'') or [[star power]] (''Splatoon 3''), no experience, and empty secondary ability slot(s). | ||
There are six (''Splatoon 2'') or nine (''Splatoon 3'') unique headgear items at a time, which are randomly chosen among eligible items and cycle at midnight UTC. In ''Splatoon 3'', Headspace shares its daily stock with [[Naut Couture]] and [[Cooler Heads]]: purchasing an item in one of the headgear shops removes it from other headgear shops. | |||
The availability of shop gear by initial star power is based on the player's [[level]]. In ''Splatoon 3'', gear items exclusive to the [[catalog]] need to be obtained from it before they start appearing in Headspace. | |||
<div style="display: flex; gap:40px; flex-wrap: wrap; justify-content: center"> | |||
{| class="wikitable sitecolor-s2" | |||
|+ Gear availability by star count in ''Splatoon 2'' | |||
|- | |||
! Levels !! {{Stars|count=1|total=1}} !! {{Stars|count=2|total=2}} !! {{Stars|count=3|total=3}} | |||
|- | |||
! 4-6 | |||
| style="text-align: right;"| 6 | |||
| style="text-align: right;"| N/A | |||
| style="text-align: right;"| N/A | |||
|- | |||
! 7-9 | |||
| style="text-align: right;"| 5 | |||
| style="text-align: right;"| 1 | |||
| style="text-align: right;"| N/A | |||
|- | |||
! 10-12 | |||
| style="text-align: right;"| 4 | |||
| style="text-align: right;"| 2 | |||
| style="text-align: right;"| N/A | |||
|- | |||
! 13-15 | |||
| style="text-align: right;"| 3 | |||
| style="text-align: right;"| 2 | |||
| style="text-align: right;"| 1 | |||
|- | |||
! 16-19 | |||
| style="text-align: right;"| 2 | |||
| style="text-align: right;"| 3 | |||
| style="text-align: right;"| 1 | |||
|- | |||
! 20+ | |||
| style="text-align: right;"| 2 | |||
| style="text-align: right;"| 2 | |||
| style="text-align: right;"| 2 | |||
|} | |||
{| class="wikitable sitecolor-s3" | |||
|+ Gear availability by star power in ''Splatoon 3'' | |||
|- | |||
!rowspan="2"| Levels | |||
!colspan="2"| | |||
!colspan="2"| {{Stars|count=1|total=1}} | |||
!colspan="2"| {{Stars|count=2|total=2}} | |||
|- | |||
!Pre-S3 | |||
!S3 | |||
!Pre-S3 | |||
!S3 | |||
!Pre-S3 | |||
!S3 | |||
|- | |||
! 4-6 | |||
| style="text-align: right;"| 6 | |||
| style="text-align: right;"| 3 | |||
| style="text-align: right;"| N/A | |||
| style="text-align: right;"| N/A | |||
| style="text-align: right;"| N/A | |||
| style="text-align: right;"| N/A | |||
|- | |||
! 7-9 | |||
| style="text-align: right;"| 6 | |||
| style="text-align: right;"| 2 | |||
| style="text-align: right;"| N/A | |||
| style="text-align: right;"| 1 | |||
| style="text-align: right;"| N/A | |||
| style="text-align: right;"| N/A | |||
|- | |||
! 10-12 | |||
| style="text-align: right;"| 4 | |||
| style="text-align: right;"| 2 | |||
| style="text-align: right;"| 2 | |||
| style="text-align: right;"| 1 | |||
| style="text-align: right;"| N/A | |||
| style="text-align: right;"| N/A | |||
|- | |||
! 13-15 | |||
| style="text-align: right;"| 3 | |||
| style="text-align: right;"| 2 | |||
| style="text-align: right;"| 2 | |||
| style="text-align: right;"| 1 | |||
| style="text-align: right;"| N/A | |||
| style="text-align: right;"| 1 | |||
|- | |||
! 16-19 | |||
| style="text-align: right;"| 2 | |||
| style="text-align: right;"| 1 | |||
| style="text-align: right;"| 2 | |||
| style="text-align: right;"| 2 | |||
| style="text-align: right;"| 1 | |||
| style="text-align: right;"| 1 | |||
|- | |||
! 20+ | |||
| style="text-align: right;"| 2 | |||
| style="text-align: right;"| 1 | |||
| style="text-align: right;"| 2 | |||
| style="text-align: right;"| 1 | |||
| style="text-align: right;"| 2 | |||
| style="text-align: right;"| 1 | |||
|}<ref>[https://discord.com/channels/1020502841544151141/1020516031875260466/1080162737793024060 {{DC}} Lean#3146 on Inkipedia Discord]</ref> | |||
</div> | |||
<div style="text-align:right;"><small>In ''Splatoon 3'', gear items in shops are grouped to (1) returning gear from previous games and (2) gear introduced in ''Splatoon 3''.<ref>[https://twitter.com/LeanYoshi/status/1630464696774979585 {{TWI}} @LeanYoshi on Twitter]</ref></small></div> | |||
Whether owned items can be repurchased differs between games: | |||
* In ''Splatoon 2'', owned items can only be repurchased if their primary ability is different from their default ones i.e., obtained from [[SplatNet 2]]; they are labelled as "Owned" and cannot be repurchased otherwise. | |||
** Repurchasing an item costs the same as buying it for the first time. | |||
** Repurchasing an item fully replaces the owned item, resetting all its abilities to their default state. | |||
** Shop items that can be repurchased have a lime loop icon on the top-left corner and have a gray background (as with "Owned" and unaffordable items). | |||
** There is no limit on how many times a specific item can be (re)purchased. | |||
* In ''Splatoon 3'', each gear item can only be bought once per day, but owned items can be repurchased, which gives the following options: | |||
** Replacing the owned item with its brand new duplicate (with default primary [[Gear ability|ability]], default [[star power]], and empty secondary ability slots), with the same price as buying it for the first time. | |||
** Upgrading the owned item's star power to the next one, which costs [[cash]] depending on its star power. | |||
<div style="display: flex; justify-content: center"> | |||
{| class="wikitable sitecolor-s3" | |||
|- | |||
!Next star power!![[Cash]]!!Slots!!XP Multiplier | |||
|- | |||
| | |||
|style="text-align: right"|N/A | |||
|style="text-align: center"|{{loop|1|{{Ability/new|game=S3|name=?|icononly=true}}}} | |||
|style="text-align: right"|1.00 | |||
|- | |||
|style="text-align: center"|{{Stars|count=1|total=1|size=15px}} | |||
|style="text-align: right"|10,000 | |||
|style="text-align: center"|{{loop|2|{{Ability/new|game=S3|name=?|icononly=true}}}} | |||
|style="text-align: right"|1.00 | |||
|- | |||
|style="text-align: center"|{{Stars|count=2|total=2|size=15px}} | |||
|style="text-align: right"|30,000 | |||
|style="text-align: center"|{{loop|3|{{Ability/new|game=S3|name=?|icononly=true}}}} | |||
|style="text-align: right"|1.00 | |||
|- | |||
|style="text-align: center"|{{Stars|count=3|total=3|size=15px}} | |||
|style="text-align: right"|50,000 | |||
|style="text-align: center"|{{loop|3|{{Ability/new|game=S3|name=?|icononly=true}}}} | |||
|style="text-align: right"|1.03 | |||
|- | |||
|style="text-align: center"|{{Stars|count=4|total=4|size=15px}} | |||
|style="text-align: right"|100,000 | |||
|style="text-align: center"|{{loop|3|{{Ability/new|game=S3|name=?|icononly=true}}}} | |||
|style="text-align: right"|1.06 | |||
|- | |||
|style="text-align: center"|{{Stars|count=5|total=5|size=15px}} | |||
|style="text-align: right"|200,000 | |||
|style="text-align: center"|{{loop|3|{{Ability/new|game=S3|name=?|icononly=true}}}} | |||
|style="text-align: right"|1.10 | |||
|}</div> | |||
Players can tilt {{button|RS|Switch}} to rotate their character and click {{button|RS|Switch}} to try on the highlighted item, and pressing {{Button|A|Switch}} purchases this item. Pressing {{Button|ZL|Switch}} displays further information about the selected item. Pressing {{Button|ZR|Switch}} zooms in on the player's head, allowing for a closer look at the headgear. Pressing {{Button|L|Switch}} allows players to enter [[Ye Olde Cloth Shoppe]] and pressing {{Button|R|Switch}} similarly allows them to enter [[Ammo Knights]], while pressing {{Button|B|Switch}} takes players back to [[Inkopolis Square]]. | |||
===Audio=== | ===Audio=== | ||
| Line 15: | Line 168: | ||
==Merchandise== | ==Merchandise== | ||
{{Headspace/List of merchandise in Splatoon 2}} | {{Headspace/List of merchandise in Splatoon 2}} | ||
==Badges== | |||
{{Main|Badge#Purchased Items}} | |||
Spending enough money at Headspace will reward the player with special [[badge]]s that they can use on their [[Splashtag]]. | |||
{| class="wikitable sitecolor-s3" | |||
! colspan="3" |Headspace [[Badge]]s | |||
|- | |||
|[[File:S3 Badge Headspace 100K.png|32x32px]]||100K Headspace Club | |||
|- | |||
|[[File:S3 Badge Headspace 1M.png|32x32px]]||1M Headspace Club | |||
|} | |||
==Gallery== | ==Gallery== | ||
<gallery> | <gallery> | ||
Headspace.jpg|Headspace as it appears in {{S2}}. | |||
Headspace interior.jpg|The interior of Headspace, with the background unobscured. | |||
Headspace poster.jpg|alt=A black rectangular poster about the size of an Inkling's body depicting the Headspace logo in white text with more white text above it. It is located outside of the Headspace shop on the wall to the right.|A Headspace Poster | |||
Headspace outside items.jpg|alt=A table with a small hat rack holding the Straw Boater with a black band rather than pink on the top, the Hickory Work Cap just below it, and the Knitted Cap on the lowest arm of the hat rack. There is a small mirror on the table and the rest is filled with colorful rectangular prisms which can be assumed are boxed products. In front of the table is a blackboard with text written on it in black chalk.|Products outside of Headspace | |||
File:Headspace wide.jpg|alt=The Headspace shop in ''Splatoon 2''. It sits between Ammo Knights to the right and Shella Fresh to the left. The shop is framed in shiny black metal and supports similar to gutters in the same material, a blackboard with white chalk text sits in front of the left frame. the storefront sits inside of the frame back by a few paces and sided with dark | Headspace close up.jpg|alt=The exterior of Headspace with smooth dark gray panels. A table with a hat rack filled with the Straw Boater with a black ribbon, the Hickory Work Cap, and the Knitted Hat along with a chalkboard sits to the left of the door while a low box with a black arrow sign poking out of it pointing towards the door is to the right and sits against the right side of the glass door panels. The door is a wide pentagon shape with a shallow point to the top which meets in the middle where the door is split into two glass panels. On the right panel, a black poster can be seen with one row of large white letters going down the leftmost side while the right side of the poster is occupied by four paragraphs of white text in a much smaller font. The interior can also somewhat be seen with a red hammock to the upper right, many shelves with various pieces of headgear such as the Bobble Hat in pink, Classic Straw Boater with a purple ribbon, Zekko Mesh, the Two-Stripe Mesh in yellow, the Straw Boater in black with a blue ribbon, and the Urchins Cap in black with a green bill. |A close screenshot of Headspace's Exterior | ||
File:Headspace wide.jpg|alt=The Headspace shop in ''Splatoon 2''. It sits between Ammo Knights to the right and Shella Fresh to the left. The shop is framed in shiny black metal and supports similar to gutters in the same material, a blackboard with white chalk text sits in front of the left frame. the storefront sits inside of the frame back by a few paces and is sided with dark gray paneling. On the right wall is a black poster with white text and on the left wall are two white papers. On the main wall is a large white glowing sign with the Headspace logo on it in large black text with a thin pink border sitting within the sign along with pink text above the logo and a pink line separating the logo's top and bottom halves which is usually separated by a line of the same color as the text. In front of the sign, there is a table with a hat rack with a Straw Bowler with a black ribbon, the Knitted Hat, and the Hickory Work Cap. On the right side of the door, there is a low rectangular box with an arrow sign propped up out of it by a thin post, the arrow on top being black with white text that points towards the poster on the door which is also in black with white text. The door is framed in black metal and is a wide and shallow pentagon with glass that shows the products inside. The ground is gray and paved. |The exterior of Headspace | |||
</gallery> | </gallery> | ||
| Line 31: | Line 196: | ||
==Names in other languages== | ==Names in other languages== | ||
{{Localized name | {{Localized name | ||
|color= | |color=Generic | ||
|Jap=エボシ・エボシ | |Jap=エボシ・エボシ | ||
|JapR=Eboshi Eboshi | |JapR=Eboshi Eboshi | ||
| Line 45: | Line 210: | ||
|Rus=Аурелия | |Rus=Аурелия | ||
|RusR=Aureliya | |RusR=Aureliya | ||
|RusM=From "aurelia", the | |RusM=From "aurelia", the Latin name of a moon jellyfish | ||
|Spa=Palasesera | |Spa=Palasesera | ||
|SpaM=Pun on ''"Para la sesera"'' (For the skull) | |SpaM=Pun on ''"Para la sesera"'' (For the skull) | ||
|ChiS=僧帽之帽 | |||
|ChiSR=Sēngmào zhī mào | |||
|ChiSM=Hat of Portuguese man-of-war | |||
|ChiT= | |||
|ChiTR= | |||
|ChiTM= | |||
}} | }} | ||
==References== | |||
<references /> | |||
{{Navbox/S2 Locations}} | {{Navbox/S2 Locations}} | ||
{{Navbox/S3 Locations}} | |||
[[Category:Splatoon 2 shops]] | [[Category:Splatoon 2 shops]] | ||
[[Category:Splatoon 3 shops]] | |||
Latest revision as of 21:11, 9 April 2024

Headspace is a shop run by Flow and Craymond in Splatoon 2 and Splatoon 3. It is found to the left of Inkopolis Square, in the center of the Galleria.
Description
Headspace sells headgear items that can be purchased with cash, which come with their default primary ability, the default number of ability slot(s) (Splatoon 2) or star power (Splatoon 3), no experience, and empty secondary ability slot(s).
There are six (Splatoon 2) or nine (Splatoon 3) unique headgear items at a time, which are randomly chosen among eligible items and cycle at midnight UTC. In Splatoon 3, Headspace shares its daily stock with Naut Couture and Cooler Heads: purchasing an item in one of the headgear shops removes it from other headgear shops.
The availability of shop gear by initial star power is based on the player's level. In Splatoon 3, gear items exclusive to the catalog need to be obtained from it before they start appearing in Headspace.
| Levels | |||
|---|---|---|---|
| 4-6 | 6 | N/A | N/A |
| 7-9 | 5 | 1 | N/A |
| 10-12 | 4 | 2 | N/A |
| 13-15 | 3 | 2 | 1 |
| 16-19 | 2 | 3 | 1 |
| 20+ | 2 | 2 | 2 |
| Levels | ||||||
|---|---|---|---|---|---|---|
| Pre-S3 | S3 | Pre-S3 | S3 | Pre-S3 | S3 | |
| 4-6 | 6 | 3 | N/A | N/A | N/A | N/A |
| 7-9 | 6 | 2 | N/A | 1 | N/A | N/A |
| 10-12 | 4 | 2 | 2 | 1 | N/A | N/A |
| 13-15 | 3 | 2 | 2 | 1 | N/A | 1 |
| 16-19 | 2 | 1 | 2 | 2 | 1 | 1 |
| 20+ | 2 | 1 | 2 | 1 | 2 | 1 |
Whether owned items can be repurchased differs between games:
- In Splatoon 2, owned items can only be repurchased if their primary ability is different from their default ones i.e., obtained from SplatNet 2; they are labelled as "Owned" and cannot be repurchased otherwise.
- Repurchasing an item costs the same as buying it for the first time.
- Repurchasing an item fully replaces the owned item, resetting all its abilities to their default state.
- Shop items that can be repurchased have a lime loop icon on the top-left corner and have a gray background (as with "Owned" and unaffordable items).
- There is no limit on how many times a specific item can be (re)purchased.
- In Splatoon 3, each gear item can only be bought once per day, but owned items can be repurchased, which gives the following options:
- Replacing the owned item with its brand new duplicate (with default primary ability, default star power, and empty secondary ability slots), with the same price as buying it for the first time.
- Upgrading the owned item's star power to the next one, which costs cash depending on its star power.
| Next star power | Cash | Slots | XP Multiplier |
|---|---|---|---|
| N/A | 1.00 | ||
| 10,000 | 1.00 | ||
| 30,000 | 1.00 | ||
| 50,000 | 1.03 | ||
| 100,000 | 1.06 | ||
| 200,000 | 1.10 |
Players can tilt to rotate their character and click to try on the highlighted item, and pressing purchases this item. Pressing displays further information about the selected item. Pressing zooms in on the player's head, allowing for a closer look at the headgear. Pressing allows players to enter Ye Olde Cloth Shoppe and pressing similarly allows them to enter Ammo Knights, while pressing takes players back to Inkopolis Square.
Audio
- Main article: Music
A variation of DJ Real Sole's song New You can be heard in the shop.
Merchandise


Badges
- Main article: Badge#Purchased Items
Spending enough money at Headspace will reward the player with special badges that they can use on their Splashtag.
| Headspace Badges | ||
|---|---|---|
| 100K Headspace Club | ||
| 1M Headspace Club | ||
Gallery
-
Headspace as it appears in Splatoon 2.
-
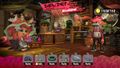
The interior of Headspace, with the background unobscured.
-
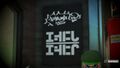
A Headspace Poster
-
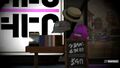
Products outside of Headspace
-
A close screenshot of Headspace's Exterior
-
The exterior of Headspace


Trivia
- Headspace seems to be inspired by Lush cosmetics, given the blackboard writing, bath bombs, and creams being shown in the background.
- Headspace's logo loosely resembles its name in Japanese, "Eboshi Eboshi" (エボシ・エボシ).
Names in other languages
| Language | Name | Meaning |
|---|---|---|
| エボシ・エボシ Eboshi Eboshi |
"Eboshi" is an ancient Japanese hat | |
| Hoofdmoot | From "hoofd" (head), and "moot" (a cut piece of fish) | |
| Couvre-seiche | From "couvre-chef" (headgear), and "seiche" (cuttlefish) | |
| Kopfsache | From "Kopf" (head) "Sache" (thing) | |
| Karma & Cappelli | Karma & Cappelli (a surname, also means "hats") | |
| Аурелия Aureliya |
From "aurelia", the Latin name of a moon jellyfish | |
| Palasesera | Pun on "Para la sesera" (For the skull) | |
| 僧帽之帽 Sēngmào zhī mào |
Hat of Portuguese man-of-war |
References
|
