Kensa Splattershot Pro: Difference between revisions
From Inkipedia, the Splatoon wiki
(Added Use and Countermeasures sections) |
GloverMist (talk | contribs) m (Alts.) |
||
| Line 17: | Line 17: | ||
|damage = 60 | |damage = 60 | ||
|fire_rate = 30 | |fire_rate = 30 | ||
|alt1 = Splattershot Pro | |||
|alt2 = Forge Splattershot Pro | |||
}} | }} | ||
| Line 24: | Line 26: | ||
* The Splattershot Pro is a midline [[Community Glossary#Slayer|slayer]]'s weapon, similar to the [[Splattershot]] but with a longer range and higher damage output. | * The Splattershot Pro is a midline [[Community Glossary#Slayer|slayer]]'s weapon, similar to the [[Splattershot]] but with a longer range and higher damage output. | ||
** The extra range and higher damage output, at just a slight cost to fire rate, make the Splattershot Pro very effective at splatting a wide variety of opponents. | ** The extra range and higher damage output, at just a slight cost to fire rate, make the Splattershot Pro very effective at splatting a wide variety of opponents. | ||
** {{Ability|S2|Main Power Up}} further increases this damage output, maxing out to 49.9 hit points of damage at 42 [[ability point]]s. | ** {{Ability|S2|Main Power Up}} further increases this damage output, maxing out to 49.9 hit points of damage at 42 [[ability point]]s. Even 29 ability points–about three [[Community Glossary#Main and Sub|mains]]–are enough to exceed 49.5 hit points of damage, so it is not uncommon for players to use three mains of Main Power Up with the Splattershot Pro. | ||
* The reduced ink efficiency and slower fire rate make the Splattershot Pro a less effective [[Community Glossary#Turfing|turfing]] weapon than most other slayer's weapons. | * The reduced ink efficiency and slower fire rate make the Splattershot Pro a less effective [[Community Glossary#Turfing|turfing]] weapon than most other slayer's weapons. Avoid getting surrounded by enemy [[ink]], and have an exit lane in case of a retreat. | ||
** Reduced turfing ability hinders its ability to either maintain [[Community Glossary#Map control|map control]] or capture a [[Splat Zones| | ** Reduced turfing ability hinders its ability to either maintain [[Community Glossary#Map control|map control]] or capture a [[Splat Zones|Splat Zone]]. Using Splat Bombs instead of the [[main weapon]] might be necessary to accomplish both. | ||
** The slower turfing rate combined with the high [[ | ** The slower turfing rate combined with the high [[special gauge]] requirement for the Kensa Splattershot Pro make it harder to build up its [[Special weapon|special weapon]] compared to most other slayer's weapons. This means the Booyah Bomb cannot be relied on as often and must use it more optimally than usual. | ||
* Use Splat Bombs to flush out opposing [[Community Glossary#Anchor|anchor]]s from perches, hindering their ability to control space with their range. | * Use Splat Bombs to flush out opposing [[Community Glossary#Anchor|anchor]]s from perches, hindering their ability to control space with their range. The exposed long-range weapon can then be directly assaulted with a quicker weapon. | ||
* The Booyah Bomb can either turn the tide of a battle or fully tilt it in | * The Booyah Bomb can either turn the tide of a battle or fully tilt it in the team's favor if used properly. | ||
** In general, activate the Booyah Bomb in a relatively safe place, as even a [[Splattershot Jr.]] within range can break the Booyah Bomb armor. | ** In general, activate the Booyah Bomb in a relatively safe place, as even a [[Splattershot Jr.]] within range can break the Booyah Bomb armor. | ||
** When deployed, the Booyah Bomb is capable of protecting oneself and one's teammates from attacks–including [[ | ** When deployed, the Booyah Bomb is capable of protecting oneself and one's teammates from attacks–including [[bomb]]s–and clearing an area of enemies, whether forcing them to flee or splatting them outright. | ||
===Countermeasures=== | ===Countermeasures=== | ||
* The Splattershot Pro is a formidable foe for most other weapons, due to its range and damage output. | * The Splattershot Pro is a formidable foe for most other weapons, due to its range and damage output. Therefore, most other weapons cannot easily defeat it in a straight one-on-one matchup and must use other means to defeat it. | ||
** To engage a Splattershot Pro with a shorter range weapon, try to catch it off guard through either careful flanking or [[Community Glossary#Sharking|sharking]]. | ** To engage a Splattershot Pro with a shorter range weapon, try to catch it off guard through either careful flanking or [[Community Glossary#Sharking|sharking]]. | ||
** Try to take advantage of the Splattershot Pro's relative inability to turf by containing it with | ** Try to take advantage of the Splattershot Pro's relative inability to turf by containing it with ink. This might require the use of [[Sub weapon|sub weapon]]s and teammates. | ||
** A few weapons that either match or exceed the range of the Splattershot Pro without sacrificing mobility can defeat one head on. | ** A few weapons that either match or exceed the range of the Splattershot Pro without sacrificing mobility can defeat one head-on. For example, the {{Weapon|S2|Main|.96 Gal}} overpowers and slightly outranges the Splattershot Pro, while the {{Weapon|S2|Main|Dualie Squelchers}} outmaneuver it. | ||
* As with versus the Splattershot, long-ranged weapons, such as [[ | * As with versus the Splattershot, long-ranged weapons, such as [[charger]]s and most [[splatlings]]s, can fire upon a Splattershot Pro with impunity, but they must remain wary of the Splattershot Pro getting too close. | ||
* If the Kensa Splattershot Pro user activates Booyah Bomb within range of | * If the Kensa Splattershot Pro user activates Booyah Bomb within range of the weapon, try attacking them, particularly with bombs and chargers. A {{Weapon|S2|Special|Splashdown}} within range can severely damage Booyah Bomb armor if not destroy it outright. | ||
===Data=== | ===Data=== | ||
Revision as of 12:29, 16 November 2019
The Kensa Splattershot Pro is a main weapon in Splatoon 2. It is a ![]() Toni Kensa-branded variant of the
Toni Kensa-branded variant of the ![]() Splattershot Pro.
Splattershot Pro.
Splatoon 2
Kensa Splattershot Pro

| Basic information | |
|---|---|
| Category | Main |
| Class | Shooter |
| Sub | |
| Special | |
| Special points | 210p |
| Range | |
| Damage | |
| Fire rate | |
| Obtainable at | |
| Level | 23 |
| Cost | |
| Specifications | |
| Base damage | 42 |
| Ink consumption | 2% |
| Other variants | |
The Kensa Splattershot Pro was released on 3 October 2018 at 02:00 UTC. It comes with ![]() Splat Bombs and the
Splat Bombs and the ![]() Booyah Bomb.
Booyah Bomb.
Use
- The Splattershot Pro is a midline slayer's weapon, similar to the Splattershot but with a longer range and higher damage output.
- The extra range and higher damage output, at just a slight cost to fire rate, make the Splattershot Pro very effective at splatting a wide variety of opponents.
 Main Power Up further increases this damage output, maxing out to 49.9 hit points of damage at 42 ability points. Even 29 ability points–about three mains–are enough to exceed 49.5 hit points of damage, so it is not uncommon for players to use three mains of Main Power Up with the Splattershot Pro.
- The reduced ink efficiency and slower fire rate make the Splattershot Pro a less effective turfing weapon than most other slayer's weapons. Avoid getting surrounded by enemy ink, and have an exit lane in case of a retreat.
- Reduced turfing ability hinders its ability to either maintain map control or capture a Splat Zone. Using Splat Bombs instead of the main weapon might be necessary to accomplish both.
- The slower turfing rate combined with the high special gauge requirement for the Kensa Splattershot Pro make it harder to build up its special weapon compared to most other slayer's weapons. This means the Booyah Bomb cannot be relied on as often and must use it more optimally than usual.
- Use Splat Bombs to flush out opposing anchors from perches, hindering their ability to control space with their range. The exposed long-range weapon can then be directly assaulted with a quicker weapon.
- The Booyah Bomb can either turn the tide of a battle or fully tilt it in the team's favor if used properly.
- In general, activate the Booyah Bomb in a relatively safe place, as even a Splattershot Jr. within range can break the Booyah Bomb armor.
- When deployed, the Booyah Bomb is capable of protecting oneself and one's teammates from attacks–including bombs–and clearing an area of enemies, whether forcing them to flee or splatting them outright.
Countermeasures
- The Splattershot Pro is a formidable foe for most other weapons, due to its range and damage output. Therefore, most other weapons cannot easily defeat it in a straight one-on-one matchup and must use other means to defeat it.
- To engage a Splattershot Pro with a shorter range weapon, try to catch it off guard through either careful flanking or sharking.
- Try to take advantage of the Splattershot Pro's relative inability to turf by containing it with ink. This might require the use of sub weapons and teammates.
- A few weapons that either match or exceed the range of the Splattershot Pro without sacrificing mobility can defeat one head-on. For example, the
 .96 Gal overpowers and slightly outranges the Splattershot Pro, while the
  Dualie Squelchers outmaneuver it.
- As with versus the Splattershot, long-ranged weapons, such as chargers and most splatlingss, can fire upon a Splattershot Pro with impunity, but they must remain wary of the Splattershot Pro getting too close.
- If the Kensa Splattershot Pro user activates Booyah Bomb within range of the weapon, try attacking them, particularly with bombs and chargers. A
 Splashdown within range can severely damage Booyah Bomb armor if not destroy it outright.
Data
Version history
| Version | Adjustments |
|---|---|
| 4.2.0 |
|
| 4.4.0 |
|
| 4.5.0 |
|
| 4.6.0 |
|
| 4.9.0 |
|
| 5.0.0 |
|
Gallery
-
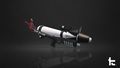
Promo Render
-
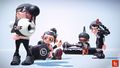
An Inkling boy (first right) with the Kensa Splattershot Pro


Demonstration
Quotes
| View the quotation page. |
