Baller: Difference between revisions
GloverMist (talk | contribs) |
Wmyttmlimvty (talk | contribs) m ({{S2}} template) |
||
| (31 intermediate revisions by 20 users not shown) | |||
| Line 1: | Line 1: | ||
{{InfoboxGobbler}} | {{InfoboxGobbler}} | ||
The '''Baller''' is a [[special weapon]] in | The '''Baller''' is a [[special weapon]] in {{S2}}. It puts the user into a [[Inkling]]/[[Octoling]]-sized hamster ball that protects them and can explode on command. | ||
== Appearance == | |||
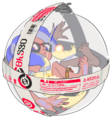
The Baller is a transparent sphere that is just large enough to encase an [[Inkling]] or [[Octoling]]. There are two white strips of tape encircling the Baller that are ripped off when it takes enough damage. A small reservoir of the user's [[ink]] rests in the bottom of the Baller. | |||
==''Splatoon 2''== | ==''Splatoon 2''== | ||
| Line 10: | Line 13: | ||
| durability = 400 | | durability = 400 | ||
}} | }} | ||
When using the special | When using the special, an [[Inkling]] or [[Octoling]] enters the Baller. This allows them to move quickly and blocks incoming damage taken while [[ink]]ing the ground as they move, and also allows them to roll up walls. If {{Button|ZR|Switch}} is held while in the bubble, or after a set time, the Baller explodes, covering the surrounding area in ink. The Baller being inked results in it shrinking, eventually disappearing, instead of the player using it taking damage. The Baller works similar to [[Splash Wall]] in matters of destructive bombs. They explode immediately upon touching it, which can be disastrous for teammates nearby. | ||
It appears in three ''Octo Expansion'' Stations: | |||
* {{OctoExpansionStation|A|04}} [[Roll Out Station]] | |||
* | * {{OctoExpansionStation|H|02}} [[Ballercise Station]] | ||
* | * {{OctoExpansionStation|J|08}} {{OctoExpansionStation|F|11}} [[Whack-Fu Station]] | ||
* | |||
=== | ===Special Power Up=== | ||
==== | {{main|Special Power Up}} | ||
Equipping Special Power Up with Baller increases its durability and explosion radius. The following table shows the HP increase percentage for Baller when stacking the ability. | |||
{{Stacking | |||
|game=Splatoon 2 | |||
|ability=Special Power Up | |||
|main0sub0=0% | |||
|main0sub1=4.8% | |||
|main0sub2=9.4% | |||
|main0sub3=13.8% | |||
|main1sub0=15.2% | |||
|main0sub4=17.9% | |||
|main1sub1=19.2% | |||
|main0sub5=21.7% | |||
==== | |main1sub2=22.9% | ||
|main0sub6=25.3% | |||
|main1sub3=26.5% | |||
|main2sub0=27.6% | |||
|main0sub7=28.7% | |||
|main1sub4=29.8% | |||
|main2sub1=30.8% | |||
|main0sub8=31.8% | |||
|main1sub5=32.8% | |||
|main2sub2=33.8% | |||
|main0sub9=34.7% | |||
|main1sub6=35.6% | |||
|main2sub3=36.5% | |||
|main3sub0=37.4% | |||
|main1sub7=38.2% | |||
|main2sub4=39.0% | |||
|main3sub1=39.7% | |||
|main1sub8=40.5% | |||
|main2sub5=41.2% | |||
|main3sub2=41.9% | |||
|main1sub9=42.6% | |||
|main2sub6=43.2% | |||
|main3sub3=43.8% | |||
|main2sub7=45.0% | |||
|main3sub4=45.5% | |||
|main2sub8=46.5% | |||
|main3sub5=46.9% | |||
|main2sub9=47.7% | |||
|main3sub6=48.1% | |||
|main3sub7=49.0% | |||
|main3sub8=49.7% | |||
|main3sub9=50.2% | |||
}} | |||
===Version history=== | ===Version history=== | ||
| Line 54: | Line 77: | ||
| '''{{Ver|S2|1.3.0}}''' || | | '''{{Ver|S2|1.3.0}}''' || | ||
* {{buff|Made the Baller less likely to be knocked back when hit with enemy attacks.}} | * {{buff|Made the Baller less likely to be knocked back when hit with enemy attacks.}} | ||
* {{buff|Increased durability of the Baller by about 33% when the [[gear]] [[ability]] "[[Special Power Up]]" isn't being used. (Durability when using the maximum amount of "Special Power Up" remains unchanged.)}} | * {{buff|Increased durability of the Baller by about 33% when the [[gear]] [[gear ability|ability]] "[[Special Power Up]]" isn't being used. (Durability when using the maximum amount of "Special Power Up" remains unchanged.)}} | ||
* {{buff|Increased damage radius of explosion by roughly 17% and radius of [[ink]] coverage by roughly 7%.}} | * {{buff|Increased damage radius of explosion by roughly 17% and radius of [[ink]] coverage by roughly 7%.}} | ||
* {{buff|Increased minimum damage caused by explosion|30.0|55.0.}} | * {{buff|Increased minimum damage caused by explosion|30.0|55.0.}} | ||
| Line 80: | Line 103: | ||
|| '''{{Ver|S2|5.2.0}}''' || | || '''{{Ver|S2|5.2.0}}''' || | ||
* {{nerf|Can now be affected by [[Toxic Mist]].}} | * {{nerf|Can now be affected by [[Toxic Mist]].}} | ||
* {{nerf|Extended the time the {{button|ZR}} Button has to be held down to trigger this by roughly 16/60 of a second|30 frames|46 frames.}} | * {{nerf|Extended the time the {{button|ZR|Switch}} Button has to be held down to trigger this by roughly 16/60 of a second|30 frames|46 frames.}} | ||
* {{buff|When a weapon that has a fast walking speed when not firing or a fast squid-form swimming speed is equipped, increased acceleration on the ground to allow the player to move more quickly.}} | * {{buff|When a weapon that has a fast walking speed when not firing or a fast squid-form swimming speed is equipped, increased acceleration on the ground to allow the player to move more quickly.}} | ||
* This applies to the following weapons that can use a Baller. | * This applies to the following weapons that can use a Baller. | ||
| Line 96: | Line 119: | ||
The ball will eventually explode, allowing you to use the moment you emerge from it as an attack. | The ball will eventually explode, allowing you to use the moment you emerge from it as an attack. | ||
You can also hold {{button|ZR}} to build up power and cause the ball to explode yourself.|{{S2}} [[Sub weapon|Sub]] & [[Special weapon|Special]] Guide}} | You can also hold {{button|ZR|Switch}} to build up power and cause the ball to explode yourself.|{{S2}} [[Sub weapon|Sub]] & [[Special weapon|Special]] Guide}} | ||
===Sets=== | ===Sets=== | ||
| Line 105: | Line 128: | ||
Baller.jpg|Baller promo image. | Baller.jpg|Baller promo image. | ||
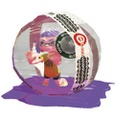
BallerRoll.jpg|An [[Inkling]] in the Baller. | BallerRoll.jpg|An [[Inkling]] in the Baller. | ||
Agent 8 In Baller. | Agent 8 In Baller.jpg|[[Agent 8]] in the Baller. | ||
S2 Inkling in Baller render.jpg|Render | |||
Splatoon Koshien 2020 Octoling in Baller.png|Artwork for Koshien 2020 | |||
</gallery> | </gallery> | ||
==Strategy== | |||
''For competitive tips about the Baller'' | |||
{{Strategy}} | |||
==Trivia== | ==Trivia== | ||
* When a player is splatted by a Baller's explosion, a message with "The Baller Inksploded!" appears. The message "Splatted by Baller!" appears in other instances. | * When a player is splatted by a Baller's explosion, a message with "The Baller Inksploded!" appears. The message "Splatted by Baller!" appears in other instances. | ||
* Baller, [[Splashdown]], and [[Ink Armor]] are the only special weapons to appear on at least one weapon in every class. | * Baller, [[Splashdown]], and [[Ink Armor]] are the only special weapons to appear on at least one weapon in every class. | ||
*The Baller | * According to ''[[The Art of Splatoon 2]]'', researchers made the Baller to find out how to contain [[ink]] released by [[Inkling]]s when they used a [[special weapon]]. | ||
**[[ | ** It was revealed that to hold all the [[ink]], the Baller would have to be 7 times its volume than the prototype, although it would become unable to roll around the [[stage]]. | ||
** They settled on having the Baller hold a portion of [[ink]] and releasing the rest as the user moved around inside. | |||
* | |||
==Names in other languages== | ==Names in other languages== | ||
{{ | {{Localized name | ||
|color=Splatoon 2 | |color=Splatoon 2 | ||
|Jap=イカスフィア | |Jap=イカスフィア | ||
| Line 130: | Line 157: | ||
|GerM=Sepia sphere | |GerM=Sepia sphere | ||
|Ita=Cromosfera | |Ita=Cromosfera | ||
|ItaM= | |ItaM=Color Sphere | ||
|Rus=Шарокат | |Rus=Шарокат | ||
|RusR=Sharokat | |RusR=Sharokat | ||
Latest revision as of 14:57, 17 April 2024
The Baller is a special weapon in Splatoon 2. It puts the user into a Inkling/Octoling-sized hamster ball that protects them and can explode on command.
Appearance
The Baller is a transparent sphere that is just large enough to encase an Inkling or Octoling. There are two white strips of tape encircling the Baller that are ripped off when it takes enough damage. A small reservoir of the user's ink rests in the bottom of the Baller.
Splatoon 2

| Category | Special |
| Durability | |
| Base damage | 50 (contact) 55 (splash) 180 (direct hit) |
| Base duration | 6s (automatic detonation) |
When using the special, an Inkling or Octoling enters the Baller. This allows them to move quickly and blocks incoming damage taken while inking the ground as they move, and also allows them to roll up walls. If is held while in the bubble, or after a set time, the Baller explodes, covering the surrounding area in ink. The Baller being inked results in it shrinking, eventually disappearing, instead of the player using it taking damage. The Baller works similar to Splash Wall in matters of destructive bombs. They explode immediately upon touching it, which can be disastrous for teammates nearby.
It appears in three Octo Expansion Stations:
- A04 Roll Out Station
- H02 Ballercise Station
- J08 F11 Whack-Fu Station
Special Power Up
- Main article: Special Power Up
Equipping Special Power Up with Baller increases its durability and explosion radius. The following table shows the HP increase percentage for Baller when stacking the ability.
| Abilities | Change | |||
|---|---|---|---|---|
| None | 0% | |||
| Main: 0, Sub: 1 | 4.8% | |||
| Main: 0, Sub: 2 | 9.4% | |||
| Main: 0, Sub: 3 | 13.8% | |||
| Main: 1, Sub: 0 | 15.2% | |||
| Main: 0, Sub: 4 | 17.9% | |||
| Main: 1, Sub: 1 | 19.2% | |||
| Main: 0, Sub: 5 | 21.7% | |||
| Main: 1, Sub: 2 | 22.9% | |||
| Main: 0, Sub: 6 | 25.3% | |||
| Main: 1, Sub: 3 | 26.5% | |||
| Main: 2, Sub: 0 | 27.6% | |||
| Main: 0, Sub: 7 | 28.7% | |||
| Main: 1, Sub: 4 | 29.8% | |||
| Main: 2, Sub: 1 | 30.8% | |||
| Main: 0, Sub: 8 | 31.8% | |||
| Main: 1, Sub: 5 | 32.8% | |||
| Main: 2, Sub: 2 | 33.8% | |||
| Main: 0, Sub: 9 | 34.7% | |||
| Main: 1, Sub: 6 | 35.6% | |||
| Main: 2, Sub: 3 | 36.5% | |||
| Main: 3, Sub: 0 | 37.4% | |||
| Main: 1, Sub: 7 | 38.2% | |||
| Main: 2, Sub: 4 | 39.0% | |||
| Main: 3, Sub: 1 | 39.7% | |||
| Main: 1, Sub: 8 | 40.5% | |||
| Main: 2, Sub: 5 | 41.2% | |||
| Main: 3, Sub: 2 | 41.9% | |||
| Main: 1, Sub: 9 | 42.6% | |||
| Main: 2, Sub: 6 | 43.2% | |||
| Main: 3, Sub: 3 | 43.8% | |||
| Main: 2, Sub: 7 | 45.0% | |||
| Main: 3, Sub: 4 | 45.5% | |||
| Main: 2, Sub: 8 | 46.5% | |||
| Main: 3, Sub: 5 | 46.9% | |||
| Main: 2, Sub: 9 | 47.7% | |||
| Main: 3, Sub: 6 | 48.1% | |||
| Main: 3, Sub: 7 | 49.0% | |||
| Main: 3, Sub: 8 | 49.7% | |||
| Main: 3, Sub: 9 | 50.2% | |||
Version history
| Version | Adjustments |
|---|---|
| 1.2.0 |
|
| 1.3.0 |
|
| 1.4.0 |
|
| 2.3.0 |
|
| 3.0.0 |
|
| 4.3.0 |
|
| 5.1.0 |
|
| 5.2.0 |
|
Quotes
| “ | Enter a defensive ball that protects you from a certain amout of damage as you play.
The ball will eventually explode, allowing you to use the moment you emerge from it as an attack. You can also hold to build up power and cause the ball to explode yourself. |
” |
Sets


Gallery
-
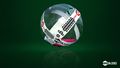
Baller promo image.
-
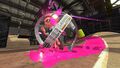
An Inkling in the Baller.
-
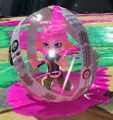
Agent 8 in the Baller.
-
Render
-
Artwork for Koshien 2020


Strategy
For competitive tips about the Baller
| View the strategy page. |
Trivia
- When a player is splatted by a Baller's explosion, a message with "The Baller Inksploded!" appears. The message "Splatted by Baller!" appears in other instances.
- Baller, Splashdown, and Ink Armor are the only special weapons to appear on at least one weapon in every class.
- According to The Art of Splatoon 2, researchers made the Baller to find out how to contain ink released by Inklings when they used a special weapon.
Names in other languages
| Language | Name | Meaning |
|---|---|---|
| イカスフィア Ikasufia |
Squid Sphere | |
| Barstbubbel | Burst Bubble | |
| Chromo-sphère | Color-sphere | |
| Sepisphäre | Sepia sphere | |
| Cromosfera | Color Sphere | |
| Шарокат Sharokat |
From шар shar (ball) and кат kat (roll) | |
| Esfera tintera | Ink Sphere |
