Kensa Splattershot: Difference between revisions
(Use and Countermeasures; Icons visually help players remember some Weapon and Abilities-based tips; I'll keep them at a minimum) |
m (→Gallery) |
||
| (48 intermediate revisions by 22 users not shown) | |||
| Line 1: | Line 1: | ||
{{InfoboxGobbler}} | {{InfoboxGobbler}} | ||
The '''Kensa Splattershot''' is a [[main weapon]] in ''[[Splatoon 2]]''. It is a [[Toni Kensa]]-branded variant of the [[Splattershot]]. | |||
The '''Kensa Splattershot''' is a [[main weapon]] in ''[[Splatoon 2]]''. It is a | |||
==Appearance== | ==Appearance== | ||
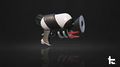
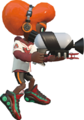
The Kensa Splattershot is | The Kensa Splattershot shares its overall design with the [[Splattershot]]. However, the Kensa Splattershot is black and white with the [[Toni Kensa]] signature red clothespin attached to the grip under the muzzle. Unlike the Splattershot and the [[Tentatek Splattershot]], the [[ink]] reservoir of the Kensa Splattershot does not change with the user's ink color and is always white. | ||
==''Splatoon 2''== | ==''Splatoon 2''== | ||
{{Infobox/Weapon | {{Infobox/Weapon | ||
|game = Splatoon 2 | |game = Splatoon 2 | ||
|3d-image-1 = S2 Weapon Main Kensa Splattershot | |||
|category = Main | |category = Main | ||
|class = Shooter | |class = Shooter | ||
| Line 16: | Line 15: | ||
|level = 6 | |level = 6 | ||
|cost = 5,300 | |cost = 5,300 | ||
|base = | |base = 36 | ||
|ink = | |ink = 0.92% | ||
|points = 180 | |points = 180 | ||
|range = 50 | |range = 50 | ||
|damage = | |damage = 47 | ||
|fire_rate = 60 | |fire_rate = 60 | ||
|alt1 = Splattershot | |||
|alt2 = Tentatek Splattershot | |||
|alt3 = Hero Shot Replica | |||
|alt4 = Octo Shot Replica | |||
|introduced={{date|2018-10-03}} | |||
}} | }} | ||
The Kensa Splattershot was released on {{date|2018-09-14}} at {{time|2018-09-14 02:00 UTC}}. It comes with | The Kensa Splattershot was released on {{date|2018-09-14}} at {{time|2018-09-14 02:00 UTC}}. It comes with [[Suction Bomb]]s and [[Tenta Missiles]]. | ||
===Data=== | ===Data=== | ||
{{ | {{#lst:Splattershot|data2}}<!--To update this section, go to the main Splattershot article.--> | ||
| | |||
}}< | |||
===Version history=== | ===Version history=== | ||
{{version history box|S2| | {{version history box|S2| | ||
{{version history item|S2|4.2.0| | {{version history item|S2|4.2.0| | ||
* {{buff|Reduce the interval between firing and | * {{buff|Reduce the interval between firing and becoming a squid or using a [[sub weapon]] by 2/60 of a second.}}}} | ||
{{version history item|S2|4.4.0| | {{version history item|S2|4.4.0| | ||
| Line 97: | Line 42: | ||
{{version history item|S2|4.7.0| | {{version history item|S2|4.7.0| | ||
* {{buff|When equipped, the [[Main Power Up]] [[gear]] [[ability]] will now also lessen shot spread variance when firing while on the ground, in addition to the benefits it previously provided.}}}} | * {{buff|When equipped, the [[Main Power Up]] [[gear]] [[gear ability|ability]] will now also lessen shot spread variance when firing while on the ground, in addition to the benefits it previously provided.}}}} | ||
{{version history item|S2|5.0.0| | {{version history item|S2|5.0.0| | ||
* {{buff|Increased damage dealt to the [[Booyah Bomb]] armor by roughly 17%.}}}} | * {{buff|Increased damage dealt to the [[Booyah Bomb]] armor by roughly 17%.}}}} | ||
{{version history item|S2|5.1.0| | |||
* {{buff|Decreased ink consumption by roughly 8%.}}}} | |||
{{Version history item|S2|5.3.0| | |||
* {{buff|Reduced the amount of time it takes for shot spread (which is the gradual distance shots spread away from the target when firing continuously) to return to normal|54 frames|22 frames. | |||
** Most [[Shooter]]-type weapons will have increased shot spread when continuously firing. | |||
** When the player stops firing, the shot spread gradually returns to normal, but with this fix, the amount of time it takes to return has been reduced.}}}} | |||
{{Version history item|S2|5.4.0| | |||
* {{Buff|Increased the likelihood the turf around the player's feet will be inked when firing.}}}} | |||
{{Version history item|S2|5.5.0| | |||
* {{buff|Increased maximum damage that can be dealt|35|36.}} | |||
* {{buff|Slowed damage falloff speed relative to projectile travel time by roughly 66.7%.}}}} | |||
}} | }} | ||
===Quotes=== | |||
{{SheldonsIntroduction|game=Splatoon 2|The '''Kensa Splattershot''' is a limited edition, custom Splattershot created in collaboration with Toni Kensa! It has the same specs as the standard model, but its [[Suction Bomb]] sub and [[Tenta Missiles]] special bring the heat from a distance! With this set, using the sub and special weapons effectively is crucial to getting the most out of the Splattershot main! I hope all you collectors and lovers of exclusive weaponry get out there and give it a try!}} | |||
===Gallery=== | ===Gallery=== | ||
<gallery> | <gallery> | ||
S2 Kensa Splattershot promo render.jpg|Promo render. | S2 Kensa Splattershot promo render.jpg|Promo render. | ||
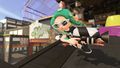
S2 female Octoling with Kensa Splattershot.jpg|An [[ | S2 female Octoling with Kensa Splattershot.jpg|An [[Octoling]] girl with the Kensa Splattershot. | ||
Splatoon 2 version 4 shooter promo 1.jpg | Splatoon 2 version 4 shooter promo 1.jpg | ||
Splatoon 2 version 4 shooter promo 2.jpg | Splatoon 2 version 4 shooter promo 2.jpg | ||
Splatoon 2 version 4 shooter promo 3.jpg | Splatoon 2 version 4 shooter promo 3.jpg | ||
S2 Octoling with Kensa Splattershot render.png | |||
</gallery> | </gallery> | ||
===Demonstration=== | ===Demonstration=== | ||
<embedvideo service="youtube">https://youtu.be/ | <embedvideo service="youtube">https://youtu.be/SaSvnPToB18</embedvideo> | ||
{{clrns}} | {{clrns}} | ||
== | ==Strategy== | ||
{{ | ''For competitive tips about the Kensa Splattershot'' | ||
{{Strategy}} | |||
== Trivia == | |||
* The Kensa Splattershot has the same kit as the [[Slosher]] and [[Foil Flingza Roller]]. | |||
**One of these shares is carried over to [[Splatoon 3]], where the [[Tentatek Splattershot]] and [[Slosher]] both have [[Splat Bomb]] and [[Triple Inkstrikes]]. | |||
==Names in other languages== | ==Names in other languages== | ||
{{ | {{Localized name | ||
|color=Splatoon 2 | |color=Splatoon 2 | ||
|Jap=スプラシューターベッチュー | |Jap=スプラシューターベッチュー | ||
| Line 126: | Line 96: | ||
|JapM=Splat Shooter Bespoke | |JapM=Splat Shooter Bespoke | ||
|Dut=Toni Kensa Superspetter | |Dut=Toni Kensa Superspetter | ||
|DutM=Toni Kensa | |DutM=Toni Kensa Splattershot | ||
|FreE=Liquidateur K | |FreE=Liquidateur K | ||
|FreEM=Liquidator K | |FreEM=Liquidator K | ||
| Line 132: | Line 102: | ||
|GerM=Kensa Splodger | |GerM=Kensa Splodger | ||
|Ita=Splasher Nero Marlin | |Ita=Splasher Nero Marlin | ||
|ItaM= | |ItaM=Splasher Toni Kensa (Toni Kensa = Nero Marlin brand in Italian) | ||
|Rus=Каплестрел от С.Кусаки | |Rus=Каплестрел от С.Кусаки | ||
|RusR=Kaplestrel ot S.Kusaki | |RusR=Kaplestrel ot S.Kusaki | ||
|RusM= | |RusM=Dropshooter by T.Kensa | ||
|SpaA=Rociador Tonken | |SpaA=Rociador Tonken | ||
|SpaAM=Tonken Sprayer | |SpaAM=Tonken Sprayer | ||
|SpaE=Lanzatintas elegante | |SpaE=Lanzatintas elegante | ||
|SpaEM=Elegant ink thrower | |SpaEM=Elegant ink thrower | ||
|FreA=Liquéficateur Thony K|FreAM=Toni Kensa Liquificator}} | |||
== | |||
==References== | ==References== | ||
Latest revision as of 04:46, 12 April 2024
The Kensa Splattershot is a main weapon in Splatoon 2. It is a Toni Kensa-branded variant of the Splattershot.
Appearance
The Kensa Splattershot shares its overall design with the Splattershot. However, the Kensa Splattershot is black and white with the Toni Kensa signature red clothespin attached to the grip under the muzzle. Unlike the Splattershot and the Tentatek Splattershot, the ink reservoir of the Kensa Splattershot does not change with the user's ink color and is always white.
Splatoon 2

| Basic information | |
|---|---|
| Category | Main |
| Class | Shooter |
| Sub | |
| Special | |
| Special points | 180p |
| Range | |
| Damage | |
| Fire rate | |
| Obtainable at | |
| Level | 6 |
| Cost | |
| Added in | 3 October 2018 |
| Specifications | |
| Base damage | 36 |
| Ink consumption | 0.92% |
| Other variants | |
The Kensa Splattershot was released on 14 September 2018 at 02:00 UTC. It comes with Suction Bombs and Tenta Missiles.
Data
- The Kensa Splattershot is a middleweight weapon.
- The matchmaking range is 125. The game's matchmaking system looks at a team's average matchmaking range value, and matches them against a team with a similar average.
- The ink consumption of 0.92% and ink tank capacity of 100% allows players to fire 108 shots before needing to refill the ink supply.
- This stat can be changed with Ink Saver (Main).
- When initially firing the weapon in humanoid form, the first shot takes 3 frames to come out.
- When firing from swim form, the first shot takes 11 frames to come out.
- The interval between firing and when the player is able to enter swim form or use a sub weapon is 4 frames.
- When firing continuously, it shoots a bullet every 6 frames (10 shots per second).
- When firing while moving, the player's movement speed is set to 0.72 units per frame.
- After firing, there is a 20 frame cooldown before the ink tank starts refilling.
- Each shot has a base damage of 36.
- If a shot is in the air for more than 8 frames after being fired, it loses 0.5625 damage per frame until it reaches 18 damage at frame 40.
- The bullet hitbox has a radius of 2 units.
- The angle its shots can deviate while on the ground is 6 degrees.
- The angle its shots can deviate while in the air is 12 degrees.
- The outer reticle immediately expands after jumping. After 25 frames, the outer reticle will start shrinking, and will finish shrinking after 70 frames.
- The Kensa Splattershot starts off having a 1% chance to shoot towards the outer reticle instead of the inner reticle.
- This chance increases by 1% per shot, and maximizes at a 25% chance to shoot towards the outer reticle, meaning that it takes 24 shots to reach minimum accuracy.
- When jumping, the chance to shoot towards the outer reticle instead of the inner reticle is immediately set to 40%.
- Accuracy starts recovering 6 frames after the player stops shooting. The chance to shoot towards the outer reticle decreases by 1.5% per frame, if the chance is not already at the minimum, meaning that it takes 22 frames to reach maximum accuracy. (32 after shooting while jumping.)
- Shots initially travel straight at a rate of 22 units per frame for 4 frames. Shots travel straight for 88 distance units.
- After that, the shot's velocity is set to 14.495 units per frame if it is not already lower than the listed value, and decreases further as it travels.
- Ink droplets occur every 92 units.
- The frequency at which ink drips from a shot occurs at a rate of 1.5 droplets per shot.
- There are a total of 6 different droplet patterns that can be created while firing this weapon.
- Droplets that occur within 11 units of the player have a radius of 18 units, and a width of 12 units.
- These droplets have their radius multiplied by a value ranging from 1.2 if they fell from a height above 100 units to 1.4 if they fell from a height below 30 units.
- Droplets that occur when they travel past 200 units of the player have a radius of 16 units.
- All other ink droplets have a radius of 12.8 units.
- Droplets that are far from the player and all other droplets have their radius multiplied by a value ranging from 1 if they fell from a height above 100 units to 1.2 if they fell from a height below 30 units.
Version history
| Version | Adjustments |
|---|---|
| 4.2.0 |
|
| 4.4.0 |
|
| 4.7.0 |
|
| 5.0.0 |
|
| 5.1.0 |
|
| 5.3.0 |
|
| 5.4.0 |
|
| 5.5.0 |
|
Quotes
 |
Sheldon's Introduction
The Kensa Splattershot is a limited edition, custom Splattershot created in collaboration with Toni Kensa! It has the same specs as the standard model, but its Suction Bomb sub and Tenta Missiles special bring the heat from a distance! With this set, using the sub and special weapons effectively is crucial to getting the most out of the Splattershot main! I hope all you collectors and lovers of exclusive weaponry get out there and give it a try! |
Gallery
-
Promo render.
-
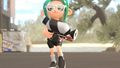
An Octoling girl with the Kensa Splattershot.
-
-
-
-


Demonstration
Strategy
For competitive tips about the Kensa Splattershot
| View the strategy page. |
Trivia
- The Kensa Splattershot has the same kit as the Slosher and Foil Flingza Roller.
- One of these shares is carried over to Splatoon 3, where the Tentatek Splattershot and Slosher both have Splat Bomb and Triple Inkstrikes.
Names in other languages
| Language | Name | Meaning |
|---|---|---|
| スプラシューターベッチュー Supura shūtā becchū |
Splat Shooter Bespoke | |
| Toni Kensa Superspetter | Toni Kensa Splattershot | |
| Liquéficateur Thony K | Toni Kensa Liquificator | |
| Liquidateur K | Liquidator K | |
| Kensa-Kleckser | Kensa Splodger | |
| Splasher Nero Marlin | Splasher Toni Kensa (Toni Kensa = Nero Marlin brand in Italian) | |
| Каплестрел от С.Кусаки Kaplestrel ot S.Kusaki |
Dropshooter by T.Kensa | |
| Rociador Tonken | Tonken Sprayer | |
| Lanzatintas elegante | Elegant ink thrower |
