Baller: Difference between revisions
From Inkipedia, the Splatoon wiki
JoshieM818 (talk | contribs) (What the Baller is not immune to) Tags: mobile edit mobile web edit |
(Added Strategy, especially pertaining to Clam Blitz; added to Uses; removed Trivia) |
||
| Line 1: | Line 1: | ||
{{InfoboxGobbler}} | {{InfoboxGobbler}} | ||
The '''Baller''' is a [[special weapon]] in ''[[Splatoon 2]]''. It resembles | The '''Baller''' is a [[special weapon]] in ''[[Splatoon 2]]''. It resembles an [[Inkling]] or [[Octoling (playable)|Octoling]]-sized hamster ball, and is similar to both the {{Weapon|S|Special|Bubbler}} and the {{Weapon|S|Special|Kraken}} from ''[[Splatoon]]''. | ||
== ''Splatoon 2'' == | == ''Splatoon 2'' == | ||
{{Infobox/Weapon | {{Infobox/Weapon | ||
| game = Splatoon 2 | | game = ''Splatoon 2'' | ||
| category = Special | | category = Special | ||
| base = 50 (Contact)<br>55 (Splash)<br>180 (Direct hit) | | base = 50 (Contact)<br>55 (Splash)<br>180 (Direct hit) | ||
| duration = 6s (automatic detonation) | | duration = 6s (automatic detonation) | ||
}} | }} | ||
When using the special move, an [[Inkling]] will enter the Baller. This allows them to move quickly and blocks incoming damage taken while inking the ground as they move, and also allows them to walk up walls. If {{Button|ZR}} is held while in the bubble, or after a set period of time, the Baller explodes, covering the surrounding area in ink. The Baller being inked results in it shrinking, eventually disappearing, instead of the Inkling using it taking damage. | When using the special move, an [[Inkling]] or [[Octoling (playable)|Octoling]] will enter the Baller. This allows them to move quickly and blocks incoming damage taken while inking the ground as they move, and also allows them to walk up walls. If {{Button|ZR}} is held while in the bubble, or after a set period of time, the Baller explodes, covering the surrounding area in ink. The Baller being inked results in it shrinking, eventually disappearing, instead of the Inkling using it taking damage. | ||
=== Use === | === Use === | ||
* | *There is a slight but critical startup delay from the time the player activates Baller to the time the player actually enters the Baller. Therefore, it is advised to activate Baller in a relatively safe place before taking enemy fire. Also, while the Baller can be used as a type of panic button to protect oneself, similar to the {{Weapon|S|Special|Bubbler}} in ''Splatoon'', activating it too late will cause the player to get splatted before benefiting from its protection. | ||
*The Baller cannot travel through grates or mesh that a morphed Inkling or Octoling can swim through, such as the gate leading to the court on [[Goby Arena]]. Keep this in mind when either pursuing an opponent with Baller or escaping an opponent using Baller. | |||
*Players are completely immune to the effects of {{Weapon|S2|Sub|Toxic Mist}} while using the Baller, since the player wouldn't actually be exposed to the mist while inside the air tight ball. However, this is not the case for {{Weapon|S2|Sub|Point Sensor}}, as going through one will cause you to be tracked as normal. | *Players are completely immune to the effects of {{Weapon|S2|Sub|Toxic Mist}} while using the Baller, since the player wouldn't actually be exposed to the mist while inside the air tight ball. However, this is not the case for {{Weapon|S2|Sub|Point Sensor}}, as going through one will cause you to be tracked as normal. | ||
*A player in a Baller who touches the [[Rainmaker (weapon)|Rainmaker]] after its shield is popped will automatically pick up the Rainmaker and exit the Baller without exploding it. Make sure not to accidentally touch the popped Rainmaker when pushing forward with Baller. | |||
*A Baller can force its user's opponent to move in a direction different from where the opponent intended, especially in narrow passages. | |||
*Even with the added protection, a Baller user can greatly benefit from the shelter of a coordinated [[Special weapon|special weapon]], such as a {{Weapon|S2|Special|Booyah Bomb}}, a {{Weapon|S2|Special|Bubble Blower}}, or an {{Weapon|S2|Special|Ink Storm}}. | |||
*While the resulting ink coverage of a Baller's explosion occurs more slowly than that of a {{Weapon|S2|Special|Splashdown}}, a player inside a Baller is more likely to survive enemy fire, such as Blaster shots or the bursting of bubbles from the {{Weapon|S2|Special|Bubble Blower}}. | |||
*After the Baller's explosion, nearby opponents not splatted are often damaged enough for one or two shots to splat them. | |||
===Strategy=== | |||
====As a Baller user==== | |||
*At the start of every battle, pull open the map with {{Button|X}} and see which, if any, opponents have the [[Object Shredder]] [[Ability|ability]], as those without it will be easier targets for Baller than those with it. | |||
*Unless you can catch the opponents by surprise, or under the protection of a teammate's [[Special weapon|special weapon]], such as the {{Weapon|S2|Special|Bubble Blower}}, reserve the use of Baller against single targets, as multiple players who focus fire and [[Bomb|Bombs]] on a Baller will eventually break it. | |||
*Certain stages, such as [[Kelp Dome]], [[Port Mackerel]], and [[Walleye Warehouse]], have a [[Competitive:Callouts#Location naming|street]] that is easily defensible in both [[Rainmaker]] and [[Clam Blitz]]. A well-timed Baller, especially with other coordinated specials, can help break through the stalemate and lay siege onto the enemy's position. | |||
*In [[Splat Zones]], a single Baller's explosion is usually enough to either un-capture a single zone held by the enemy or capture one of two zones on a dual-zone stage. The Baller user and his or her teammates must be able to follow this up to fully capture either the single zone or the second of two dual zones. | |||
*The Baller can provide a Tower rider in [[Tower Control]] ample protection from enemy fire, even from a {{Weapon|S2|Special|Sting Ray}}, similar to how both the {{Weapon|S|Special|Bubbler}} and the {{Weapon|S|Special|Kraken}} were used in the original ''[[Splatoon]]''. Position yourself between the enemy fire and the middle post of the Tower to avoid getting knocked off. This tactic is most optimally used for clearing Checkpoints, where the Tower is stationary and vulnerable to enemy attack. | |||
*One of the most effective means of scoring in [[Clam Blitz]], especially on stages that are medium to large in size, involves the Baller providing a safe [[Super Jump]] landing point for teammates carrying Power Clams: | |||
**To conceal one's position, the Baller player should not carry a Power Clam. If one builds one, one should pass it to a teammate, preferably the [[Community Glossary#Roles and Positions|Anchor]], who will remain relatively safe until a Super Jump opportunity presents itself. | |||
**Once the Baller player has built up one's [[Special gauge]] and at least one teammate (not the Baller) has a Power Clam, the Baller player activates Baller in a spot that is nearby the enemy Clam Basket but relatively safe from enemy attack, then rolls underneath the basket, and detonates the Baller, spreading ink around the basket, all while signalling one's teammates with {{Button|DPad}}, indicating that the Baller player is within throwing range of the enemy Clam Basket. | |||
**Any of the Baller's teammates who has a Power Clam will [[Super Jump]] to the Baller's position, landing within a throw's reach of the enemy Clam Basket, and toss their clams (Power Clams first) into the basket. | |||
====Versus a Baller user==== | |||
*Study the Head-up display to determine which, if any, opponents have Baller. This early intelligence is valuable in any mode, especially in Clam Blitz. | |||
*If multiple players are in firing range of an enemy Baller, concentrate fire to quickly destroy and defuse it. Both Bombs and [[Object Shredder]] can help speed up the destruction and defusing of a Baller. Bombs that strike an enemy Baller will immediately detonate, not only damaging it but also damaging or splatting any of the Baller user's teammates nearby. | |||
*{{Weapon|S2|Special|Splashdown}} is often powerful enough to destroy a Baller, but be wary of the Baller's explosion. | |||
*On Tower Control, fire at an enemy Baller at a proper angle to knock it off of the Tower. With a mesh brim surrounding the Tower, the Baller cannot climb back on without the assistance of another structure. | |||
=== Version history === | === Version history === | ||
| Line 57: | Line 82: | ||
== Quotes == | == Quotes == | ||
{{Quotes}} | {{Quotes}} | ||
== Names in other languages == | == Names in other languages == | ||
Revision as of 20:41, 3 April 2019
The Baller is a special weapon in Splatoon 2. It resembles an Inkling or Octoling-sized hamster ball, and is similar to both the ![]() Bubbler and the
Bubbler and the ![]() Kraken from Splatoon.
Kraken from Splatoon.
Splatoon 2
Baller
File:S Weapon Special Baller.png
| Category | Special |
| Base damage | 50 (Contact) 55 (Splash) 180 (Direct hit) |
| Base duration | 6s (automatic detonation) |
When using the special move, an Inkling or Octoling will enter the Baller. This allows them to move quickly and blocks incoming damage taken while inking the ground as they move, and also allows them to walk up walls. If ![]() is held while in the bubble, or after a set period of time, the Baller explodes, covering the surrounding area in ink. The Baller being inked results in it shrinking, eventually disappearing, instead of the Inkling using it taking damage.
is held while in the bubble, or after a set period of time, the Baller explodes, covering the surrounding area in ink. The Baller being inked results in it shrinking, eventually disappearing, instead of the Inkling using it taking damage.
Use
- There is a slight but critical startup delay from the time the player activates Baller to the time the player actually enters the Baller. Therefore, it is advised to activate Baller in a relatively safe place before taking enemy fire. Also, while the Baller can be used as a type of panic button to protect oneself, similar to the
 Bubbler in Splatoon, activating it too late will cause the player to get splatted before benefiting from its protection.
 - The Baller cannot travel through grates or mesh that a morphed Inkling or Octoling can swim through, such as the gate leading to the court on Goby Arena. Keep this in mind when either pursuing an opponent with Baller or escaping an opponent using Baller.
- Players are completely immune to the effects of
 Toxic Mist while using the Baller, since the player wouldn't actually be exposed to the mist while inside the air tight ball. However, this is not the case for
  Point Sensor, as going through one will cause you to be tracked as normal.
 - A player in a Baller who touches the Rainmaker after its shield is popped will automatically pick up the Rainmaker and exit the Baller without exploding it. Make sure not to accidentally touch the popped Rainmaker when pushing forward with Baller.
- A Baller can force its user's opponent to move in a direction different from where the opponent intended, especially in narrow passages.
- Even with the added protection, a Baller user can greatly benefit from the shelter of a coordinated special weapon, such as a
 Booyah Bomb, a
  Bubble Blower, or an
  Ink Storm.
 - While the resulting ink coverage of a Baller's explosion occurs more slowly than that of a
 Splashdown, a player inside a Baller is more likely to survive enemy fire, such as Blaster shots or the bursting of bubbles from the Bubble Blower.
 - After the Baller's explosion, nearby opponents not splatted are often damaged enough for one or two shots to splat them.
Strategy
As a Baller user
- At the start of every battle, pull open the map with
 and see which, if any, opponents have the Object Shredder ability, as those without it will be easier targets for Baller than those with it.
 - Unless you can catch the opponents by surprise, or under the protection of a teammate's special weapon, such as the Bubble Blower, reserve the use of Baller against single targets, as multiple players who focus fire and Bombs on a Baller will eventually break it.
- Certain stages, such as Kelp Dome, Port Mackerel, and Walleye Warehouse, have a street that is easily defensible in both Rainmaker and Clam Blitz. A well-timed Baller, especially with other coordinated specials, can help break through the stalemate and lay siege onto the enemy's position.
- In Splat Zones, a single Baller's explosion is usually enough to either un-capture a single zone held by the enemy or capture one of two zones on a dual-zone stage. The Baller user and his or her teammates must be able to follow this up to fully capture either the single zone or the second of two dual zones.
- The Baller can provide a Tower rider in Tower Control ample protection from enemy fire, even from a
 Sting Ray, similar to how both the Bubbler and the
  Kraken were used in the original Splatoon. Position yourself between the enemy fire and the middle post of the Tower to avoid getting knocked off. This tactic is most optimally used for clearing Checkpoints, where the Tower is stationary and vulnerable to enemy attack.
 - One of the most effective means of scoring in Clam Blitz, especially on stages that are medium to large in size, involves the Baller providing a safe Super Jump landing point for teammates carrying Power Clams:
- To conceal one's position, the Baller player should not carry a Power Clam. If one builds one, one should pass it to a teammate, preferably the Anchor, who will remain relatively safe until a Super Jump opportunity presents itself.
- Once the Baller player has built up one's Special gauge and at least one teammate (not the Baller) has a Power Clam, the Baller player activates Baller in a spot that is nearby the enemy Clam Basket but relatively safe from enemy attack, then rolls underneath the basket, and detonates the Baller, spreading ink around the basket, all while signalling one's teammates with
 , indicating that the Baller player is within throwing range of the enemy Clam Basket.
 - Any of the Baller's teammates who has a Power Clam will Super Jump to the Baller's position, landing within a throw's reach of the enemy Clam Basket, and toss their clams (Power Clams first) into the basket.
Versus a Baller user
- Study the Head-up display to determine which, if any, opponents have Baller. This early intelligence is valuable in any mode, especially in Clam Blitz.
- If multiple players are in firing range of an enemy Baller, concentrate fire to quickly destroy and defuse it. Both Bombs and Object Shredder can help speed up the destruction and defusing of a Baller. Bombs that strike an enemy Baller will immediately detonate, not only damaging it but also damaging or splatting any of the Baller user's teammates nearby.
- Splashdown is often powerful enough to destroy a Baller, but be wary of the Baller's explosion.
- On Tower Control, fire at an enemy Baller at a proper angle to knock it off of the Tower. With a mesh brim surrounding the Tower, the Baller cannot climb back on without the assistance of another structure.
Version history
| Version | Adjustments |
|---|---|
| 1.2.0 |
|
| 1.3.0 |
|
| 1.4.0 |
|
| 2.3.0 |
|
| 3.0.0 |
|
| 4.3.0 |
|
Sets
Weapons with Baller in Splatoon 2


Gallery
-
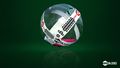
Baller promo image.
-
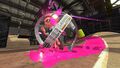
An Inkling in the Baller.


Quotes
| View the quotation page. |
