Squid Beakon: Difference between revisions
(moved quotes back) |
GloverMist (talk | contribs) mNo edit summary |
||
| Line 4: | Line 4: | ||
==''Splatoon''== | ==''Splatoon''== | ||
{{Infobox/Weapon | {{Infobox/Weapon | ||
|game | |game = Splatoon | ||
|category = Sub | |category = Sub | ||
|duration | |duration = ∞ | ||
|ink = 90% | |ink = 90% | ||
}} | }} | ||
| Line 15: | Line 15: | ||
* [[Ink]] the area around the Beakon so an arriving ally can hide immediately after landing. | * [[Ink]] the area around the Beakon so an arriving ally can hide immediately after landing. | ||
* If Beakon is in a good spot, place a new one as soon as it is used. | * If Beakon is in a good spot, place a new one as soon as it is used. | ||
* Like | * Like [[Sprinkler]]s, Beakons can be used as light shields in a pinch, taking some damage in place of the user. | ||
** Even when not used as shields, the attention drawn by an unguarded Beakon can be used to one's advantage for an ambush or escape. This is especially effective in [[Ranked Battle]]s, since preventing enemy movement is a greater concern. | ** Even when not used as shields, the attention drawn by an unguarded Beakon can be used to one's advantage for an ambush or escape. This is especially effective in [[Ranked Battle]]s, since preventing enemy movement is a greater concern. | ||
* Beakons can be used with the | * Beakons can be used with the [[Krak-On Splat Roller]] to attack an enemy on a ledge above the user. To do this, place a Beakon right next to their perch, Super Jump to it, then fling ink at them on the way down. | ||
* If a teammate is nearby a Beakon, Super Jump to the teammate rather than the Beakon so it can be used when there is no teammate nearby. | * If a teammate is nearby a Beakon, Super Jump to the teammate rather than the Beakon so it can be used when there is no teammate nearby. | ||
* Squid Beakons can be seen on {{GP}} by either team, allowing the player to find hidden Beakons or predict enemies' positions. | * Squid Beakons can be seen on {{GP}} by either team, allowing the player to find hidden Beakons or predict enemies' positions. | ||
| Line 24: | Line 24: | ||
===Squid Beakon destruction=== | ===Squid Beakon destruction=== | ||
Destroying a Squid Beakon varies between [[weapon]]s: for instance, an | Destroying a Squid Beakon varies between [[weapon]]s: for instance, an [[Inkbrush]] can squish it with only 20 damage but it takes a [[Splattershot Pro]] 126 damage. | ||
* [[Shooter]]s and [[splatling]]s require the same amount of shots to destroy a Beakon as they do to splat an [[Inkling]]. | * [[Shooter]]s and [[splatling]]s require the same amount of shots to destroy a Beakon as they do to splat an [[Inkling]]. | ||
* Blasters take one direct hit to destroy a Beakon, including those in the | * Blasters take one direct hit to destroy a Beakon, including those in the [[Rapid Blaster]] series, despite their low damage. Using indirect hits, blasters need to do a total of 50 damage. Therefore, it takes one indirect shot for the regular [[Blaster]], [[Range Blaster]]s, and [[Luna Blaster]]s and two indirect hits for the Rapid Blasters. | ||
* [[ | * [[Roller]]s and brushes take approximately the same number of flings or flicks to destroy a Beakon as to splat an Inkling. All rollers and brushes can squish a Beakon in one hit. | ||
* [[ | * [[Charger]]s, including the [[Bamboozler]]s, can destroy a Beakon with one fully charged shot or two uncharged shots. [[Classic Squiffer]]s and [[Splat Charger]]s can destroy it with a half charge and [[E-liter 3K]]s can destroy it with a quarter charge. | ||
* [[Slosher]]s can destroy a Beakon in one direct slosh or two indirect sloshes. | * [[Slosher]]s can destroy a Beakon in one direct slosh or two indirect sloshes. | ||
Additional information: | Additional information: | ||
* Two indirect | * Two indirect [[Burst Bomb]] hits will destroy a Beakon. | ||
* A | * A [[Splash Wall]] placed on or very near the Beakon will destroy it. | ||
* A | * A [[Sprinkler]] will destroy a Beakon in four drops. | ||
* Beakons are unaffected by standing in enemy [[ink]]. | * Beakons are unaffected by standing in enemy [[ink]]. | ||
<ref>[https://www.reddit.com/r/splatoon/comments/4h86my/how_to_kill_a_beakon/ {{RDT}} /u/Rose94 on Reddit: How to kill a beakon]</ref> | <ref>[https://www.reddit.com/r/splatoon/comments/4h86my/how_to_kill_a_beakon/ {{RDT}} /u/Rose94 on Reddit: How to kill a beakon]</ref> | ||
===Quotes=== | ===Quotes=== | ||
{{quote|This radar-like device can be dropped to give your team a jump point on the [[Stage]]. Squid Beakons appear on the | {{quote|This radar-like device can be dropped to give your team a jump point on the [[Stage]]. Squid Beakons appear on the GamePad's map as radar icons. Simply select one of these icons to initiate a [[Super Jump]] toward the selected Beakon. Once a player lands on a Squid Beakon, it explodes - so don't be stingy with these things. Keep deploying more Squid Beakons to give your team an advantage. For best results, place Squid Beakons in safe areas near the center of a stage. This gives your team quick access to hotly contested areas like [[Splat Zones]]. The GamePad's map also shows enemy Squid Beakons. Use this intel to hunt down the enemy's Squid Beakons - they can be destroyed by shooting them. Or simply camp an enemy Squid Beakon and ambush an opponent as they jump into view. Each player can place up to three Squid Beakons on a stage at a time. If all eight players have Squid Beakons, that means there can be up to twenty-four Squid Beakons on a stage at any given time.|''Splatoon'' Prima Guide}} | ||
{{JuddAdvice|Meow! (Squid Beakons let you or an ally [[Super Jump]] to that position! They'll be displayed on all your [[Wii U GamePad|maps]] once placed, so just tap to jump! Place up to 3 of them in strategic locations, then mount an offensive!)}} | {{JuddAdvice|Meow! (Squid Beakons let you or an ally [[Super Jump]] to that position! They'll be displayed on all your [[Wii U GamePad|maps]] once placed, so just tap to jump! Place up to 3 of them in strategic locations, then mount an offensive!)}} | ||
| Line 59: | Line 59: | ||
==''Splatoon 2''== | ==''Splatoon 2''== | ||
{{Infobox/Weapon | {{Infobox/Weapon | ||
|game | |game = Splatoon 2 | ||
|category = Sub | |category = Sub | ||
|duration | |duration = ∞ | ||
|ink = 75% | |ink = 75% | ||
}} | }} | ||
| Line 71: | Line 71: | ||
|- | |- | ||
{{version history item|S2|base| | {{version history item|S2|base| | ||
*{{nerf|When destroyed, shows indicator of the | *{{nerf|When destroyed, shows indicator of the [[Super Jump]] player.}} | ||
}} | }} | ||
|- | |- | ||
| Line 78: | Line 78: | ||
|- | |- | ||
| '''{{Ver|S2|1.4.0}}''' || | | '''{{Ver|S2|1.4.0}}''' || | ||
* {{buff| | * {{buff|[[Sub Power Up]] applies the effects of [[Quick Super Jump]].}} | ||
|- | |- | ||
| '''{{Ver|S2|2.3.0}}''' || | | '''{{Ver|S2|2.3.0}}''' || | ||
| Line 86: | Line 86: | ||
* {{Buff|Increased durability by roughly 20%.}} | * {{Buff|Increased durability by roughly 20%.}} | ||
* Due to the above fix, damage dealt by certain attacks has also changed. | * Due to the above fix, damage dealt by certain attacks has also changed. | ||
** {{Buff|Decreased damage dealt by | ** {{Buff|Decreased damage dealt by [[Sting Ray]]s by roughly 58%.}} | ||
** {{Buff|Decreased damage dealt by | ** {{Buff|Decreased damage dealt by [[Ink Storm]]s by roughly 67%.}} | ||
** {{Nerf|Increased damage dealt by Nozzlenose weapons by roughly 20%.}} | ** {{Nerf|Increased damage dealt by Nozzlenose weapons by roughly 20%.}} | ||
** {{Nerf|Increased damage dealt by Blaster weapons by roughly 20%.}} | ** {{Nerf|Increased damage dealt by Blaster weapons by roughly 20%.}} | ||
| Line 97: | Line 97: | ||
|- | |- | ||
| '''{{Ver|S2|4.3.0}}''' || | | '''{{Ver|S2|4.3.0}}''' || | ||
* {{buff|Increased the effect of the | * {{buff|Increased the effect of the [[Ink Saver (Sub)]] gear ability.}} | ||
|- | |- | ||
| '''{{Ver|S2|4.7.0}}''' || | | '''{{Ver|S2|4.7.0}}''' || | ||
| Line 104: | Line 104: | ||
===Quotes=== | ===Quotes=== | ||
{{quote|This device emits a special signal that can be detected by | {{quote|This device emits a special signal that can be detected by [[Inkling]]s. | ||
Any of your teammates can Super Jump to a Squid Beakon's position by selecting it and pressing {{button|A}}. | Any of your teammates can [[Super Jump]] to a Squid Beakon's position by selecting it and pressing {{button|A}}. | ||
It's single-use, so it'll break once | It's single-use, so it'll break once somebody Super Jumps to it. | ||
You can place up to three at once.|''Splatoon 2'' Sub & Special Guide}} | You can place up to three at once.|''Splatoon 2'' Sub & Special Guide}} | ||
| Line 123: | Line 123: | ||
==Trivia== | ==Trivia== | ||
* Squid Beakons in {{S}} have the highest ink consumption of any [[sub weapon]]. | * Squid Beakons in {{S}} have the highest ink consumption of any [[sub weapon]]. | ||
* In ''Splatoon'', only two specials can appear on weapons with Squid Beakon as their sub weapon, being the | * In ''Splatoon'', only two specials can appear on weapons with Squid Beakon as their sub weapon, being the [[Kraken]] and [[Killer Wail]]. | ||
* The Squid Beakon used to only be available with two [[weapon]]s, the | * The Squid Beakon used to only be available with two [[weapon]]s, the [[Krak-On Splat Roller]] and the [[Dapple Dualies]], which made it the rarest sub weapon at the launch of ''Splatoon'' and {{S2}}. | ||
* There are no [[ | * There are no [[Shooter|blasters]] or [[Slosher (weapon class)|sloshers]] paired with Squid Beakons nor are they paired with the [[Booyah Bomb]], [[Ink Armor]], [[Inkjet]], [[Splashdown]], [[Sting Ray]] or [[Ultra Stamp]]. | ||
* The name is a play on words between a 'beacon' and a 'squid's beak'. | * The name is a play on words between a 'beacon' and a 'squid's beak'. | ||
* The Squid Beakon resembles an [[Wikipedia:Airport surveillance radar|airport surveillance radar]] mounted on a camera tripod. | * The Squid Beakon resembles an [[Wikipedia:Airport surveillance radar|airport surveillance radar]] mounted on a camera tripod. | ||
Revision as of 11:15, 13 January 2021
The Squid Beakon is a sub weapon in Splatoon and Splatoon 2. They provide places to Super Jump to. A single player can have three Beakons in play at once. Beakons can be used up to two times if the first player to use does not also have Squid Beakons.
Splatoon

Squid Beakons are small devices placed at the user's feet that can be Super Jumped to by allies. A Beakon is destroyed when the Super Jumping Inkling lands or when it is damaged by an enemy. One Inkling using Beakons can have up to three placed in the stage at one time; attempting to create a fourth will destroy the oldest of those currently active.
Use
- Put Beakons in places where they are less vulnerable to enemies, such as up high or behind obstacles.
- Ink the area around the Beakon so an arriving ally can hide immediately after landing.
- If Beakon is in a good spot, place a new one as soon as it is used.
- Like Sprinklers, Beakons can be used as light shields in a pinch, taking some damage in place of the user.
- Even when not used as shields, the attention drawn by an unguarded Beakon can be used to one's advantage for an ambush or escape. This is especially effective in Ranked Battles, since preventing enemy movement is a greater concern.
- Beakons can be used with the Krak-On Splat Roller to attack an enemy on a ledge above the user. To do this, place a Beakon right next to their perch, Super Jump to it, then fling ink at them on the way down.
- If a teammate is nearby a Beakon, Super Jump to the teammate rather than the Beakon so it can be used when there is no teammate nearby.
- Squid Beakons can be seen on
 by either team, allowing the player to find hidden Beakons or predict enemies' positions.
 - A Beakon may be bait; it would be wise to keep an eye on one's surroundings when destroying it.
- Alternatively to destroying a Beakon, one can wait in their ink near it and splat an opponent when they land. However, this may simply waste time if the Beakon is never jumped to.
Squid Beakon destruction
Destroying a Squid Beakon varies between weapons: for instance, an Inkbrush can squish it with only 20 damage but it takes a Splattershot Pro 126 damage.
- Shooters and splatlings require the same amount of shots to destroy a Beakon as they do to splat an Inkling.
- Blasters take one direct hit to destroy a Beakon, including those in the Rapid Blaster series, despite their low damage. Using indirect hits, blasters need to do a total of 50 damage. Therefore, it takes one indirect shot for the regular Blaster, Range Blasters, and Luna Blasters and two indirect hits for the Rapid Blasters.
- Rollers and brushes take approximately the same number of flings or flicks to destroy a Beakon as to splat an Inkling. All rollers and brushes can squish a Beakon in one hit.
- Chargers, including the Bamboozlers, can destroy a Beakon with one fully charged shot or two uncharged shots. Classic Squiffers and Splat Chargers can destroy it with a half charge and E-liter 3Ks can destroy it with a quarter charge.
- Sloshers can destroy a Beakon in one direct slosh or two indirect sloshes.
Additional information:
- Two indirect Burst Bomb hits will destroy a Beakon.
- A Splash Wall placed on or very near the Beakon will destroy it.
- A Sprinkler will destroy a Beakon in four drops.
- Beakons are unaffected by standing in enemy ink.
Quotes
| “ | This radar-like device can be dropped to give your team a jump point on the Stage. Squid Beakons appear on the GamePad's map as radar icons. Simply select one of these icons to initiate a Super Jump toward the selected Beakon. Once a player lands on a Squid Beakon, it explodes - so don't be stingy with these things. Keep deploying more Squid Beakons to give your team an advantage. For best results, place Squid Beakons in safe areas near the center of a stage. This gives your team quick access to hotly contested areas like Splat Zones. The GamePad's map also shows enemy Squid Beakons. Use this intel to hunt down the enemy's Squid Beakons - they can be destroyed by shooting them. Or simply camp an enemy Squid Beakon and ambush an opponent as they jump into view. Each player can place up to three Squid Beakons on a stage at a time. If all eight players have Squid Beakons, that means there can be up to twenty-four Squid Beakons on a stage at any given time. | ” |
— Splatoon Prima Guide
| ||

Sets
| Main | #ID | Sub | Special | Special Depletion | Level | Price | Class | Introduced | |
|---|---|---|---|---|---|---|---|---|---|

|
Custom Dual Squelcher | 81 | 18 | Shooter | 27 June 2015 | ||||

|
Custom E-liter 3K(NA)[a] Custom E-Litre 3K(EU/OC)[b] |
2031 | 19 | Charger | 17 June 2015 | ||||

|
Custom E-liter 3K Scope(NA)[a] Custom E-Litre 3K Scope(EU/OC)[b] |
2041 | 20 | Charger | 10 October 2015 | ||||

|
Krak-On Splat Roller | 1011 | 7 | Roller | 28 May 2015 (1.0.0) | ||||

|
Octobrush | 1110 | 12 | Roller | 18 July 2015 | ||||

|
Sploosh-o-matic | 0 | 12 | Shooter | 8 July 2015 |
Gallery
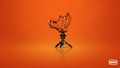
-
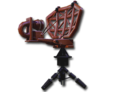
Squid Beakon high-quality image.
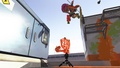
-
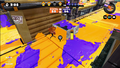
The Squid Beakon in action at Blackbelly Skatepark.
-
The Squid Beakon icon that indicates that a Beakon has been deployed by the player or a teammate.
-

Promo art with a Squid Beakon at the far right.
-
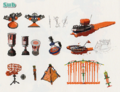
Concept art of various sub weapons, with the Squid Beakon at the lower left.


Splatoon 2

The Squid Beakon returns in Splatoon 2.
Version history
| Version | Adjustments |
|---|---|
| Base game |
|
| 1.3.0 |
|
| 1.4.0 |
|
| 2.3.0 |
|
| 3.0.0 |
|
| 4.2.0 |
|
| 4.3.0 |
|
| 4.7.0 |
|
Quotes
| “ | This device emits a special signal that can be detected by Inklings.
Any of your teammates can Super Jump to a Squid Beakon's position by selecting it and pressing It's single-use, so it'll break once somebody Super Jumps to it. You can place up to three at once. |
” |
— Splatoon 2 Sub & Special Guide
| ||
Sets
| Main | #ID | Sub | Special | Special Points | Level | Price | Class | Introduced | |
|---|---|---|---|---|---|---|---|---|---|

|
Ballpoint Splatling Nouveau | 4031 | 220p | 28 | Splatling | 5 December 2018 (4.3.0) | |||

|
Custom E-liter 4K | 2031 | 170p | 26 | Charger | 14 October 2017 | |||

|
Custom E-liter 4K Scope | 2041 | 170p | 30 | Charger | 14 October 2017 | |||

|
Dapple Dualies | 5000 | 170p | 26 | Dualie | 7 July 2017 (1.0.0) | |||

|
Krak-On Splat Roller | 1011 | 170p | 12 | Roller | 7 July 2017 (1.0.0) | |||

|
Neo Sploosh-o-matic | 1 | 170p | 18 | Shooter | 10 March 2018 | |||

|
Octobrush Nouveau | 1111 | 170p | 15 | Roller | 2 January 2018 | |||

|
Tenta Brella | 6010 | 200p | 23 | Brella | 30 September 2017 |
Gallery
-
Promo image.
-
Super Jumping to a Squid Beakon in Moray Towers.


Trivia
- Squid Beakons in Splatoon have the highest ink consumption of any sub weapon.
- In Splatoon, only two specials can appear on weapons with Squid Beakon as their sub weapon, being the Kraken and Killer Wail.
- The Squid Beakon used to only be available with two weapons, the Krak-On Splat Roller and the Dapple Dualies, which made it the rarest sub weapon at the launch of Splatoon and Splatoon 2.
- There are no blasters or sloshers paired with Squid Beakons nor are they paired with the Booyah Bomb, Ink Armor, Inkjet, Splashdown, Sting Ray or Ultra Stamp.
- The name is a play on words between a 'beacon' and a 'squid's beak'.
- The Squid Beakon resembles an airport surveillance radar mounted on a camera tripod.
- When standing next to a Beakon, Inkling voice clips can be heard. This is often difficult to notice, however, due to the fact that multiplayer music may drown out the sounds.
- These voice clips are distorted versions of the Inkling voice clips that come from players.
- Beakons are used in many out of bounds glitches. This is done by putting a Beakon next to a moving wall in Rainmaker mode. Wait until the wall moves, then splat the Rainmaker next to the Beakon. Super Jump to the Beakon and the player will clip into the wall.
